The ability to take advantage of automatic generation of delivery schedule lines for vendors adds value to the procurement process by eliminating the need to create and maintain them manually. Find out how you can easily put this into action with a practical example.
Key Concept
The procurement process can be enhanced by taking advantage of material requirements planning (MRP) functionality, which automatically creates delivery schedule lines for a vendor’s scheduling agreement where applicable. However, to optimize this procurement process, you have to set up the relevant master data appropriately. The MRP runs on the finished product level and reads the bill of materials (BOM) of the finished product. It focuses on materials to be procured externally from vendors whose scheduling agreements are already available in SAP ERP Central Component.
By taking advantage of existing functionality in SAP ERP Central Component (SAP ECC), you can optimize your company’s procurement process. It is easy to automate existing scheduling agreements with vendors that you now manage manually. You just need to set up or update the master data for materials procured externally via scheduling agreements in the materials management (MM) module.
I’ll show the step-by-step procedure for setting up the master data in SAP ECC for MM. In addition, I describe how SAP ECC makes use of the bill of materials (BOM) of the production planning (PP) module. SAP ECC uses the BOM to calculate the delivery quantities and to generate delivery schedule lines for the scheduling agreement previously created during the material requirements planning (MRP) run. A schedule line includes the date of delivery and also the quantity of the material that needs to be delivered on that specific date.
Master Data
Setting up master data in the MM module entails two steps. The first is to activate the source list option for the materials to be procured. A source list is a list of various sources for supply of a given material — that is, the vendors that are allowed to supply a particular material during a specific period. For those vendors, outline agreements in the form of quantity/value contracts or scheduling agreements exist in SAP ECC. An outline agreement is a long-term supply agreement with vendors. I focus on scheduling agreements that are already set up in SAP ECC for a vendor. They are the basis for maintaining a source list for procuring materials from various sources. The second step is to maintain the source lists.
Next, I cover the BOM of finished goods that has raw materials as components to be procured against the scheduling agreement. The production plan of the finished good, in the form of Planned Independent Requirements (PIR) in SAP ECC, generates the requisite procurement quantities of raw materials. It also generates their delivery schedule lines against a scheduling agreement when the MRP is run for the finished good. When the company has finalized its monthly/annual production plan, the final figures of the production plan are incorporated as PIR in the SAP system. When you run MRP, the system reads these PIR figures/quantities to generate results.
Master Data Maintenance
In the MM module, you perform the following two activities as part of master data maintenance:
- Activate the source list option in the material master
- Maintain the source list
1. Activate the Source List Option in the Material Master
Activating the source list requirement in the material master is the first step of master data maintenance. A source list is defined as the possible sources of supply for a particular material from various vendors. It is made up of outline agreements such as scheduling agreements, quantity or value contracts, or purchasing information records. My focus is on the scheduling agreement option as the basis for the source list maintenance. Purchasing information records can be created manually before any purchasing is initiated. Otherwise, when a purchase order for a material is issued to a vendor, the system automatically creates the purchasing information record.
To activate the source list option in the material master, follow menu path Logistics > Materials Management > Material Master > Material > Change > Immediately or use transaction code MM02 (Figure 1). In Figure 1, enter the material number and click the Select view(s) button (1). In the pop-up window, select the Purchasing view (2) and click the continue icon (3).
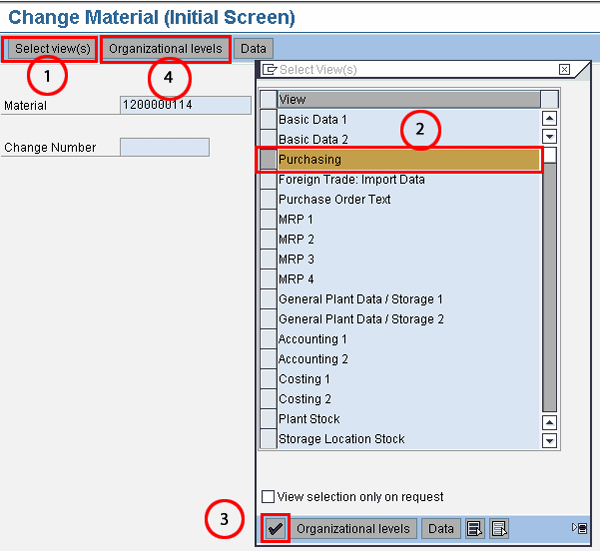
Figure 1
Initial screen of material master
Then select the Organizational levels button (4) in Figure 1, which leads to Figure 2. In Figure 2, select the organizational level – that is, Plant. In my example, I use Plant 1000.
After entering 1000, press Enter or click the enter icon. This leads to Figure 3, which is the purchasing view of the material master. Check the Source list check box at the bottom of the screen to activate it. This ensures that SAP ECC checks for the existence of a source list while running MRP and therefore is able to generate procurement proposals.

Figure 2
Organizational level selection screen for material master
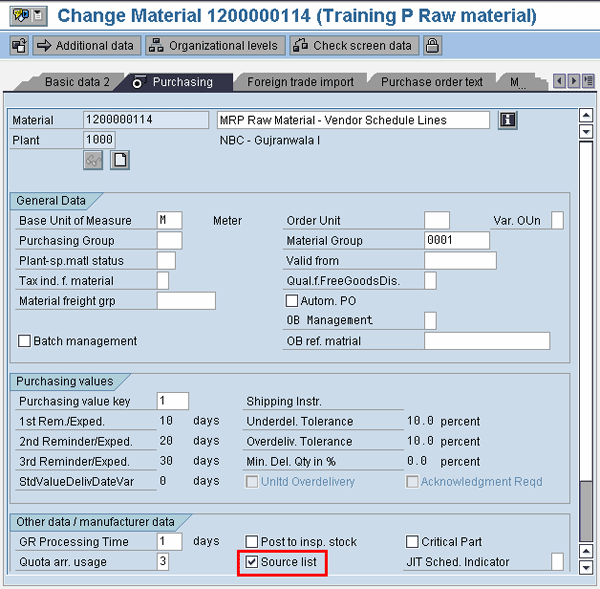
Figure 3
Purchasing view of material master
2. Maintain the Source List
To maintain the source list, follow menu path Logistics > Materials Management > Purchasing > Master Data > Source List > Maintain, or use transaction code ME01 (Figure 4). Figure 4 is the initial screen for maintaining the source list. Enter a material and plant. Press Enter or click the enter icon. This takes you to Figure 5.
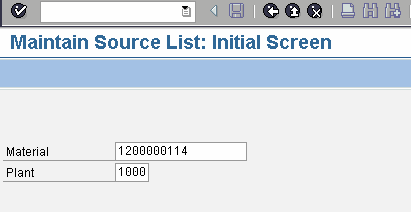
Figure 4
Initial screen for source list maintenance
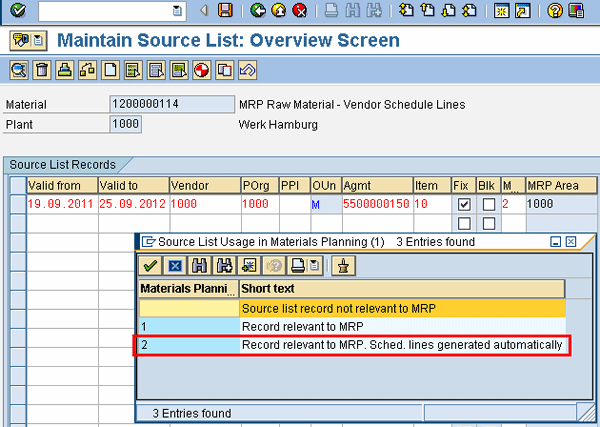
Figure 5
Detailed screen for source list maintenance
Figure 5 is the detailed screen for the maintenance of the source list. Enter all the required information, including validity dates, vendor purchasing organization, the scheduling agreement, and the line item number of a scheduling agreement. It is important to select 2 for the MRP indicator in the source list, so that vendor delivery schedule lines are generated automatically, as shown by the drop-down menu in Figure 5. Save the source list by pressing Ctrl+S or by clicking the save icon  .
.
In Figure 5, click the generate records icon  . This automatically proposes the scheduling agreements that have the material and plant combination as a possible option for the source list. In other words, if the material 1200000114 has three different scheduling agreements with three different vendors, then the system automatically proposes these three scheduling agreements, which you can then accept. You accept them by clicking the accept icon that is available for selection at that time. This option saves you the effort of individually and manually maintaining the details needed in Figure 5. Additionally, if any vendor is blocked for any reason or if the scheduling agreement is invalid, they are not proposed.
Tip!To facilitate maintenance of source lists of a large number of raw materials, follow menu path Logistics > Materials Management > Purchasing > Master Data > Source List > Follow-on Functions > Generate, or use transaction code ME05. Enter the material and plant and then click the execute icon or press F8 to generate the source lists You can perform a test run on generating a source list at this stage to get a preview of which source list records are generated during an actual run.
Note
The scheduling agreement must already be created previously or must exist in SAP ECC prior to creation and maintenance of the source list.
Production Planning (PP) Master Data
The production planning (PP) master data comprised of the BOM serves to fill an important role. The BOM of finished goods is read during the MRP run. Proposals on quantities to be procured for externally-procured materials are based on the information given in the BOM. When the MRP is run on a finished good, it reads the information from the BOM of the finished good to calculate the quantities required for external procurement. Therefore, to produce one quantity of finished good A, it requires raw material B in a quantity of 3. This information and ratio of 1:3 for A:B (finished goods to raw material ratio) is defined in the BOM of the finished good.
Figure 6 is the display screen for the BOM. To get to the screen follow menu path Logistics > Production > Master Data > Bill of Material > Bill of Material > Material BOM > Display, or use transaction code CS03. Enter the finished goods material code together with the plant and BOM usage (1 for production). Select the Item button to get to the screen shown in Figure 7.
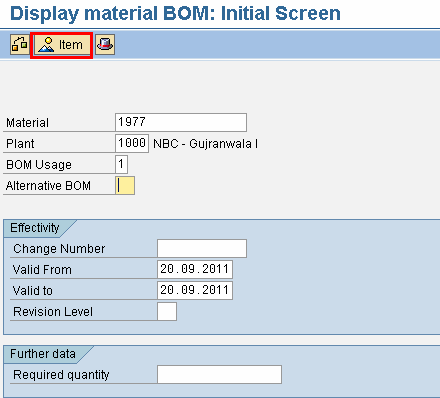
Figure 6
Initial screen for BOM display
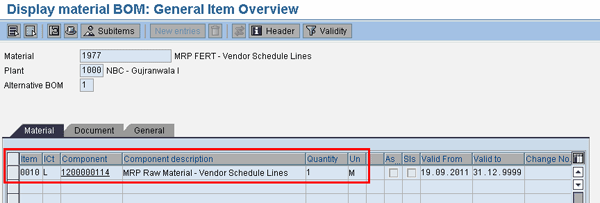
Figure 7
Component overview of BOM
Figure 7 is the item overview screen of the BOM maintenance transaction. It shows that one unit of finished goods material 1977 requires raw material 1200000114 in a quantity of 1 meter. That is, to produce 1 unit of material 1977, the quantity needed for raw material 1200000114 is 1 meter.
Process Flow
I now cover the end-to-end process flow for automatic generation of a vendor’s delivery schedule lines (Figure 8). In Figure 8, the process begins with the creation of the PIR of the finished goods.
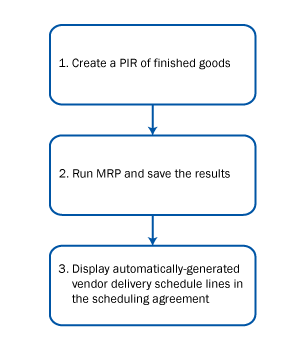
Figure 8
An end-to-end process flow to automatically generate a vendor’s delivery schedule lines in SAP ECC
The PIR is the demand planning quantity of the finished goods needed to be produced according to the production plan. The PIR is set to active version by selecting the Active check box available for selection on the PIR screen. An active version of PIR ensures that it is considered for production and procurement planning during an MRP run. You save the PIR by clicking the save icon or by pressing Ctrl+S.
The MRP on the finished goods is run next. It calculates the procurement quantity of the raw material from the BOM of finished goods and generates procurement proposals in the form of the vendor’s delivery schedule lines. The MRP run also calculates the production quantities of the finished goods. However, due to the scope of this article, which is focused on raw material procurement, I only cover procurement planning, not production planning.
The person responsible for running the MRP can save the results of the MRP by clicking the save icon or pressing Ctrl+S. The scheduling agreement is then checked by the procurement person responsible for managing scheduling agreements with vendors. It is displayed with transaction code ME33L and you can check to see if the automatically generated vendor’s delivery schedule lines are incorporated as per the results of the MRP.
In the following sections, I explain these three steps in greater detail.
1. Create the PIR of Finished Goods
When the company has finalized its monthly/annual production plan, the final figures of the production plan are incorporated as a PIR. A PIR of finished goods is the quantities that need to be produced during a defined timeline. The PIR can be defined in days, weeks, or months. During an MRP run, the system looks up these PIR to generate production proposals for in-house production or procurement proposals for externally procured raw materials.
To create a PIR, follow menu path Logistics > Production > Production Planning > Demand Management > Planned Independent Requirements > Create, or use transaction code MD61. Figure 9 is the initial screen for the PIR. Enter the following:
- Material number of the finished goods, which is 1977 in my example
- Plant, which is 1000 in my example
- Requirement version, which is GP (for production plan). There are various requirement versions available. For my example, I use version GP, which denotes quantities of the finalized production plan.
The dates on the planning horizon need to be given based on the planner’s decision about the time period under consideration. For example, if the PIR contains quantities for the entire year’s production, but the MRP planner only wishes to plan for the next three months, then the planner needs to provide the planning horizon. Then all planning by MRP is done for the three-month time period only. Once you have defined all the parameters, press Enter, which takes you to Figure 10.
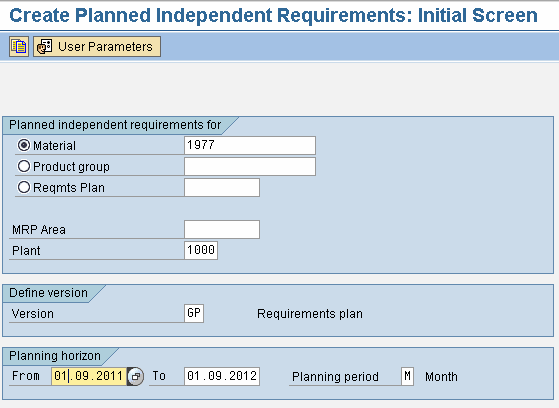
Figure 9
Initial screen for PIR creation
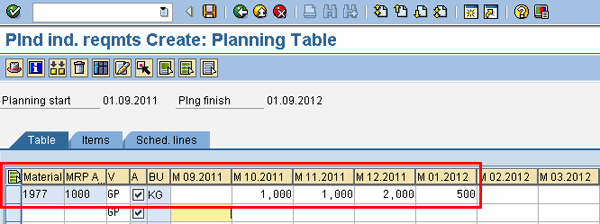
Figure 10
Month-wise production figures of finished goods are incorporated
In Figure 10, the production planning figures for four months are defined for the material/plant combination. Ensure that the A (active) check box in the PIR is checked to enable the system to use the PIR during the MRP run. Save this information by clicking the save icon at the top of the screen.
2. Run MRP and Save the Results
Once the month-wise production planning figure has been entered in a PIR, the next step is to run MRP and save the results. To run the MRP, follow menu path Logistics > Production > MRP > Planning > Single-Item, Multi-Level, or use transaction code MD02.
Figure 11 is the single-item, multi-level screen to define initial parameters to run the MRP. After defining the material code of finished goods together with the plant, it is important to carefully define the MRP control parameters, especially the delivery schedules. For delivery schedules to be created automatically, select option 3. If someone selects, for example, option 1, then no schedule lines are created.
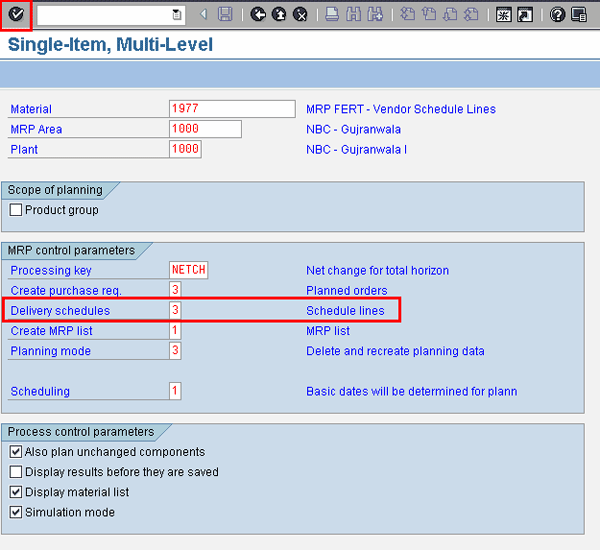
Figure 11
Initial screen for defining MRP parameters
Once all the parameters are entered, press Enter. The system cross checks all the parameters, and then issues a prompt saying to check the parameters again. This is just for information purposes. Press Enter again to start the MRP run.
After the MRP run, the system generates the material list shown in Figure 12. The material list is the list of materials that were marked for planning in the material masters of these materials. Now, after the MRP run, the list shows system-generated proposals for each of the materials planned. In the material master you mark if a proposal is relevant for planning during an MRP run or not. All those materials marked for planning are displayed in the form of a material list in the MRP results.
For finished goods material 1977, these proposals are planned orders that can then be converted into production orders. For raw material 1200000114, the procurement proposals are in the form of automatic generation of the vendor’s delivery schedule lines, thereby specifying the dates and quantities on which the raw material 1200000114 must be available in the company for timely production of finished goods 1977.
In Figure 12, select the line item for raw material 1200000114 and click the Selected results button. This leads to the detailed planning results of raw material 1200000114 after the MRP run, shown in Figure 13. Notice that schedule lines were generated against scheduling agreement 5500000150 along with dates. It also shows that the raw materials required during various timelines are due to the dependent requirements of the finished good material 1977.

Figure 12
Results of MRP
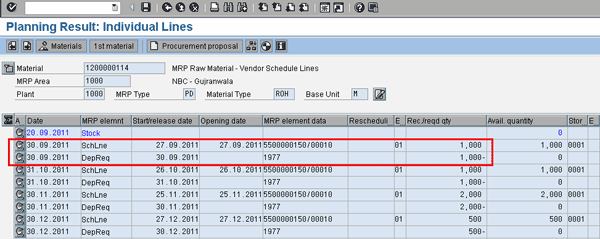
Figure 13
Detailed view of planning results for raw materials after MRP run
Once you analyze the MRP results in detail, you can save them by clicking the save icon at the top of the screen.
3. Display Automatically-Generated Vendor Delivery Schedule Lines in the Scheduling Agreement
I now show how the outcome and results of the MRP run and automatic generation of the vendor’s delivery schedule lines are directly reflected in a scheduling agreement. To display the scheduling agreement, follow menu path Logistics > Materials Management > Purchasing > Outline Agreement > Scheduling Agreement > Display, or use transaction code ME33L (Figure 14). Figure 14 is the initial screen for the display of the scheduling agreement. Enter the scheduling agreement number and click the item overview icon to get to the screen shown in Figure 15.
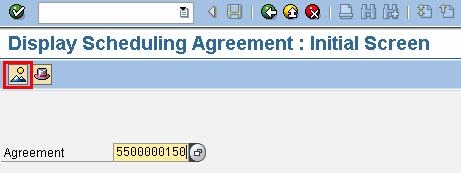
Figure 14
Initial screen for display of scheduling agreement

Figure 15
Item overview of scheduling agreement
Figure 15 is the item overview screen of the scheduling agreement. Select the first line item 10 with material 1200000114 and click the delivery schedule icon  .
.
Figure 16 is the detailed view of dates and quantities to be delivered by the vendor for the material 1200000114. Note that the creation identification (column Creation ID) is shown to be B, which is due to the MRP. That is, the schedule lines were created automatically by the MRP.
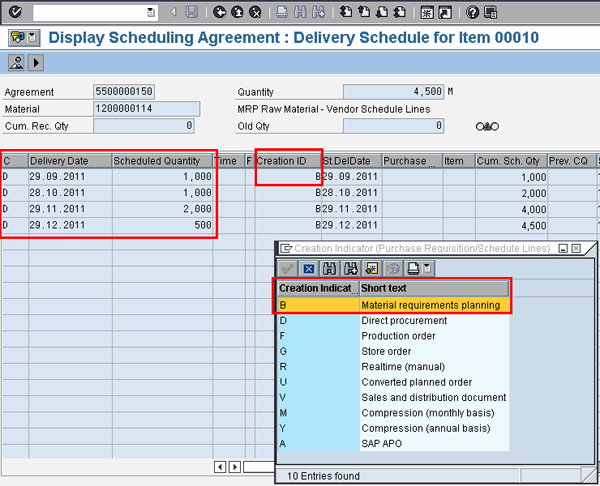
Figure 16
Automatically generated vendor’s delivery schedule with quantities
The date and quantity information can then be provided to the vendor by the process currently followed by the company. For example, if the company sends a printed version of the delivery schedule to the vendor for its information and action to ensure timely deliveries, then this is the process/procedure that you follow once the automatically-generated vendor delivery schedules are created. Finally, when the deliveries against this scheduling agreement are made by the vendor, the system automatically updates the information in the scheduling agreement.

Jawad Akhtar
Jawad Akhtar earned his chemical engineering degree from Missouri University of Science and Technology. He has 17 years of professional experience, of which nine years are in SAP. He has completed eight end-to-end SAP project implementation lifecycles in the areas of PP, QM, MM, PM, and DMS in the steel, automobile, chemical, fertilizer, FMCG, and building products industries. He also has worked as an SAP integration manager and an SAP project manager. He has been proactively involved in a business development and solution architect role for seven years. He is the author of Production Planning and Control with SAP ERP, it's filled with in-depth infomation on discrete, process, and repetitive manufacturing types. His profile on LinkedIn is at https://pk.linkedin.com/in/jawadakhtar. You may follow Jawad on Twitter @jawadahl. Currently, he is associated with AbacusConsulting as Head of SAP Delivery.
You may contact the author at jawad.akhtar@live.com.
If you have comments about this article or publication, or would like to submit an article idea, please contact the editor.


