Management
The ability to digitally sign and approve documents in an SAP system improves organizational efficiencies as well reducing the amount of paper used, thus saving money and natural resources. Digital signatures are offered in several areas of an SAP system, most notably in Production Planning for Process Industries, quality management, plant maintenance, Document Management System, and Engineering Change Management.
Key Concept
The digital signature functionality reduces the number of printed documents that need to be signed. You can define and then assign digital signatures in an SAP system during various transaction processes, such as changing the status of a document in the SAP Document Management System, completing a process instructions sheet in the production planning module, or recording results and making usage decisions in the quality management module. Digital signatures can be internal, such as an SAP user’s password, or even external devices such as fingerprint readers or card slides.
Digital signatures can confirm important decisions in the quality management (QM) module, validate the correctness of shift reports in the plant maintenance (PM) module, or simply confirm the values of process parameters in Production Planning for Process Industries (PP-PI). They do all this electronically, saving significant time and effort and eventually bringing about improvement in business processes as well as saving money.
If digital signature functionality is further integrated with SAP workflow, then the person responsible for digitally signing a particular SAP document automatically receives the relevant document information via the SAP mailbox.
Note
The scope of this article is limited to configuring and implementing digital signatures.
Note
In the following articles, I broadly touch on the option to digitally sign SAP documents:
I start out by covering the important steps to take to configure digital signatures in an SAP system. Next, I incorporate signature strategy, which is the collection and sequence of individual signatures, in the SAP Document Management System (DMS). I then run the entire end-to-end business process in SAP DMS to show digital signatures in action. Finally, I show the comprehensive log created by digital signatures.
There are three important steps for configuring digital signatures:
- Define authorization groups
- Define individual signatures
- Define a signature strategy
Note
While this article focuses on covering the digital signature in the SAP DMS configuration, the general (module-independent) menu path for digital signatures is SPRO > Reference IMG (or press F5) > Cross-Application Components > General Application Functions > Digital Signature.
Define Authorization Groups
An authorization group is used to limit the authorization of a document or document status to a specific user or group of users performing the same role. Once configured, this authorization group can then be controlled through authorization object C_SIGN_BGR. You need to coordinate with your Basis team member to get the right authorization group assigned to the right user.
To create an authorization group, use SAP menu path SPRO > Reference IMG (or press F5) > Cross-Application Components > Document Management > Approval > Define Authorization Group (Figure 1). Figure 1 is the initial screen for the creation of an authorization group for digital signatures.
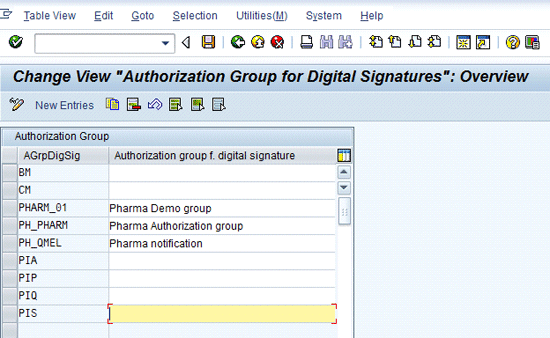
Figure 1
Initial screen for the creation of an authorization group
Click the New Entries button (Figure 1), which leads to Figure 2. In Figure 2, create a new authorization group, DMS-01, and give it a description (DMS Initiators’ Group, in my example). Save the authorization group by pressing Ctrl+S or by clicking the save icon.
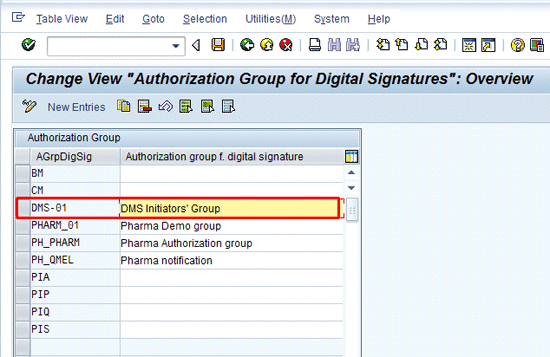
Figure 2
New authorization group DMS-01 added
Define Individual Signatures
An individual signature is a unique identification of an SAP digital signature to which the user is assigned. To create a new individual signature, follow menu path SPRO > Reference IMG (or press F5) > Cross-Application Components > Document Management > Approval > Define Individual Signature (Figure 3).
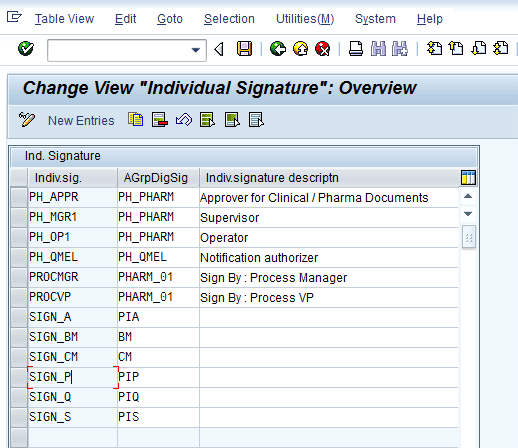
Figure 3
Initial screen for an individual signature
Click the New Entries button, which leads to Figure 4. In Figure 4, two individual signatures are defined, namely, DMS-01 and DMS-02, with descriptions. Both individual signatures are assigned to the same authorization group— DMS-01. Save the entries by pressing Ctrl+S or clicking the save icon.

Figure 4
Two new individual signatures (DMS_01 and DMS_02) created
Define a Signature Strategy
A signature strategy is the combination of different individual signatures that are assigned to an authorization group. A signature strategy also defines the sequence and flow of individual signatures and maintains the predecessor–successor relationships. The signature strategy is used to control the level to which the document can be considered as released. A released status denotes that the digital signature process is complete in every respect.
To create a signature strategy, follow menu path SPRO > Reference IMG (or press F5) > Cross-Application Components > Document Management > Approval > Define Signature Strategy (Figure 5).
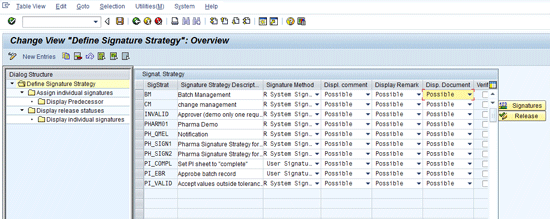
Figure 5
Initial screen for the creation of a signature strategy
Before I show how to create a new signature strategy, let me explain some of the columns on the right side of Figure 5 and their functions. The third column, Signature Method, stipulates how a signature in SAP is to be verified. The three possible options are:
- System signature with authorization with SAP user name or password
- User signature with external security product with verification
- User signature with external security product without verification
The Displ. comment column enables a user to enter comments to be displayed when the digital signature is executed. In the Display Remark column, users can view a short text before signing. The Displ. Document column is an option to allow or disallow viewing of a DMS document. The Verify column with the check box verifies the sequence of the digital signature, known as the signature strategy, before the system marks the document as complete. To define a new signature strategy, make your selections in the appropriate columns, and then click the New Entries button in Figure 5, which leads to Figure 6.

Figure 6
Signature strategy DMS with the description DMS GROUP
Figure 6 is the overview screen of the signature strategy where you can define a new signature strategy DMS with the description as DMS GROUP. Select the signature option to be SAP signature and password and make the Disp. comment box, Display Remark box, and Displ. Document required entries. Finally, select the Verify check box to require verification of the signature strategy.
Next you select the signature strategy. Enter DMS into the Signature Strategy field and double-clicked the Assign individual signatures folder in Figure 6, which leads to Figure 7.

Figure 7
Initial screen to assign new individual signatures to signature strategy DMS
Click the New Entries button (Figure 7), which leads to Figure 8. In Figure 8, add the previously created individual signatures DMS_01 and DMS_02 to the signature strategy DMS. Save by pressing Ctrl+S or clicking the save icon. Click the back icon in Figure 8 to go to Figure 9, which displays the new DMS signature strategy.
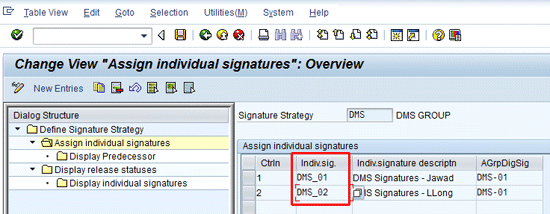
Figure 8
Individual signatures DMS_01 and DMS_02 assigned to signature strategy DMS

Figure 9
Signature strategy DMS created
Figure 9 is the signature strategy overview screen, originally displayed in Figure 5, but with new entries. Select the newly created signature strategy DMS and click the Signatures button to go to Figure 10.

Figure 10
Initial screen to define the signature sequence in terms of predecessor–successor
In Figure 10, stipulate that the individual signature DMS_01 must be signed (denoted as the predecessor in the column titled DMS_01) before individual signature DMS_02. In other words, DMS_01 is the predecessor and DMS_02 is the successor. This is shown in Figure 11 with the relevant check box.

Figure 11
Signature DMS_01 to be executed before signature DMS_02
Figure 11 is the signature sequence in which individual signature DMS_01 must be signed before individual signature DMS_02. Click the enter icon in Figure 11, which leads to Figure 12.

Figure 12
Signature strategies including signature strategy DMS
In Figure 12, again select the signature strategy DMS and click the Release button to go to Figure 13. Figure 13 is the pop-up screen to select the check box that denotes the release status of the document as well as the completion of the signature strategy. A completion strategy means that the required sequence of digital signatures is performed.

Figure 13
Initial screen of signature release status
In Figure 13, select the check box in the second row in which both individual signatures, DMS_01 and DMS_02, must be marked for the signature strategy to be declared as complete (Figure 14).

Figure 14
Check boxes selected to show release status when individual signatures DMS_01 and DMS_02 are executed
In Figure 14, ensure that the check boxes for release status have been selected for both individual signatures. Click the enter icon and save. The configuration needed to enable SAP digital signatures is complete. However, the newly created signature strategy DMS needs to be assigned to the SAP DMS.
Assign a Signature Strategy to SAP DMS Document Type
You want to assign the digital signature strategy DMS to DMS document type DRW. To assign the newly created digital strategy to a specific DMS document status, follow menu path SPRO > Reference IMG (or press F5) > Cross-Application Components > Document Management > Control Data > Define Document Type (Figure 15).

Figure 15
Initial screen of the various DMS document types
Figure 15 is the DMS document type overview screen. Select document type DRW and click the Define document status folder (Figure 15) to go to Figure 16.
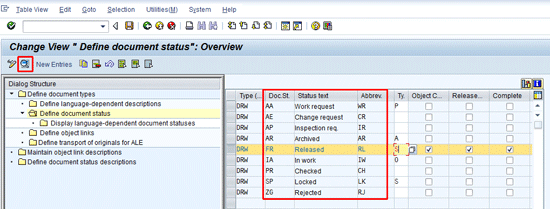
Figure 16
Document type DRW with various document statuses
Figure 16 contains all the document statuses for DMS document type DRW. Notice the different document statuses such as IA for in-work status and its abbreviation of IW. Similarly, the document status AA is a work request and its abbreviation is WR. Select the document status FR, which is for Status text Released, with the abbreviation RL. Click the detail icon in Figure 16 to go to Figure 17.

Figure 17
Document strategy DMS assigned to document type DRW with status FR
In Figure 17, assign the signature strategy DMS to document type DRW having the status RL. In other words, as soon as the DMS document type DRW changes its status to RL or Released, the signature strategy DMS is activated.
The previous status before the RL status must be IA. Save the document type DRW by pressing Ctrl+S or clicking the save icon. This completes the needed configuration steps for defining and assigning the digital signature strategy to document type DRW. To confirm that the digital signature is configured correctly, I cover the transactional part of the process in the next part of this article.
Digital Signature in Action
You first create a new SAP DMS document of document type DRW and set the initial status to WR. Change to the next status IW as stipulated in the status network in Figure 17. A status network is the sequence of status changes that must be followed for any document type. Finally, change the status from IW to RL, to which the signature strategy DMS has been assigned. The DMS document type is also sometimes referred to as a Document Info Record (DIR).
To create a new DMS document, follow menu path Logistics > Central Functions > Document Management System > Document > Create or use transaction code CV01N (Figure 18). Enter the document type, DRW, and press Enter. This leads to Figure 19.
Note
When you first save a DMS document, the system generates a document number. To make changes in the same document, you have to give the DMS document number, document type, document part, and document version. I made a note of all the DMS document creation details from Figure 19, re-entered them in Figure 20 in the DMS document change mode, and pressed Enter.
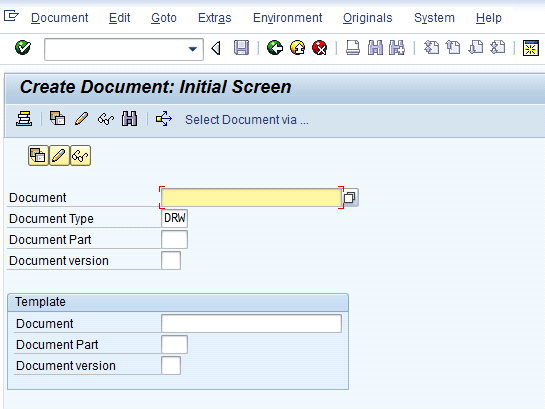
Figure 18
Initial screen for the creation of DMS document

Figure 19
Status of DMS document WR
Figure 19 contains the initial DMS status WR for work request. Enter a short description and save the DMS document. The system then generates document number 10000000258, Document Type DRW, Document Part 000, and Document version 00.
Next, change the status of the already created DMS document from WR to IW (which is for in-process status) as it should be the status before the DMS document’s status can be changed to RL for release. To change the DMS, follow menu path Logistics > Central Functions > Document Management System > Document > Change or use transaction code CV02N (Figure 20).
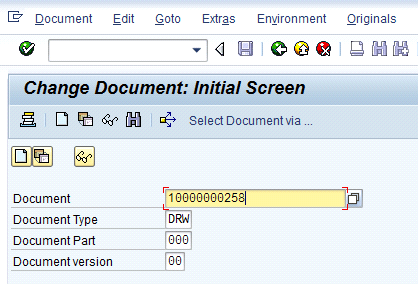
Figure 20
Initial screen for the change of a DMS document
In Figure 20, enter the document number (10000000258, in my example), document type DRW, Document Part 000, and Document version 00. Press Enter, which leads to Figure 21. In Figure 21, change the document status to IW and save by clicking the save icon or pressing Ctrl+S.
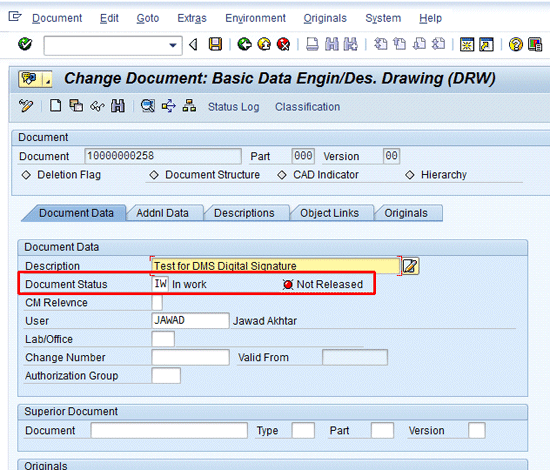
Figure 21
Status of DMS document changed to IW
To again change the status from IW to RL in the DIR, follow menu path Logistics > Central Functions > Document Management System > Document > Change or use transaction code CV02N (Figure 22).

Figure 22
Initial screen for the change of DMS document
In Figure 22, enter the document number 10000000258, document type DRW, Document Part 000, and Document version 00. Press Enter to go to Figure 23. In the Document Status field, press F4, which brings up a pop-up of available options. When you change the DMS document status from IW to RL, a warning message appears at the bottom of the screen (Figure 24). It says that this DMS document must now be digitally signed when the document status is RL.
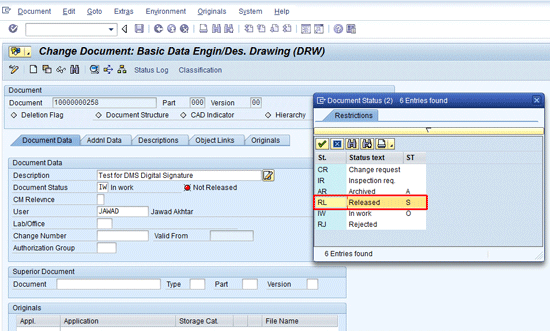
Figure 23
Status of DMS document changed from IW to RL for released
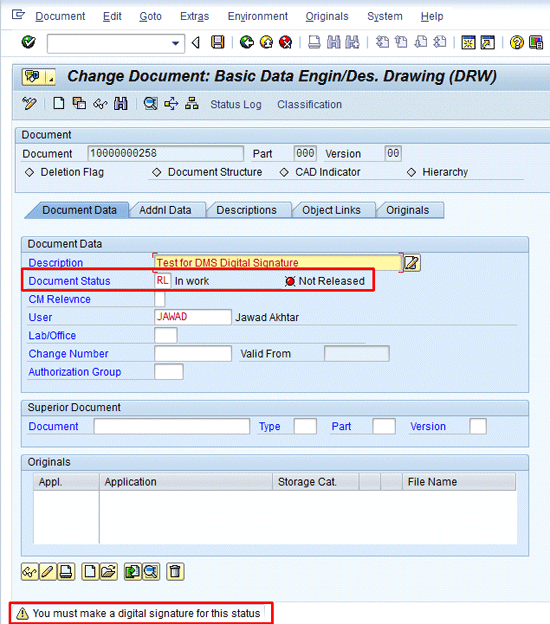
Figure 24
Warning message that the DMS document requires a digital signature for the status RL
Press Enter to confirm this, and the the system leads to Figure 25.
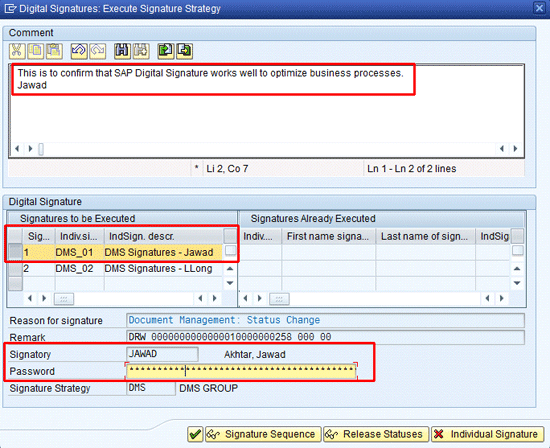
Figure 25
First (DMS_01) of the two individual digital signatures to be executed
In Figure 25 a comment box is available to add comments. Select individual signature DMS_01, type the SAP password, and press Enter, which results in the screen in Figure 26. Figure 26 is the pop-up information message that tells you that the digital signature process is still incomplete.
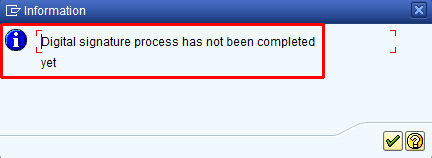
Figure 26
Process is incomplete pop-up information message
Now log in to the SAP system with a different user name (I used LLong in my example) and use the change document transaction code (CV02N) or refer to Figure 22 and enter the same DMS document number (10000000258), document type (DRW), document part (000), and document version (00). Once you’ve entered this information, press enter, which takes you to the screen in Figure 27. At the bottom of this screen, you get a message that says the digital signature process is not complete. Click the Digital Signature button in Figure 27, which takes you to the screen in Figure 28.

Figure 27
Information message that digital signature process is incomplete
Figure 28 is a pop-up window where you have to enter the digital signature DMS_02 in the form of an SAP password. In this screen you have the option to enter comments and the signature that was already executed (DMS_01) appears on the bottom right. After you enter the correct password and press enter, it leads to the information message that confirms the successful completion of the digital signature process in Figure 29.
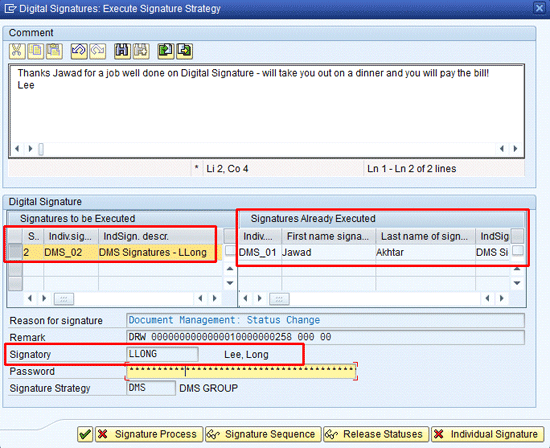
Figure 28
Second of the two (DMS_02) individual digital signatures to be executed
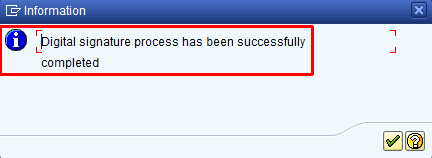
Figure 29
Information message that the digital signature process is complete
Digital Signature Logs
SAP provides a comprehensive log that you can view that ensures complete visibility of all the activities undertaken for digital signatures. This digital signature log is available not only for SAP DMS but for all the applications and components in which digital signatures are used, including PM, QM, and PP-PI.
To access the digital signature logs, follow SAP menu path Cross Application Components > Engineering Change Management > Reporting > Log for Digital Signature or use transaction code DSAL. This takes you to the initial screen to enter relevant parameters (Figure 30).
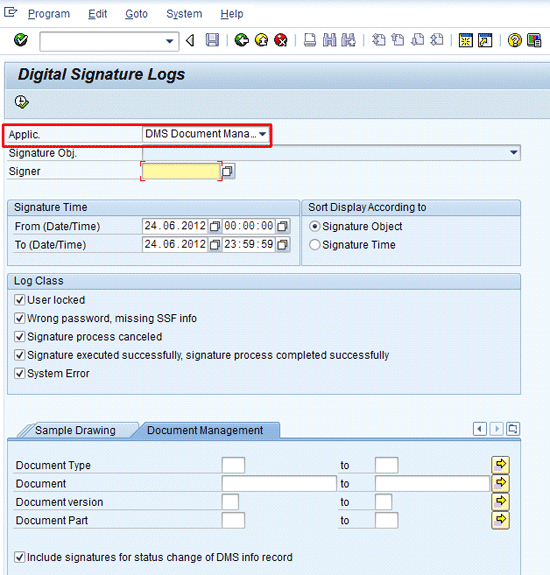
Figure 30
Initial screen for digital signature logs
In the Applic. (application) field, select DMS and do not give any other selection criteria. Press F8 or click the execute icon to go to the screen in Figure 31. This screen provides a comprehensive log of digital signatures for DMS document 10000000258. The bottom half of the screen provides details about who executed the digital signatures and when the signatures were executed. It also provides details of the individual signatures (DMS_01 and DMS_02) as well the signature strategy DMS.

Figure 31
Detailed log of digital signatures

Jawad Akhtar
Jawad Akhtar earned his chemical engineering degree from Missouri University of Science and Technology. He has 17 years of professional experience, of which nine years are in SAP. He has completed eight end-to-end SAP project implementation lifecycles in the areas of PP, QM, MM, PM, and DMS in the steel, automobile, chemical, fertilizer, FMCG, and building products industries. He also has worked as an SAP integration manager and an SAP project manager. He has been proactively involved in a business development and solution architect role for seven years. He is the author of Production Planning and Control with SAP ERP, it's filled with in-depth infomation on discrete, process, and repetitive manufacturing types. His profile on LinkedIn is at https://pk.linkedin.com/in/jawadakhtar. You may follow Jawad on Twitter @jawadahl. Currently, he is associated with AbacusConsulting as Head of SAP Delivery.
You may contact the author at jawad.akhtar@live.com.
If you have comments about this article or publication, or would like to submit an article idea, please contact the editor.


