SAPexperts?BI
SAPexperts/GRC
Repartitioning is a new administration function that can improve system performance for InfoProviders. Find out the options you have for using it.
Key Concept
Repartitioning allows you to repartition an already filled dataset for any particular InfoProvider by either adding, merging, or completely partitioning the dataset. Successful repartitioning enhances the performance of queries and workbooks because queries access the directed repartitioned data.
Repartitioning in SAP NetWeaver BI 7.0 enables you to repartition an InfoProvider after loading data into the dataset. Prior to SAP NetWeaver BI 7.0 it was not possible to easily alter or repartition a populated InfoProvider. The repartitioning function allows you to reorganize the InfoProvider by adding, merging, or completely repartitioning the dataset without the need to create a new InfoProvider or dropping and reloading the data.
You can use repartitioning in the following scenarios:
- You loaded additional data into a partitioned InfoProvider, causing the workbook and queries to run against one large InfoProvider
- The time period of the partitions created when the InfoProviders were activated is too small, so the system gathers data for the current time period in an overflow partition
- Partitions contain little or no data in the InfoProvider
- The InfoProvider contains no initial partition, making it one large partition that needs to be re- partitioned
I’ll explain how you can use the three available options for repartitioning (add a new one, merge several partitions into one large one, or complete repartitioning). I’ll then show you how you can monitor the repartitioning process.
Tip!
Prior to taking advantage of this new functionality, you should back up the system/database. Although you can execute these partition options easily within SAP NetWeaver BI 7.0, SAP recommends that your system administrators back up your system and database prior to executing any of the repartitions options. This ensures that you’ll be able to restore the status of your data and system if an error occurs during or after you execute repartitioning.
Repartitioning Options
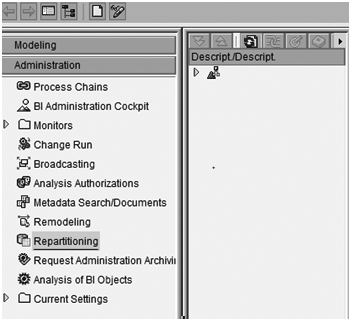
In my example, I have three partitions in the format of year/period: 2008012, 2008011, and 2008010 for the InfoCube Demo Cube. Start the repartition function by activating transaction RSA1. In the main Administration Workbench screen that appears, select the Administration Function Area from the left panel. The screen changes to show all the available options, including Repartitioning (Figure 1).

Figure 1
Repartitioning option under Administration options
Next, select how you want to repartition the InfoProvider. Click on Repartitioning to access the new Repartitioning of InfoProviders screen (Figure 2). Here you can select one of three options: Adding Partitions, Merging Partitions, or Complete Repartitioning. Next, I’ll describe each of these options in more detail.

Figure 2
Select the repartitioning option
Adding Partitions
This option allows you to append a new partition to the existing InfoProvider partitions. Selecting Adding Partitions creates a new upper limit partition for the InfoProvider to allow the collection of the new dataset for that time partition.
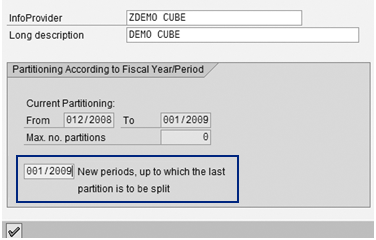
Say you start a business in 2009 and begin posting new transactions in the new year. The BI team decides to ensure good performance by adding a new partition of year/period 001/2009. In the screen in Figure 2, select Adding Partitions and click on the Initialize button. In the Partitioning: Attaching Partition screen that appears, enter the new time period that the BI team would like to add. In this example it is 001/2009 (Figure 3).

Figure 3
Add a new partition
When you finish entering the data, click on the enter icon to execute and add the partition. The system then shows a warning message to remind you to back up the database prior to continuing the execution. Click on the Yes button to continue.
When finished, use transaction ST04 to check for the new partition. In Figure 4 you can see that an additional partition year/period 2009001 was added and is ready for data collection.

Figure 4
Segments — Detail Analysis screen
Merging Partitions
This option enables you to combine existing partitions into a new merged repartition. Use this option when you have early existing partitions that you can combine into a larger dataset or you can collapse empty or low volume partitions.
In my example, the BI team wants to collapse existing year/period 010/2008, 011/2008, 012/2008 into one large merged repartition of year/period 012/2008. Return to Figure 2, select the Merging Partitions option, and then click on the Initialize button. In the Partitioning: Merging Partitions screen that appears, enter the new time period (Figure 5). Then click on the enter icon. The system displays a message to remind you about the database backup. Click on the Yes button to continue the execution.

Figure 5
Enter the parameters for the partition
When you finish merging the partitions, go to transaction ST04 to check if the partitions combined. In my example, you can see that the system has combined all partitions up to 2008012 into 2008012 (Figure 6).

Figure 6
Notice that all prior periods of 0122008 have been collapsed into 2008012
Complete Repartitioning
This option fully transforms an existing InfoProvider dataset. Repartitioning copies the existing (source) schema and its data into shadow tables, then it develops the newly requested and designed partitioning schema with the records from the source tables. It is best to use this option when the BI team must implicitly change the whole dataset rather then merging or adding partitions.
Use caution when selecting the Complete Repartitioning function because it creates shadow tables on the BI system as part of its steps. This requires that you ensure that SAP NetWeaver BI has enough database space to hold the complete copy of the initial data and the shadow tables that this option creates.
Furthermore, remember to delete the shadow tables and their data after the repartition is complete to gain back the space using the transaction SE11. Finally, note that shadow tables use the name format of /BIC/4F or /BIC/4E. This is the generic format to quickly locate and delete the table and its data.
In my example, the range of the partition is fiscal year/period 001/2008 to 001/2009 with 13 as the maximum number of partitions. With this repartitioning, the parameters should split the datasets into 13 periods from 001/2008 to 001/2009 (Figure 7). Return to Figure 2, select the Complete Repartitioning option, and then click on the Initialize button.

Figure 7
Enter the year/period range that has been decided to split out the dataset
When you have finished, go to transaction ST04 to check that all 13 partitions from 001/2008 to 001/2009 appear (Figure 8).

Figure 8
Notice that there are individual partition rows ranging from year/period 001/2008 to 001/2009
Monitor Repartitioning
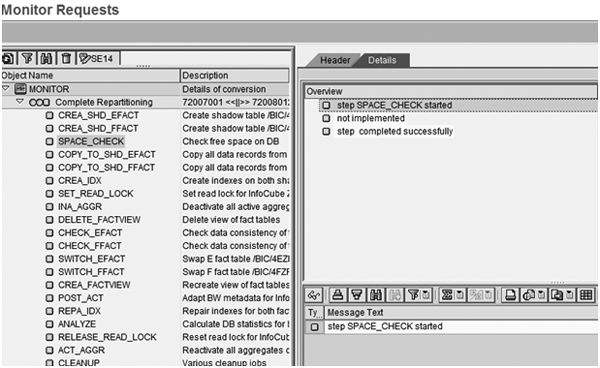
You can monitor and review logs of the repartitioning process via the SAP Monitor Request function. In Figure 2, click on the Monitor button to bring up the screen in Figure 9. The Monitor Requests screen provides a detailed log and the tasks of all the repartitions executed for a specific InfoProvider. The left side contains the processing steps. The right side contains the details and messages for each task. For example, if you choose the Complete Repartitioning option, the monitor provides detailed steps (e.g., development of tables, verification of disk space, index, and cleanup) and logs for the identified InfoProvider.

This information allows the BI team to monitor any problems or issues with the repartition.
Refer to SAP Note 1008833 (“Supplementary SAP Note about Repartitioning”) for more details of the processing steps. You should also read SAP Note 1008833 (“Supplementary SAP Note about Repartitioning”) prior to executing repartitioning. The same SAP Note provides special features for the various database platforms. They are explained within the repartitioning steps described in the note.
Muke Abdelnaby
Muke Abdelnaby is a principal with Renaissance Partner Group, Inc. (RPG). He and RPG create sustainable value for their customers by effective implementation and support of enterprise reporting, financial planning, and consolidations solutions. Muke and RPG not only focus on the technology of SAP NetWeaver, but also on business process understanding, industry knowledge, and technical expertise to deliver value solutions in both implementation services and product development. Muke has presented at several SAP NetWeaver BI sessions at ASUG and TechEd.
You may contact the author at muke.abdelnaby@rpg-corp.com.
If you have comments about this article or publication, or would like to submit an article idea, please contact the editor.


