Learn how to modify the standard organization and staffing interface to integrate custom built infotypes in detailed views of the transaction PPOSE. This integration means users do not have to resort to another transaction to view most custom Organizational Management/Personnel Development infotype information when they are using PPOSE.
Key Concept
A hierarchy framework scenario offers a range of configuration options such as the format of the right screen area, possible ways of visualizing data in structural form in the overview area, the choice of tab pages displayed for each object type in the detail area, and the definition of analysis periods. The SAP hierarchy framework is a Basis development used for visualizing and modifying hierarchical structures and objects. Scenario is a field stored in an SAP system and can be named with up to eight characters. Scenario OME0 is the standard scenario used in the organization and staffing interface. Other examples of scenarios are PBC, a standard scenario for Personnel Budget Plan Management, and MGEGE, a standard scenario for Compensation Overview.
When custom infotypes are created in the SAP Organizational Management (OM)/Personnel Development (PD) modules, users like to view them through transaction PPOSE (organization and staffing interface). When users are viewing information related to OM/PD using transaction PPOSE, they frequently have to go to a new transaction to view the information that is stored in custom infotypes. This multi-step process is time consuming and does not result in a user-friendly experience. SAP standard configuration does not integrate custom infotypes directly in the organization and staffing interface. However, it is possible to integrate them using a step-by-step approach that includes configuration and development.
By modifying and integrating custom infotypes in the PPOSE view, users do not have to navigate to another transaction to view custom infotype information when they are using transaction PPOSE to view most of the existing OM/PD infotypes. Having information in one view reduces the navigation steps necessary to view the required information, saves time, and helps prevent potential errors from navigating from one screen to another.
You can integrate custom infotypes directly into transaction PPOSE in five easy steps.
Step 1. Define your own Tab page
Step 2. Add the newly created Tab Page in a configured scenario
Step 3. Create subscreen 7000 for the infotype to be integrated
Step 4. Adjust subscreen 7000 for the required look and feel
Step 5. Confirm the new entry for the infotype in table T77ID
These steps are detailed in the following section.
Integrate Custom Infotypes in Transaction PPOSE
Step 1. Define and add your own Tab Page and put infotype details in it. Each detail view that you see when you run transaction PPOSE is simply a tab page in technical language. To reach the configuration settings for defining and adding the Tab Page, use menu path Personal management > Organizational management > Hierarchy Framework > Integrate New Infotype (Figure 1).
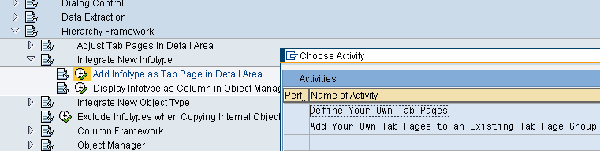
Figure 1
Define your own tab page
The tabs that you view are attached to one scenario. The default OM interface scenario is OME0, as shown in Figure 2. A specific configuration of the hierarchy framework is represented by a hierarchy framework scenario. More documentation on this can be found at configuration nodes accessed through transaction SPRO at Personnel management > Organizational management > Hierarchy Framework. You now create a Tab Page that will be attached to scenario OME0 (Figure 3).

Figure 2
Scenario for OM

Figure 3
View to create new tab page
Use the New Entries button to create the new Tab Page definition, which is the tab for the custom infotype that you want to view in the detail screen. I’ll use custom infotype IT 9101 to illustrate how to create the Tab Page Definition (Figure 4).

Figure 4
Create a new Tab Page
Populate the following data to create a new Tab Page:
- Tab Page is described uniquely by its Tab Page key
- Description is the description of the Tab Page
- Infotype-specific – Enter the infotype number if you want to make the tab infotype-specific. This means you want to view the infotype-specific data in detail view. You need to have this checked to view the data in output. When you want to view data in transaction PPOSE, the system looks for a subscreen generated for the infotype.
- Infotype identifies the infotype that you want to view in the detail area
Step 2. Add the newly created Tab Page in configured scenario OME0. Figure 5 shows the view to add new Tab Page to the scenario.

Figure 5
View to add new Tab Page to the scenario
Use the New Entries button to add a new Tab Page that you created in the previous step. Figure 6 shows new entries and the populated entries on the right side of the figure, such as Scenario, Object Type, and Tab Page, which when saved creates a new Tab Page.

Figure 6
Add new Tab Page to the scenario OME0
Populate the following data in fields in Figure 6 to attach the Tab Page to the scenario:
- Scenario – OME0
- Object Type – Depends on the object type (for example, S for position)
- Tab Page – Drop-down value. Select the Tab Page that was previously created.
- Sequence – This is the position of the Tab Page among all the defined Tab Pages specified for an object type in the hierarchy framework
- FM for icons – Although not applicable for this case, this is where you mention the function module name to display an icon. If no function module is entered, the detail screen does not display an icon unless the Tab Page is infotype-specific.
- Exclude tab page – Selecting or deselecting this check box influences the view of the tab in the framework. If you have created the screen and do not want to display it on the PPOSE output screen, then use this check box. This check box is useful if you want to exclude some of the standard SAP-supplied Tab Pages from being displayed in the scenario.
Save the data by clicking the save icon or pressing Ctrl S.
Step 3. Create subscreen 7000 for the infotype to be integrated. Following is the development related to adding a custom infotype on PPOSE. The screen that is shown on PPOSE is subscreen 7000. subscreen 7000 is not created when a new custom infotype is created. You need to create it to display custom infotype information in the PPOSE view. Use transaction PPCI (create infotype), which opens up the screen shown in Figure 7. Then you can populate it with an infotype number. In my example, I used number 9101.

Figure 7
Initial screen of transaction PPCI after being populated with infotype number 9101
Use the create icon shown in Figure 7 to create a view screen as shown in Figure 8. This allows you to create the subscreen.

Figure 8
Screen that helps you create a subscreen (7000)
Select the Creating a subscreen option that comes up after you click the Infotype button. This creates a new subscreen. You can verify the screen generation in a couple of different ways – the easiest way is to use transaction SE80/SE51. Figure 9 shows different screens such as 1000, 2000, 3000, and 7000 attached to the infotype when you use transaction SE51 and the drop-down functionality in the Screen number field.

Figure 9
Confirm creation of subscreen (7000)
You can confirm creation of a subscreen (7000) by checking drop-down values for the Screen number field. Review the screen and screen layout created by standard generation of the subscreen in which you can see how fields have been placed on the subscreen. You can customize the screen look and feel if you choose. You can hide some of the unwanted fields or move around the fields using the layout editor.
Step 4. Adjust the subscreen 7000 for the desired look and feel. For this example I used the default-generated screen (Figure 10) and changed the layout as shown in Figure 11.

Figure 10
Default created/generated subscreen (7000)

Figure 11
Change the default created/generated subscreen (7000) as required
Do not forget to generate the screen. Do this by using the activate icon.
Step 5. Confirm the new entry for the infotype in table T77ID using transaction SM31.
The entry with subscreen 7000 and the entry of IT 9101 indicates that I created the subscreen successfully. Now it displays the data in detail view of custom infotype in transaction PPOSE. The view in SM31 for table T77ID looks like Figure 12.

Figure 12
View of T771D table
The record in this table should have the following information:
- IT: Infotype number
- Structure for IT – specific fields: HRI structure of the infotype. It is HRI9101 in this scenario (HRI structures are part of infotype structures HRP9101 – which is the database table for infotype 9101 that stores infotype specific fields).
- Subscreen: Populate with 7000
Figure 13 shows the final result of my changes as viewed in the PPOSE view. In this figure you can see the tab of the custom infotype Position Info IT9101 as the third tab. To get an idea of how other tabs would look, you can see the detailed tab of IT1013 EE groups/subgroup, which is the SAP-supplied details tab.

Figure 13
Default full screen PPOSE view showing the tabs for configured infotypes
To view the detailed tab for the custom infotype, highlight the tab of the custom infotype Position Info IT9101 and you find the details as shown in Figure 14. This detailed tab has the information related to the position of Sales Specialist II for which you have configured the Tab Page and designed the subscreen 7000.

Figure 14
Detailed custom infotype 9101 view using PPOSE showing the fields of the custom infotype
For more information on inserting customer-specific tab page integration, refer to SAP Note 327614 - TA PPOME customer-specific tab pages. This note also talks about creating subscreen 7000 for an infotype needed for viewing the infotype through PPOME or PPOSE transactions.
Nitin Fuldeore
Nitin Fuldeore is an SAP consultant who specializes in the SAP ERP Human Capital Management module. For the last decade he has been helping his global clients implement SAP HR in the US, Greater China, Singapore, and India. Nitin is currently working with IBM’s HCM practice.
If you have comments about this article or HR Expert, or would like to submit an article idea, please contact the HR Expert editor.
You may contact the author at nitin_ful@yahoo.com.
If you have comments about this article or publication, or would like to submit an article idea, please contact the editor.