Learn about the different aspects and flexibility of mass maintenance of mitigation control owners and risk owners in Access Request Management.
Key Concept
Mass maintenance of mitigation controls and mass maintenance of risk owners are new features introduced in SAP Access Control 10.1. These features enable you to reassign mitigation owners and risk owners, update existing assignments after a reorganization, and download existing mitigation owners and risk owners to update their data.
Mass maintenance of mitigation controls is a new feature introduced in SAP Access Control 10.1. With this SAP solution, companies can maintain the mitigation control owners en masse. After you implement the mass maintenance of mitigation control feature, you can maintain the assignment of the owner for the mitigation control. You also can enable the additional feature to upload the owners into SAP Access Control.
With the mass maintenance of mitigation controls feature you can perform the following tasks:
- Reassign mitigation owners
- Update existing assignments after the reorganization of a mitigation owner is completed
- Download existing mitigation owners to a file from SAP Access Control
After implementing the mass maintenance of risk owners feature, you can maintain the assignment of the owner for the risk. You can also enable the additional feature of uploading the owners from the file into SAP Access Control. With the mass maintenance of risk owners feature you can perform the following tasks:
- Reassign the risk owner
- Update the existing assignments after reorganization of the risk owner is completed
- Download existing risk owners, update the file, and upload it
Note
Mass maintenance of mitigation controls and mass maintenance of risk owners are available as part of SAP Access Control 10.1 Support Package 18.
Mass Maintenance of Mitigation Control Owners
Here is the step-by-step process to maintain the mitigation control owners.
Log on to the SAP GRC system and type transaction code NWBC. In the screen that the system displays, go to Setup > Mitigating Controls (
Figure 1). Click the Mass Maintenance of Mitigation Control Owners link. This action displays the screen in
Figure 2.
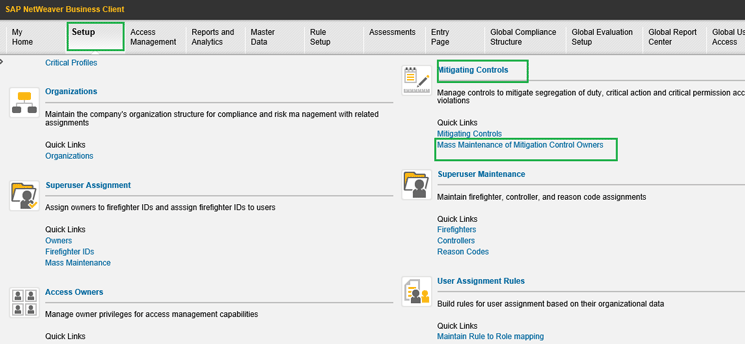
Figure 1
Click the Mass Maintenance of Mitigation Control Owners link
The wizard has four steps (
Figure 2):
- Search: The selection screen for selecting the mitigation control parameters
- Edit: Change the owners or add the owners
- Review: Review the changed content in a non-editable format.
- Submit: Update data and check the status of the changed records
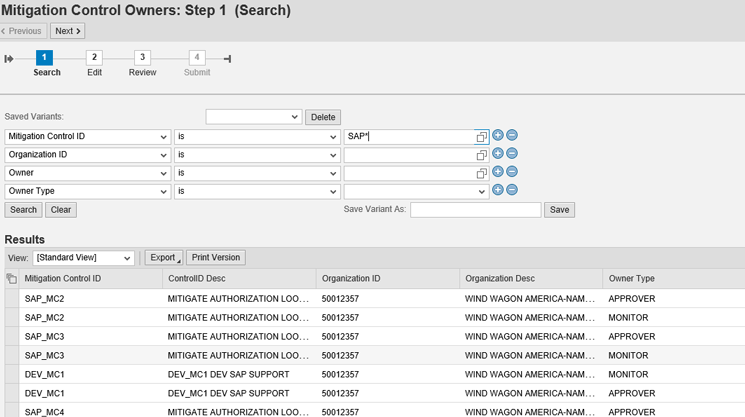
Figure 2
Select the data based on the input parameters
In
Figure 2, enter the required fields for filtering the mitigation control data (for example, enter SAP* in the Mitigation Control ID field). Click the Search button to display the data based on the selection in the Results section of
Figure 2. Select the required entries, as shown in
Figure 3 and click the Next button.
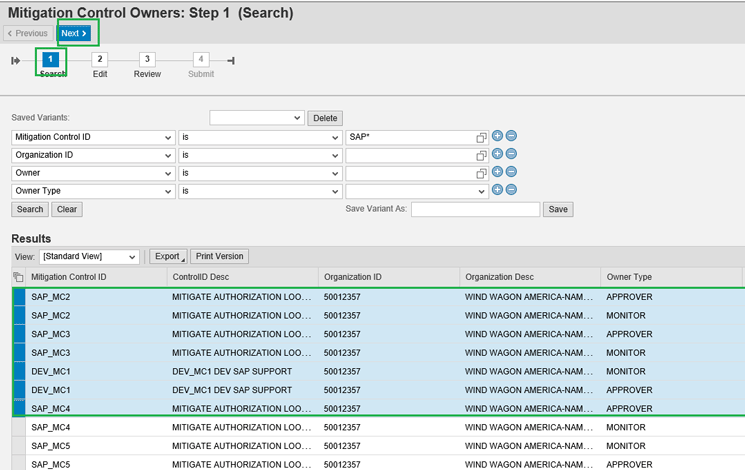
Figure 3
Select the required entries at the Search stage
Now select the required entry, add the new owner, and click the Validate button as shown in
Figure 4. After the system performs the validation, the status message is displayed with the required status as to whether the Owner is valid or not valid. The Action status is changed to Change status.
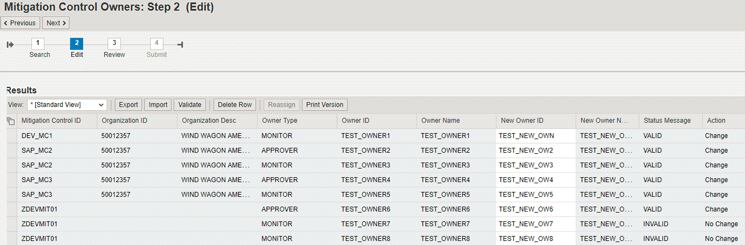
Figure 4
Validate the new owner ID
You also have the option to import and export the mass data. To complete this step, click the Export button. (The Import and Export buttons perform the required data import and export to save the data.) Change the owner by pressing the F4 help key. You can now select one of three options in the E column (
Figure 5): No Change (0), Change (1), Add (2).

Figure 5
Fill the Excel sheet with the required new owner and required action
Once the changes are done save the file. Click the Validate button to validate the data and then click the Next button. Then the system imports the data.
Click the Import button to import the data from the application and then click the OK button.
The data validation is performed automatically and the required status and action columns are updated accordingly as shown in
Figure 4. After you click the Import button and select the file, the data entered in the file is validated. Based on the data validation, the status is updated accordingly on the screen (for example, success or failure).
In
Figure 6 there is one more option to select multiple line items for which you want to assign a single owner. After you select the line items, click the Reassign button to display the pop-up screen in
Figure 6. In this screen select the new owner by browsing in the New Owner field. Click the OK button to validate the data.
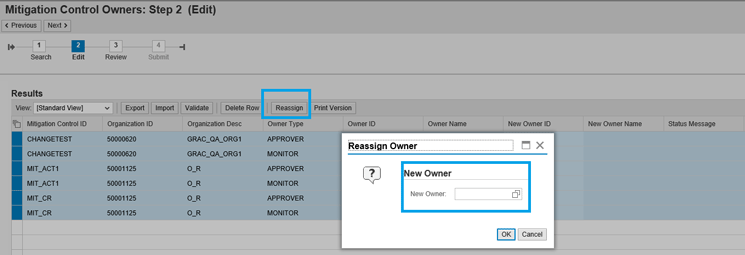
Figure 6
Reassign the owner
Now click the Next button and go to the Review screen to see the results shown in
Figure 7. Here the data that is updated can be viewed in a non-editable format.
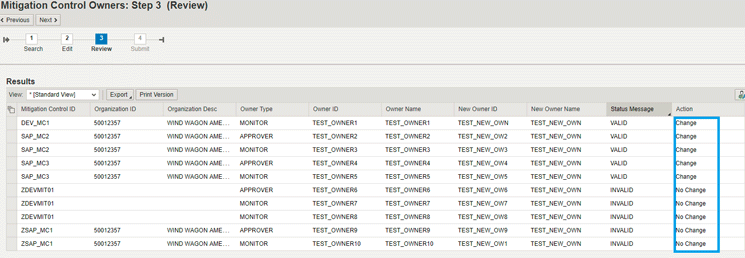
Figure 7
Review the owners for mitigation controls
Click the Next button and go to the Submit screen to see the actual data change in SAP Access Control mitigation controls (
Figure 8). In this screen, the actual number of records is displayed.
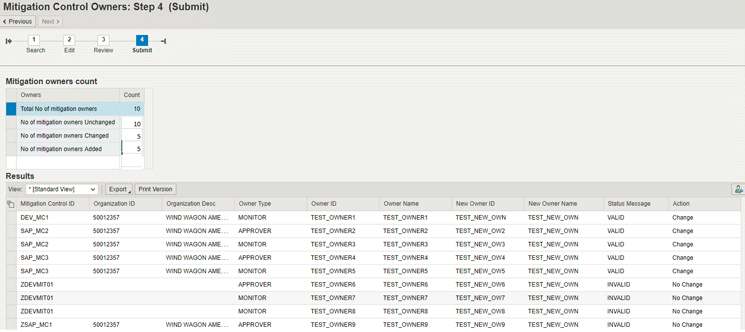
Figure 8
The total status and the actual number of records
Mass Maintenance of Risk Owners
To maintain the risk mitigation owners, log on to GRC system and type transaction code NWBC. Go to Setup > Access Rule Maintenance > Access Risk Owners Mass Maintenance (
Figure 9). Click the Access Risk Owners Mass Maintenance link.
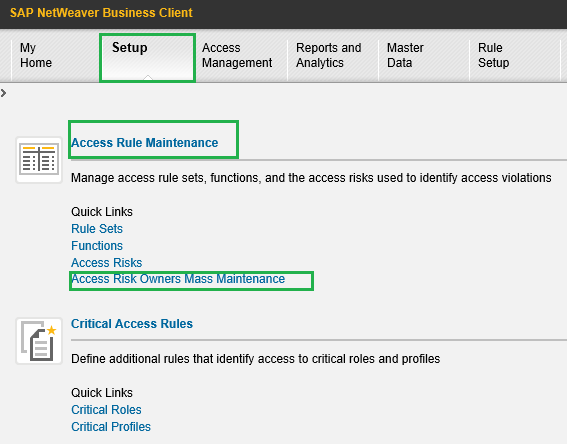
Figure 9
Click the Access Risk Owners Mass Maintenance link
In the screen that the system displays, enter the required selection parameters to filter the data for the maintenance. Click the Search button to display the data based on the selection in the Results section of
Figure 10.
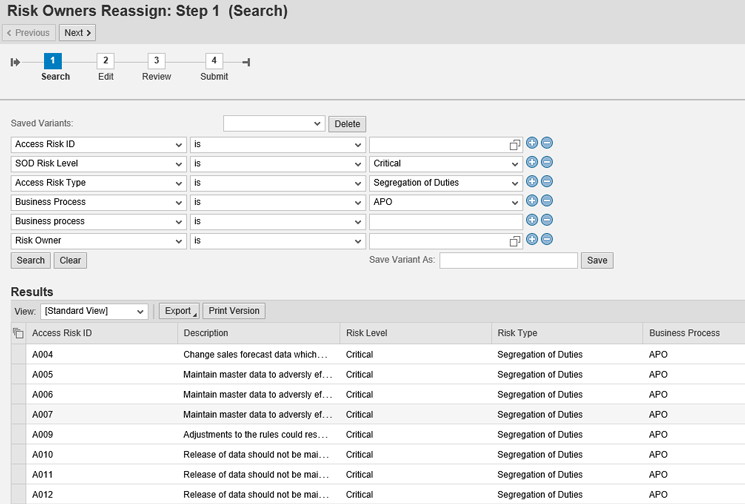
Figure 10
Results based on the selection
Select the required entries and click the Next button (
Figure 10). Select the required entries and assign the new owner by clicking the Reassign button (
Figure 11). Select the owner from the list under the New Owner ID column and click the Validate button to validate the new owner’s data.

Figure 11
Assign the new owner by using the reassign functionality
You also have an option to export the data by clicking the Export button. Perform the required changes by adding the new owners and then upload the data by clicking the Import button. After the system validates the new owner’s data, the required status information is updated in the Status Message column along with the owner status (i.e., whether the owner is valid or not) as shown in
Figure 12.
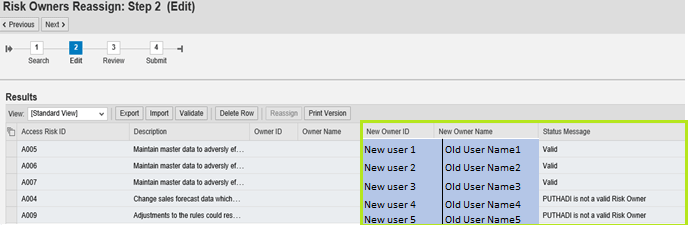
Figure 12
New owner status and status message description
Click the Next button to view the reassigned risk owners in the Review screen (
Figure 13).
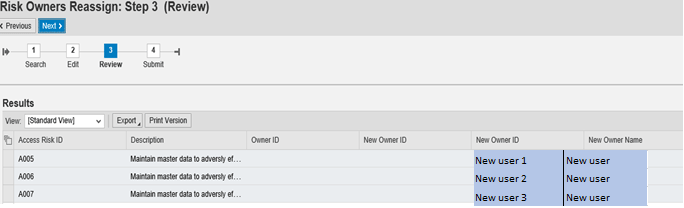
Figure 13
Review of the data to be submitted
Note
The status message can be of many types. If the owner’s status is valid, then Valid appears in the field under the Status Message column. However, if the owner’s status check fails, then a message appears such as the following message shown in Figure 12: PUTHADI is not a valid Risk Owner. When the failed status message appears, you pick the owner that is valid by using the F4 help key again.
Figure 13 shows the changed success records data status in non-editable format.
After you review the data for the reassigned risk owners, click the Next button to see the final data updated in SAP Access Control (
Figure 14).
Figure 14 shows the actual data that was updated successfully in SAP Access Control. This screen provides the detailed status of the records selected and records changed.

Figure 14
The final status of the records that were successfully updated in SAP Access Control
Suman Puthadi
Suman Puthadi is an associate architect at SAP Labs India Pvt. Ltd., where he has worked since September 2011. He has a total of 10 years of experience in software development. He has been involved in various phases of development and maintenance of SAP Access Control 10.0 and 10.1. He has expertise in Emergency Access Management, Access Risk Analysis, mitigations, Access Request Management, Business Role Management, and SAP security and authorization concepts. He also has expertise in technical areas such as work flow, WebDynpro-ABAP, SAP Cloud Platform Integration, cloud, and ABAP-HR. He has worked on various modules, including SD, MM, FI, and CO. He also has experience with SAP GRC solutions and SAP HCM.
You may contact the author at
suman.puthadi01@sap.com.
If you have comments about this article or publication, or would like to submit an article idea, please contact the
editor.