Discover how to store your test scripts in Solution Manager, which saves time and ensures consistency.
Key Concept
extended Computer Aided Test Tool (eCATT) functionality replaces the old SAP Computer Aided Test Tool (CATT) functionality. eCATT has many more advantages than CATT, such as a user-friendly interface and the ability to create a script that allows you to point the script at multiple systems. Transports are no longer required in eCATT as they were previously in CATT.
Multiple testing tools are available that you can use to execute SAP test scripts. Executing test scripts quickly and consistently is essential to any project. When you introduce new functionality, apply SAP Notes, or implement Support Packages in your system, it makes good business sense to perform a series of standard regression tests to ensure that the change did not affect current functionality.
Wouldn’t it be nice to have a series of SAP test scripts that you could run through swiftly when you need to and ensure that these scripts are consistent across all platforms, be it your sandbox, development, quality assurance, consolidation, or production client? This is possible and it is simple to do with extended Computer Aided Test Tools (eCATTs). You can run them in any SAP environment.
You then can use Solution Manager as a central repository to store the eCATTs. I’ll explain how you can take advantage of this functionality. While it is true that individuals can create an eCATT in any SAP R/3 and SAP ERP Central Component (ECC) system, you would have to ensure that this eCATT has been transported to each of your environments before you run it if you do not use Solution Manager. Here are some of the issues that you might encounter if you simply create and store eCATTs in each system directly:
- The eCATT is changed in the development environment, but did not transport its changes to the other environments
- You have a specific variant that you want used when the eCATT is run. If you store the eCATT in each environment, you need to maintain your variant values in each environment.
- If the eCATT is not the correct version in one system, you have to wait for the transport to be applied to that system. Depending on the frequency of your transport, it could take some time to wait for the transport to be applied to the system you need it in.
For those of you who are not familiar with how easy it is to create an eCATT, I’ll demonstrate this using a quick example. I will also show you how to register the eCATT in Solution Manager.
Using eCATT in Solution Manager
If you have Solution Manager, you could create an eCATT in your development environment, download this script from that environment, and then upload it into the Solution Manager system. Basis could perform a few simple configuration steps in Solution Manager that would indicate to which systems Solution Manager can perform a Remote Function Call (RFC). Then you could link your eCATT to that value. This means that you could maintain the eCATT and the variant in Solution Manager and just point the eCATT to any ECC system to execute the script. This saves time and ensures more consistency across the various systems.
Two main steps are required prior to running an eCATT from Solution Manager:
1. There must be a container in the Solution Manager system that directs the RFC to the appropriate system/client where you will run the eCATT
2. Create and execute eCATT
Tip!
Some companies elect not to transport eCATTs. Instead, they simply allow the developer to download the eCATTs and upload them in different systems such as production or quality. If your company does not employ Solution Manager, then your developer can simply create a script in a development environment and then transport it to the quality or production systems.
Tip!
Although this article indicates how to set up an eCATT for HR data, you can use eCATT in any SAP module.
eCATT Process Overview
Figure 1 illustrates a high-level depiction of the steps required to set up an eCATT and register the script in Solution Manager. I’ll examine each of these items in more detail later in this article.

Figure 1
eCATT process overview
For the purposes of this article, I’ll provide step-by-step instructions that will take you through the phases shown in Figure 1. The business scenario that I am testing for is: A company hired a new employee so I now must go into the system to create a valid infotype 9000 for the employee. Infotype 9000 was set up to link the employee’s personnel number to the personnel number of the person’s spouse, who is also employed by the company.
I could not go into Solution Manager to create the script directly because transaction PA30 (maintain master data) does not exist in Solution Manager. Therefore, I start by going into the sandbox or development environment (whichever one allows for scripts to be recorded) because I want to create my script, download it to my C drive, and then upload it into Solution Manager.
Steps to Create an eCATT
In this section, I’ll review the steps necessary to create an eCATT. Subsequent sections cover how to download the eCATT script and then upload it in Solution Manager.
Step 1. Configure your settings. Log in to the sandbox or development environment. Go to transaction SECATT. In the screen that appears, identify these four settings:
Test Configuration: The name of the eCATT object that you want to process
Test Script: The name of the eCATT object that you want to process. When creating the script, you start here as you need to create the script. The test configuration and test script name field values do not have to match. However, it is easier to identify which test script is linked to which test configuration object if they have the same name.
Test Data: Specific data that you want to import or export for the script
System Data: The system in which you plan to execute the script
Select the Test Script option and enter the name of the test script. In my example, I entered z_HR_IT9000. Then click on the create icon.
Step 2. Enter script data. In the screen that appears, provide a script title such as Maintaining an infotype 9000 record as in my example (Figure 2). The Component is PA-PA for HR. In the Package field, save your new script to a local temporary object as you are not transporting it to another system. Now click on the Pattern button to generate the Change Test Script screen.

Figure 2
Create a test script
Step 3. Link your test script to other attributes. In the Insert statement pop-up window that appears, select the UI Control option for recording and the Command is TCD (Record) option for recording a transaction code (Figure 3). Enter PA30 for Transaction. The system defaults the Interface field so you do not need to modify it.
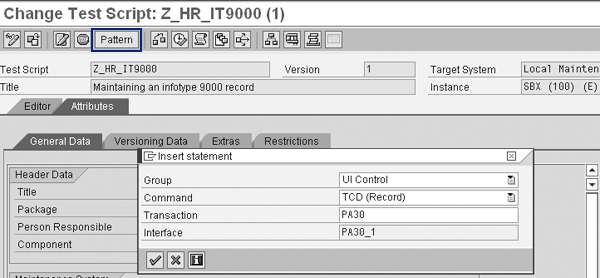
Figure 3
Link your test script to a group, command, transaction, and interface
Step 4. Initialize the script recording. Now the script recording begins. You are automatically taken to transaction PA30. Enter a personnel number, select infotype 9000, and click on the create icon. Next, you must enter the Validity From date 01/01/2008 and indicate any changes you want to make to the screen. Note that the system defaults 12/31/9999 for the validity to date and you do not need to change it. In my example, I enter the personnel number of the employee’s spouse into a custom spouse personnel number field. When you complete this task, click on the green back arrow at the top of the PA30 screen. Click on Yes when you are prompted to save the script.
Looking at the script in the SECATT transaction, you should now see a similar screen to Figure 4. Under the Editor tab, notice the TCD, which means transaction code. The first PA30 statement is the name of the transaction that you went to. PA30_1 is the actual script that was recorded from step 4. Double-click on the PA30_1 statement to populate the script parameters that determine the nature of the test script (Figure 5).

Figure 4
Change the script TCD PA30_1 initial default values
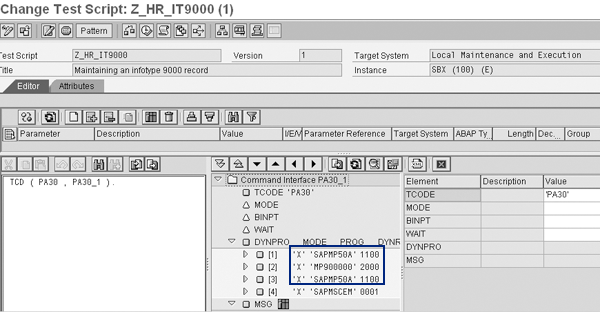
Figure 5
Identify the correct screen values that allow you to establish parameter values
Step 5. Assign the test script parameters. Expand the sub-options under the DYNPRO program to display the program screen field names and their default values that were called in the recording appears automatically. Click on the SAPMP50A dynpro, which is the SAP program that contains the logic behind transaction PA30, to display the default values you need to edit (Figure 6).
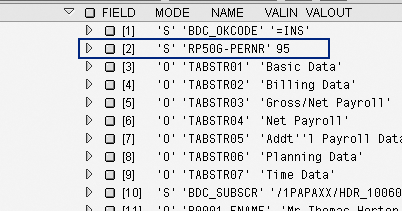
Figure 6
Change the parameter input value
You do not always want this script to run updating for a specific personnel number. Therefore, if you look into the values for the script, you see the personnel number 95 is the default. This is the value that you entered into the PA30 screen when you were making the recording. You need to change this to a parameter.
Step 6. Replace the default value to a parameter. Double-click on the value RP50G- PERNR95. Enter PERNR instead of the personnel number 95 in the VALIN (value in) field. Press Enter to view your updated parameter value (Figure 7). When you save your changes, the Parameter Maintenance pop-up window appears. Select the Import setting to ensure the field is dependent on the import parameter and click on the Yes button to confirm your changes.

Figure 7
Enter an import value instead of a default value in the eCATT
Repeat this step for all of the values that you wish to change. These are only the values that could vary from record to record. If you want the value to always be the same, then do not change the value that you entered in the script.
Step 7. Define validity begin date. Return to the background screen in Figure 5 by closing the pop-up windows. Expand the sub-options under the MP900000 program. Double-click on the P9000- BEGDA field and indicate that it is an import value by selecting Import and clicking on the Yes button in the pop-up window that appears (Figure 8). Similar to step 6, replace the default value of 1/1/2008 with the parameter value Begin. Note that the default date (1/1/2008) was the date that you used when you created the recording via transaction PA30.

Figure 8
Set up a parameter default value for the begin date value
Step 8. Test your record changes. Now you should determine if the update to the individual’s record was successful. One way to verify success is to perform a test run of the script to see if you receive a success message from the system.
For my example, a successful update to the infotype 9000 record produces a message type S, message group ID PG, and a message group number of 102. To determine these values, run the update in test mode, which displays them at the bottom of your screen. Return to the screen in Figure 3 by clicking on the Attributes tab and click on the Pattern button to display the Insert statement pop-up window. Select the All Commands group then select the command Message…Endmessage. The system defaults the Interface (Type Message) for you.
You’ll notice that SAP defaults a MESSAGE….ENDMESSAGE statement on the screen (Figure 9). You don’t want to check the message before the update TCD (PA30, PA30_1) has been performed on the record update. Therefore, you need to move the endmessage statement after the TCD update to the infotype record. To do this, simply copy ENDMESSAGE (E_MSG_1) and paste it at the end of group TCD (PA30, PA30_1) as shown in Figure 10.

Figure 9
SAP default message statement

Figure 10
Adjust the order of the message check elements
Select the MSG_1 statement that is listed on the left hand side of the screen to determine if the script was successful. Double- click on the MSG_1 value on the middle of the screen and then click on the create icon. Enter MODE E (expected) as this is the message you want to see. Message type (MSGTYP) S, message group ID (MSGID) PG, and message group number (MSGNR) 102 indicates your records changes were successful (Figure 11).

Figure 11
Example of a successful update to infotype 9000
Download an eCATT Script
Now that you’ve created the script, you need to download the script before uploading your script to Solution Manager. In your sandbox or development system, select Test Script>Other Features>Download. Indicate a name for the script and the location where you would like to store it on your PC. After you complete this step, you are ready to upload your script.
Upload an eCATT Script to Solution Manager
To upload the recorded script, log in to Solution Manager and go to transaction SECATT. Select the menu path Test Script>Other Features>Upload, now you will be asked which file do you want to load. Select the file from your PC and continue, you will now see the change eCATT objects to be uploaded box appear (Figure 12). The system wants you to confirm that this is the file that you wish to upload. Highlight the script by clicking on the box next to the row entry and then select the continue icon at the bottom of the change eCATT objects to be updated box.

Figure 12
Upload the recorded script from your PC into Solution Manager
Once the script is uploaded, you see a green light (if it was successful) or a red light (if there are errors) under Status in Figure 13.

Figure 13
Status lights indicate success, error, or warning
Tip!
INSERT The script that you downloaded from the sandbox or development environment onto your C drive is saved as an XML file. Once you upload this file into Solution Manager, you can simply remove the old file from your C drive.HERE
Test Configuration in Solution Manager
To test the configuration in Solution Manager, go to transaction SECATT and provide a name for your test configuration. I chose to keep the name of the test configuration the same as the script (Z_HR_IT9000) to avoid confusion. Click on the create icon and populate the Title, Component, and Person Responsible fields (Figure 14).
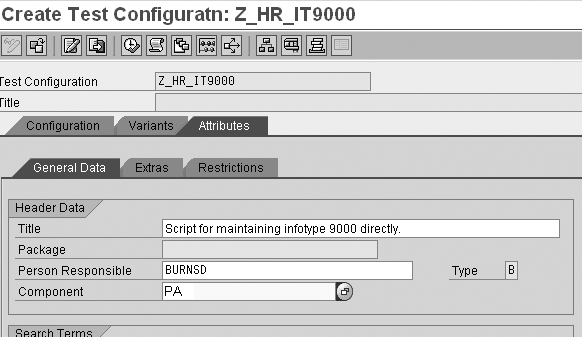
Figure 14
Required data entries
Click on the Configuration tab. You now state the System Data Container, Test Script, and Target System (Figure 15).
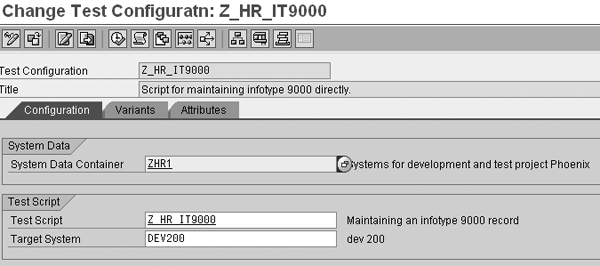
Figure 15
Enter the required system information
The System Data Container points you to the RFC system where you run your script that you created in the sandbox or development system and just imported into Solution Manager. The Target System is the client where you eventually run the script. Remember, Solution Manager points you to whatever system you indicate that you want this run in as long as Basis has set up an RFC for you to that system from Solution Manager.
You now set up the data that you want to upload and run in the target system. You can download the variant if you wish. I find this is useful if you have a lot of columns and want to include the headers in a spreadsheet so that you don’t have to remember what order they were in. This is helpful if you have a spreadsheet of data that you want to upload and you just want your variant headers at the top of the document. To do this, select Edit>Variants>download. When you have completed your data manipulation, you can select Edit>Variants>upload to bring the values back into the system.
Sometimes, you might want to just simply add your data directly into the screen and not worry about uploading or downloading variants. This is easier especially if you only have a few fields to populate. To do this, enter the values in the Variants tab (Figure 16). This option is simpler if you have less volume.
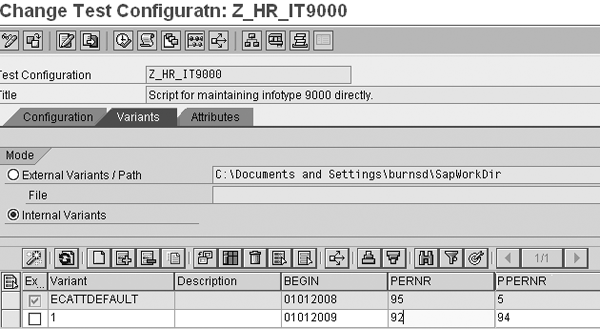
Figure 16
Manipulate the variant values directly in the test configuration screen
The check box in the Ex…column means that the system will execute this particular row when the script is run. The Variant has to be a unique name or number. The Description can be blank or you can enter text into this field. It does not update anything, but it is there for you in the event you want to document a quick comment about the item.
Tip!
If you are uploading a spreadsheet, you must account for every column value as you would if you were maintaining the variant directly on the eCATT screen itself.
Note
If you run the test script variants in the foreground, you need to click on the enter/continue icon through the commands as you do in a Batch Data Communication (BDC) that was run in foreground. When the variant run is complete, you’ll receive a log summarizing the results for each of the variant rows.
BEGIN is the effective date of the new infotype 9000 record that you will create.
PERNR is the employee’s personnel number. PPERNR is the personnel number of the employee’s partner/spouse. To briefly recap my example, I wanted to write the eCATT to track the spouse’s personnel number on the employee’s infotype 9000 record in the event that both individuals were employed by the same company. BEGIN and PERNR were import parameters that I set up directly after recording the script. PPERNR is set up in the same way as BEGIN and PERNR import parameters.
If you were running the script in Figure 16, you must uncheck the ECATTDEFAULT item and check the variant 1 value. ECATTDEFAULT was the initial script’s values from when I first created the recording. The information that I used to create the script might not exist in the other systems so we do not necessarily want the individual’s values updated across multiple systems.
Click on the save icon to update your edits. Now you can execute the test by selecting the execute icon  . The system defaults to run the script in background. If you want to run this in foreground, you can select the option A Process in Foreground, Synchronous Local as the Start Mode for the Command TCD.
The eCATT log displays a summary for each of the variants that were run (Figure 17). If they are successful, you’ll see a green box in front of their name. If there were errors, you’ll see a red box.

Figure 17
eCATT log summary with successful runs circled
Link an eCATT to a Specific Test Case in Solution Manager
Say your company wants to use Solution Manager as a repository system for all test scripts. There might be a group at your company that sets up transaction SOLAR (configuration change for project) that lists all the items that you would like to regression test. You can link this eCATT to a specific step in Solution Manager (Figure 18).
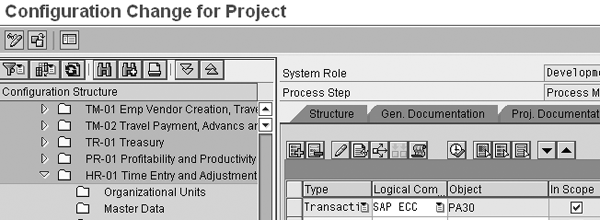
Figure 18
Add an eCATT to the Solution Manager configuration structure step
Select the configuration step for which you wrote the script and select the type of transaction under Type. Select the object that is your script. From this step, you can drill into the script (which takes you to transaction SECATT) and can point the script to a different server. The result is that you have one central repository for all scripts.
Don’t Forget These Tips
Containers: Sometimes people do not recall how to set up a container to use in the configuration testing phase. To do this, go to transaction SECATT in Solution Manager. Select the System Data radio button and enter a container that you used in the past or one of the SAP standard provided entries (Figure 19).
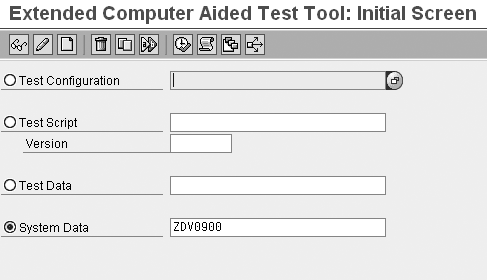
Figure 19
System data for the new container
Select the copy icon button and enter the name of the new system data container. Normally, this would be called Z so that you don’t confuse this with an SAP standard value. While the radio button is still set on the System Data option, select the change icon. Now you will need to create the new Target System, Description, and RFC Destination information and remove the old information that applied to the old RFC destination that you copied this entry from (Figure 20). Make sure you save your entries.
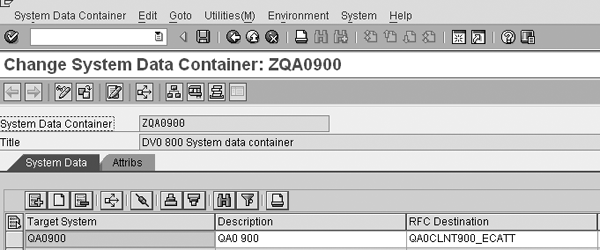
Figure 20
Change the target, description, and RFC information for the system data container
Back on the Extended Computer Aided Test Tool: Initial Screen, select the Test configuration option and the eCATT that you completed. You’ll need to put your new System Data Container information into the Configuration tab screen.
Keep in mind that your Basis team must complete the RFC destination link and needs to know what you configured.
Authorization: Many times I’m asked whose authorization will be used when the eCATT is run. Basis is the best group to tell you if the RFC has been set up to run with a generic user ID for all of the eCATTs to run under or if the RFC will default to the user ID of the individual who executed the script. Normally, it is the person who is running the eCATT.
Dawn Burns
Dawn Burns is an SAP-certified human resources senior consultant and Quality Assurance Manager and HR Consultant with Howrey LLP. She is a former SAP Human Resources instructor for SAP America and has more than 12 years of experience in human resources and information technology.
If you have comments about this article or publication, or would like to submit an article idea, please contact the editor.


