Learn how to create, maintain, and consume a Plant Information Catalog (PIC) hierarchy in SAP Manufacturing Integration and Intelligence (SAP MII). Discover how to integrate shop floor data and enterprise data from SAP ERP in the PIC.
Key Concept
Plant Information Catalog (PIC) is a framework provided by SAP Manufacturing Integration and Intelligence (SAP MII) version 14.0 and above that enables organizations to create and maintain their asset hierarchies in SAP MII. The PIC is a hierarchical or logical representation of various assets in a plant or the entire enterprise. This hierarchy is integrated with real-time shop floor data and the business assets maintained in SAP ERP production planning (PP) and plant maintenance (PM) modules. The PIC provides not only the functionality to create a logical asset hierarchy of the shop floor assets but also the business context to the shop floor assets by integration with the PP and PM module hierarchies of SAP ERP.
All manufacturing organizations have a lot of data in their shop floor systems. This data is stored in the shop floor systems without any relevant business context. Imagine that you are using a historian for storing a lot of data points. When you see the data in the historian, can you figure out for whom this data is relevant? Can you tell the work center or functional location for which this data is relevant? The answer is no if you don’t have a place or mechanism in which you can maintain this relationship. The Plant Information Catalog (PIC) framework in SAP Manufacturing Integration and Intelligence (SAP MII) helps you maintain this relationship.
On a plant’s shop floor, many systems store or capture data for various data points, such as temperature or pressure for various types of equipment. This data is usually stored as a flat structure and therefore has no relationship with other data or any business context associated with it. For example, consider a scenario in which you have temperature readings for a boiler, but you do not know to which work center in the ERP system this boiler is mapped. The data is also usually stored with strict technical naming formats, making it very difficult to search or fetch this data if you don’t know the exact technical name of the data point in the shop floor system.
The pain point here is that you have data available, but this data is named in a very technical manner, making it difficult to understand and search for it. This data does not have a business sense or context associated with it, thus making it difficult for you to analyze it or use it for analytics.
The SAP MII PIC is helpful in this situation because it provides the framework for creating a hierarchical, plant-specific catalog of data points or tags from different shop floor systems. The PIC also provides a business context to this hierarchy from the SAP ERP system. Therefore, you can group shop floor assets logically and also by business rules defined in the ERP system. Additionally, you can have business-friendly naming conventions for the objects and data points so that it makes it easier for you and also for the business user to understand the hierarchy.
In this article, I take you through all the steps for creating an SAP MII PIC hierarchy and consuming it.
The PIC is a hierarchical structure defining the asset hierarchy for plants. Objects in this hierarchy are mapped to the shop floor system’s data points and ERP system’s objects from the production planning (PP) and plant maintenance (PM) hierarchies. The data resides in the shop floor systems and is pulled from there and the business sense or context is added to this data using the ERP system objects.
Therefore, the PIC hierarchy sits between the shop floor systems and enterprise systems. The PIC gets data from the shop floor system and gets the business context from an enterprise system (Figure 1).

Figure 1
PIC hierarchy high-level architecture diagram
Note
The SAP MII PIC is available from SAP MII 14.0 Support Package 0, but the integration with SAP ERP PP and PM is only available from SAP MII 14.0 Support Package 4.
The PIC hierarchy contains two types of objects: tags and groups. Tags are the data points in the shop floor systems and are leaf nodes in the PIC hierarchy. Groups are logical tag containers (i.e., groups contain all the tags logically clubbed together). For example, all the tags associated with particular equipment can be put under one group.
To create the PIC hierarchy in an SAP MII system, follow these steps:
- Create property sets
- Create categories
- Create a change list
- Create a PIC hierarchy in Plant Information Maintenance
- Approve the change list and apply the changes
- View and validate the hierarchy
After the hierarchy is created, it can be consumed in the Catalog Query. The Catalog Query is the query template specifically for the PIC. The Catalog Query fetches the data for the PIC. I explain the steps you need to complete for this process in the section “Consume the Plant Information Catalog Using the Catalog Query.”
Note
Catalog Query is also known as PIC Query.
Now I explain the steps to create a PIC hierarchy in detail.
Create Property Sets
Each object in the PIC hierarchy can have properties associated with it, and these properties can store values along with them, thus making them a name value pair. Property sets are collections of such properties that facilitate attaching the properties to the PIC objects. For example, a certain type of object (e.g., a work center) always has certain properties associated with it, such as work center ID, and your PIC hierarchy has multiple objects of this type. Therefore, instead of adding all the properties to each object, you can create a property set containing all the common properties and then add this property set to each object. All the properties in a property set are added for that PIC object automatically.
Property sets and their associated properties can be created, modified, and deleted in the Property Set admin screen (Figure 2). To access this screen, follow menu path Catalog Services > Property Set.
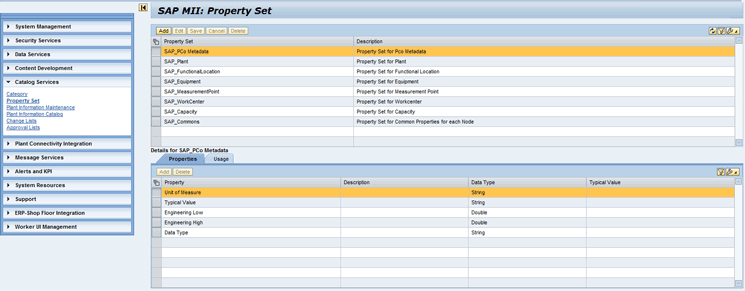
Figure 2
The Property Set screen
SAP MII also provides some predefined property sets whose names start with SAP_ such as SAP_Plant and SAP_WorkCenter. You cannot edit or delete these predefined property sets. These property sets contain properties associated with standard ERP objects, including Plant, Work Center, and Equipment.
In the Usage tab in the Property Set screen, you can see the list of PIC objects in which this property set is used or added (Figure 3).
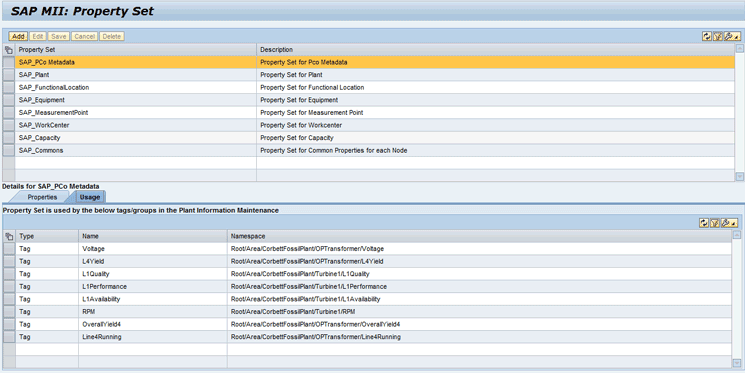
Figure 3
The Usage tab of the Property Set screen
When you edit a property set and save the changes, the system shows you the list of PIC objects in which this property set is used and gives you the choice to push the changes to the PIC objects as well (Figure 4). Push the changes means that the changes are also reflected in the PIC objects where this property set is used in the Plant Information Maintenance screen. If you do not push the changes done in the property set to the PIC objects, then they can be also pulled from the Plant Information Maintenance screen. I explain this process later.
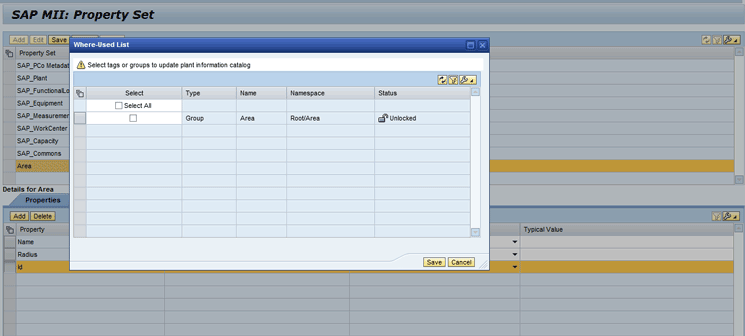
Figure 4
The Where-Used List pop-up screen
Create Categories
Categories are used to categorize the PIC objects. Categorize means defining the object’s type (e.g., Plant, Work Center, and Equipment). Categories also have property sets associated with them. Therefore, when a PIC object is added to a certain category, the property sets associated with that category are automatically added to the PIC object.
Categories can be created, modified, and deleted in the Category admin screen (Figure 5). To access this screen, follow menu path Catalog Services > Category.
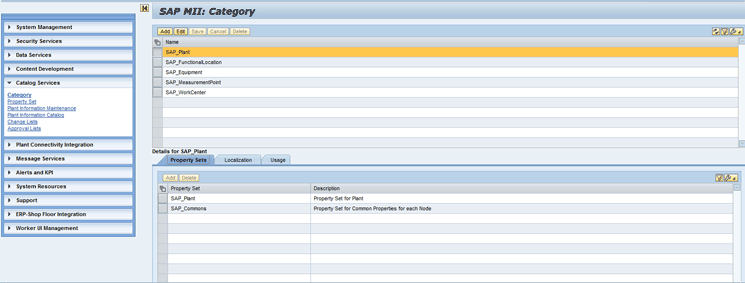
Figure 5
The Category screen
SAP MII also provides some predefined categories whose name starts with SAP_ such as SAP_Plant and SAP_WorkCenter. These categories also contain some predefined property sets that are functionally valid for them. For example, the SAP_Plant category has SAP_Plant and SAP_Common property sets added to them. You cannot delete these predefined categories or remove the predefined property sets from them, but you can edit the predefined categories and add more property sets to them.
In the Localization tab for each category in the Category screen, you can define a language-specific description for the category. This description is used based on the locale of the user in the PIC for this particular category (Figure 6).
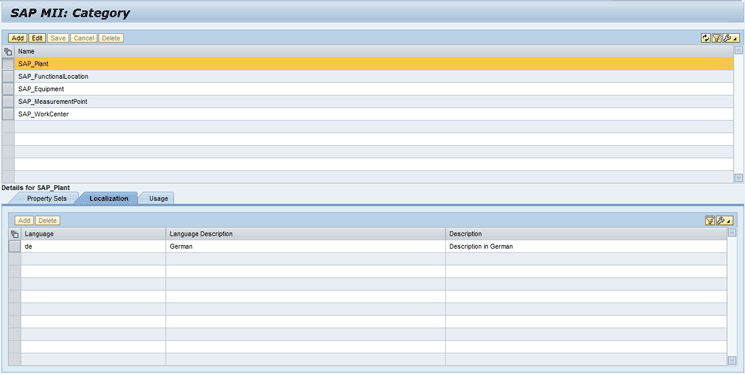
Figure 6
The Localization tab of the Category screen
In the Usage tab for each category in the Category screen, you can see the list of PIC objects in which this category is used (Figure 7).
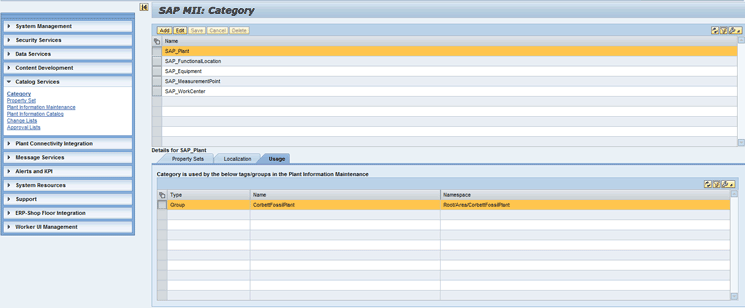
Figure 7
The Usage tab of the Category screen
As you do in the Property Set screen, when you edit a category in the Category screen, the system shows you the list of PIC objects in which this category is used. You can push the changes done in the category to these PIC objects or this can be done in the Plant Maintenance screen.
Create a Change List
Catalog services is the name of the group containing all the PIC admin screen links in SAP MII. There are two screens in Catalog Services: Plant Information Maintenance and Plant Information Catalog. Plant Information Maintenance is the screen used to create and configure the plant asset hierarchy and map the objects to shop floor assets as well as to ERP system objects. The Plant Information Catalog is a read-only screen to see the hierarchy created and approved in the Plant Information Maintenance screen. All the changes are made by the user in the Plant Information Maintenance screen. These changes need to be approved by an authorized user and then the changes are moved to the PIC. I describe the functionalities of these two screens later.
A Change List is a list containing all the changes performed by the user in the Plant Information Maintenance screen hierarchy. It acts as a log of all the changes done by the user in the hierarchy. Until this change list is approved by an authorized person, the changes are not moved to the PIC and thus can be reverted or modified again.
The life cycle of a change list is diagrammed in Figure 8.
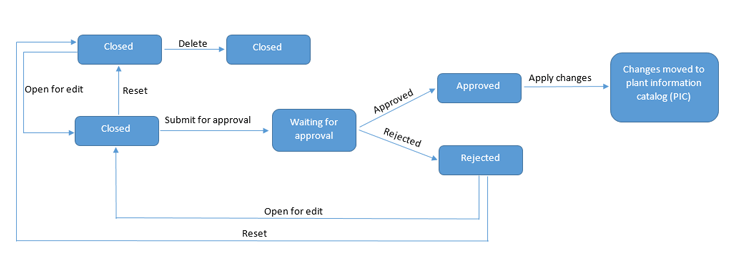
Figure 8
Life cycle of a change list
A new change list is in open state and is ready to be used. Once all the changes are done by the user in the Plant Information Maintenance screen and are attached to the change list, the change list needs to be submitted for approval. An authorized person can either approve or reject the change list. If the user approves the change list, it moves to an approved state and then the changes can be applied to the PIC. If rejected, the change list moves to a rejected state and then can be again made open by the user or reset. Reset means all the changes are reverted and the change list is closed. I discuss the approval process of the change list later.
The Change Lists screen is used to create, view, set as current, reset, submit for approval, or delete the change lists (Figure 9). To access this screen, follow menu path Catalog Services > Change Lists.

Figure 9
The SAP MII Change list screen
You can create multiple change lists for yourself, but at any particular point, only one change list is treated as a current change list. All the changes done by you in the Plant Information Maintenance screen are associated to this current change list. Any change list that you create can be marked as current by clicking the Set as Current button in the Change List screen (Figure 10).
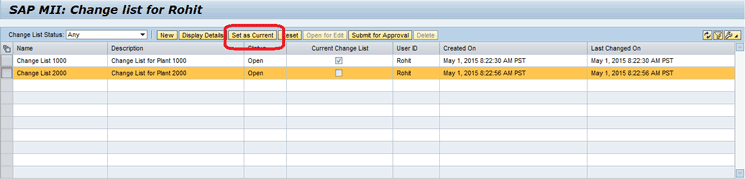
Figure 10
The Set as Current button
To view the details of the change list, click the Display Details button in the SAP MII Change list screen (Figure 11).
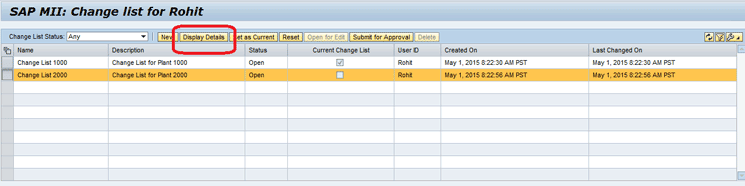
Figure 11
The Display Details button
This action opens a pop-up screen in which the details of the change list are shown (Figure 12).

Figure 12
The New tab
This change list details pop-up screen has five tabs:
- New: This tab lists all new objects that you create (Figure 12).
- Edit: This tab list all the objects that you edit. In this tab, you can also compare the objects in the Plant Information Maintenance and PIC screens (i.e., between working version and live versions as shown in Figure 13).
- Delete: This tab lists all the objects that you delete (Figure 14).
- Log: This tab lists the logs for the change list that shows the various stages it has passed through (Figure 15).
- Notes to Approver: In this tab you can add extra information or add comments about the changes that are available to the approver (Figure 16).

Figure 13
The Edit tab

Figure 14
The Delete tab
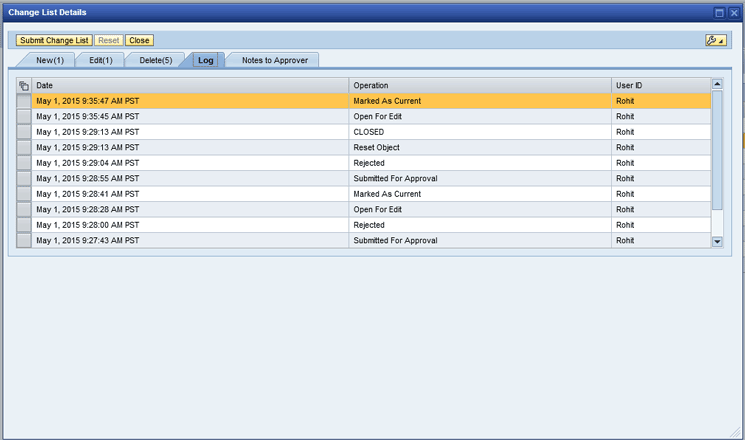
Figure 15
The Log tab
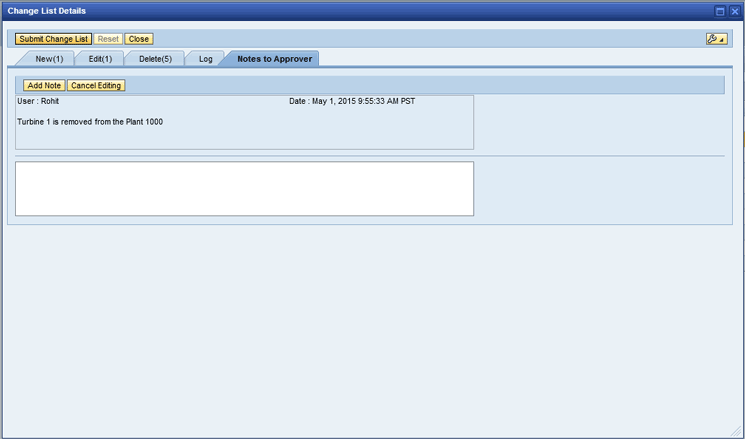
Figure 16
The Notes to Approver tab
To submit the change list, click the Submit for Approval button in the Change Lists screen (Figure 17). After submission, an authorized user needs to take action on the change list (i.e., either approve or reject the change list). I explain this approval process later.
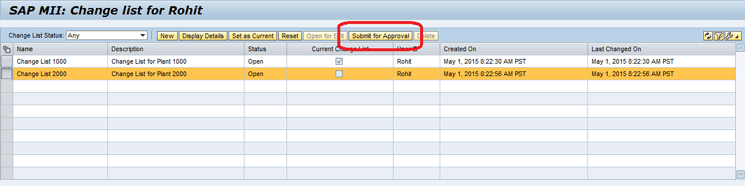
Figure 17
The Submit for Approval button
To reset a change list, click the Reset button in the Change Lists screen (Figure 18). Reset means that all the changes associated in the change list are reverted and the change list is closed.
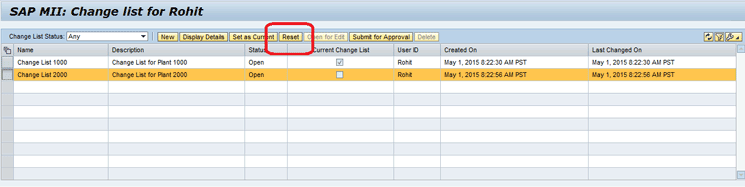
Figure 18
The Reset button
Create a PIC Hierarchy in Plant Information Maintenance
You create and maintain the asset hierarchy in the Plant Information Maintenance screen (Figure 19). This screen can be called a working screen and the hierarchy can be called working hierarchy.
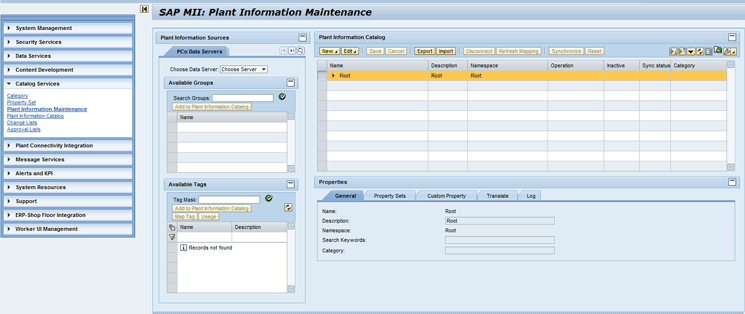
Figure 19
The Plant Information Maintenance screen
To access the Plant Information Maintenance screen, follow menu path Catalog Services > Plant Information Maintenance.
The Plant Information Maintenance screen is divided into two parts: Plant Information Sources on the left and Plant Information Catalog on the right (Figure 20).
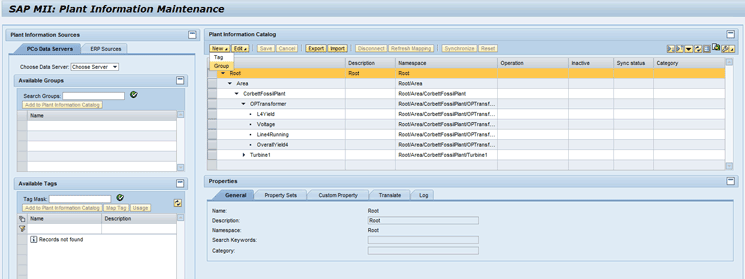
Figure 20
New menu in the Plant Information Maintenance screen
The right side of the screen (the Plant Information Catalog) is where you create the PIC hierarchy. The PIC hierarchy has two types of objects: Groups and Tags. Tags are the leaf node of the hierarchy and basically represent the measurement points or the data points. Groups are the tag containers that contain tags grouped logically (for example, tags belonging to the same equipment).
By default, the Plant Information Catalog section includes a group named Root. This is the root of the hierarchy, and all objects are created under this group.
Various functions are available in the top menu bar of the Plant Information Catalog. The First button available in the menu bar is New (Figure 20). This is where you find the options for creating Tags and Groups. When you select either Tag or Group from the drop-down list of options provided by the New button, a pop-up screen appears in which you enter a name, description, and category for the object (Figure 21).
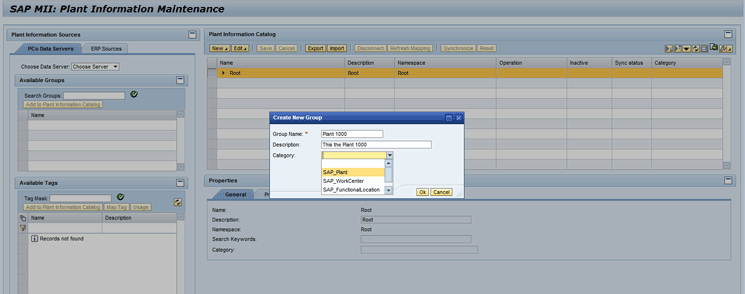
Figure 21
The Create New Group pop-up screen in the Plant Information Maintenance screen
After the object is created, you can see all the details about the object in the Properties section (Figure 22).
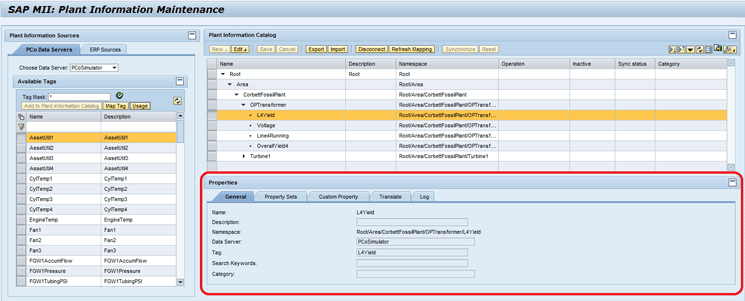
Figure 22
Properties of PIC objects
There are five tabs in the Properties section:
- General: This tab shows the general properties, such as name, description, namespace, and category of the object.
- Property Sets: This tab shows all the associated property sets of the object. You can provide values to the properties of the property sets.
- Custom Property: This tab shows all the custom properties added to the objects along with its values.
- Translate: This tab shows the language-dependent text for the description of the object.
- Log: This tab shows the lags of the activities done on the object.
The Second menu button is Edit, which provides the edit functionalities for the PIC objects, such as edit, cut, copy, paste, delete, and rename (Figure 23). After you click the Edit button for editing the PIC object, all the tabs in the Properties section of the screen become editable. You can then change values for all the properties of the PIC object.
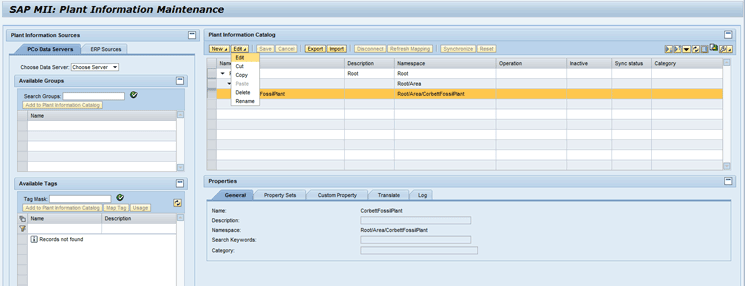
Figure 23
The Edit menu in the Plant Information Maintenance screen
To the right of the Edit button are the Save and Cancel buttons, both of which are used while creating and editing the PIC objects to save the object or cancel the changes.
The Export and Import buttons are positioned to the right of the Save and Cancel buttons. The Export and Import buttons can be used to export the PIC hierarchy as an XML file or import the hierarchy from an XML file (Figure 24). You need to select a Group and then click the Export button to export the group and all its child objects. Similarly, while importing, you need to choose a group under which the objects would be imported and then click the Import button.
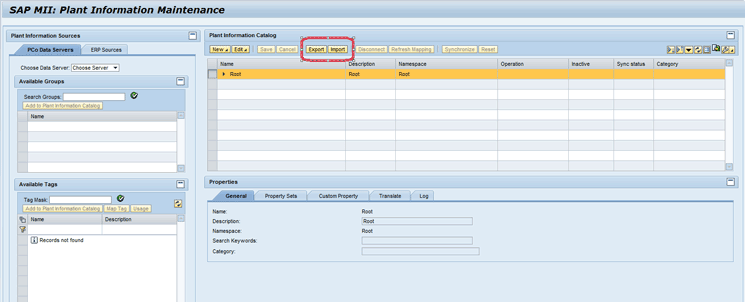
Figure 24
Export and Import buttons in the Plant Information Maintenance screen
The left side of the Plant Information Maintenance screen displays the Plant Information Sources section. This section includes the PCo Data Servers tab. This tab lists all the shop floor systems connected to the SAP MII system through PCo and InSQLPCo Connector of SAP MII. Therefore, all the PCo and InSQLPCo data servers created in the Data Servers screen are included in the drop-down list in the Choose Data Server field (Figure 25). You can search for the different tags and then either add or map them to the PIC tags.
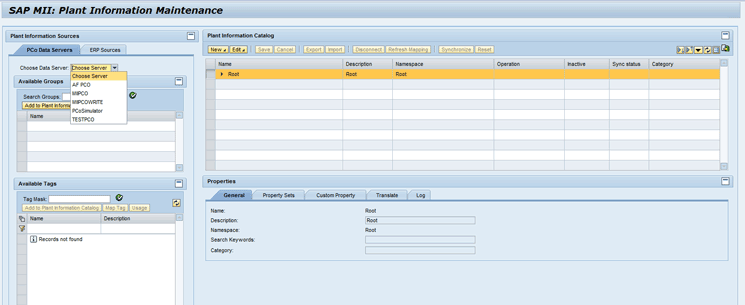
Figure 25
Data Server drop-down list in the Plant Information Maintenance screen
There are two ways of adding shop floor tags to the PIC. One is directly adding the tag under a PIC group and clicking the Add to Plant Information Catalog button (Figure 26).
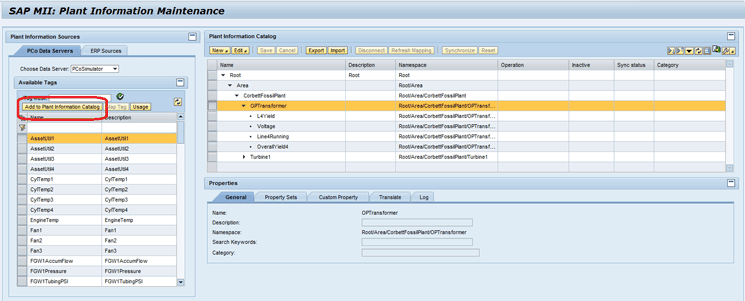
Figure 26
The Add to Plant Information Catalog button in the Plant Information Maintenance screen
The second way is to create a PIC tag and then map the shop floor tag to the PIC tag by clicking the Map Tag button (Figure 27).
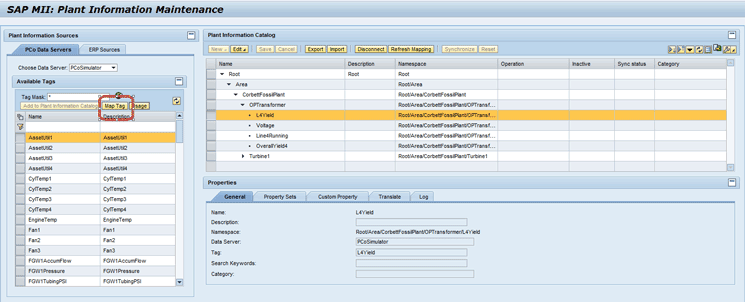
Figure 27
The Map Tag button in the Plant Information Maintenance screen
The Usage button in the Plant Information Sources section shows the list of PIC tags to which this shop floor tag is mapped in a Where-Used pop-up screen (Figures 28 and 29).
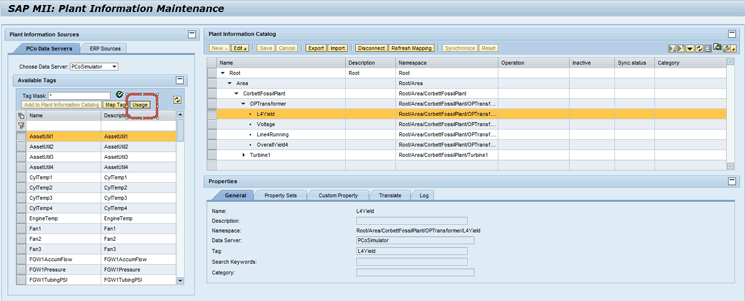
Figure 28
The Usage button in the Plant Information Maintenance screen
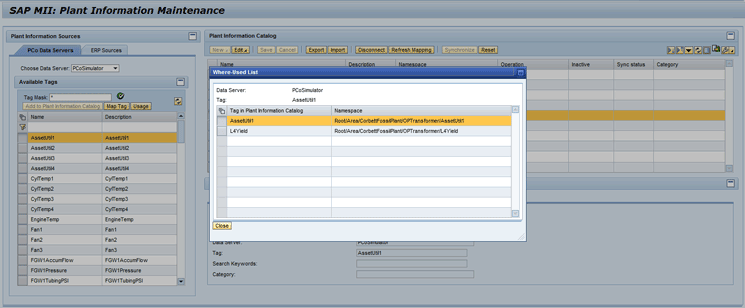
Figure 29
The Where-Used List pop-up screen in the Plant Information Maintenance screen
After a PIC tag is mapped to a shop floor tag, all the properties associated with the PIC tag can also be mapped to metadata of the shop floor tag (Figure 30). This is applicable to custom properties of the tag as well as to the properties coming with a property set. Therefore, the value for the property is fetched from the shop floor and stored, and you cannot give the value for the property manually. This is applicable only for the PIC tags that are mapped to shop floor tags.
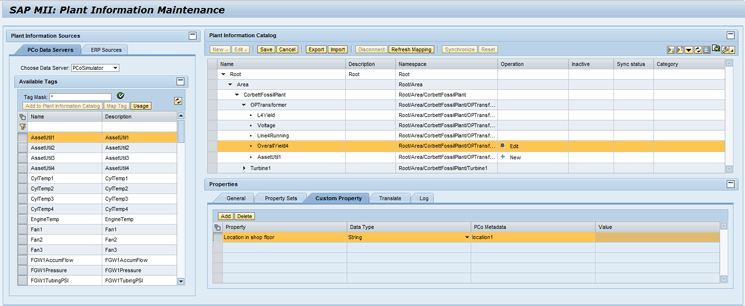
Figure 30
Mapping properties to the metadata of the shop floor tag
You can also refresh the values for the properties mapped to metadata of the shop floor tags so that they are fetched again from the shop floor system by clicking the Refresh Mapping button in the top menu bar (Figure 31).
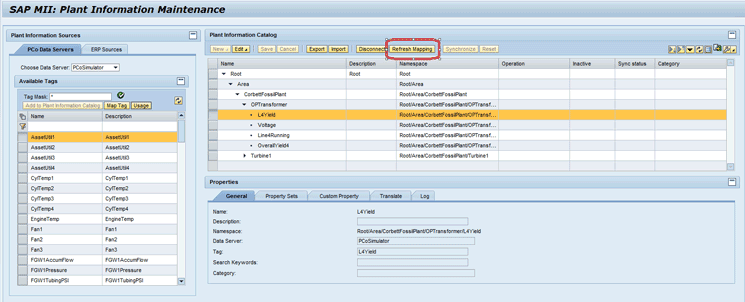
Figure 31
The Refresh Mapping button in the Plant Information Maintenance screen
All the changes that you make in the hierarchy, such as creating new groups and tags, editing existing groups and tags, or mapping the tags to the shop floor tags, are associated with your current change list. Therefore, whenever you do some changes in the hierarchy, the Operation column of the hierarchy shows the relevant text to indicate the status of the object (Figure 32). For example, for a newly created object, the Operation column shows a row with New as text. For an edited object, it shows Edit, or for a deleted object, it shows Marked for Delete. This Operation column of the hierarchy shows the operation done by the user on the object or the status of the object.
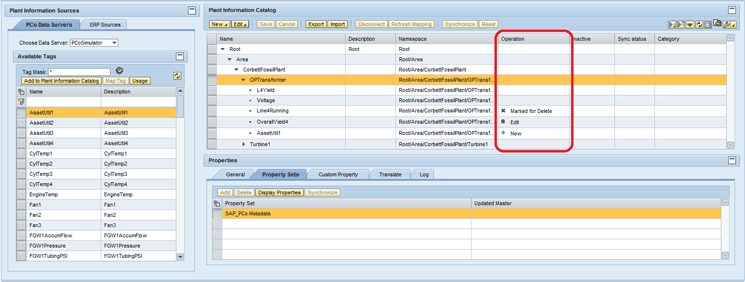
Figure 32
The Operation column of the PIC hierarchy
After the change list is submitted, approved, and the changes are applied, all the objects are released from the change list association and the Operation column becomes blank (i.e., the object is free). If some other user has edited or done some operation on an object, then this object has Locked by User text in the Operation column, indicating that some other user is working on the object and you cannot edit the object.
Until now, I have explained how the PIC hierarchy can be created and mapped to the shop floor tags. Now, I show you how the PIC hierarchy is integrated with the ERP system to provide the business context to the data from the shop floor. This is done by mapping the PP and PM objects to the PIC objects.
To fetch data from an ERP system, first you need to tell the SAP MII system the details about the ERP system. For this, SAP MII has five resource adapters that can be configured to bring the data from the respective ERP systems. Configuring these adapters enables you to connect to five ERP systems at one point and fetch the data from these systems.
To give the ERP system details, you need to log in to SAP NetWeaver Administrator and navigate to Configuration > Infrastructure > Application Resources. After you search with the keyword Plant Information Catalog, you find five resource adapters with the names MII Plant Information Catalog Connection. Go to the Properties tab of the resource adapter and enter data in the required fields (Name, Type, Value, and Description). Click the save icon to save your entries. Now you can use this resource adapter in the Plant Information Maintenance screen (Figure 33).
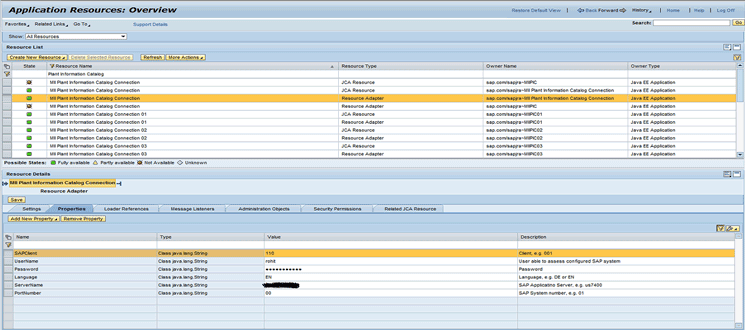
Figure 33
Resource adapters for PIC
Note
In SAP MII version 14.0 Support Package 4, only one resource adapter is present, so you can connect to only one ERP system. However, in SAP MII 15.0, five resource adapters are present, enabling you to connect to five ERP Systems.
After you complete the resource adapter configuration in SAP NetWeaver Administrator, you can navigate and search the PP and PM hierarchy and can then map ERP objects to PIC objects. The objects that are for the PP hierarchy are Plant, Work Center, and Capacity. For the PM hierarchy, the objects are Plant, Functional Location, Equipment, and Measurement Point. This hierarchy is available in the ERP Sources tab in the Plant Information Sources section in the left side of the Plant Information Maintenance screen (Figure 34).
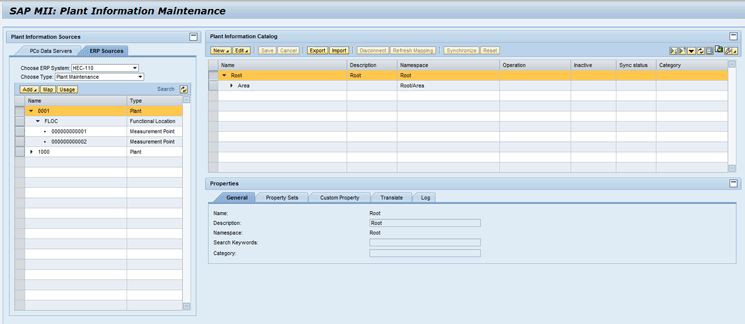
Figure 34
The ERP Sources tab in the Plant Information Maintenance screen
To select the ERP system you want to use, choose one of the options from the drop-down list in the Choose ERP System field and then choose either Production Planning or Plant Maintenance from the drop-down list of options in the Choose Type field. After you have chosen the values, the whole hierarchy is visible to you. You can then either map or add the ERP objects to the PIC by clicking the Add or Map buttons available in the toolbar above the hierarchy. You also find a Usage button in the toolbar. If you click the Usage button, the screen displays a list of PIC objects to which the chosen ERP object is mapped to (Figure 35).
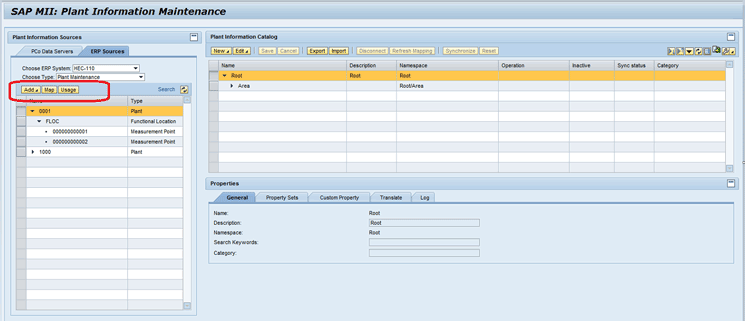
Figure 35
Add, Map, and Usage buttons for ERP objects in the Plant Information Maintenance screen
After you map or add an ERP object to a PIC object, an applicable predefined category and the property set are also added to the PIC object. For example, if the PIC object is mapped to a Plant object, the category assigned to the PIC object is SAP_Plant, and the SAP_Plant property set is automatically added to the PIC object. This property set saves the details of the mapped ERP object. Similarly, if the PIC object is mapped to a Functional Location object, the category is SAP_FunctionalLocation, and the property set is SAP_FunctionalLocation. This assigned property set contains the details of the mapped ERP object, and you cannot edit the values of the properties in this property set (Figure 36).
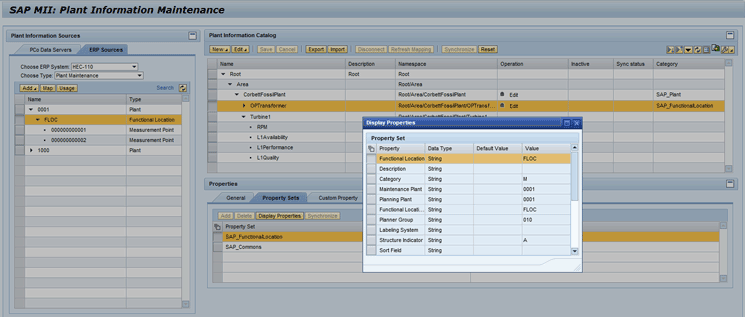
Figure 36
Details of the mapped ERP object in the property set properties value
A search option is also available. You can click the Search button for particular ERP objects in the PP and PM hierarchies (Figure 37).
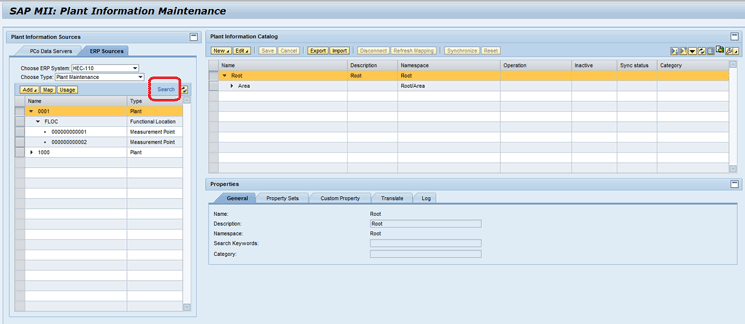
Figure 37
The Search option in the Plant Information Maintenance screen
During the discussion about property sets and categories, I explained that changes done to the property sets or categories that are used in the PIC hierarchy can also be pulled from the Plant Information Maintenance screen. To do this, click the Synchronize button in the top menu and in the Property Sets tab (Figure 38). When you make any changes to a property set or the category and do not push the changes to the PIC objects using them, the PIC objects become out of sync. The sync status can be seen in the Sync status column in the hierarchy or the Updated Master column in the Property Sets tab. The difference between both the buttons is that the Synchronize button in the property sets tab synchronizes only the property set for which it is pressed, and the Synchronize button in the top menu synchronizes the whole object (i.e., all the property sets and the category).
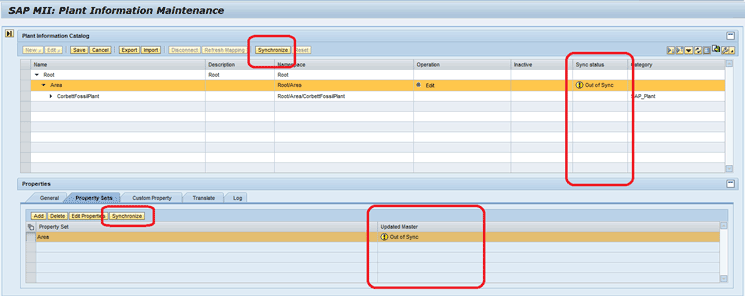
Figure 38
The Synchronize buttons in the Plant Information Maintenance screen
To clear all the changes done on an object, select the object and click the Reset button in the top menu (Figure 39).

Figure 39
The Reset button in the Plant Information Maintenance screen
Approve the Change List and Apply Changes
After you create the hierarchy and map all the shop floor assets or tags as well as the ERP objects and you think the hierarchy is ready, you need to submit your change list for approval. Without approval, the changes in the hierarchy cannot be moved to the PIC from Plant Information Maintenance. You need to have the SAP_XMII_Approver user management engine (UME) action block assigned to your user for having the authorization for approving or rejecting a change list. To approve or reject a change list, follow menu path Catalog Services > Approval Lists. The SAP MII Approval list screen appears (Figure 40).
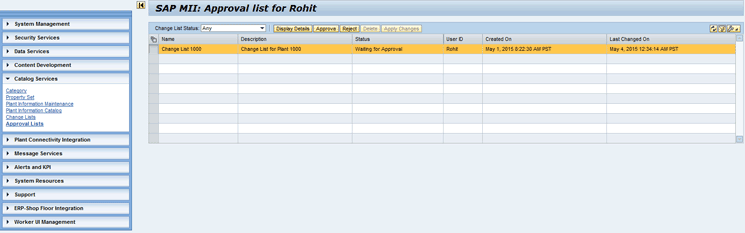
Figure 40
The SAP MII Approval list screen
To see the details of the change list, click the Display Details button. Approve or reject the change list by clicking the Approve or Reject button in the top menu bar of the SAP MII Approval list screen (Figure 41).
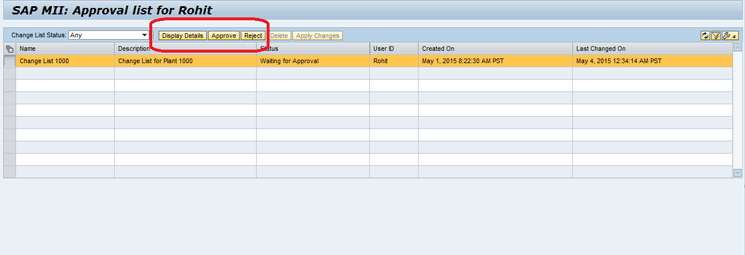
Figure 41
Display Details, Approve, and Reject buttons in the SAP MII Approval list screen
After you approve the change list, you can apply the changes by clicking the Apply Changes button (Figure 42). Apply changes means that the changes are moved from the Plant Information Maintenance screen to the Plant Information Catalog screen.
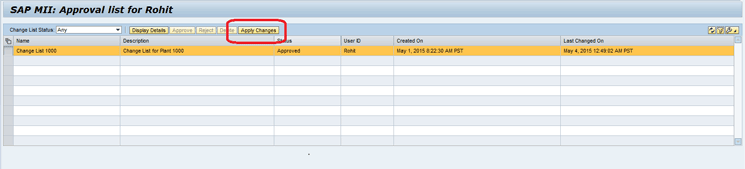
Figure 42
Apply changes in the SAP MII Approval list screen
The PIC also provides the functionality of email notifications for change list life cycle stages such as when a change list is submitted for approval and when a change list is approved or rejected. To set up the PIC for email notification, you need to create a mail server named MII_MAIL_ADMIN in the Connections screen and a credential named MII_MAIL_ADMIN in the Credential Editor screen. SAP MII automatically sends email notifications to the submitter and approver of the change list using the above configured mail server and credential alias.
View and Validate the Hierarchy
You can view the PIC hierarchy in the Plant Information Catalog screen (Figure 43). You create and work on the hierarchy in the Plant Information Maintenance screen or the working version of the hierarchy and then push it to the Plant Information Catalog screen after the approval process, thus making it the live version of the hierarchy. The Plant Information Catalog screen is a read-only screen and you cannot change anything in it. You can see the hierarchy and the properties of the PIC objects.
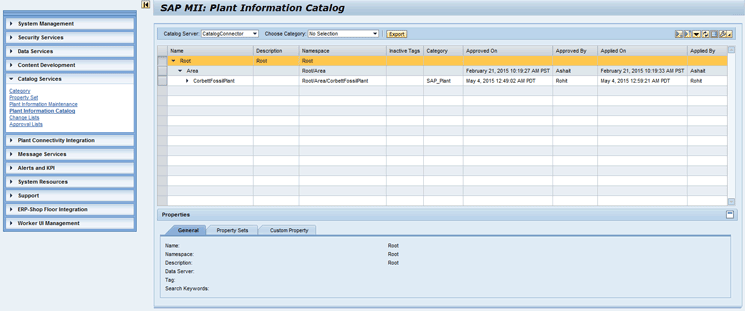
Figure 43
The Plant Information Catalog screen
To access the Plant Information Catalog screen, follow menu path Catalog Services > Plant Information Catalog.
The PIC comes with two connectors: Catalog Connector and Virtual Catalog Connector. The Catalog Connector always connects to the local PIC (i.e., the PIC configured in the local SAP MII instance), whereas the Virtual Catalog Connector is used to connect to a remote PIC (i.e., the PIC configured on another SAP MII instance). You can see these two connectors in the Data Servers screen.
In the Plant Information Catalog screen, the Catalog Server field provides a drop-down list of all the Catalog and Virtual Catalog data servers configured in the Data Servers screen (Figure 44). This drop-down list includes the local PIC (i.e., the PIC configured on the local SAP MII instance) and the PIC configured on other SAP MII instances. Therefore, when you choose a server in the drop-down list, the PIC hierarchy refreshes and displays the hierarchy of the SAP MII system that you have chosen.
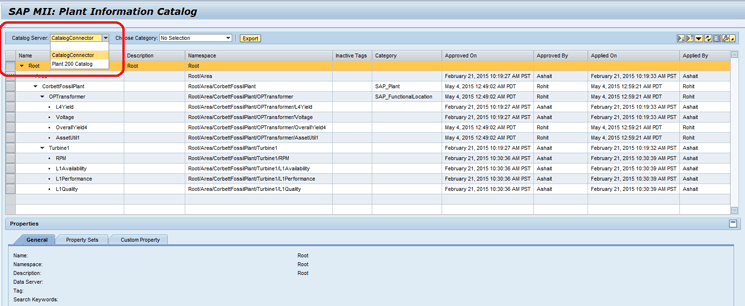
Figure 44
The Catalog Server drop-down list in the Plant Information Catalog screen
You can also search for PIC objects (i.e., groups and tags) using basic and advanced search functionalities. To conduct a basic search for PIC objects, click the search icon on the right side menu of the hierarchy and the search fields appear on the screen (Figure 45).
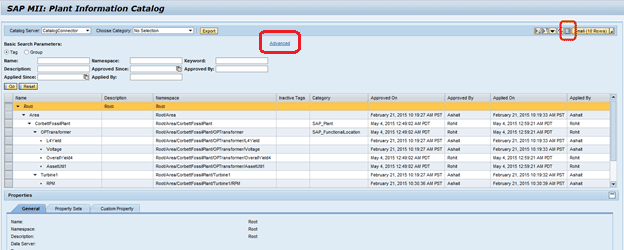
Figure 45
The basic search icon in the Plant Information Catalog screen
Click the Advanced link in the basic search fields for the advanced search option. A list of parameters that you can use in an advanced search is shown in Figure 46. This search functionality is also available in the Plant Information Maintenance screen.
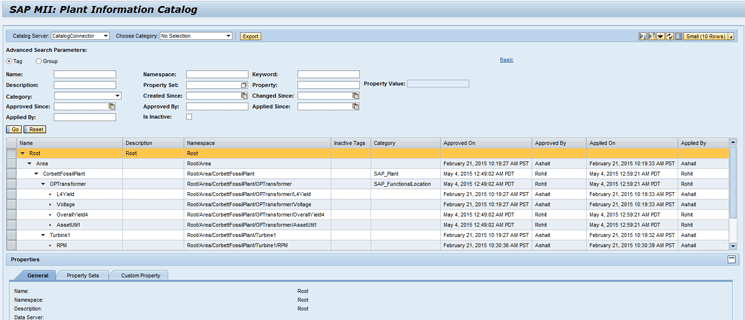
Figure 46
Advanced Search in the Plant Information Catalog screen
Consume the Plant Information Catalog Using the Catalog Query
Catalog Query is the query template for querying the data in the PIC. When you create the PIC, you map the PIC tags to the PCo data server’s tags or shop floor tags. The PIC only saves this mapping and does not store the data. Therefore, when you query a PIC tag, the live data is fetched from the shop floor system at that instant.
This is not the case with ERP objects mapping. When you map the PIC object to an ERP object, all the details of the ERP object are saved in the relevant property sets in the local SAP MII system. Now I explain how to use the Catalog Query.
You can find the Catalog Query option in the workbench just as you find any other query template. To create a Catalog Query, go to the SAP MII workbench’s Catalog tab and right-click the folder under which you want to create the Catalog Query object. Navigate to New > CatalogQuery (Figure 47).
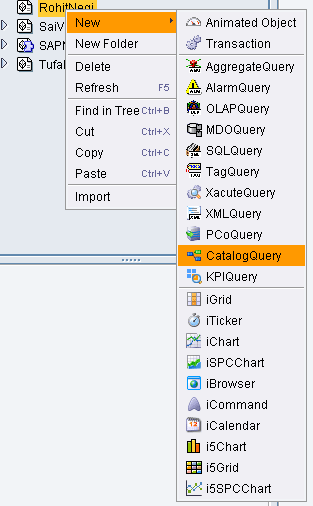
Figure 47
Create a Catalog Query
The first step for creating a Catalog Query is to select the source data server for the query. This is done in the Data Source screen of the query (Figure 48). You find the list of all the Catalog and Virtual Catalog data servers displayed in the Available Servers section. Next, you need to select the mode of the query. One important thing to note here is that you can select multiple data servers here unlike in any other query in SAP MII.
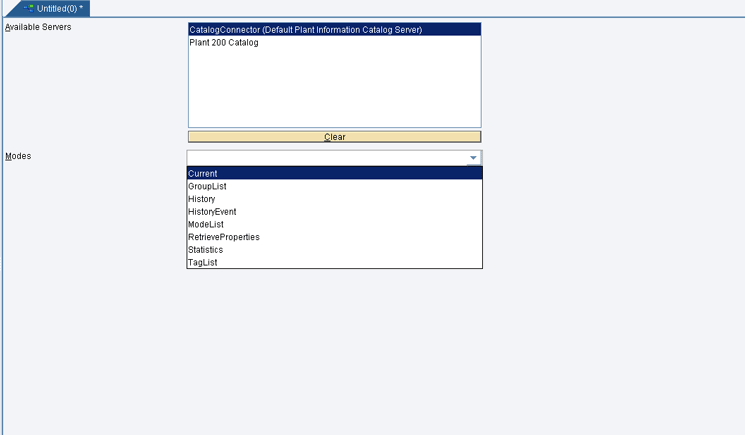
Figure 48
The Data Source screen of the Catalog Query
The Catalog Query supports the following modes:
- ModeList: For fetching the list of modes supported by the Catalog Query
- GroupList: For fetching the list of all the groups available in the PIC hierarchy
- TagList: For fetching the list of all the tags available in the PIC hierarchy
- Current: For fetching the current values of the tags and also the property values
- History: For fetching the interpolated historical values of the tags and also the property values
- HistoryEvent: For fetching the historical values of the tags and also the property values
- Statistics: For fetching the statistical data from the shop floor
- RetrieveProperties: For fetching the property values
Two main screens that you use for different modes of the Catalog Query are Plant Information Catalog Query Details and Retrieve Properties Details.
The Plant Information Catalog Query Details screen of the Catalog Query is enabled for the Current, History, HistoryEvent, and Statistics modes of the query. In this screen you choose the tags and their metadata as well as the properties of PIC objects for which you want to query or get the data.
To choose the tags, metadata, and properties of PIC objects in the Plant Information Catalog Query Details screen, you need to complete six steps.
Step 1. Select the data server in the Available Servers section (Figure 49).
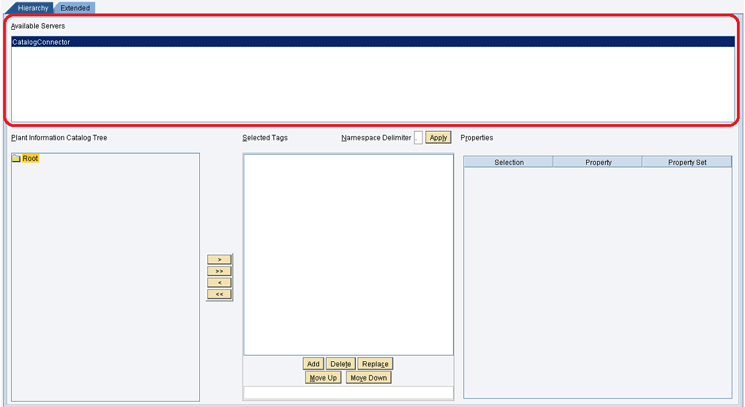
Figure 49
Available Servers in the Plant Information Catalog Query Details screen
Step 2. Navigate the PIC hierarchy of the selected data server in the PIC tree section (Figure 50).
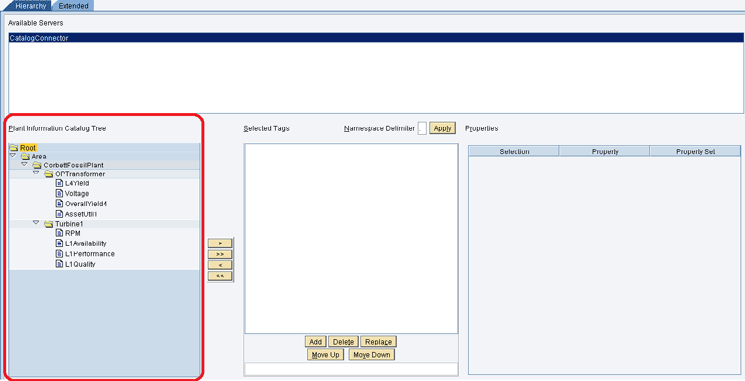
Figure 50
The PIC tree
Step 3. Drag and drop the tag objects in the PIC tree to the Selected Tags section or use the buttons available on the screen for adding and deleting the selected tags (Figure 51).
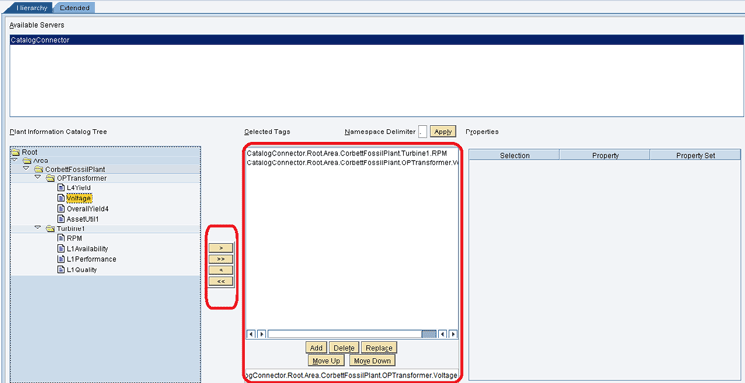
Figure 51
Selected tags
Step 4. Select one tag in the Selected Tags list and then select the properties for this tag in the Properties table. Repeat this for all the tags in the Selected Tags list. You have two types of options for selecting a property: Selected (i.e., selected for this particular tag) and Selected for all objects (i.e., selected for all selected tags). To use the second option, double-click the check box in the Selection column of the Properties table (Figure 52).
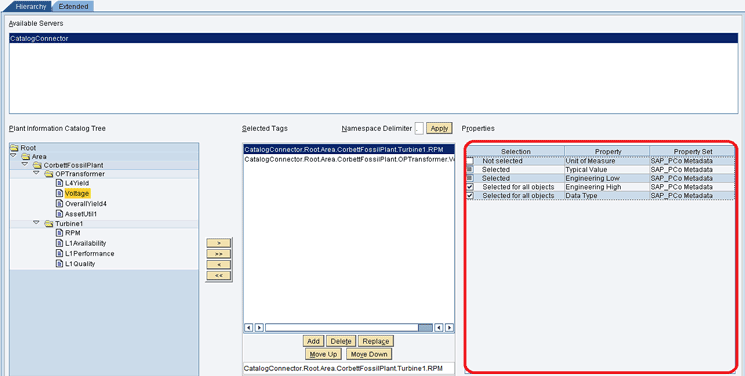
Figure 52
Properties
Step 5. Click the Extended tab and select the Catalog server from the drop-down list of options in the Selected Catalog Server field. Then select the PCo server in the Mapped PCo Server table section (Figure 53).

Figure 53
Selected Catalog Server and Mapped PCo servers in the Extended tab of the Plant Information Catalog Query Details screen
Step 6. Select the Secondaries and the Metadata for the PCo server (Figure 54). Repeat this step for all the PCo servers and Catalog data servers. You need to repeat this as one Catalog Server can be mapped to different PCo servers and then different PCo servers can have different Secondaries and Metadata.
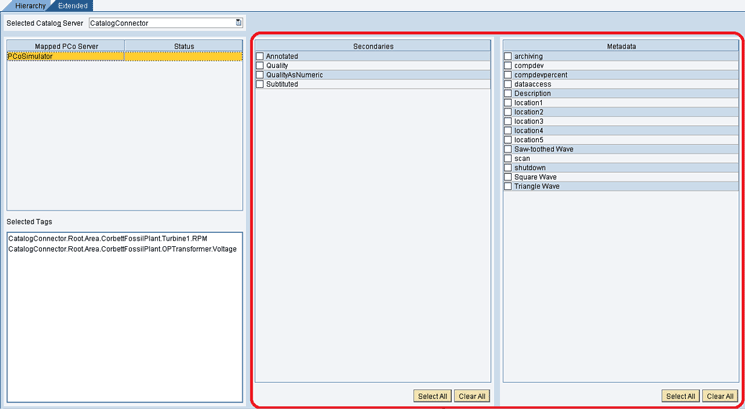
Figure 54
Secondaries and Metadata in the Extended tab of the Plant Information Catalog Query Details screen
The Retrieve Properties Details screen is also similar to the Plant Information Catalog Query Details screen in that this screen is used for RetrievePropreties mode and you can select groups as well as tags in the Selected Catalog Objects list (Figure 55).
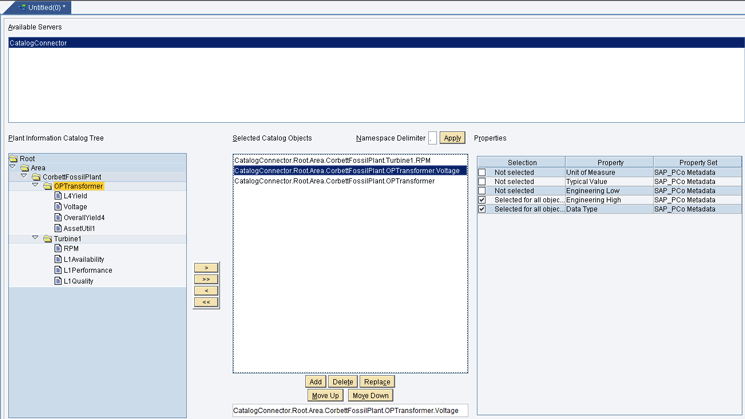
Figure 55
The Retrieve Properties Details screen
If you are creating a Catalog Query for fetching the tag values and properties, then you need to complete these steps:
- Select the data server and Mode as Current in the Data Source screen.
- Select the tags, properties, metadata and secondaries in the Plant Information Catalog Query Details screen as explained above.
- Save your query by clicking the save icon or pressing Ctrl and S.
To create a Catalog Query for fetching property values of the PIC objects, you need to complete these steps:
- Select the data server and Mode as RetrieveProperties in the Data Source screen.
- Select the PIC objects and properties in the Retrieve Properties Details screen as explained above.
- Save your query by clicking the save icon or pressing Ctrl and S.
You can use the different modes of the query to get the data and consume it according to your requirements. You can call the Catalog Queries using the Illuminator service and then consume the data returned by the query in your applications.
PIC Web Services
The PIC also provides four web services. These can be used to do all the operations available in different Catalog Services screens.
The web services are as follows:
- Catalog Services
- Catalog Admin Service
- Change Lists Services
- Property Set Service
Catalog Services are for the Plant Information Catalog screen (i.e., the live version). You find all the operation or actions that you can do in the Plant Information Catalog screen as methods of this web service.
The Web Services Definition Language (WSDL) URL for this web service is:
<Protocol>://<Server IP>:<Port>/PlantInformationCatalogService/PlantInformationCatalogServiceBean?wsdl&mode=ws_policy
- BrowseGroups
- BrowseTags
- GetTagDetails
- GetGroupdetails
- GetCategories
- FetchAllCustomProperties
- GetObjectProperties
- GetPropertyValue
- SearchGroups
- SearchTags
Catalog Admin Services are for the Plant Information Maintenance screen (i.e., the working version). You can use this web service for doing action or operations in the Plant Information Maintenance screen.
The WSDL URL for this web service is:
<Protocol>://<Server IP>:<Port>/PlantInformationMaintenanceService/PlantInformationMaintenanceServiceBean?wsdl&mode=ws_policy
The following methods are available in this web service:
- AddProperties
- BrowseGroups
- BrowseTags
- CreateGroup
- CreateTag
- DeleteGroup
- DeleteTag
- DeleteProperties
- GetGroupDetails
- GetTagDetails
- GetPropertyValue
- MaintainGroup
- MaintainTag
- SearchGroups
- SearchTags
Change Lists Services are for the Change List screen. You can use this web service for doing action or operations in the Change Lists screen.
The WSDL URL for this web service is:
<Protocol>://<Server IP>:<Port>/ ChangeListServices/ChangeListServicesBean?wsdl&mode=ws_policy
The following methods are available in this web service:
- ApplyChanges
- CreateChangeList
- ManageChangeListStatus
- ResetObjects
- SearchChangeLists
Property Set Services are for the Property Set screen. You can use this web service for doing action or operations in the Property Set screen.
The WSDL URL for this web service is:
<Protocol>://<Server IP>:<Port>/ PropertySetServices/PropertySetServicesBean?wsdl&mode=ws_policy
The following methods are available in this web service:
- AddProperties
- CreatePropertySet
- DeleteProperties
- DeletePropertySet
- EditPropertySet
- GetPropertySets
Use Case of the PIC: Asset Monitoring Dashboard
Consider this use case to see how you can use the PIC, Catalog Query, and Catalog Web Services for building a simple scenario. Suppose you have to develop an equipment-monitoring dashboard (Figure 56). You want to use this dashboard to show the PIC hierarchy, choose the equipment in the hierarchy, and then display values of the tags or data points of this equipment along with permissible range for each data point or tag. I use SAP UI5 for creating this dashboard, but you can use any user interface (UI) technology or library. I do not describe the UI technology, but rather, only the back end that needs to be created in SAP MII so that the data is exposed from SAP MII to the UI.
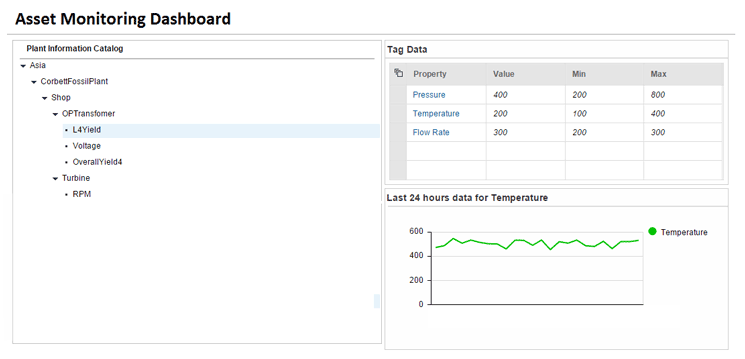
Figure 56
An equipment-monitoring dashboard
The first task is to create the hierarchy in the PIC. I already discussed this process earlier. You have to create the whole hierarchy in the Plant Information Maintenance screen and then map the tags or data points from the shop floor to the tags in the PIC using the PCo data servers. You then need to map the ERP objects from PP and PM hierarchy to the PIC objects. At the end, move the hierarchy to the Plant Information Catalog screen.
You also need to save the range for all data points (i.e., the maximum value and the minimum value for each data point). To complete this task, you can use the SAP_PCo Metadata property set that is automatically assigned to each tag in the PIC. This property set has two properties named Engineering Low and Engineering High. You can use them to store the maximum and minimum permissible values for the data point. Alternatively, you can also create another property set with properties to save the maximum and minimum values for the tag. In this case, you need to assign this property set to all the tags.
Make sure that you take care of these points:
- You have created property sets and categories required for your hierarchy.
- All PIC objects (i.e., property sets, categories, tags, and groups) have business-friendly names.
- You have created and mapped all the tags and groups to their respective ERP objects and shop floor tags.
- All the PIC objects are categorized according to their business functions.
- All the PIC objects have details stored in their respective properties.
Your hierarchy should look like the hierarchy shown in Figure 57.
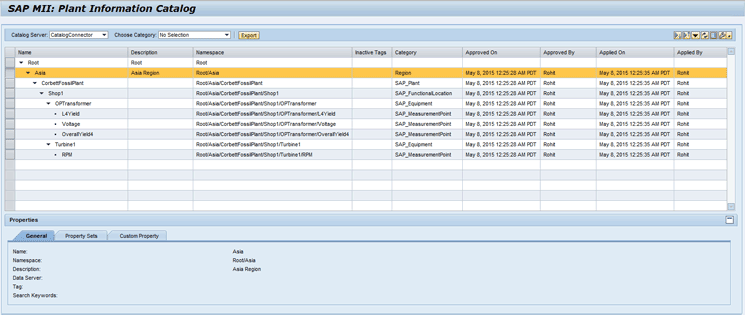
Figure 57
The PIC hierarchy
Now, I explain how to bring the data from the SAP MII PIC hierarchy in the UI for creating the dashboard. You need the following data in the UI:
- PIC hierarchy
- PIC Objects properties value
- PIC tags values
- PIC tags historical values (i.e., the last 24-hour values)
I explain these points one by one.
Data for PIC Hierarchy
You can bring the PIC hierarchy to the UI by using either the Catalog Query or Plant Information Catalog web service.
I describe the Catalog Query approach first.
To create the PIC tree in the UI, you need all the groups of the PIC. You get these groups by creating a Catalog Query in GroupList mode. Then you can call this query from the UI using the Illuminator service of SAP MII.
The URL of Illuminator service would look like this:
<Protocol>://<Server IP>:<Port>/XMII/Illuminator?QueryTemplate=<Path of Query>&Content-type=text/xml
The Catalog Query in GroupList mode provides all the groups in the hierarchy and the output is in the format shown in Figure 58. This response from the query can be used to create the PIC hierarchy on the UI.
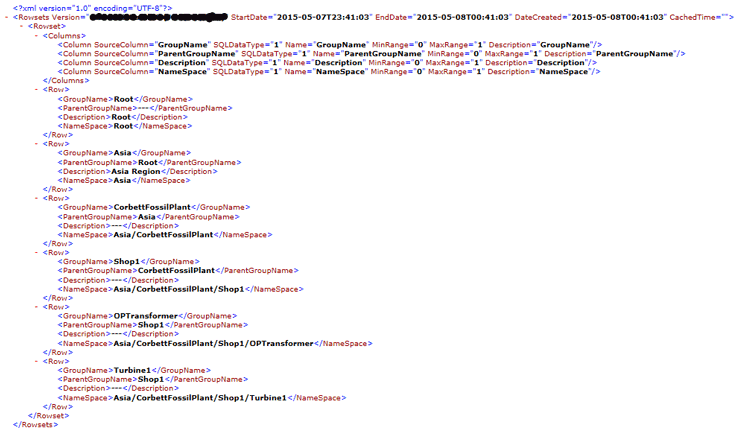
Figure 58
Output of the Catalog Query in GroupList Mode
For fetching the tags under the groups, you need to create a Catalog Query in TagList mode. From the UI you also need to send the group name for which you need the tags. This can be done by adding the Group=<name of the group> in the Illuminator URL of the query.
The URL of Illuminator service would look like this:
<Protocol>://<Server IP>:<Port>/XMII/Illuminator?QueryTemplate=<Path of Query>&Content-type=text/xml&Group=<Name of the Group>
Output of the Catalog Query in TagList mode is in the format shown in Figure 59.
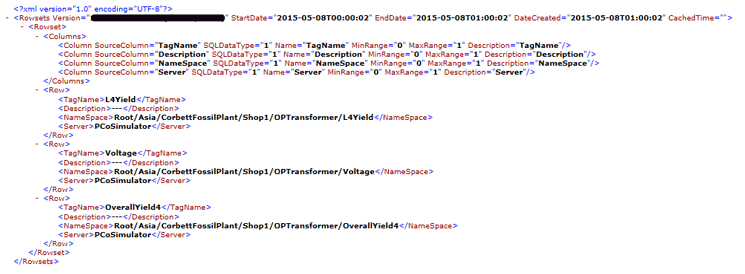
Figure 59
Output of Catalog Query in TagList Mode
Now I show you how to use the PIC web service for fetching the same information.This web service has two methods named BrowseGroups and BrowseTags, both of which return the list of groups and tags, respectively, under the group whose name you provide as input. Here only objects directly under the group whose name you have provided as input are returned (i.e., only one level down objects are returned). Therefore, it is your responsibility to call the service again when required (i.e., when the user expands the hierarchy tree by clicking a node in the hierarchy tree).
This approach is better than the Catalog Query approach as here you are not pulling the whole hierarchy in one request and creating the whole hierarchy during the initial loading of the UI. Instead, you bring the information when needed, thus reducing the initial load time. You can use these two methods of the web service using the Web Service action block in an SAP MII transaction and then call this transaction from the UI using the Runner Service to get the data on the UI. Remember that you need to pass the group name as input to the transaction and then to the web service method.
The URL of the Runner service looks like this example:
<Protocol>://<Server IP>:<Port>/XMII/Runner? Transaction=<Path of Transaction>&Content-type=text/xml&InputParamName=<Name of the Group>
Figures 60 and 61 show the SOAP response that you receive for the BrowseGroups and BrowseTags methods of the Plant Information Catalog web service.
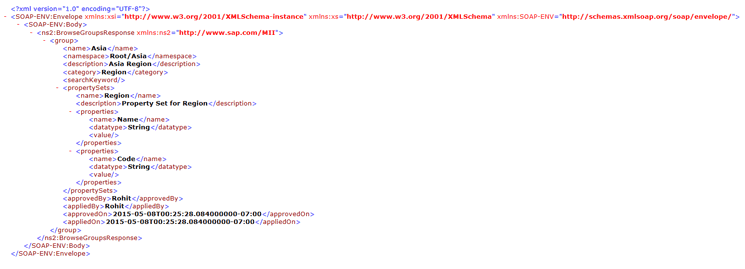
Figure 60
Output from the BrowseGroups method of the Plant Information Catalog web service

Figure 61
Output from the BrowseTags method of the Plant Information Catalog web service
PIC Objects Properties Value
If you have used the PIC web service for fetching the hierarchy details, you already have property values, so you do not need to fetch the details again. This is because the BrowseGroups and BrowseTags methods of the web service also return the full detail, including the property values of the object.
If you have not used the PIC web service for fetching the hierarchy details, then you can use the GetTagDetails and GetGroupDetails methods of the PIC web service. These two methods take the name or namespace of the object as input and then provide all the details about the object. You can use these two methods of the web service using the Web Service action block in an SAP MII transaction and then call this transaction from the UI using the Runner Service to get the data on the UI as explained in an earlier section of this article. The output from these two methods is same as that from BrowseGroup and BrowseTag methods.
For getting the tag values you need to create a Catalog Query with Current mode and then call this query from the UI and pass the namespace of the tag as a URL parameter.
The URL of Illuminator service looks like this example:
<Protocol>://<Server IP>:<Port>/XMII/Illuminator?QueryTemplate=<Path of Query>&Content-type=text/xml& SelectedObjects =<Comma separated namespaces of the tags>
You can also use this URL, and you don’t need to create any catalog query object in workbench.
<Protocol>://< Server IP >:<Port>/XMII/Illuminator?Server=<Catalog Data Server Name>&Mode=Current&
SelectedObjects= <Comma separated namespaces of the tags>&NamespaceDelimeter=<Delimiter used in the namespace>&Content-Type=text/xml
Figure 62 shows the output format of the Catalog Query in Current mode.

Figure 62
Output of Catalog Query in Current Mode
PIC Tags Historical Values (i.e., the Last 24-Hour Values)
For getting the historical values, you need to create a Catalog Query in History or HistoryEvent mode, and again provide the tag namespace from the UI as URL parameter. The URL would look the same as mentioned above for tag values.
Figure 63 shows the output format of the Catalog Query in History mode.
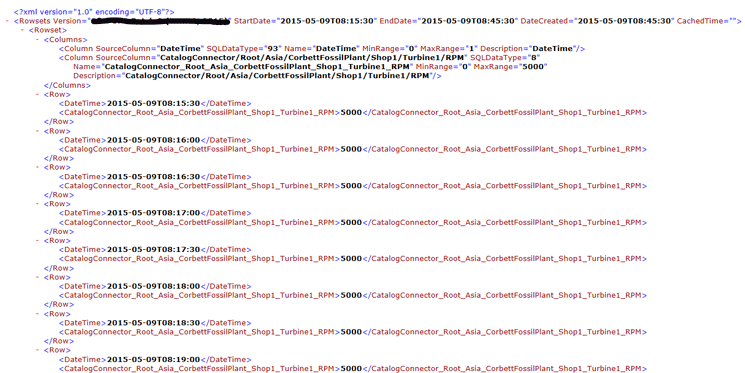
Figure 63
Output of Catalog Query in History Mode
Rohit Negi
Rohit Negi is a senior consultant at Cibersites India with around seven years of experience in the IT industry. He is currently providing SAP MII-based solutions to clients. Rohit was a part of the SAP MII Product Development Team at SAP Labs Bangalore and has worked on 12.2, 14.0, and 15.0 releases of SAP MII as a senior developer.
You may contact the author at rohit.negi.2003@gmail.com.
If you have comments about this article or publication, or would like to submit an article idea, please contact the editor.