Learn about the User Interface Framework of SAP Business Suite, the Floorplan Manager (FPM) with a focus on generic UI building blocks. See how to deal with generic UI building blocks and prepare new applications with rich content features.
Key Concept
The Floorplan Manager (FPM) as a User Interface (UI) Framework provides generic user interface building blocks (GUIBBs) for the most important user interface templates. By using those building blocks developers and users can easily collaborate with SAP-defined UI patterns for covering application content. They can take advantage of framework-supported editors and interfaces for simple creation and use wide personalization features of generic UI building blocks.
To implement application content that is consistent with current guidelines, the Floorplan Manager (FPM) offers generic UI building blocks (GUIBBs). They are used to render and configure application content similar to the floorplan itself. GUIBBs are available for the typical user interface (UI) content types in SAP environments such as lists, forms, searches, and trees.
As part of the FPM delivery with the SAP ABAP Basis all GUIBBs are implemented as Web Dynpro components. The configuration features are fully integrated with the FPM Editor. GUIBBs are available for forms and lists with the initial FPM shipment in SAP NetWeaver 7.01. Since then the variety of GUIBBs has been enriched with further types.
Note
The information provided is based on the previous article about FPM. While the first article gave a general introduction to the FPM this article focuses on using GUIBBs and creating applications in general. The screenprints and information are relevant for SAP NetWeaver 7.31 and the corresponding Business Suite Enhancement Package 6. The coding examples are developed in ABAP using Web Dynpro UI technology.
Basic Concept
Application content is usually distributed between several UI elements holding specific information. The appearance of different applications can be very inhomogeneous depending on the business background. The Web Dynpro ABAP foundation offers a large set of UI controls. An arbitrary set of combinations is available to arrange application views. To avoid clustering in presenting application content all over SAP’s Business Suite, FPM offers GUIBBs to render content in a consistent way. By following this approach the application content looks similar and gives users a homogenous user experience.
GUIBBs are available for the most popular UI templates to render application content. There are different GUIBBs available. Among them the GUIBBs for forms and lists are most commonly used.
Like floorplans in general, GUIBBs conform to SAP’s UI guidelines. Each GUIBB can be configured using separate editors as part of the FPM configuration. To complete the FPM idea to adapt all essential application aspects at each stage of the application lifecycle, end users can further personalize GUIBBs to their specific needs.
The connection to the necessary business data available within SAP’s back-end system is implemented by using feeder classes. The feeder class supplies data to the GUIBB by means of standard interface technology. While the feeder class is responsible for data provisioning, the GUIBB takes care about all UI aspects. This concept allows the application developer to focus on the implementation of feeder classes. All other UI relevant parts are managed by FPM and its GUIBBs.
Variety of Generic UI Building Blocks
SAP’s Business Suite includes a wide range of applications across the different areas including ERP, Supplier Relationship Management (SRM), Product Lifecycle Management (PLM), or industry solutions that provide a typical UI according to the related business case. To support these areas with the characteristic UI templates FPM delivers the following GUIBBs represented by certain Web Dynpro components that can be found under package APB_FPM_GUIBB:
- Form (Web Dynpro component: FPM_FORM_UIBB_GL2, FPM_FORM_REPEATER_UIBB, FPM_FORM_UIBB)
- List (Web Dynpro component: FPM_LIST_UIBB_ATS, FPM_LIST_UIBB)
- Hierarchical List (Tree) component (Web Dynpro component: FPM_TREE_UIBB)
- Search (Web Dynpro component: FPM_SEARCH_UIBB)
- Launchpad (Web Dynpro component: FPM_LAUNCHPAD_UIBB)
- Power List (POWL, Web Dynpro component: FPM_POWL_UIBB)
As mentioned in the bullet points above the form and the list are implemented by more than one Web Dynpro component. As both GUIBBs existed since the initial FPM shipment they have been changed according to the UI guideline updates. The different components reflect the implementation according to the different versions of the guideline.
We are focusing on the components that consider the latest UI guideline 2.0 in SAP NetWeaver 7.31. SAP’s UI guideline defines all necessary rules for the assembly of application screens as described in our first article. In this article we will focus on the components that represent the guideline 2.0 which are FPM_FORM_UIBB_GL2 and FPM_LIST_UIBB_ATS. Although it would be possible to use the older components we recommend that you work with the newest components. Then you can benefit not only from the latest guideline but also from a richer feature set that is offered by the new components. For example, the list component FPM_LIST_UIBB_ATS provides sorting, filtering, and grouping.
If you read the first article on FPM, you should be familiar with the aforementioned form and list GUIBBs. They were displayed in the FPM application we introduced there to display two lists and one form. In upcoming sections, we look at these components in more detail.
Aside from the mentioned GUIBB for the standard list FPM offers a hierarchical list that is also known as a tree. Figure 1 illustrates a GUIBB with a hierarchical list.
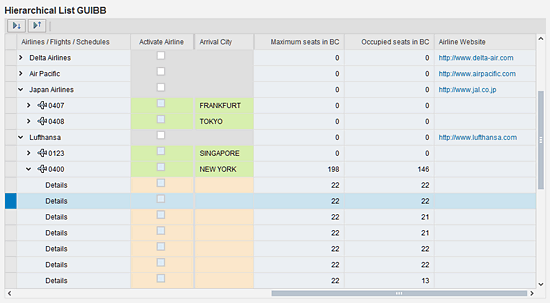
Figure 1
Hierarchical List GUIBB
Another GUIBB presents the typical search template that is used for running search requests from the SAP back end. An example of a search request with a number of search attributes is shown in the Figure 2. You can find this example as part of the Web Dynpro application S_EPM_FPM_PD in ABAP Package S_EPM_UX. This package should be familiar to you from the first part of the Floor Plan Manager article series. The application lets the user search for products.
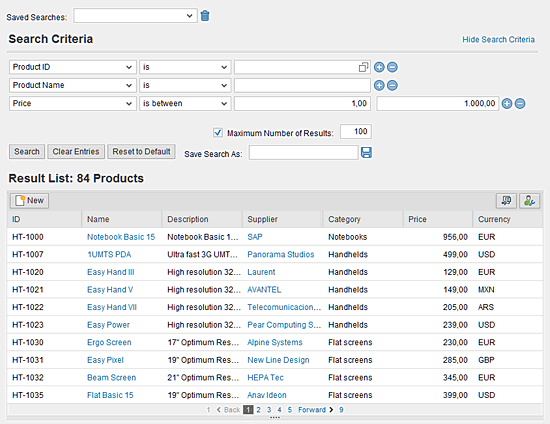
Figure 2
Search GUIBB
Other sample applications that present further features can be found in package S_EPM_UX and its sub-packages. Exploring the content within this package is a good starting point to get further insight into working with FPM.
The remaining GUIBBs for the Launchpad and the POWL cover specific use cases in the SAP ERP world. The Launchpad is used in several application areas as a start page to navigate to the dependent applications. The most popular use of the Launchpad GUIBB is in the starting page of the Employee Self-Service (ESS) application suite.
As illustrated in Figure 3 the Launchpad GUIBB groups navigation links in several sections. Each section can be viewed as an application area that makes several applications available. The related navigation links can be defined via customizing that can be maintained in transaction LPD_CUST.
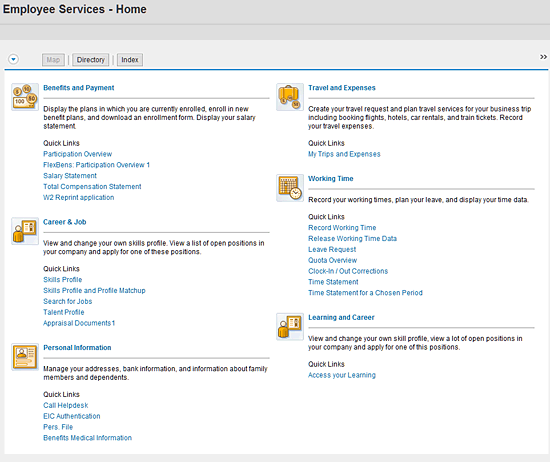
Figure 3
Launchpad GUIBB
The customizing responsible for the Launchpad arrangement in Figure 3 can be found under the role/instance HOME_AND AREA_PAGE that defines the customizing key for a Launchpad GUIBB.
The POWL GUIBB inbox includes SAP’s power list called POWL. The POWL is also available as a separate Web Dynpro component. It acts as a kind of personal inbox for work items. The POWL GUIBB can be directly integrated into an FPM application. This means that the FPM framework includes the POWL as an individual framework.
Figure 4 shows the POWL GUIBB with a number of work items. The POWL provides the information related to work items as a complex list that allows filtering, calculation, and sorting. The result is a feature list that renders all available work items that concern the particular end user.
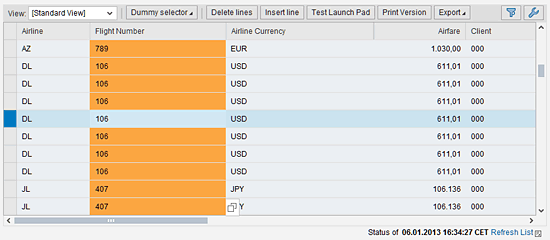
Figure 4
POWL GUIBB
The basic concepts are generally similar for all GUIBBs independent of the specific type. Therefore, when describing the details we mainly focus on the form GUIBB as an example for all GUIBBs.
Feeder Classes
While GUIBBs with their rendering and configuration features are completely managed by FPM, application data needs to be delivered by the responsible application owner. This can be SAP in case of the Business Suite or a customer implementation. To deliver the necessary business data to a GUIBB an ABAP class needs to act as a so-called feeder class. A feeder class has to implement an interface specific to the GUIBB in order to be connected as a data supplier.
The related feeder class interfaces are included as ABAP class interfaces in package APB_FPM_GUIBB. Table 1 shows the GUIBB and the interface that needs to be implemented by the respective feeder class.

Table 1
GUIBBs and the corresponding feeder interfaces
As the POWL GUIBB acts as a container for the standard POWL it is not using an FPM feeder class. It uses a separate POWL feeder class interface. While the Launchpad uses a feeder class like the other GUIBBs, the interface IF_FPM_GUIBB_LAUNCHPAD covers a very specific logic to deal with navigation links. All other feeder class interfaces provide the same methods with various parameters according to the characteristics of the related GUIBB. Two methods are present in all feeder classes: GET_PARAMETER_LIST and INITIALIZE. Both methods are processed only during the initialization phase of a GUIBB. See a description in Table 2.

Table 2
Description of the feeder class methods which are identical in all GUIBBs
In Table 3 you can find the descriptions for the other feeder interface methods. While the method parameters differ slightly depending on the corresponding GUIBB, the application logic follows the same principles for each type of GUIBB.
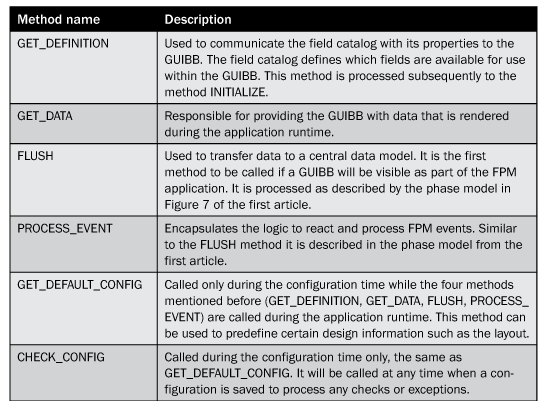
Table 3
Description of the GUIBB type related feeder class methods
Both methods GET_DEFINITION and GET_DATA need to be implemented in general by each feeder class to supply the GUIBB with the field catalog and the data that is going to be displayed. Otherwise the GUIBB cannot show any data. All the other methods can be implemented if necessary for the different application cases. To avoid runtime exceptions, all methods should be implemented even if they are not used. In this case the methods don’t need to contain any coding.
Set Up an FPM Application with GUIBBs
To demonstrate how to work with GUIBBs we will create our own FPM application configuration. This will illustrate the necessary steps for dealing with the FPM Editor and GUIBBs and will help you understand the basic procedure to configure an FPM application in general.
While the first article about FPM illustrated how to adjust an FPM application via customizing, we are going to create a completely new application configuration in this article. Therefore we are free to prepare all application aspects under the role of a developer. For this task we use the application of the first article as a blueprint and create a copy of the configuration.
To create a copy of the configuration from our application, we start the FPM Editor. To access it, run transaction SE80 (Developer Workbench), select the package S_EPM_UX, and follow menu path Embedded Package S_EPM_UX_SO > Web Dynpro > Web Dynpro Application S_EPM_UX_SO_PAGEMASTER > Application Configuration S_EPM_UX_SO_PAGEMASTER. Click the Start Configurator button afterwards as shown in Figure 5.

Figure 5
Start the application configuration
If the Web Dynpro Editor was started in a separate Browser window, click the Continue button in display mode. To reach the FPM Editor click to the action link with the floorplan Configuration Name S_EPM_UX_SO_PAGEMASTER_OVP as highlighted in Figure 6.
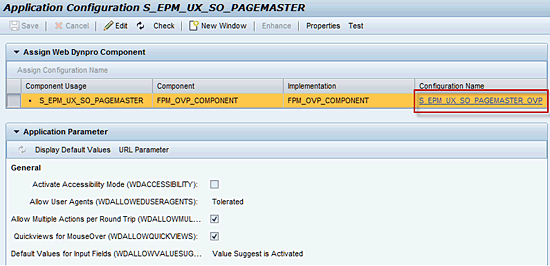
Figure 6
Start the FPM Editor
Once the FPM Editor shows the complete configuration you can look at the overview page floorplan (OVP) and the included GUIBBs in the preview section of the editor. Figure 7 shows the preview area with the included list GUIBBs and one form GUIBB. When moving the mouse pointer to one of the GUIBBs you see the ghost that appears over the related GUIBB. This way you can jump to the GUIBB configuration that we discuss in the next section.
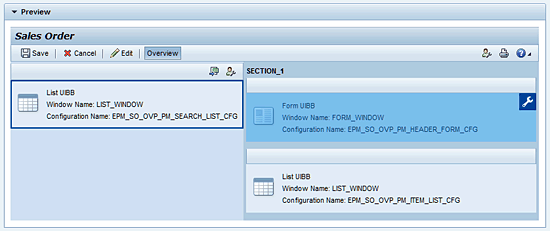
Figure 7
Preview to the floorplan and the included GUIBBs
To create a copy of the existing configuration and all included components click the toggle button Additional Functions in the top toolbar of the editor window as shown in Figure 8. There you find the drop-down option Deep-Copy which initiates the copy of the configuration.

Figure 8
Initiate the deep copy procedure
After the application hierarchy browser appears, click the Start Deep Copy button. Then you select a package within the appearing popup dialog window. For our local development it is fine to work with local objects instead of using transport requests for objects that will be deployed over the complete system landscape. To do this, click the Local Object button in the upper right corner of the selection dialog. The possibility to assign objects to an individual local object repository is one of the standard features of ABAP development. Refer to the ABAP transport management documentation for details.
When the success message appears in the message area of the editor screen the complete configuration has been copied with all the included components. You can access your configuration by clicking the active link with the name of the copy. It typically has the same name as the original with the suffix CP. In our example, click the link with the name S_EPM_UX_SO_PAGEMASTER_OVP_CP_1. Figure 9 shows this action.

Figure 9
Access the copy of the floorplan configuration
By using your own configuration you can define all application features in the role of a developer. You can change the configuration of all GUIBBs with all details. Focusing on the form GUIBB we demonstrate the configuration features in the next section. The final section covers implementation details that can be realized in combination with the feeder class.
Configuration
To illustrate the configuration using the FPM Editor go back to the configuration screen in Figure 7. There you find a small wrench icon when you move the mouse over the form GUIBB until the ghost appears. Now click the wrench icon to switch to the configuration of the form GUIBB. Figure 10 shows the GUIBB editor of the form.

Figure 10
FPM Editor for the form GUIBB
The view on the editor in Figure 10 illustrates the available configuration areas. These are the Preview area (panel labeled Preview), the attribute area (panel labeled Attributes of Group), and the general settings area (panel labeled General Settings). To see how the preview and the attribute area interact with each other simply click the fields in the preview area. Notice that the available attributes change depending on the selected field. This allows you to edit each element in the form.
To hide the attribute area click the Attributes button in the toolbar at the top of the page as highlighted in Figure 10. In our example this brings the area about the form schema in focus as shown in Figure 11.

Figure 11
View to the schema of a Form GUIBB
The schema in Figure 11 allows the user to define available texts and the general visibility of all elements. To add more fields from the field catalog to the form you can activate the repository with the Repository button. Fields from the repository can be easily added to the form via drag and drop. Alternatively you can drag and drop fields to the form in a similar way from the schema.
The general settings area includes additional settings and the option to change final flags. You can also define the related feeder class and feeder class parameters.
In the additional settings section you can define the layout type. In addition you can set flags to suppress F4 events and define mandatory checks. You can mark those settings as final by pressing the Final Flags button on the toolbar of the general settings area. If settings are marked as final it is not possible for end users to change these settings via personalization. Final flags are available beside the general settings for each element via the Final Flags button at the toolbar of the attributes area.
Finally you can select the feeder class for the GUIBB by clicking the Feeder Class button which is located in the general settings toolbar. This way it is possible to connect each GUIBB with any feeder class that implements the feeder class interface. Any available feeder class parameters can be added to the corresponding feeder class by clicking the Feeder Class Parameters button as shown in Figure 10 on the right corner of the general settings toolbar.
Since you know how to add fields and set the attributes for each field you can easily arrange the content on your form GUIBB. So it is a good time to adapt the content of your GUIBB and save it as part of the FPM configuration by clicking the Save button in the upper left corner of the toolbar.
Working with GUIBBs
Now we show how to create your own feeder class implementation for the form GUIBB that is part of the FPM application prepared earlier. In this context you adjust the configuration S_EPM_UX_SO_PAGEMASTER_OVP_CP_1 that was previously created via deep copy (Figure 9). In addition you need to make a copy of the existing feeder class to enhance it with new code. This step requires some knowledge of ABAP programing.
To start, you create a copy of the SAP-delivered ABAP class to the customer name space. To do so, run transaction SE24 in SAP GUI and enter the class name CL_EPM_SO_PM_HDR_FORM_FEEDER. Click the Copy Class button (or CTRL + F5) and enter a new Z class name such as ZCL_EPM_SO_PM_HDR_FORM_FEEDER. Save the class as a local object via the Local Object button (or F7) as you probably don’t need to transport it.
Then you need to correct the code of the new feeder class with the name of your Z class. Click the Change button from the SE24 screen and go directly to the related code line by using the Check button (or CTRL F2). Double-click to the error description. This brings you to code line 3 where you need to change the class name from the standard class name to the chosen class name ZCL_EPM_SO_PM_HDR_FORM_FEEDER. You need to change the variable mo_cut to the customer class type in code line 27. Click the Activate button to finish the creation of the Feeder Class.
To replace the standard Feeder Class with the just created class, start the configuration of the Feeder Class as shown in Figure 10. Click the Feeder Class button from the General Settings area and enter the name of the custom class. Click the Edit Parameters button as shown in Figure 12. The final popup informs you that no parameters are available, which is fine. Store the updated configuration with the Save button.
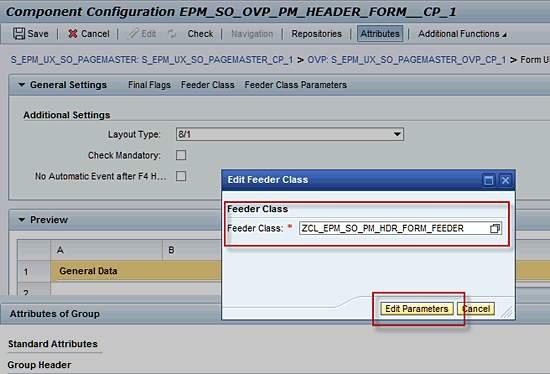
Figure 12
Enter the new Feeder Class name for the configuration
To demonstrate how the feeder class implementation controls the data to be rendered by the GUIBB, we provide some code (Figure 13). For this task you add a condition to the implementation of the method GET_DATA. As mentioned in Table 3 the method GET_DATA provides the GUIBB with the data to be rendered at runtime.
Enter some code here to suppress the output of certain information for a particular sales order item. This would make sense if the data should be hidden from end users. Open the ABAP editor with the method implementation of GET_DATA and enter the following code beginning in code line 138 (after the CASE statement). With this code you check whether the sales order item 500000016 is selected. If this is the case, clear all available information and add the information text “This information is top secret and will be not shown.”
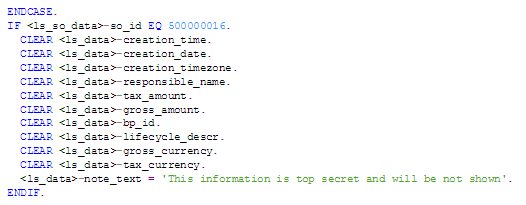
Figure 13
Implementation code as part of the feeder class method GET_DATA
When running the application in a new browser window you see the screen shown in Figure 14 if you click sales order item 500000016. As you can see the detail information is empty apart from the note text.
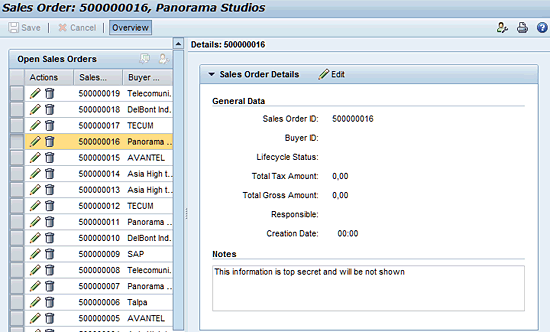
Figure 14
Application screen with sales order details
Kay Eidner
Kay Eidner graduated in economics and computer science at the University of Technology in Magdeburg. He has worked with and at SAP AG since 2000. He is currently working on IMS Development for SAP ERP HCM. His diverse areas of expertise include Java, ABAP, mobile technology, applications such as ESS, MSS, and DFPS, and several other focus areas in the context of SAP technology.
You may contact the author at .
If you have comments about this article or publication, or would like to submit an article idea, please contact the editor.

Thomas Frambach
Thomas Frambach graduated in engineering and computer science at the University of Applied Science HTW Berlin. He has worked as a developer for SAP AG in Walldorf, Germany since 2004. As member of the FPM development team, he was responsible for the implementation of Floorplans. Currently, he is working on IMS Development for SAP ERP HCM with a focus on Talent Management.
You may contact the author at thomas.frambach@sap.com.
If you have comments about this article or publication, or would like to submit an article idea, please contact the editor.


