Learn how to optimize your use of SAP’s cross-client table compare function. You can use it to compare your system to SAP standard settings and locate customization discrepancies.
Key Concept
Remote Function Call (RFC) is a connection is between two SAP clients or systems. Transaction SM59 maintains RFC destinations. The Basis team normally sets up RFC connections. It can configure the RFC connection using your own user authorizations. Alternately, the team can set up a default user, which means you don’t need to be set up in the destination system. This is especially useful when working with client 000, because you want as few users as possible logging onto that client so that it isn’t accidentally modified.
Before you start any testing in your SAP system, it is essential that your configuration settings are the same across your development, test, and production boxes. If your configuration differs, then you cannot guarantee that any testing you do will have the same effect when it is done for real in production. One way to compare system settings is to log on to both systems, capture screenshots, and compare them. However, this method can take a long time and you may overlook a change.
I’ll show you how to use SAP R/3’s cross-client table compare function that does the hard work for you. I’m demonstrating this standard functionality with an R/3 4.6 system, but it also works with newer releases. It shows you all the records that are only in one system and not the other and flags any differing records that are in both. The table comparison tool uses a Remote Function Call (RFC) connection to log onto another box or client and compare the table entries between them.
Note
Table comparison transactions such as SM30, SCU0, and OY19 have been available since R/3 Release 3.1I. As of R/3 4.5A, the transactions SCU0 and OY19 were collectively named the Customizing Cross-System Viewer (or Compare). These transactions provide selection options for mass table comparisons, from entire systems to specific application components, although you can also choose a single table to compare. This article focuses on the process for comparing a single table through the menu option Utilities>Comparison. You can perform mass comparisons with SCU0 and OY19 beginning with R/3 Release 4.0A, but that is outside the scope of this article.
You can compare all configuration tables in SAP R/3. You can adjust most of them, but some tables (e.g., V_512W_D [processing classes, cumulations, and evaluation classes]) contain very complex sets of data, so only comparisons are possible. Table 1 lists common tables and the options available for them.
| Table |
Name |
Compare |
Adjust |
| V_T512T |
Wage type texts |
Yes |
Yes |
| V_511_B |
Permissibility of wage types |
Yes |
Yes |
| V_T510 |
Pay scale groups |
Yes |
Yes |
| V_T510 |
Period work schedules |
Yes |
Yes |
| V_T551A |
Wage type characteristics |
Yes |
No |
| V_512W_D |
Processing classes, cumulations, and evaluation classes |
Yes |
No |
| Table 1 |
Compare/adjust functionality available in common HR tables |
Tip!
A helpful use for this table comparison is to compare your customized configuration with the standard entries from client 000 (the standard-delivered SAP system).
Compare Tables
Let’s say you think that a consultant working on your SAP HR system has changed the settings of some of your infotypes. You want to compare them to the standard SAP settings from client 000 to check if they have changed from standard SAP. Use the following procedure to compare the settings.
To compare the settings of your infotypes to standard R/3 settings, you must compare the entries in the table that holds infotype customizing settings (V_T582A). Use the IMG menu path Personnel Management>Personnel Administration>Customizing Procedures>Infotypes>Infotypes>Infotype or go to table V_T582A directly via SM30/SM31.
From the menu at the top of the toolbar, choose Utilities>Comparison (Figure 1). The system prompts you to enter the R/3 connection you want to use to connect to the comparison system (Figure 2).

Figure 1
Choose Comparison in table V_T582A

Figure 2
Enter the R/3 connection
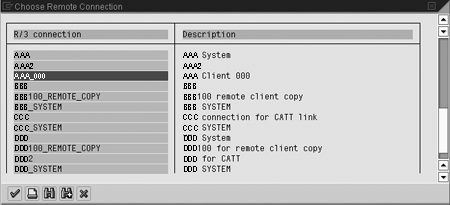
Press F4 to access the drop-down list to compare the RFC connections between your logon client and other SAP R/3 systems. As shown in Figure 3, select the SAP standard client 000 from the drop-down list by highlighting it and clicking on the green check mark icon to begin the comparison.

Figure 3
Select standard SAP client 000 to compare it to your system
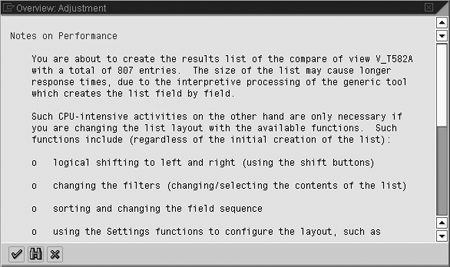
If this comparison is large enough to affect processing performance, you receive a warning message (Figure 4). Accept it by clicking on the check mark icon to view the results of the comparison (Figure 5).

Figure 4
Warning message

Figure 5
Results of the comparison of RFC connections between AAA client 800 and AAA client 000
The first line under the toolbar provides a summary of the comparison. Figure 5’s comparison of table V_T582A compares logon system AAA client 800 to entries in AAA client 000.
You can see a quick overview of the number of differences by clicking on the Statistics button or by pressing Ctrl + F7. This summary of the tables and their entries shows the number of modifications (Figure 6).

Figure 6
Summary of differences between the two compared tables
Based on this summary, you can analyze the differences between the two systems. Below the heading line are the results of the comparison. Across the horizontal axis, SAP R/3 outputs all the fields in the table, and along the vertical axis SAP R/3 outputs the table entries from both systems with a key beside them explaining their status.
The key to the status is as follows:
- ML: There are differences in this record; this is the logon client entry.
- MR: There are differences in this record; this is the comparison client entry.
- L: This entry only exists in the logon client.
- R: This entry only exists in the comparison client.
- M: There are differences, but they are only in hidden fields.
- (Blank): The entries in the two systems are identical.
SAP R/3 also uses different colors to identify what type of difference exists between the systems, as shown in Figure 7.

Figure 7
Colors designate the differences between tables
For example, the screen in Figure 5 shows infotype 0000 Actions does not differ from 0001 Organizational Assignment. SAP R/3 identifies differences in the settings of infotype 0002 Personal Data. The top entry shows the logon client settings and the second line shows the entry from the comparison client. SAP identifies the fields with differences by highlighting them in yellow. Within most tables, you can use the F1 key to see the SAP help for the field.
Adjust Tables
While viewing the differences in table settings is practical, this tool’s adjustment functionality is even more useful. The adjustment function copies the configuration settings from a different client into your logon client. It can also replicate your configuration from your development box to your sandbox, or from your production box into a testing or training box.
This adjustment functionality is available for most standard tables and views of tables, as shown in the Table 1, but it cannot adjust some of the more complex tables (for example, the view of table V_512W_O) because there are too many interdependent table settings.
To use the adjustment functionality, go into the maintain view of the table via the IMG path described in the "Compare Tables" section or use transaction SM30/SM31. Under the menu Utilities you should see an Adjustment button (rather than a Compare button as in the compare tables example). This is the only difference between the adjusting and comparing tables. Follow the same steps as in the “Compare Tables” section to identify your comparison client and perform the comparison.
Figure 8 shows the comparison of RFC connections between logon system AAA client 010 and AAA client 000. When you have identified which settings you want to copy into your logon client, select the entries with check marks and click the Adjust button to perform the adjustment.

Figure 8
Results of the comparison of RFC connections between AAA client 010 and AAA client 000
As shown in Figure 9, SAP R/3 presents the details of the adjustments it is about to make. You can move between the entries to check them using the first six toolbar icons. Once you have selected your entries, click on the Entry, Field, or All buttons to perform the copy.

Figure 9
Details of the adjustment
- Entry copies just the line you have selected and all the fields in it.
- Field copies just the field you have selected within the line.
- All copies every record selected.
If you want to make all the changes that R/3 presents at once, it is easiest to use the All button. Once you have selected the button you require, R/3 automatically updates the view of the data to show that it has made the changes and completed the adjustment.
Once you have verified that all the changes are correct, back out of the comparison (using F3 or the back icon  ). This returns you to the whole table with your adjusted values.
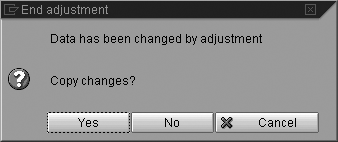
When you have finished making your adjustments, back out again (using F3 or the back icon). If you have automatic transport recording turned on, R/3 reminds you that you have made changes with a pop-up window shown in Figure 10.

Figure 10
A pop-up window informs you of your table adjustment
When you select the Yes button, R/3 prompts you to save the settings onto a transport (Figure 11). Here you can either add the change onto an existing transport request or create a new one as required. Your adjustment is now complete.

Figure 11
Save your settings in a transport
Tips for Comparing and Adjusting Tables
The first task the HR configuration team or person responsible for support should do is request the RFC connection between the clients that are to be compared. If the most frequent use is comparing the quality assurance and production clients, this RFC connection should be established and kept in place so that the compares can be done whenever required. If you are in the implementation phase of an HR system, you can compare tables using a connection between the development and quality assurance clients.
If you normally access configuration tables through the IMG and want to know a table name so that you can quickly access it directly via SM30/SM31, then all you need to do is to click on the print icon when viewing the table contents. The technical name is displayed in the top left corner in the print preview of the table.
Greg Newman
Greg Newman is originally from New Zealand, and has been implementing and supporting HR and Payroll systems since 1999. He has worked on numerous SAP HR and Payroll implementations for Great Britain, the Republic of Ireland, Australia, New Zealand, and several other international rollouts. Currently Greg is a managing consultant working for Newhit HR and Payroll Solutions in England.
You may contact the author at greg.newman@saphr.com.
If you have comments about this article or publication, or would like to submit an article idea, please contact the editor.


