Manager
Effectively use a solution, maintenance project, and integrated messaging for approvals to achieve a controlled and reliable way to keep your solution documentation in sync with enhancement deployments to your SAP system.
Key Concept
SAP Solution Manager is built to do just what it sounds like: manage your solution. Now that you’ve got an SAP solution implemented, you must support the business running it with up-to-date and accurate solution documentation. When end users call in for help, your support team needs to be able to count on the fact that the documentation truly represents the current production system.
It is natural for systems to evolve and need continuous enhancement to meet today’s ever-changing business needs. Keeping your solution documentation current is critical, and SAP Solution Manager provides some key tools to help you as you work them into your standard change management processes.
For your support team to have the information it needs to provide good service, your organization’s solution documentation must reflect what is currently in the productive solution. After go-live, keeping solution documentation current is an important but often overlooked activity — the project team has often dismantled and everyone is back to business as usual. By integrating the use of the maintenance project into your change control process, you can help keep the solution documentation current.
In this article, you’ll explore the check-out and check-in capabilities delivered in SAP Solution Manager through both the solution and the maintenance project. You will also learn about the process, use, and setup of these two key components of SAP Solution Manager to help you keep your solution documentation updated and provide your support team with the tools they need to support the business.
Get to Know the Parts Involved
First, you need to get to know the key parts of SAP Solution Manager that allow you to keep the solution documentation in sync with the migration of changes to production.
Note
The three parts in this section are subsets of the deployment of Change Request Management (ChaRM) in SAP Solution Manager. The full scope of ChaRM is beyond the scope of this article.
Part 1: The Solution
The concept of the solution in SAP Solution Manager can be a little daunting at first, if for no other reason than it is called a “solution.” The solution is a logical representation of a collection of business functionality deployed in production. There are many schools of thought on how to define a solution, but for this article’s purposes, I’ll try to keep it as simple as possible.
Basically, a solution represents all the component parts needed to support a business in production. For example, say you’ve implemented SAP ERP Central Component (SAP ECC), SAP Customer Relationship Management (SAP CRM), and SAP NetWeaver Business Warehouse (SAP NetWeaver BW) for the purpose of supporting your finances, the order-to-cash scenario, and your business intelligence reporting. Because these component parts are delivered as a group to support the business, you can logically represent them in SAP Solution Manager as a solution (but this is beyond the scope of this article).
As part of go-live (during cutover or before), you migrate the content from your template or implementation projects into the solution. The intent of the solution is to always represent what is in production separately from work in process associated with other projects, standard releases associated with releases, or break fix (i.e., bug fixes in production or the system not performing as designed).
Part 2: The Maintenance Project
Like template and implementation projects, the maintenance project has a Business Process Hierarchy (BPH) structure. However, the maintenance project is intended for use in release management for periodic and controlled updates to production. For the most part, these are not associated with emergency break fix, bigger functionality releases, or rollouts. You can use the maintenance project for routine maintenance and minor enhancements to the solution that are rolled out at a planned cadence.
Part 3: The Approval Life Cycle
By creating and assigning a maintenance project to a solution, you enable an approval life cycle for managing changes to your solution. I’ll get into the approval life cycle as I go through the process.
The Maintenance Project
When you create a maintenance project and assign it to the solution, you’re creating a controlled work in process area that allows you to organize changes into groups for release at a planned time. The maintenance project sources its content from the solution, and releases its revised content back to the solution.
Now I’ll review a summary of the process of making changes to your production environment using these components in SAP Solution Manager. First I’ll set up the component parts of the solution and the maintenance project.
To set up the solution, use transaction SOLUTION_MANAGER. In Figure 1, you see the Solution Overview screen. It shows the solutions that have already been created in SAP Solution Manager and their current statuses.

Figure 1
Entry screen for SOLUTION_MANAGER
To create a solution, click the Create button to launch the Create new solution guided procedure. This walks you through the initial setup of your solution with information about each step displayed along the way (Figure 2).
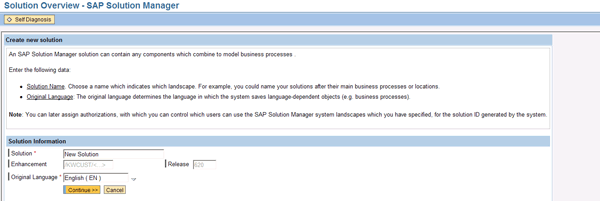
Figure 2
First screen of the Create new solution guided procedure
Enter the name of the solution and the language. Click the Continue button and the Solution Landscape maintenance screen appears (Figure 3).
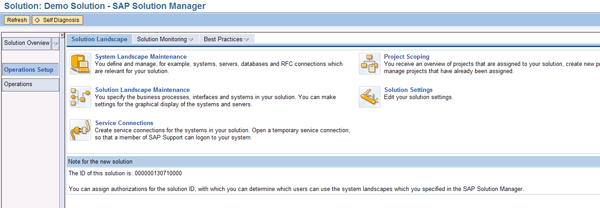
Figure 3
Solution landscape information
There is a lot you can do with your solution from this navigation window, but for the purposes of this example, I’ll just copy over a couple of business processes from a template project. This is a go-live preparation activity that the implementation team would perform. To start, click the Solution Landscape Maintenance icon  . This opens the directory for your solution (Figure 4).

Figure 4
Solution directory for your solution
At this point, your solution is essentially an empty shell. The next step is to give it some content. Click the arrow icons  in the Solution Structure on the left side of the screen to navigate to the Business Scenarios section. Here, you can import a business scenario from your project. Figure 5 shows the tree expanded to the point where you can add the scenarios with the Structure tab selected. Note that the Source field defaults to Project; this allows you to get the finished scenarios from your implementation project.
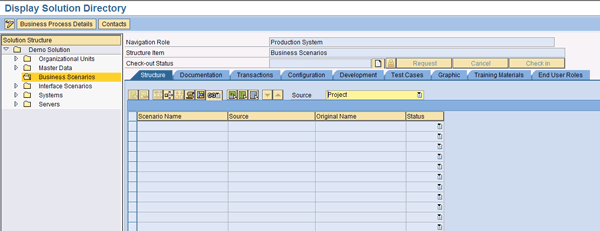
Figure 5
The business scenarios section, with the Structure tab selected
Now that you are ready to add scenarios to your solution, you must first put the solution into change mode by clicking the display/change icon  . If you click the Scenario Name column, you get a drop-down option to open up a project from which you can retrieve your business scenarios for your solution. Click the drop-down icon
  to see selection options to navigate to the scenarios within a project (Figure 6).
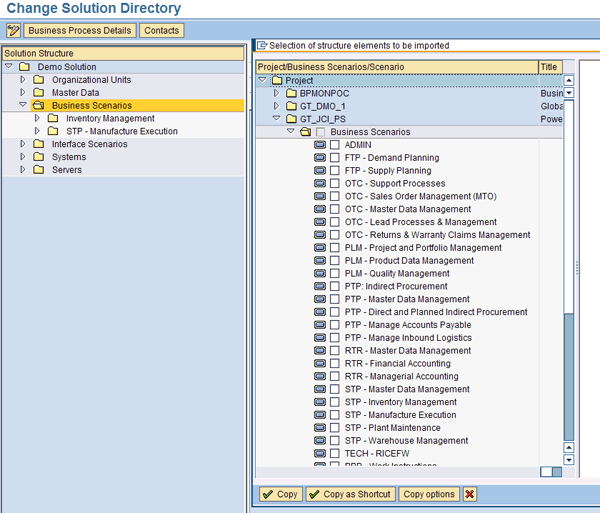
Figure 6
Project and scenario selection screen from the Solution Directory
Select the scenarios you wish to add to the solution by marking their corresponding check boxes. You can choose multiple scenarios from multiple projects. Remember, the solution represents what is in production. The production system is most likely built from more than one project over time. In addition, sometimes multiple projects are completed on the same timeline, so you might have scenarios or new processes going live together from multiple projects.
When you click the Copy button, the business process structure and the content from the project are brought into the solution. For this example, I selected two scenarios: Inventory Management and STP – Manufacture Execution. The scenario you choose does not affect the processes I’m covering in this article. Now that you’ve set up your solution and added your scenarios, you can create and assign the maintenance project.
Note
During this part of the setup I’ve added scenarios to the solution. In doing so, SAP Solution Manager copied the business processes and steps from the project into the solution. Later in this article, I describe how to change business processes. Because changes to business scenarios are typically rare in a production maintenance situation, I focus on changing processes, a subset of the scenarios that you imported in this example.
To create and assign the maintenance project to your solution, select the highest node of the solution in the tree structure on the left side of the screen. Then, click the Solution Settings tab on the right side of the screen (Figure 7).

Figure 7
Solution Settings maintenance
Scroll down to the Assigned Maintenance Project subwindow. Click the Create And Assign New Project button (Figure 8).

Figure 8
Assigned maintenance project subwindow
This opens the Create a new Maintenance Project pop-up screen (Figure 9). Enter the project name and description. The language defaults to the language of the solution.
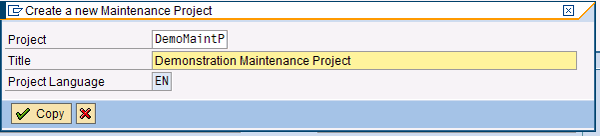
Figure 9
Create your new maintenance project
Click the Copy button to create the maintenance project and assign it to the solution. The system returns you to the Solution Settings tab with the maintenance project officially assigned (Figure 10).
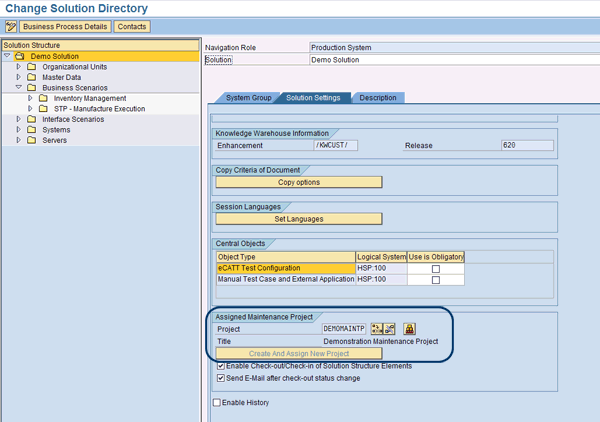
Figure 10
Maintenance project assignment on the Solution Settings tab
Select the check box for Enable Check-out/Check-in of Solution Structure Elements to activate this change management feature (Figure 11). Mark the check box for Send E-Mail after check-out status change to activate the email notifications. Be sure to save your work when you’ve made your settings.

Figure 11
Check box selections
Now your setup is complete. The solution has an accurate representation of the scenarios, processes, and steps that have just gone live with all the current solution documentation delivered by the project team. Now it’s time to go into steady state support.
Bring the Pieces Together
Now that you have the raw materials, you need to build in the change control that gives you the benefit of current solution documentation in a controlled release process. First I should mention the process of managing changes to the production solution documentation.
During the initial deployment of your SAP system, you created a solution in SAP Solution Manager to represent your production environment as a single entity. As I stated earlier, the solution represents all the processes and components that are to be delivered as the production system. Next, the implementation team populated the solution with the scenarios, processes, and steps from the template or implementation project that went live. Now your solution has all the solution documentation created by the implementation project and matches the productive systems.
However, you and your teams didn’t put all that work into your SAP system to have it stand still. Inevitably, you’ll have changes to make to that production environment to keep pace with the ever-changing business it supports. You need to manage these changes while they’re being designed, built, and tested, and you need to coordinate releasing them into the production environment.
Manage Changes to Your Production Solution
The first step is to check out the business process affected by the change. This copies the process documentation from the solution and places it into the maintenance project. SAP Solution Manager provides this functionality in a multi-step process so you can enforce approvals and segregation of duties. It starts by requesting the check out on the solution. To request a check out, follow these steps:
Step 1. Use transaction SOLUTION_MANAGER.
Step 2. From the Solution Overview screen, select your solution and double-click it to open it (Figure 12).

Figure 12
Solution Overview screen
Step 3. On the Solution screen, click Solution Landscape to display the landscape window (Figure 13).
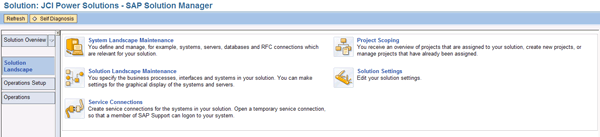
Figure 13
The Solution Landscape window where you can navigate to many functions for the solution
Step 4. Click the icon next to Solution Landscape Maintenance to open the solution.
Step 5. Navigate to the business process you are going to check out and switch to change mode by clicking the display/change icon (Figure 14). Note the Request button is active, but the Cancel and Check in buttons are inactive. This is because this business process is not currently checked out for maintenance.

Figure 14
Business process selection
Step 6. Click the Request button to request a check out. This automatically invokes an email alert window (Figure 15). A default message is generated by SAP Solution Manager and a selection list is presented, which you can use to determine who gets the email. Make changes as appropriate and press Enter.
Note
You must have the SMTP server configured in transaction SCOT for this functionality to work properly. You can coordinate with your Basis team to ensure that the SCOT configuration is complete before implementing this process.

Figure 15
Email alert from check-out request
Step 7. The email is sent to the approver to indicate a check out has been requested, and the status of the process is set to Check-Out Requested. Note the blue arrow  in the BPH structure that indicates a check-out request is active for this business process (Figure 16).
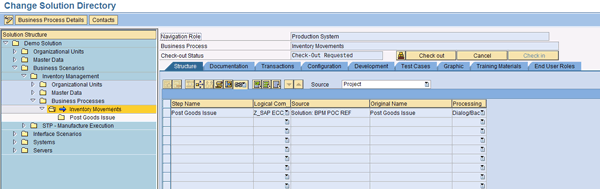
Figure 16
Check out requested; note the Check out and Cancel buttons are now active
Step 8. The approving authority logs into SAP Solution Manager and clicks the Check out button (Figure 17). This copies the content of the business process from the solution to the maintenance project and updates the status to Checked Out. Note the red check-out icon  on the structure node for the business process in Figure 18. This indicates the business process is now checked out to the maintenance project.

Figure 17
Check-out screen shown to the approving authority
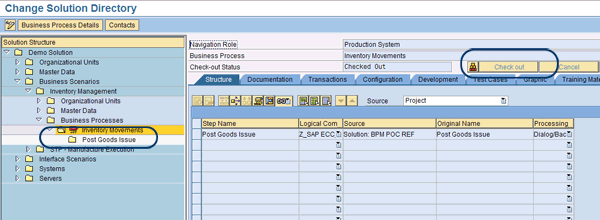
Figure 18
Process checked out, with the Check out and Cancel buttons no longer active
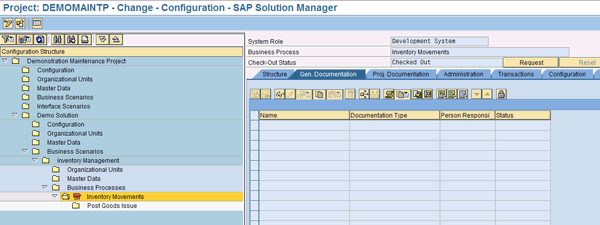
Figure 19
Check-in request from the maintenance project
Step 10. The approving authority logs into SAP Solution Manager and accepts the check-in request by clicking the Check in button on the business process in the solution (Figure 20). Note that in the next screen that appears, there are no icons on the structure element and the Request button is activated (Figure 21). This indicates that the process is checked in and available for future check-out requests as necessary. Checking in the process copies the content from the maintenance project back into the solution, updating the production version of the solution content. Now the support team has access to the updated documentation reflecting the change.
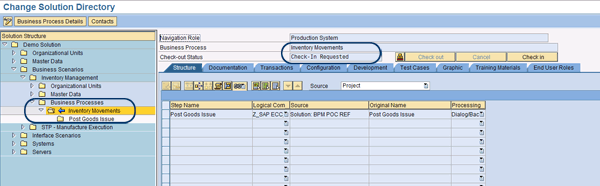
Figure 20
The blue arrow indicates that the business process is ready to be checked into the solution
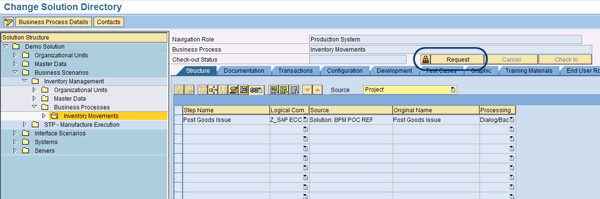
Figure 21
Updated business process in the solution after check in is accepted
Final Tips on Maintenance Projects
You can repeat this process as many times as you like, but I recommend that you manage the maintenance projects as a release. By this, I mean that you combine all the changes and release them at a predefined interval (e.g., monthly or quarterly). This gives you a way to close down the maintenance project and encapsulate the changes that occurred in a given release for auditing and other tracking purposes.
You can create and close as many maintenance projects as you want, but you can only assign one maintenance project to a solution at a time. This provides for a level of control that truly encapsulates releases.
As with any deployment of a process in the SAP system, setting up the system isn’t the toughest part. I discussed requesting check out, doing the actual check out of a business process, making changes, requesting check in, and the actual check in of the process back to the production solution. It is important that you treat this process as you would any other business process: Take the time to design and document it. Understand who in your organization performs which roles in the process, and put the process through its paces during the implementation of your solution. Test this process like any other.
The two most common stumbling blocks I see when deploying this and other SAP Solution Manager processes are a lack of complete understanding of the roles the different people in the organization play in ensuring control, and a failure to adequately test the security profiles assigned to these people. SAP Solution Manager is a production system just like the rest of your SAP landscape. To get the most out of it, use the same rigor in designing, building, testing, and deploying the processes in SAP Solution Manager that you do for every other business process in your SAP solution.
D. Russell Sloan
D. Russell Sloan is a specialist in project and program governance for IBM. He focuses on the use of SAP Solution Manager for global rollout projects for IBM’s largest customers, having worked with SAP software since 1996. Russell has degrees in accounting and information systems and has been a team and project leader for SAP projects for more than 14 years. He has been developing and deploying software systems for over 30 years.
You may contact the author at solmanruss@gmail.com.
If you have comments about this article or publication, or would like to submit an article idea, please contact the editor.


 Premium