Manager
You can use the Service Desk as much more than a help desk. Using its configuration capabilities, you can create and customize transactions to manage IT service requests, manage business process changes (regardless of whether they include system changes), and keep everyone on your team in the loop with automatic notifications. Explore how the Service Desk can help you enforce processes, manage approvals, and keep track of the life cycle of the many different activities within your project and your organization. In particular, dive into the details of setting up email alerts based on the specific status values of a Service Desk transaction.
Key Concept
Implementation and support teams require the ability to monitor and coordinate their work during the design, build, implement, and support phases that SAP solutions require. Because SAP Solution Manager contains the solution documentation, access to transactions, configuration, custom code, and more, why not use it to manage work in the same system? In particular, you can use the Service Desk to manage and track a wide variety of project-related activities, such as risk management, issue management, and scope changes, during both implementation and project post-go-live.
Blueprint and configuration transactions in SAP Solution Manager help you document your solution and keep track of what went into building it. However, what about all the other activities that go on that are directly related to the design and build of the solution? These activities include issues, risks, change requests, and service requests. Managing this work efficiently can yield a higher quality solution and a more responsive service delivery from your organization.
You are probably already familiar with the Service Desk in SAP Solution Manager as a help desk ticket system. However, the information in a help desk ticket varies considerably from the information needed to document, track, and resolve an issue or a change request. Fortunately, the Service Desk has more than 40 different transaction types that you can use to manage your work. Table 1 shows the transactions that I have found useful during projects and for ongoing support.
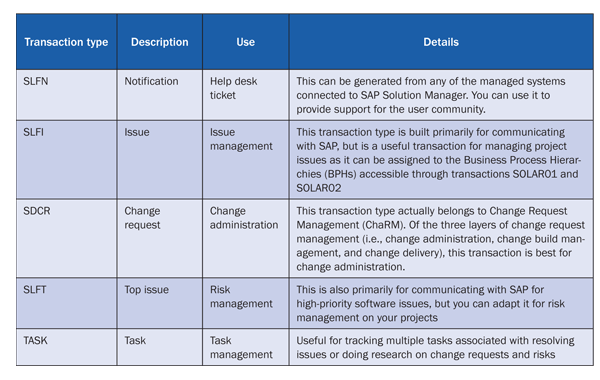
Table 1
Service Desk transaction types
Note
Before I cover the details, I must note that that I am only going to cover a small part of the capabilities of the Service Desk. My example will show you how to set up email alerts based on the specific status values of a Service Desk transaction. However, you can configure hundreds of actions to automate work in the Service Desk. As I move through the configuration, I’ll point out some of the ways that you can extend beyond the scope of this article.
Note
If you do not have significant experience with Service Desk, ChaRM, or SAP Customer Relationship Management, be very careful following the steps I provide. This article goes deep into the SAP Solution Manager system and involves changing and enhancing configuration.
I’ll introduce you to the idea of using the Service Desk as more than just a help desk. I explore how you can use status values and emails to manage workflow across the team, and I take a deep dive into the configuration to make it all work. Note that for the screenprints in this article, I used SAP Solution Manager 7.0 with Support Package 19.
Use Actions to Manage Work
The Service Desk has actions and action profiles that help you manage work. Issues, risks, and change requests routinely involve multiple team members to manage them to completion. Coordinating busy team members to close items efficiently can be challenging, but action profiles in the Service Desk can help.
First, let’s take a look at a simple issue workflow:
- The Issue is identified and logged into Service Desk (using transaction CRMD_ORDER) as document/transaction type SLFI. The Creator assigns a business partner to work the issue and sets the status to Assigned.
- The Assigned To party is notified via email
- The Assigned To party proposes resolution and updates the status to Solution Proposed
- The Created By business partner (i.e., the person who originally created the issue) is notified via email
- The Created By party reviews the proposal and either approves or rejects the proposal.
- If rejected, the Created By party sets the status to Assigned. If approved, it is set to Solution Implemented.
- The Assigned To party is notified of new status
- If rejected, the Assigned To party proposes a new resolution and the process continues with step 4
- If approved, the Assigned To party takes the proposed action and sets the issue to Closed
- The Created By party is notified via email that the issue is Closed
This is a simple process, but it illustrates how the Service Desk can help you manage work across the team. Next let’s walk through this process in SAP Solution Manager, and then I’ll go into the configuration.
Step 1. Create the issue by using transaction CRMD_ORDER, following menu path Business Transaction > Create, and selecting Issue from the Service Grouping drop-down menu. As you can see, the description indicates that there is a delay in scheduling testing (Figure 1). The status is set to Assigned.

Figure 1
New issue creation
I have two business partners set up in this system, so in this example I play both the part of the Created By (business partner #142) party and the Assigned To (business partner #1) party. The Assigned status triggers an email to my #1 business partner, the Assigned To party. Click the Transaction Data tab and then the Actions tab to review the action log for this transaction (Figure 2). Note that the E-Mail to Message Creator has a yellow triangle beside it. This indicates that the conditions to send the email to the creator have not been met.
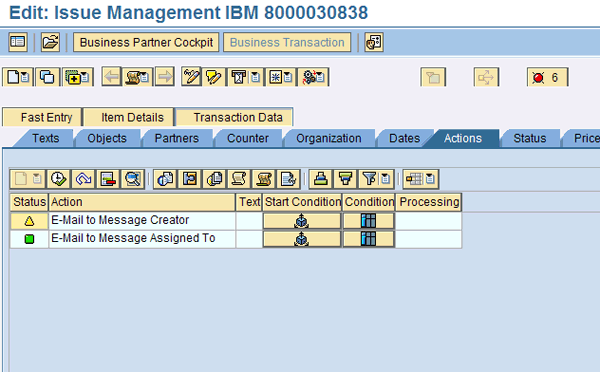
Figure 2
Email sent to Assigned To partner, but not the message creator
Now, as the Assigned To partner, I update the issue with a proposed resolution and set the status to Solution Proposed (Figure 3).
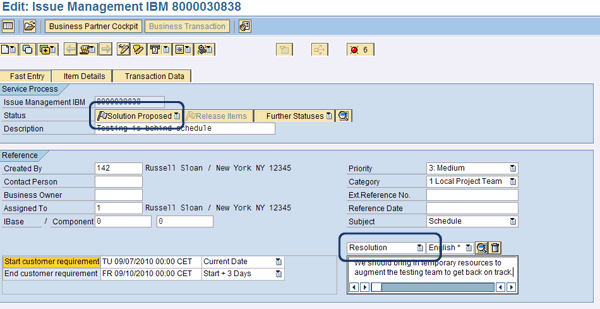
Figure 3
Resolution long text updated and issue status set to Solution Proposed
Now, click the Transaction Data tab and then the Actions tab to return to the action log. Note that the E-Mail to Message Creator is now green (Figure 4).
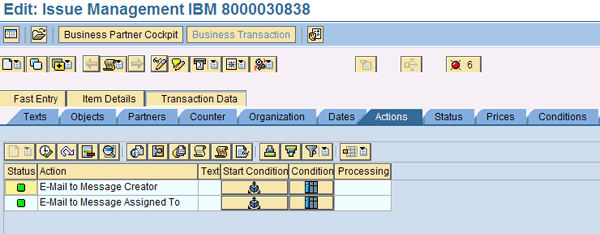
Figure 4
An email is sent to creator because the issue status is now Solution Proposed
In the interest of saving time and getting to details of the configuration, I will stop the process tour here. The rest of the process of moving this issue to closure involves more of the same steps that you see in Figures 1 through 4. So, now it’s time to make all of this work for your project.
The Key Parts
To make this workflow process possible, you need to know the key parts of customizing and master data shown in Table 2.
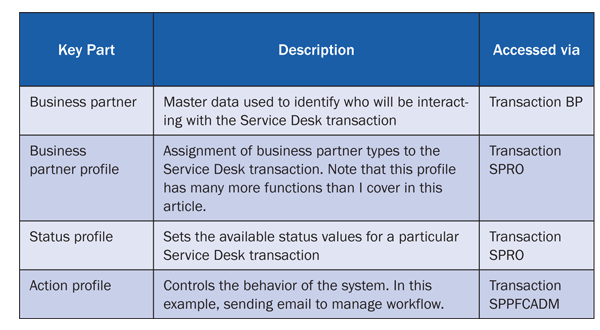
Table 2
Important customizing and master data definitions
I will start with the business partner master data. In transaction BP, set up two business partners for each person who will be interacting with the Service Desk. One is for general data and the other for employee data. I’ll go through the screens to set up this master data and then show you a utility that SAP Solution Manager has to automate the setup of business partner master data.
Business Partner Master Data
Start in transaction BP. Click the Person button (Figure 5).

Figure 5
The business partner Create Person screen
For the purposes of this example, you only need to fill in the First Name, Last Name, Country, Region, and E-Mail Address. Then, click the save icon. This creates Business Partner (Gen.), which is the general data for the business partner. You also need an entry for the Employee data. Therefore, you must also open the Change in BP role dropdown menu and select Employee (Figure 6).

Figure 6
Employee BP role selection
Press Enter and then click the Identification tab. On this tab, enter the user ID in the User Name field (Figure 7). To process messages in the Service Desk, the business partners must have an employee record. The other data is copied from the general role already created in the last step. Click the save icon and you’re done with this step.
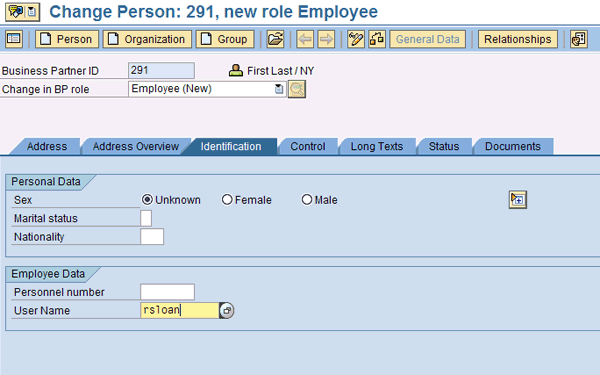
Figure 7
Add an employee role with the proper user ID
An alternate way to create business partners is to use transaction BP_GEN. For this process to work, the user IDs have to already be set up with address and email information in transaction SU01. From BP_GEN, click the Add button to add the SAP Solution Manager system to the systems list. In Figure 8 you can see that I am adding MS4 to the system list.
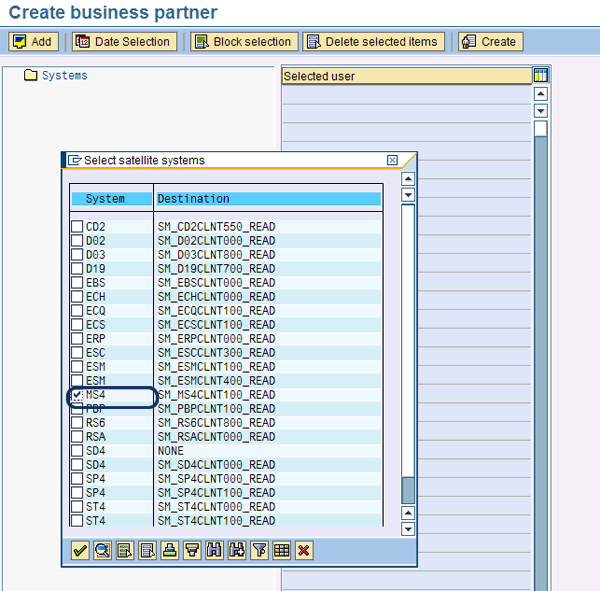
Figure 8
Add the SAP Solution Manager system to the list
Figure 9 appears after you click the green checkmark icon in Figure 1. Click the arrow icon to expand the list of users defined on the system. If you don’t see all the users you expect, change the Date Selection settings by clicking the button of the same name.

Figure 9
Users on the SAP Solution Manager system
Double-click names to copy them to the Selected user list. Once you’ve selected all the users you want, click the Create button to generate the users (Figure 10).
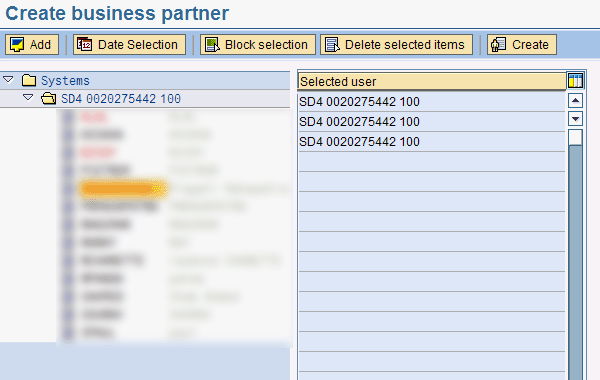
Figure 10
Users selected for generation
Business Partner Profile
Next, you need to tell SAP Solution Manager what role people will play in processing the transactions. In configuration transaction SPRO, follow menu path SAP Solution Manager > Scenario-Specific Settings > Service Desk > Service Desk > Partner Determination Procedure.
Partner determination processing provides many functions. I only touch on the simplest aspects here. For the purposes of this article, I make a couple of assumptions: I use a completely custom partner procedure, and I use custom partner functions.
To begin, click the Define Partner Functions node in the IMG. The screen shown in Figure 11 appears. I created Created By, Assigned To, and Business Owner. The other functions are SAP standard partner functions.

Figure 11
Custom business partner functions
The Created By and Assigned To partner functions each have the settings in Table 3. The Business Owner partner function has the settings in Table 4.

Table 3
Settings for Created By and Assigned To functions

Table 4
Settings for the Business Owner partner function
Next, you need to assign these functions to a partner determination procedure. I’ll show you how to do this in Figures 12, 13, and 14. First, click the Define Partner Determination Procedure IMG node and then click the New Entries button. Enter the procedure name and description and then click the save icon (Figure 12).

Figure 12
New partner procedure
Next, select your new procedure and click the Partner Functions in Procedure folder (Figure 13).

Figure 13
Partner functions in procedure screen
Click the New Entries button to add the partner functions to the partner procedure. Add the partner functions until your screen looks like Figure 14. Note that both Change and Changeable Address are checked.

Figure 14
Partner Determination Procedure
Next, assign the new partner procedure to the Service Desk transaction. For my example, I’m using a copy of transaction SLFI called ZLFI. It is generally recommended to make such changes only to custom copies of standard SAP transaction types. When copying, it is also recommended to leave the last three letters identical to the original.
Return to the IMG and click the Assign Partner Schema to Transaction Type node. Click the Position button and enter the transaction type to move to the transaction type you wish to configure (in my example, this is ZLFI). Once positioned, double-click the transaction name to open the transaction configuration. In Figure 15 you can see the transaction configuration screen. Enter the name of your partner determination procedure in the Partner Determ.Proc. field.

Figure 15
Define transaction type
Save your work. Remember these steps because you need to repeat them to assign the status profile to the transaction after you set up the status profile. The Status Profile entry is under the Partner Determination procedure assignment in Figure 15.
Status Profile
The status profile configuration is next. Follow menu path SAP Solution Manager > Scenario-Specific Settings > Service Desk > Service Desk > Status Profile. Open the Status Profile Configuration and click the Position button. Enter SLFI* and press Enter. This positions you to the SAP-delivered issue status profile. I prefer to copy SAP configuration whenever I can, and the status profile is no exception. You can avoid many potential problems with the status values by copying the SAP-delivered profile. To do this, select the SLFI0001 and click the copy icon  (Figure 16).
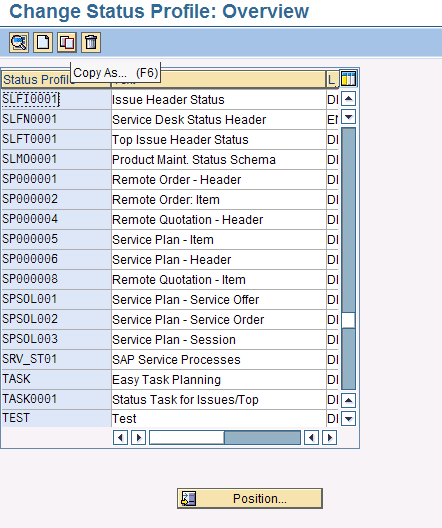
Figure 16
Copy the existing status profile
Enter the name and description for your Status Profile (Figure 17). I set the maintenance language to EN (English) because my German is lousy. Figure 18 shows the newly copied status profile.
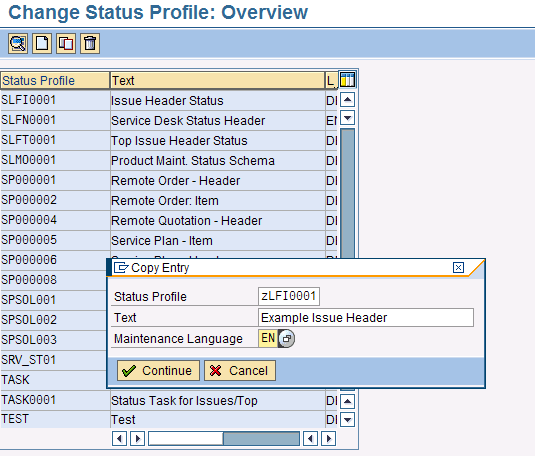
Figure 17
Enter a name and language for status profile
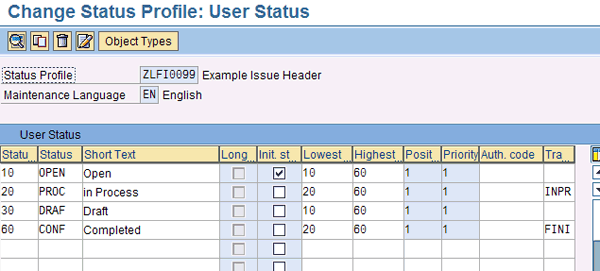
Figure 18
Copied status profile
There is a lot going on in Figure 18, so I’ll describe the columns first (Table 5).

Table 5
The columns of a status profile
If you double-click one of the status codes, it takes you to the transaction control configuration. This is where potential problems hide. However, by copying the status profile, you get these set for you.
The issue I’ve run into most often is the distribution lock. Because Service Desk is based on SAP Customer Relationship Management (SAP CRM), the To be distributed transaction control is used to invoke SAP CRM Middleware to send transactions to the SAP system. Since the work is going to be done completely in SAP Solution Manager, always set this to Off for every status value you use (Figure 19). You should do this even if you copied to a Z file just to double-check.
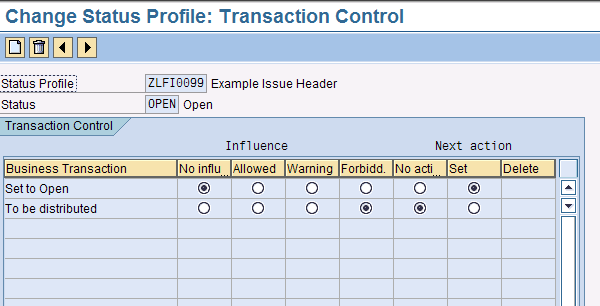
Figure 19
Turn off the To be distributed transaction control for the status value OPEN
Go back one screen using the back icon  . Update the entries in your status profile to match Figure 20. This allows you to mirror the functionality described in this article. Simply type over the values in the columns; don’t delete and re-add.
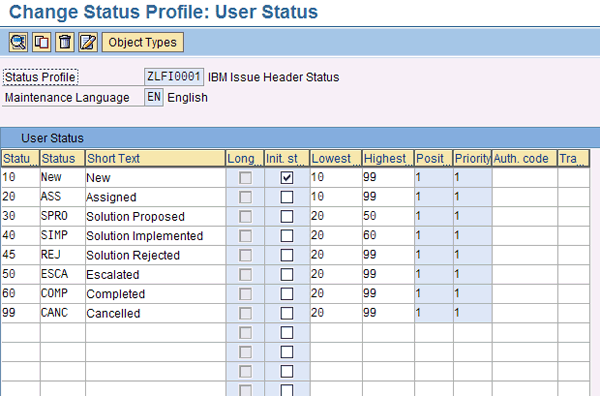
Figure 20
Status profile
Action Profile
Until now, you have been building parts for a work management engine. Now it’s time to put them together and turn it on. The action profile is where the real power of the Service Desk is. You can perform activities such as automatically escalating issues based on business rules, triggering programs to run, firing interfaces to third-party tools, and communicating with SAP support services — to name a few.
For now, I’ll focus on letting people know when it is their turn to take action in an Issue Management scenario. Start with transaction SPPFCADM, which takes you into the configuration for the Post Processing Framework (PPF). The PPF is the machine behind the Service Desk. Figure 21 shows the main entry screen for transaction SPPFCADM. To use the PPF effectively, you’ll need to know a few terms (Table 6).
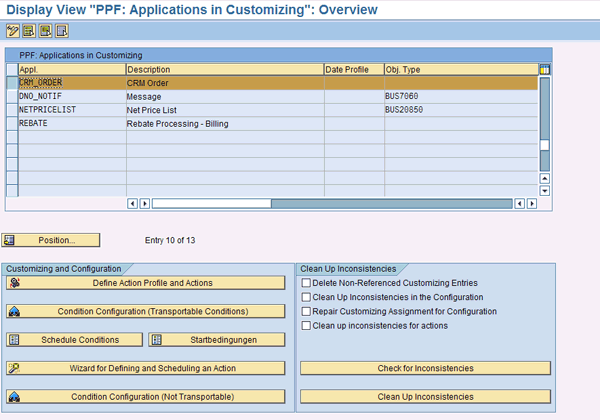
Figure 21
Main configuration screen for the PPF
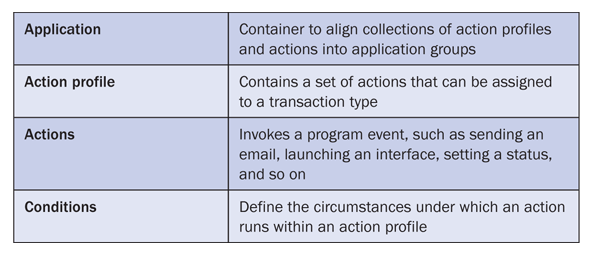
Table 6
Basic terms to know for the PPF
Applications
The two applications you use most in the Service Desk are DNO_NOTIF and CRM_ORDER. DNO_NOTIF is for use with SLF1 and SLFN service messages or notifications. These are the help desk functions of the Service Desk and transactions that are passed back and forth to SAP for support. For issues, risks, and other transactions, you use CRM_ORDER.
To begin the configuration for email alerts, select CRM_ORDER as the application in Figure 21 and click the Define Action Profile and Actions button. This takes you to the action profile maintenance screen. It includes the list of defined action profiles associated with the CRM_ORDER application (Figure 22). The action profile holds a collection of actions that are controlled by conditions.
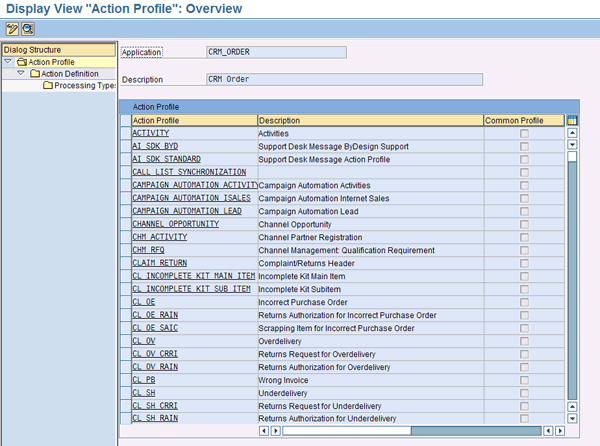
Figure 22
Action profile display
First, switch to change mode by clicking the change/display toggle icon  . Then, click the Position button and enter SLFI* in the entry box to position to the SAP-delivered action profile for Issues (Figure 23).

Figure 23
Position to the SLFI* action profiles to copy SAP-delivered issue action profiles
You can use profile SLFN0001_ADVANCED for messages and issues. It has a lot of the features you are looking for, so you should copy it by selecting the row SLFN0001_ADVANCED and clicking the copy icon  . Enter the new name for the profile and press Enter. When prompted, click the copy all button (Figure 24).
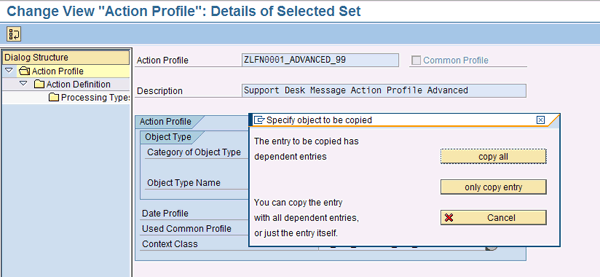
Figure 24
Copying an action profile
You will probably see a message alerting you that you must choose a name from the allowed namespace. This is because the profile is copying the actions as well and assigns them to the same name by default. I usually just change the first letter to Z or Y and move on (Figure 25).
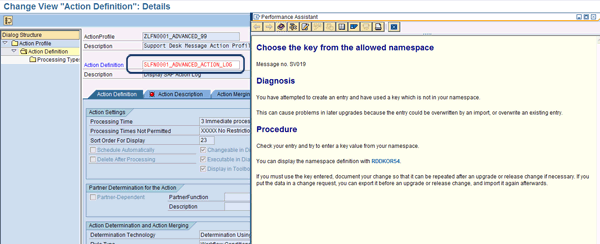
Figure 25
Change the name of SLFN0001_ADVANCED_ACTION_LOG to ZSLFN0001_ADVANCED_ACTION_LOG
Once you’ve finished your copy, you should have a new action definition that looks like Figure 26.
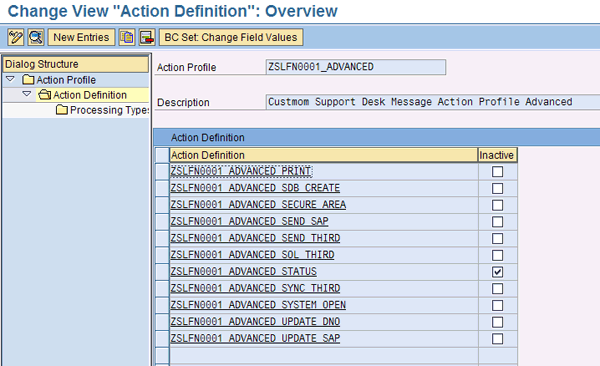
Figure 26
New action profile
Because you want to send emails to the Assigned To party and to the Creator, you need to define actions for these activities. The simplest way is to copy the mail activity that is already in the profile. Do this by selecting ZSLFN0001_ADVANCED_MAIL (default mail action delivered by SAP) and clicking the copy icon. Note that in Figure 27 I’ve renamed the action definition and changed the partner function to point to the Assigned To party.

Figure 27
New action definition in profile
Repeat this process to create a definition for the mail to the Created By party. When you’re done, your action profile should look like Figure 28.
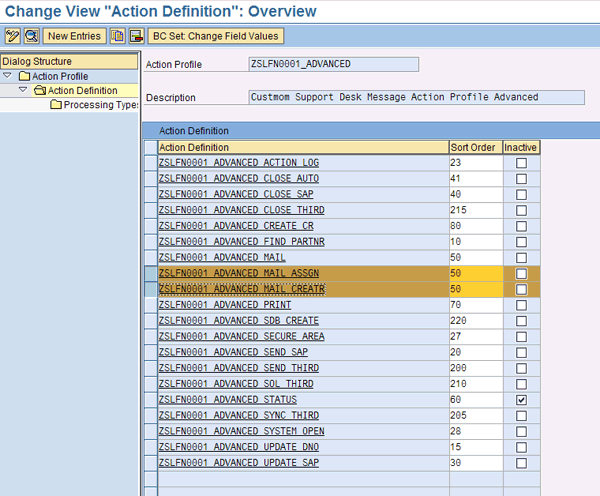
Figure 28
Action profile with two new actions for Mail to Creator and Mail to Assignee
As you can see in Figure 28, there are many other actions in this profile, but for now I’m focusing on the emails to the Creator and Assigned To parties.
Next, you need the conditions. Action profiles and actions tell the system what to do, while the conditions tell the system when to do it. Go back to transaction SPPFCADM. Select CRM_ORDER as the application again and click the Condition Configuration (Transportable Conditions) button as shown in Figure 29.
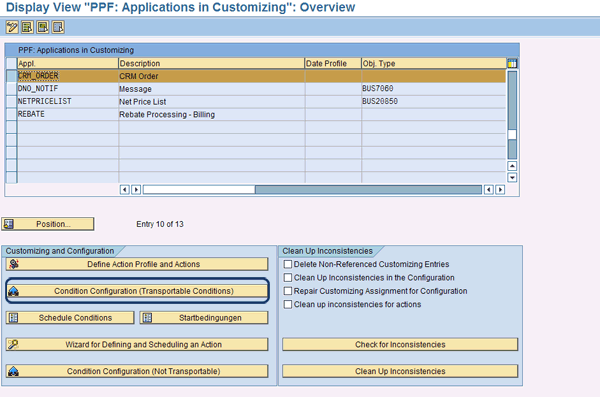
Figure 29
Select transportable conditions
When the next screen is displayed, the first thing I recommend that you do is turn on technical names by clicking the Technical Names button at the top of the screen. It makes it easier to find what you’re looking for. Figure 30 shows the screen with technical names on.

Figure 30
Conditions maintenance with technical names activated
I’ve already positioned the list to the new action profile that I just created. You might notice a 0 in the number column. This indicates that you have not activated any actions for this profile with conditions. To do this, click the create a holder icon  in the right subwindow. This creates a holder for your condition within a specific action in your action profile. This might sound confusing, so let’s step through it. First, choose the action from your profile for which you want to assign a condition (Figure 31).
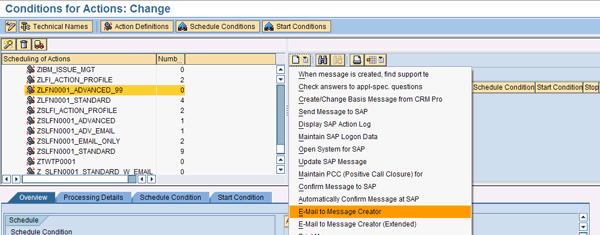
Figure 31
Select the action for sending an email to the Created By party
I repeated this step for the action that will send an e-mail to the Assigned To party. When I’ve selected my actions, the screen looks like Figure 32.
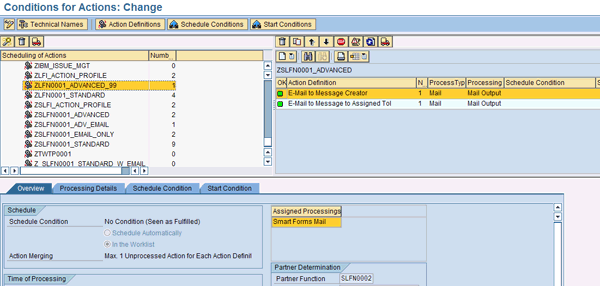
Figure 32
Select the action for sending an email to the Created By party
Now SAP Solution Manager knows to send emails to the Creator and Assigned to parties, but you should provide additional details as to when. First, select the action definition E-Mail Message to Creator in the right subwindow, then click the Start Condition tab in the lower subwindow. Your screen should now look like Figure 33.
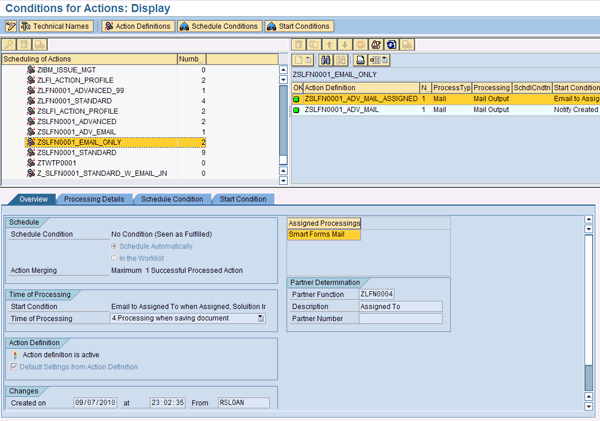
Figure 33
Prepare to create a start condition (I’m using the ZSLFN0001_EMAIL_ONLY action profile to be concise)
When you highlight zslfi0001_adv_mail_assigned, the Overview window in the bottom part of the screen shows that the partner determination is set to go to the Assigned To party, but there is no partner number. This is because the Service Desk uses the partner number entered into the transaction.
By clicking the Start Condition tab, you can reach the screen where you can build the detail conditions to let the Service Desk know under what circumstances to fire the action. As you recall from my explanation earlier, I want to send an email to the Assigned To party when an issue is assigned, when the solution is rejected, or when the solution is implemented. You can do this with a single condition record as follows.
From the Start Condition screen, you can see that I’ve already done the configuration to deliver the business rules for notifying the Assigned To (Figure 34). You screen will be blank in the lower left window.
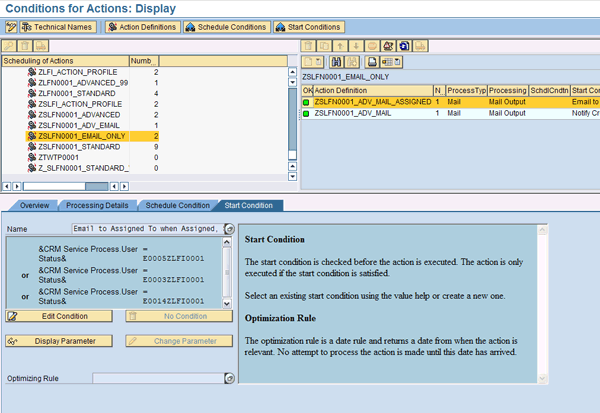
Figure 34
Start Condition maintenance with the rules for Assigned To already in place
Now you will see how I created the start condition. Click the Edit Condition button in Figure 34. In Figure 35, you see the edit screen based on how I’ve already set up a condition.

Figure 35
Edit screen with condition already developed
Figure 36 shows the edit screen for a brand new condition. Note that you need to enter a Name for the condition and click the text “Click here to create a new condition” to open the condition editor (you have to click on the actual text; there is no button to launch the condition editor).
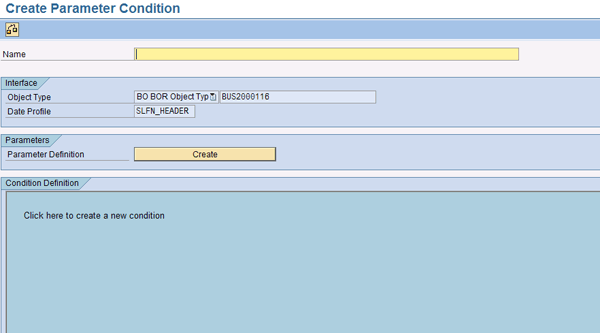
Figure 36
Create condition initial screen
To meet your business rules, you need to tell SAP Solution Manager to fire the action when the user status is Assigned, Solution Implemented, or Solution Rejected.
Next, I’ll show you how to add these criteria into the condition. From the Change Condition screen (Figure 37), double-click the User Status value. By double-clicking the User Status field, the condition editor adds &CRM Service Process.UserStatus& to the Express. 1 column, and the editor has moved to the Op… field. Since you want the condition to fire when the user status is equal to Assigned, you should double-click the = operator in the operator subwindow on the top left of the screen.

Figure 37
Change condition
Figure 38 shows the selection of the = operator. You need to give SAP Solution Manager the value against which you want to compare. This is done by populating the Constant field.
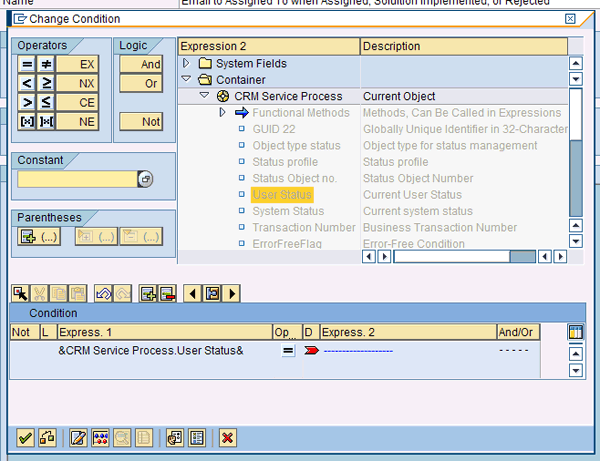
Figure 38
Condition built through the = operator
Through prompting on the Constant field, SAP Solution Manager offers a prompt against which the User Status profile tests. It knows to do this because you chose User Status as the Expression 1 criteria (Figure 39).
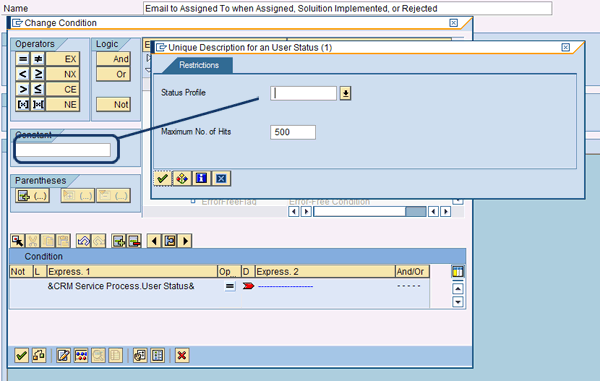
Figure 39
Searching for the Status Profile
Enter the Status Profile that you created previously and press Enter. This makes SAP Solution Manager prompt you with the status values available in that profile. Select the one that represents Assigned (Figure 40). Press Enter twice to complete this part of the condition entry (Figure 41).
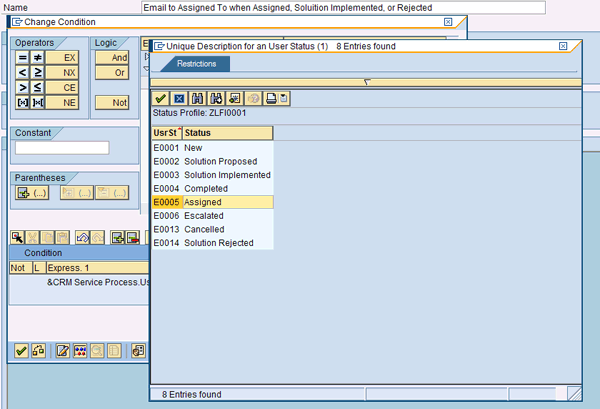
Figure 40
Choose the assigned status value
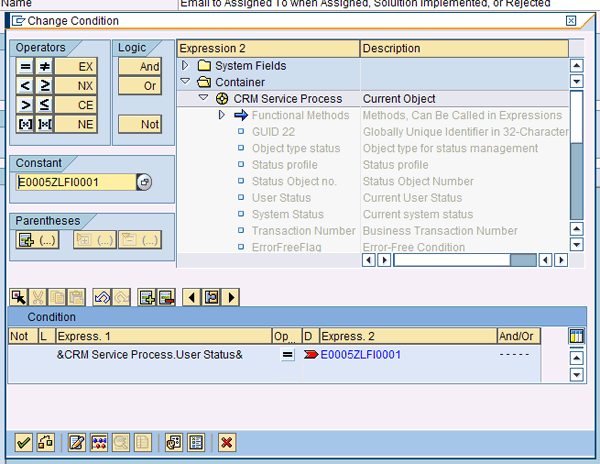
Figure 41
First part of condition complete: approved to fire action when status is Assigned
You might have noticed that the And/Or column has ----- displayed. This is where you can extend your condition rules. Because you have three possible status values that you would like to cause an email to be sent to the Assigned To party, this is an Or condition. Double-click the Or button in the Logic (from the options And, Or, and Not) section of the screen to tell SAP Solution Manager you are extending the condition.
Repeat the steps as before, selecting User Status as the Expression 1, = as the operator, and Solution Implemented as the status. Then, double-click the Or button again to repeat for Solution Rejected. When this is done, your condition should look like Figure 42.
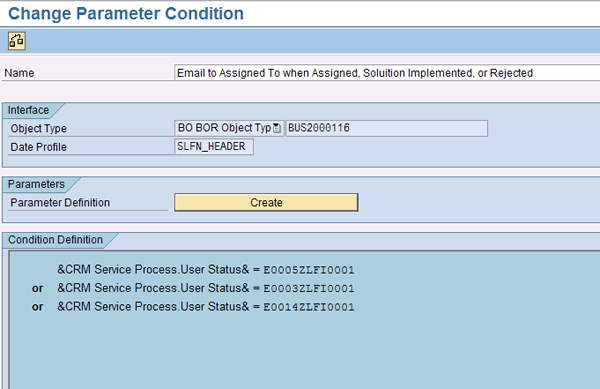
Figure 42
All three conditions for sending an email to the Assigned To party have been entered with Or conditions
Perform the same steps for sending the email to the Created By party based on the rules outlined in the process above. Save all your work, then assign the Action Profile to your transaction type.
To assign the Action Profile to your transaction type, start with transaction SPRO. Follow menu path SAP Solution Manager > Scenario-Specific Settings > Service Desk > Service Desk > General Settings > Define Transaction Types. Open the Define Transaction Types configuration screen and position to your Service Desk transaction type. (We did this for the Status Profile and Partner Profile assignments earlier.) Double-click the transaction type to open the transaction type configuration (Figure 43). Note the assignment of the action profile to the transaction type.
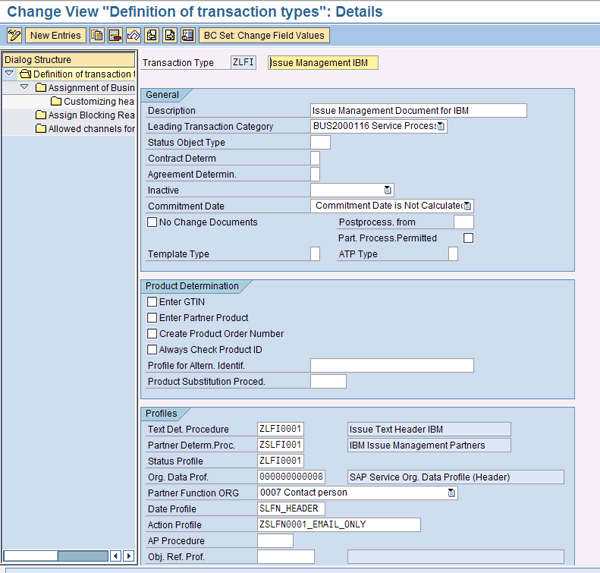
Figure 43
Configuration of Service Desk transaction type
Believe it or not, that’s all there is to it. A couple of other considerations and assumptions to ensure that this all works the way it should:
- Your security team should have as part of their processes the maintenance of the user’s email and address data in their user IDs to enable BP_GEN for automated BP building
- The article assumes the Basis team already has the SMTP configuration done and the SCOT background jobs are running to process outgoing email
D. Russell Sloan
D. Russell Sloan is a specialist in project and program governance for IBM. He focuses on the use of SAP Solution Manager for global rollout projects for IBM’s largest customers, having worked with SAP software since 1996. Russell has degrees in accounting and information systems and has been a team and project leader for SAP projects for more than 14 years. He has been developing and deploying software systems for over 30 years.
You may contact the author at solmanruss@gmail.com.
If you have comments about this article or publication, or would like to submit an article idea, please contact the editor.


