SAP Access Control 10.0 comes with a feature called HR Trigger. It can create a request automatically in the Access Request Management module owing to the changes in different fields (infotype and subtype) of SAP ERP Human Capital Management (SAP ERP HCM). Learn how to:
• Configure SAP Access Control 10.0 to integrate with SAP ERP HCM.
• Take advantage of the HR Trigger functionality in SAP Access Control 10.0 to automatically provision and de-provision access via HR event triggering.
Key Concept
In SAP Access Control 10.0, an
HR Trigger is a feature that enables an SAP Access Control system to capture HR events such as hiring, termination, and retirement, and then use these events to provision or de-provision access depending on conditions defined in SAP Access Control 10.0.
In general, all master data is maintained in a specific SAP ERP Human Capital Management (SAP ERP HCM) system. Once a change occurs in this system, the data needs to be disseminated to other associated SAP ERP HCM systems. HR Triggers in Access Request Management provide the means to automatically transfer the changes from the SAP ERP HCM system to other systems. When an event is triggered in the SAP ERP HCM system, such as hiring a new employee, rules are applied along with its corresponding HR Trigger. The rule and HR Trigger initiate an action for the Access Request Management module to create a request for system access.
HR Trigger is a solid feature in SAP Access Control 10.0 that is underutilized because of complexity in configuration and a lack of information around use of the functionality. I walk you through a step-by-step process for HR Trigger configuration and use. I cover integration of SAP Access Control 10.0 Service Pack 11 with SAP ERP HCM 7.3 (the latest version of both SAP Access Control and SAP ERP HCM at the time this article was written).
Step 1. Install a Foundation Component on SAP GRC and Plug-In Components on SAP ERP HCM
To enable HR Trigger functionality, you need to install GRCFND_A (an SAP GRC Foundation component) on SAP Access Control, and the matching GRCPINW and GRCPIERP plug-in components on the SAP ERP ERP HCM system.
Figure 1 shows the GRC system (SAP Access Control, SAP Process Control, and SAP Risk Management) with GRCFND_A installed.

Figure 1
Components in the SAP GRC system
Note
SAP ERP HCM 7.31 requires you to install GRCPINW-731 SP02 and GRCPIERP-700 SP11. SAP released these components for SAP NetWeaver 7.31 after SAP GRC 10.0 became generally available.
Figure 2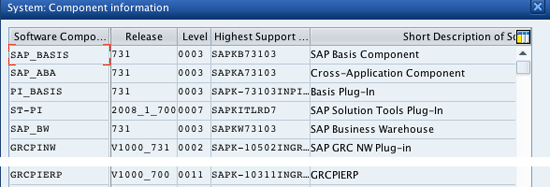
Figure 2
Plug-in components in the SAP ERP HCM system
Step 2. Set Up the SAP Access Control and SAP ERP HCM Systems
Execute transaction code SM59 and make sure that the Remote Function Call (RFC) destination for the SAP Access Control (I refer to my SAP Access Control system as GRDCLNT100) and SAP ERP HCM (I refer to my SAP ERP HCM system as HRDCLNT100) systems is created in the SAP GRC and SAP ERP HCM systems, and that the RFC destination names are the same in both systems (Figure 3).
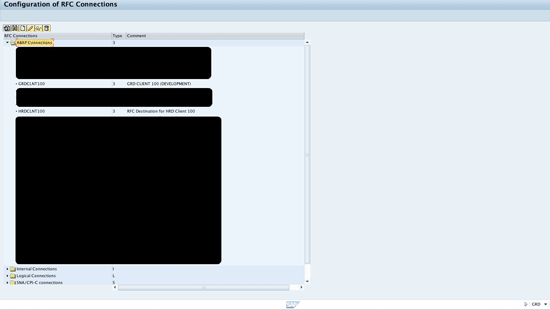
Figure 3
The RFC destinations of GRDCLNT100 (for the SAP GRC system) and HRDCLNT100 (for the SAP ERP HCM system)
In Figure 4 you can see that SM59 in HRDCLNT100 shows RFCs for GRDCLNT100 (GRC system) and HRDCLNT100 (HR system).
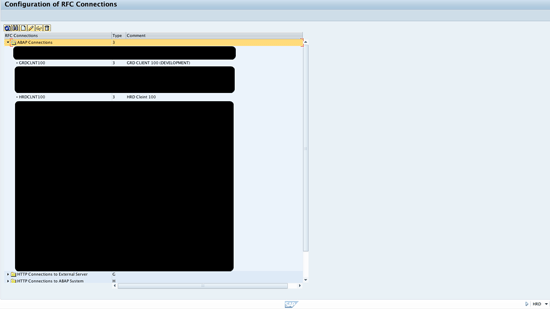
Figure 4
RFCs for GRDCLNT100 and HRDCLNT100
The entire configuration required for HR Trigger is done in the IMG (transaction code SPRO) in the SAP GRC and SAP ERP HCM systems.
Step 3. Set Up Connectors in the SAP GRC System
To set up connectors in the SAP GRC system use transaction code SPRO. Finish the connector-related IMG configuration for SAP ERP HCM in the SAP GRC system. Connector configuration is required to connect the SAP GRC system to any target system (SAP or non-SAP), so it is out of scope of this article. Here are the steps needed to configure connectors.
To define an HR connector and associate it to a connector group, follow menu path Governance, Risk and Compliance > Common Component Settings > Integration Framework > Maintain Connectors and Connection Types. In my example, I define the target connector HRDCLNT100 in the SAP GRC system (Figure 5). Click the New Entries button and then provide values.

Figure 5
HRDCLNT100 defined in GRC system
To associate the target connector to connector groups, follow menu path Governance, Risk and Compliance > Common Component Settings > Integration Framework > Maintain Connection Settings. Select the target connector from the options shown in the drop-down menu in Figure 6. Press Enter.
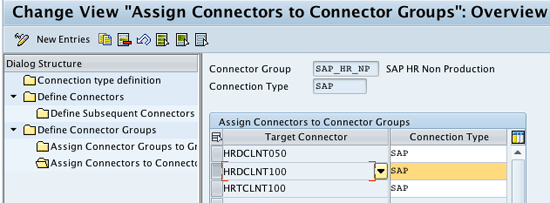
Figure 6
HRDCLNT100 associated to SAP_HR_NP group in GRC system
Note
Every screen in the SAP Access Control back end requires users to click the New Entries button. This is the standard way to complete a configuration step. These steps are required for any user of SAP Access Control, SAP Process Control, and SAP Risk Management.
Add HRDCLNT100 to AUTH (Authorization Management), PROV (Provisioning), ROLEMG (Role Management), and SUPMG (Role Management Super User Privilege Management) integration scenarios.
Figure 7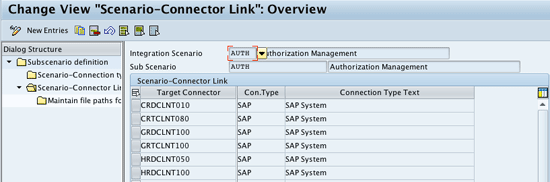
Figure 7
HRDCLNT100 associated to AUTH scenario
Follow menu path Governance, Risk and Compliance > Access Control > Maintain Connector Settings (Figure 8). Click New Entries and enter the connector name. Select the application type and the environment.
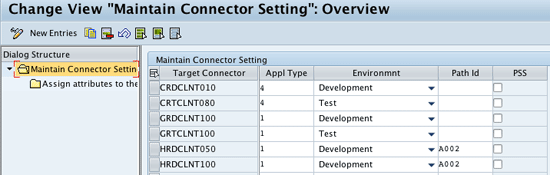
Figure 8
Assign environment and application type to HRDCLNT100
Now associate the connector to the actions 4 (provisioning) and 5 (HR Trigger) as shown in Figure 9. Double-click the Assign default connector to connector group folder and add entries for actions 4 and 5 for SAP_HR_NP.You also need to select the box in the Default column to ensure that HRDCLNT100 is the default connector for HR triggers.

Figure 9
HRDCLNT100 added to actions 4 and 5
You do not need to associate the connector to the other actions: 1 (role generation), 2 (role risk analysis), and 3 (authorization maintenance) for HR Triggers. Follow menu path Governance, Risk and Compliance > Access Control > Maintain Mappings for Actions and Connector Groups.
Step 4. Set HR Triggers in SAP ERP HCM
To set the HR Triggers in SAP ERP HCM execute transaction code SPRO. Follow menu path Governance, Risk and Compliance (Plug-In) > Access Control > Maintain Plug-in configuration Settings. Maintain the connector name for the HR and GRC systems (both have to be exactly the same as defined in the GRC system). To turn on the HR triggers for this HR system, click the New Entries button and add the three parameters shown in Figure 10.
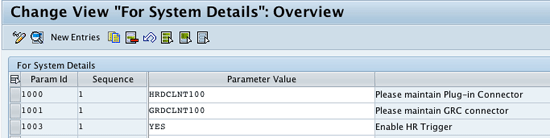
Figure 10
SPRO configuration in the SAP ERP HCM system
Step 5. HR Trigger Settings in the SAP GRC System
At this point, it’s important to identify the events in the SAP ERP HCM system that should trigger request creation in Access Request Management. For this article, I focus on hiring actions in the SAP ERP HCM system. I also describe the configuration related to terminate actions in the SAP ERP HCM system.
Figure 11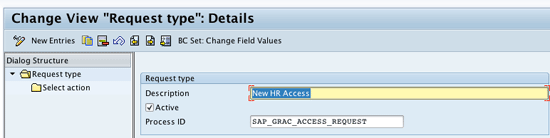
Figure 11
Add Request type for new hire
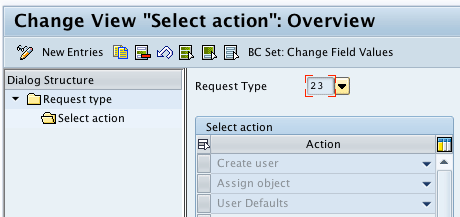
Figure 12
Add actions to a new hire request type
Add the same number of request types as the number of HR events. Select the checkbox in the Active column for the corresponding request type. In my example request types 23 and 24 are for HR new hire and terminate actions (Figure 13).
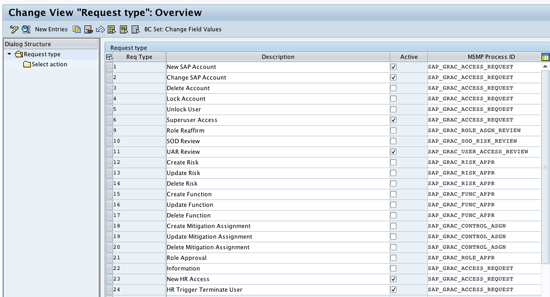
Figure 13
Add the same number of request types as the number of HR events
Note
I assume that the entire necessary configuration required to make Access Request functioning is complete.
Follow menu path Governance, Risk and Compliance > Access Control > User Provisioning > Maintain Settings for HR Trigger. Click New Entries and add entries for the corresponding actions for the request types you created earlier (Figure 14). If you want to update other SU01 (user master) fields, click the drop-down menu and select Yes or No for each of the fields.
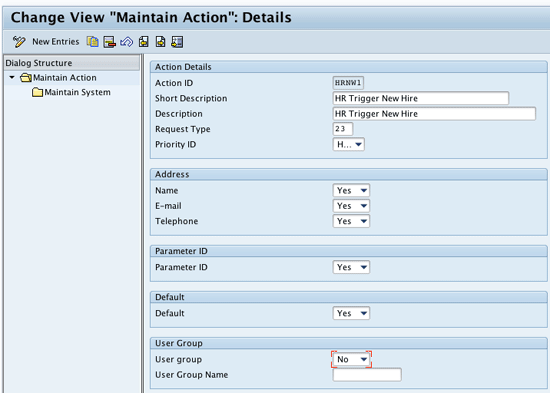
Figure 14
New hire HR Trigger (HRNW1) action for request type 23
To add a system for that particular action, click the Maintain System folder (Figure 15). This system is added to the request. If you want to provision to more systems in addition to HR, add them here.

Figure 15
System for HRNW1 action
To add actions for the two request types, click the Maintain Action folder (Figure 16).
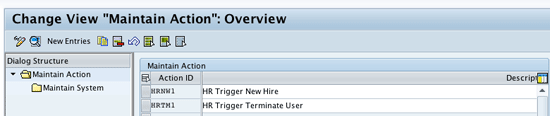
Figure 16
Actions added for both the request types
Step 6. Business Rule Framework (BRF+) Configuration in the SAP GRC System
Note
I assume that readers have adequate knowledge of BRF+. Explaining BRF+ and multistage multipath (MSMP) workflow is out of scope for this article.
To configure BRF+ in the SAP GRC system, execute transaction code SPRO. Follow menu path Governance, Risk and Compliance > Access Control > Maintain AC Applications and BRFplus Function Mapping. Copy the BRF Function Id for HR Triggers from this screen (Figure 17).

Figure 17
Function ID for HR Triggers BRF+ application
After you execute the transaction BRF+, a browser (e.g., Internet Explorer) window opens. Click Workbench and select Open Object... from the list of options (not shown). In the pop-up box that appears paste the BRF+ function ID copied earlier (Figure 17) and then click the Show button (Figure 18).
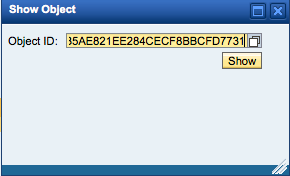
Figure 18
BRF+ function ID
In the screen for the BRF+ function click the Assigned Rulesets tab and click the Create Ruleset button (Figure 19).
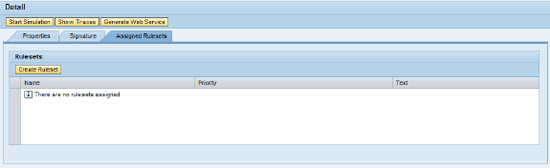
Figure 19
The Assigned Rulesets tab in the HR Trigger function
In the pop-up box that appears (Figure 20) enter the name, short text, text, and application. Click the Create and Navigate To Object button.
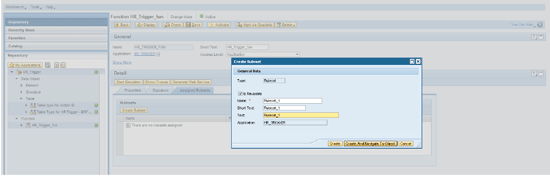
Figure 20
Create the ruleset
In the next pop-up box click the Yes button to save the object. Enable the ruleset by clicking the Enable Ruleset button (not shown). Then assign the priority to the ruleset. Click Ruleset Operations and select Assign Ruleset Priority from the list of options (Figure 21).
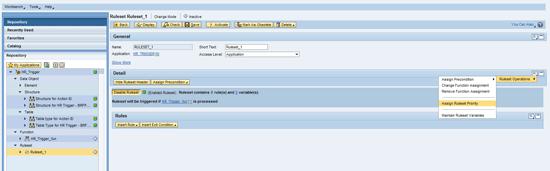
Figure 21
Assign priority
Enter the priority and click the OK button (Figure 22).
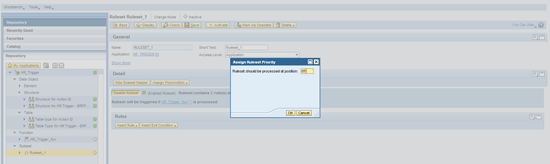
Figure 22
Save the priority
In the screen that appears, click the save icon. You receive a status message like the one shown in Figure 23.
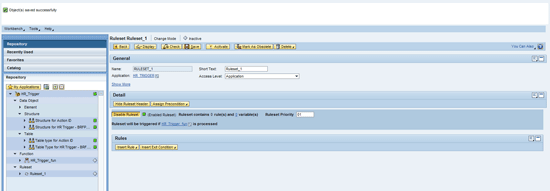
Figure 23
Status message indicating that Ruleset_1 is saved
To create the rule right-click the HR_TRIGGER link in the Application field. Go to Create > Rule... (Figure 24).

Figure 24
Add a rule to the ruleset
In the pop-up box that appears enter the details as shown in Figure 25. Click the Create And Navigate To Object button.
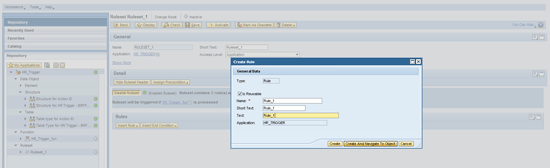
Figure 25
Create rule_1
To save the rule click the save icon. Now insert the rule in the ruleset that you created earlier. In the Rules section click Insert Rule and then choose Select... (Figure 26).
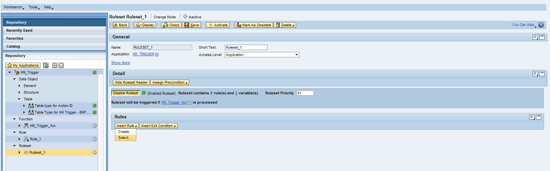
Figure 26
Insert a rule in ruleset_1
In the pop-up box that appears (Figure 27) select the rule RULE_1.
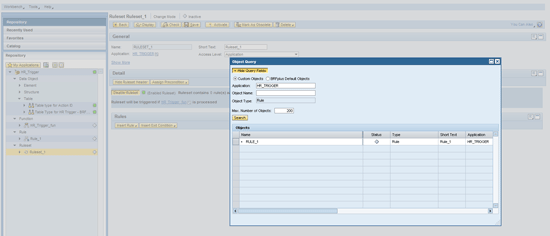
Figure 27
Select the Rule_1
To save the ruleset click the save icon. You receive a status message stating that Rule 1 has been defined (Figure 28).
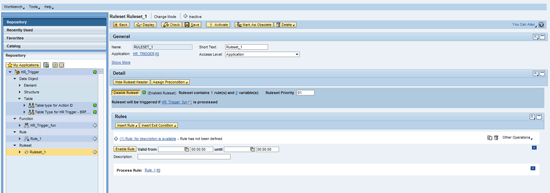
Figure 28
Rule_1 is inserted in Ruleset_1
In the next screen (Figure 29) select Rule_1. Click Add and then select Process Expression and Create… from the options in the menu.
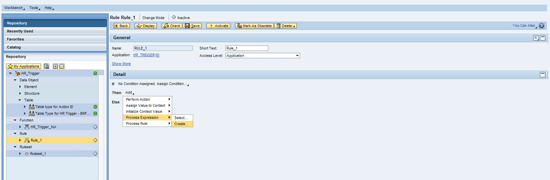
Figure 29
Create a Process Expression
In the pop-up box that appears (Figure 30) define the Process Expression. Populate the Name, Short Text, and Text fields. Enter HR_TRIGGER in the Application field. Now click the create button.

Figure 30
Define the Process Expression
In the next screen (Figure 31) associate the Process Expression type to a loop by selecting Loop from the options in the menu. Click the Create button.
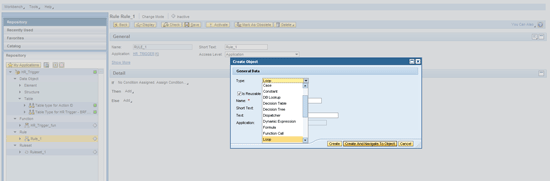
Figure 31
The Process Expression is associated to Loop
In the next pop-up box that appears (Figure 32) enter Loop_1 in the Name, Short Text, and Text fields. Enter HR_TRIGGER in the Application field and click the Create And Navigate To Object button.

Figure 32
Provide values for Loop_1
The next screen (Figure 33) shows that Loop 1 is added to Rule_1.
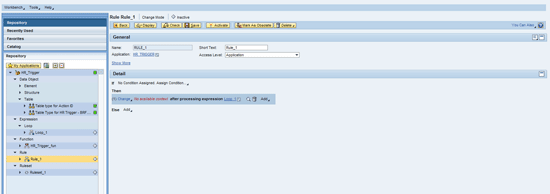
Figure 33
Loop_1 is added to Rule_1
Click the Loop_1 button in the middle of the next screen (Figure 34).

Figure 34
Open Loop_1
In the pop-up box that appears (not shown) click the Yes button to save the object Rule_1. You receive a status message indicating that the object was saved successfully. In the Result Type field select Perform Action (Figure 35).
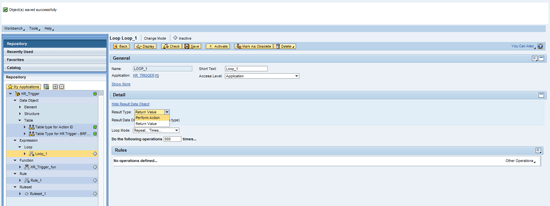
Figure 35
Select Result Type
Select the Loop Mode For Each Entry in… as shown in Figure 36.

Figure 36
Select a Loop Mode
Select the table by clicking Select… as shown in Figure 37.
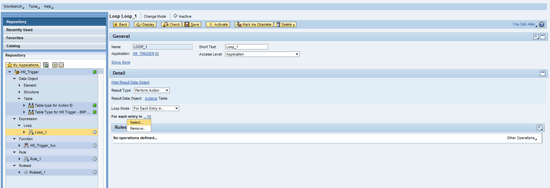
Figure 37
Select the table
In the pop-up box that appears (Figure 38), select the HR_TRIGGER_TABLE.
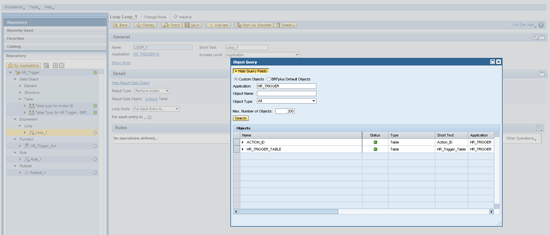
Figure 38
Select the HR_TRIGGER_TABLE
Click the save icon to save the loop Loop_1. Now create one more rule as shown in Figure 39.
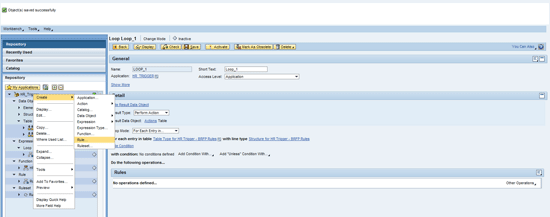
Figure 39
Add the rule to the application
In the pop-up box that appears, enter the details shown in Figure 40. Click the Create And Navigate To Object button.
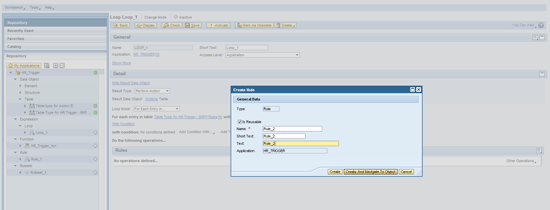
Click the save icon to save the rule Rule_2. You receive a status message indicating that the object was saved successfully (this screen is not shown). Now add Rule_2 as shown in Figure 41.

Figure 41
Add Rule_2 to Loop_1
In the pop-up box that appears click the Search button. Select the RULE_2 object (Figure 42).

Figure 42
Highlight the row containing Rule_2
Save the loop Loop_1. You receive a status message indicating that the object was saved successfully. Then create a decision table as shown in Figure 43.
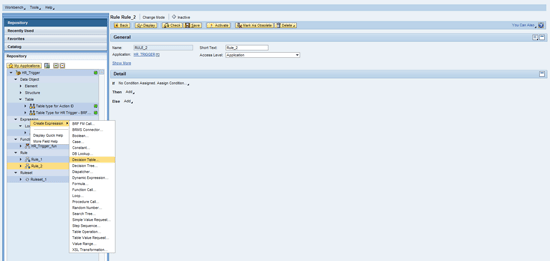
Figure 43
Create a decision table
In the pop-up box that appears enter the details as shown in Figure 44. Click the Create And Navigate To Object button.

Figure 44
Provide values for the decision table
A pop-up box appears with a message stating that a Decision Table was created successfully (Figure 45).

Figure 45
The column selection screen for the decision table
Click the Insert Column button and then choose From Context Data Objects from the list of options in the drop-down menu (I have not included a figure showing this menu). Select the objects in the table and click the Select button (Figure 46).

Figure 46
Select objects in the table
The selected objects are displayed in the table shown in Figure 47. Now click the Insert Column from Data Object button in the Result Columns table.
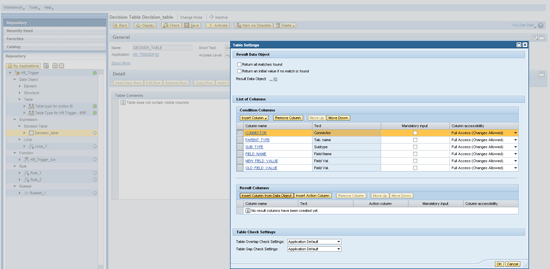
Figure 47
Selected columns appear in the Condition Columns table
In the pop-up box that appears click the Search button. Select the object and click the Select button (Figure 48).
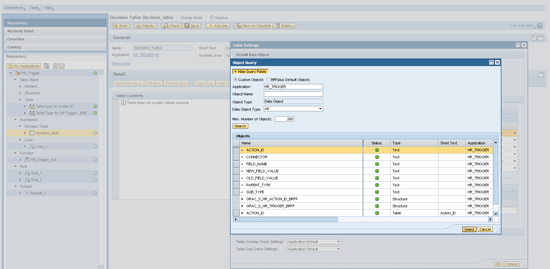
Figure 48
The selection screen for result columns
The selected objects are displayed in the table. Now click the OK button (Figure 49).

Figure 49
Selected columns for condition and result columns
Now you can find the columns in the table (Figure 50).
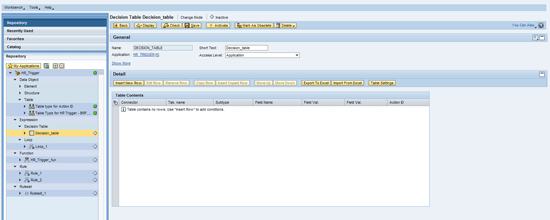
Figure 50
The screen showing all the selected columns under table contents
Click the Insert New Row button to add the contents to the decision table (Figure 51).

Figure 51
Add contents to the decision table
Enter the connector value (e.g., HRDCLNT100) and add it to the connector. Click the OK button (Figure 52).
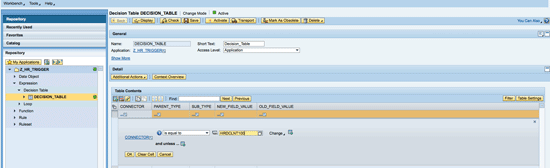
Figure 52
Add the connector value
Follow the same steps and add values for the necessary columns as shown in Figure 53.

Figure 53
Condition values for new hire action
Add another row by following the same steps, and provide values for the next action (Figure 54).
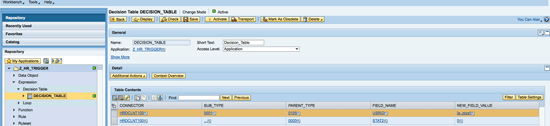
Figure 54
The condition screen
You can see two entries in the decision table matching the request types and HR Trigger actions you created earlier in the SAP GRC system (Figure 55):
- Condition 1 is for a hiring event and it only triggers the event when the user ID starts with a character from A…Z
- Condition 2 is for a termination event

Figure 55
New hire and termination conditions
Save the decision table by clicking the Save button. Activate the decision table by clicking the Activate button. Add a Process Expression as shown in Figure 56.

Figure 56
Add a Process Expression to Rule_2
Select the object DECISION_TABLE (Figure 57). Click the Search button and then highlight Decision_Table.
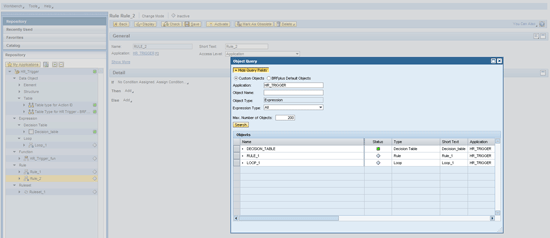
Figure 57
Select the Decision_Table object
Now assign the value to the Action ID result data table. Click Add and from the drop-down menu select Assign Value to Content > Table type for Action ID. Select Insert (Figure 58).
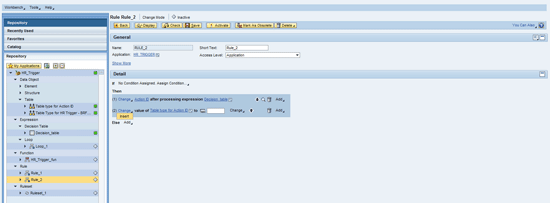
Figure 58
Assign a value to the action ID result data table
In the next screen select the context parameter (Figure 59).
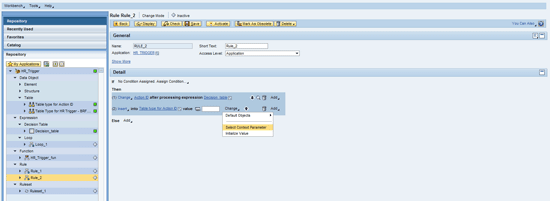
Figure 59
Select a context parameter
Select the ACTION_ID object (Figure 60). Action_ID captures the event from HR (new hire or terminate).

Figure 60
Select the Action_ID object
Save Rule_2. You receive a status message indicating that the object was saved successfully. To activate this rule, click the Activate button. A pop-up box appears asking you if you really want to activate Rule_2. Click the Activate button as shown in Figure 61. You receive a status message indicating that the object was activated.

Figure 61
Activate Rule_2
Now activate the loop Loop_1. Highlight Loop_1 and click the Activate button (Figure 62).
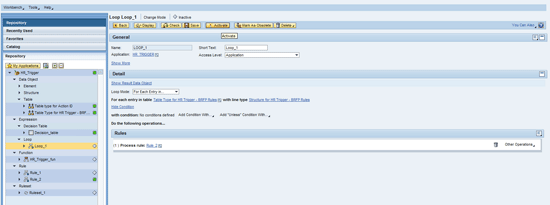
Figure 62
The Loop_1 screen showing condition and rules
In the pop-up box click the Activate button (Figure 63).

Figure 63
Activate Loop_1
You receive a status message indicating that the object was activated successfully. Now activate Rule_1. Highlight Rule_1 and click the Activate button (Figure 64).

Figure 64
Activate Rule_2
In the pop-up box that appears click the Activate button. Now activate the Ruleset_1. Highlight Ruleset_1 and click the Activate button. Again, you receive a status message indicating that the object was activated successfully. You have now completed the configuration of HR Triggers. Now I explain how to troubleshoot if there is any issue.
Step 7. Test HR Triggers
Note
I assume that reader has adequate knowledge of an SAP ERP HCM system. Explaining HR-related transaction codes is out of scope for this article.
Execute transaction PA30. Perform a hiring, position change, or termination action. In my example, I initiate a hiring event (Figure 65).

Figure 65
Assign a user name (user ID) to a user in HR
Figure 66 shows the transaction PA30 screen after assigning a user name to a personnel number.

Figure 66
A user name assigned to a personnel number
Step 8. Monitor a Queue in the SAP ERP HCM System
In GRC 10.0, HR Triggers that are generated from the SAP ERP HCM system are stored in a queued RFC (qRFC). This queue is processed from time to time and the HR Triggers are then sent to the GRC box (i.e., the GRC system). This is designed to deal with a situation in which the GRC box is down and HR Triggers are still generated. In this case, as soon as the GRC box is up again, the HR Triggers queue begins processing again.
Execute transaction code SMQ1. Enter the client and * in the Queue Name field (Figure 67). If you see a queue for /GRCPI/HR_TRIGGER, then there may be an issue with the HR Triggers. To resolve the issue, select the HR Trigger row and click the Activate button.

Figure 67
Monitor a queue in the SAP ERP HCM system
Step 9. Review the Application Log in the SAP GRC System
Once the trigger is generated and received in the GRC box, the transaction code SLG1 in the GRC box shows the HR Trigger logs. In the logs it shows the HR data that is modified. The log also shows if the BRF+ rule is not satisfied.
Execute transaction code SLG1. Enter GRAC as the value for Object and HRTRIGGER for the Subobject (Figure 68). GRAC is for SAP Access Control. This is how SAP built the SAP GRC system. Select the green check mark (not shown) to execute this transaction.
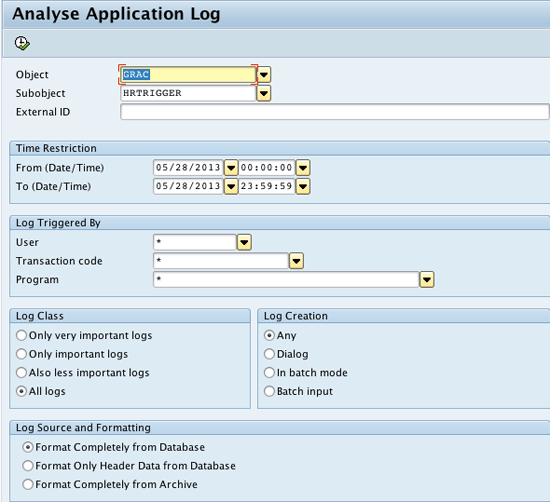
Figure 68
Select values for the Object and Subobject fields
Figure 69 is a list of all of the HR Triggers. You can double-click HR Triggers from the top panel to see more information about that trigger (details are displayed in bottom panel).

Figure 69
Logs for HR Triggers
Step 10. Check the Request in GRC System Front End
Once you are able to confirm that the HR Trigger is working and a request has been created, you can validate the request in the Access Control front end.
Note
Make sure Multistage Multipath (MSMP) workflow is active and working before moving to this step.
Open the SAP NetWeaver Business Client front end and go to Search Requests under the Access Request Management tab. Although configuring HR Triggers in SAP Access Control 10.0 is not straightforward, it’s a solid functionality and a vast improvement over HR Triggers in SAP Access Control 5.3.

Alpesh Parmar
Alpesh Parmar is the managing partner at ultimumIT, Inc. He has over 11 years of experience in the IT field and led many SAP implementations. He is an internationally recognized and a renowned subject matter expert for SAP GRC solutions and has been speaking at different SAP conferences. His articles have been published in SAP forums, SAPinsider, and the SAPexperts GRC hub. Before founding ultimumIT, Inc., he was at Levi Strauss & Co. for almost three years serving as GRC architect/advisor. Prior to joining Levi, he was a manager at PricewaterhouseCoopers and led multiple SAP GRC engagements. He also served as implementation team lead at SAP Labs and as senior software developer at Virsa Systems. Alpesh holds a bachelor’s degree in control engineering (B.E.I.C.) from Gujarat University, in India, and a master’s degree in computer science (M.S.C.S.) from Monmouth University, in New Jersey.
You may contact the author at alpeshparmar@ultimumit.com.
If you have comments about this article or publication, or would like to submit an article idea, please contact the editor.