Effective SAP BusinessObjects Web Intelligence report design is generally measured by a user's level of satisfaction with their ability to efficiently analyze business data in a report. The likelihood of success improves greatly when reports are designed for a particular group of users and a specific purpose. Among the key factors to consider when designing reports include the placement and relative position of elements on the report canvas, customization of formatting properties, and adjustment of page layout settings.
Key Concept
The relative position property gives ad hoc users and report writers the capability to connect data tables and charts to maintain a uniformed and synced appearance when the size of the data set changes. Without careful attention to the relative position property of report elements, your reports could eventually encounter layering issues, large empty gaps, or a combination of both as users filter and drill into data on the report panel.
Similar to dashboard design, the style and format of charts and tables on an SAP BusinessObjects Web Intelligence (also known as WebI) report play a major role in user acceptance because of Web Intelligence’s capability to easily change the volume of data being analyzed. Because users have the ability to interact with data on-the-fly and manipulate reports in so many different ways, the amount of content being analyzed can jump from only a few rows to several thousand in a single click. While viewing reports, users have the capability to apply filters, drill to details, fold or unfold groups and breaks, and control the on-screen results with input controls.
Knowing how report users draw on data in Web Intelligence is critical when deciding how to display it. Questions to ask when creating reports include:
- Should reports be designed for printing or used for analysis only?
- Will reports be exported to PDF or Excel for portable distribution?
- Is your audience internal or external to the organization?
These questions should be considered in order to effectively design with the business user in mind. Let’s look at these three questions in more detail.
Designing Reports to be Printed or Exported
If reports are to be printed or exported to PDF for distribution, change the view mode from the default quick display mode to page or PDF mode. These choices present the reports as they will appear on a printed page. Use the page mode to also see the report with simple filters and input controls. PDF mode converts the report panel to Adobe Reader and transforms the data to a PDF. All simple filters, input controls, and drilling are disabled in PDF mode. Use this view mode strictly for printing and exporting for portable distribution.
Figure 1 shows a basic report in quick display mode within InfoView. To see how the report appears if printed, click View on the default toolbar in the upper left and select either Page mode or PDF mode.
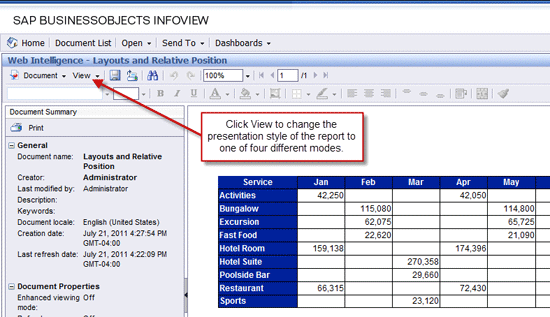
Figure 1
Use the View menu to change between page and PDF mode
Figure 2 shows how the report appears in page mode. Notice the amount of empty blank space above and on both sides of the data table. By default, all margins (top, bottom, left, right) are set at 76 pixels or 0.78 inches. These margins often leave excessive blank space and should be adjusted to a more appropriate size for the data being delivered. You can also see that all the information does not display on a single page because the columns for August through December are missing. You can remove or minimize page headers and footers to appropriate dimensions to make better use of the report canvas.
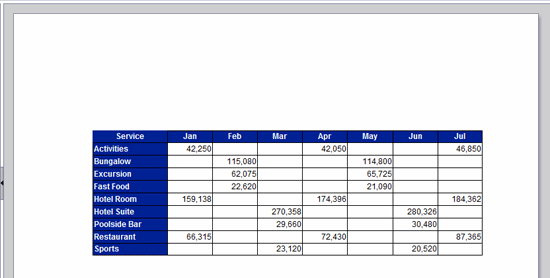
Figure 2
A report displayed in page mode
Changing the Page Orientation
In these situations, the data fits the page better if the page orientation is changed from portrait to landscape. Maximize the space on the screen by adjusting the margins and moving report elements to the outer edges of the canvas.
To change the page orientation while viewing a report, right-click anywhere on the report panel and select Format Report (Figure 3).
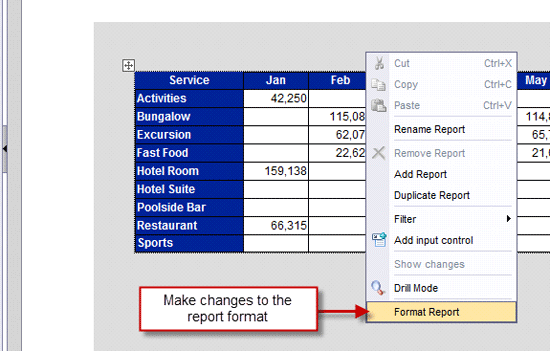
Figure 3
Select Format Report to change a format
The subsequent Format Report window provides several properties to modify the presentation style and appearance of the report without having to enter edit mode (Figure 4).
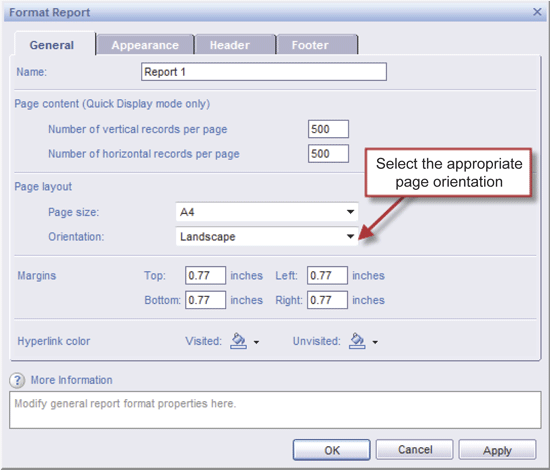
Figure 4
Options in the Format Report window
Some of the elements available in the Format Report dialog box include the following:
- Page content (Quick Display mode only), which lets you adjust the number of vertical and horizontal records displayed per page.
- Page layout, which lets you:
- Change the page size – Choose among 24 page-size options
- Switch page orientation to either portrait and landscape
- Adjust margins for the top, bottom, left, and right sides of a report (the default is 0.77 inches in view mode and 75 pixels in edit mode)
- Show header and show footer, and adjust their heights, using the tabs at the top
Meanwhile, to format reports in edit mode, use the extensive set of modifiable properties available in the Properties tab on the Report panel. Users will commonly perform ad hoc query and analysis of business data in a Web Intelligence report. When these types of reports are created, the report will be in edit mode.
Designing Reports for Analysis
If reports are designed primarily for analysis, for exporting to Excel, or for use as a business intelligence Web Service data source for Xcelsius, then save reports in quick display mode or draft mode. These viewing modes are generally not intended for printing and provide the largest canvas for analysis.
Setting up the Relative Position Property
One of the best ways to achieve a consistent appearance in a filtered report is by explicitly defining the relative position of all report elements. This is done by overriding the implicit location of every object added to a report canvas. Any time you add a new element, the location of the object is identified in pixels in relation to the left edge and top edge of the report. This method works fine until the amount of data being analyzed in the report changes significantly. By using the relative position property, consistency and uniformity are maintained while reports are analyzed or when varying data sizes are returned after queries are refreshed.
Figure 5 shows a report in InfoView in page mode containing two charts and a data table. At first glance, the report elements appear to be positioned acceptably because the selected filters only returned three rows of data.
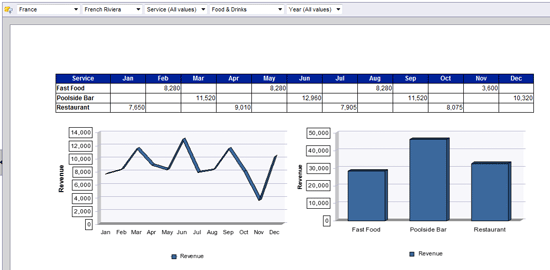
Figure 5
A Web Intelligence report with filters, data table, and two charts in a presentable format
However, when the filters change, the number of rows being analyzed is different and the charts overlap the data table (Figure 6). This example highlights the need for enabling the relative position property and forcing the two chart elements to always appear a specified distance from the data table. By setting up this feature, all report elements remain in sync regardless of the data being analyzed.

Figure 6
Report elements can overlap without proper positioning
By default, all report elements are given a relative position within the report based on where they were placed on the canvas. To override this position and make it relative to a different object, right-click on one of the charts and select Format > Chart. Select the Layout tab after the dialog window opens (Figure 7).
When the layout tab is selected for the first time, an object’s relative position is set to its position within the report itself and identified inches from the left edge of report and top edge of report. When the drop-down is changed from “Left edge of report” to “Left side of …”, you’ll have the opportunity to select an anchor object rather than the report itself.
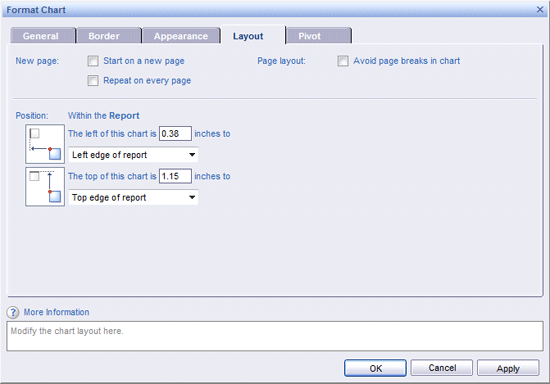
Figure 7
Report elements you can modify under the Layout tab
Follow these steps to set up relative positioning while viewing a report:
- Identify the name of the anchor object (i.e., report element) on the canvas (on the General tab in Figure 7)
- Right-click on the report element to be used as the anchor object
- Select Format > Table if the anchor object is a data table
- Select Format > Chart if the anchor object is a chart
- Select Format > Cell if the anchor object is a cell
- Locate the object name on the General Formatting tab (select this name as the “relative to” object in step 2)
- You can modify the name of the anchor object to make it easier to identify in subsequent steps
- Identify every report element that needs relative positioning
- Right-click on each element individually to format the object
- Select the Layout tab in the Format dialog window (Figure 7)
- Modify the Position settings on the Layout tab of every connecting element
- Change the selection “Left edge of report” to “Left side of …” or “Right side of …”
- Change the selection “Top edge of report” to “Top side of …” or “Bottom side of …”
- Select the anchor object that the current element should be relative to beside the prior two selections
- Change the amount of space in inches to be relative to the anchor block
- Click the Apply and OK buttons
Figure 8 shows how the location of a chart is set relative to the Test Data Block object. As mentioned earlier, an anchor object can be selected when the first drop-down is changed from “Left edge of report” to “Left side of …” or “Right side of …”.

Figure 8
Adjusting an object’s position relative to the Test Data Block
After setting up relative positioning on both chart objects in Figure 5, the charts are now displayed correctly regardless of the data size being analyzed.
The screenshots below illustrate the improved report with both charts set up with their position relative to the anchor data block. Figure 9 shows the appearance of the report with nine rows of data in the table and 12 months in the columns.
Figure 10 shows how the relationship of the two charts remains intact when other filters are selected and fewer rows of data are displayed.

Figure 9
The table at the top of the screen shows nine rows of data now after adjusting the positions of the lower charts
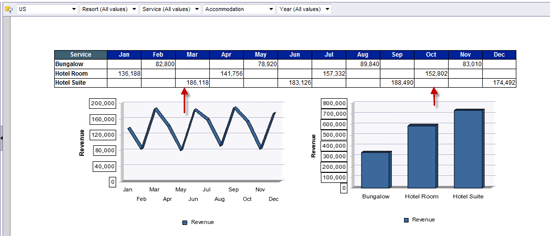
Figure 10
The charts retain their positioning relative to the table even after filters reduce the amount of rows in the table
Setting Relative Position While Editing a Report
My earlier instructions outline the steps for setting up relative positioning of objects while viewing a report. You can set up the same properties while editing a report, but the steps are slightly different (Figure 11):
- Select the object to assign relative positioning to
- Under the Properties tab, expand the page layout property
- Expand the Relative Position item and then click the ellipsis icon located to the right of the property
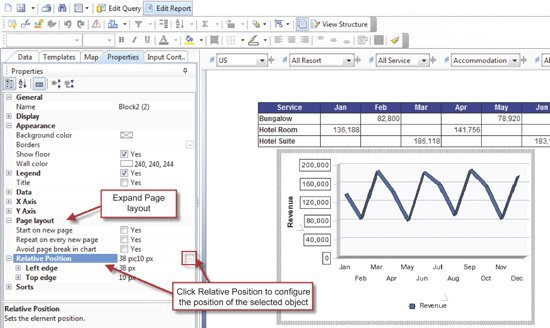
Figure 11
Adjusting relative position in edit mode
The settings in the Relative Position dialog box are similar to the settings in the Format Chart window in view mode, with the primary exception being that the space is calculated in pixels rather than inches (Figure 12).
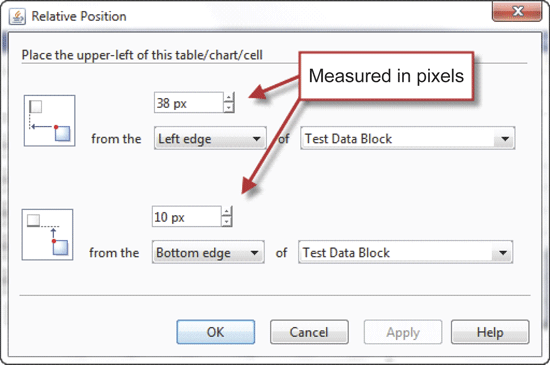
Figure 12
The Relative Position dialog box in edit mode