Learn about the down payment process using the sales and distribution (SD) module, including details about the main customizing settings to be done in the system from a sales and financial point of view. See solutions already implemented in production environments for SD and Financial Accounting (FI) in SAP ERP Central Component (SAP ECC) 6.0. These processes also apply to previous versions.
Key Concept
Using milestone billing, you distribute the total amount to be billed over multiple billing dates in the billing plan. As each milestone is successfully reached, the customer is billed either a percentage of the entire product cost or simply a pre-defined amount. During sales order processing, the system determines from the item category whether a billing plan is required and, if so, which type of plan to use. The type of billing plan that is determined at this point is set up in Customizing and cannot be changed in the sales document.
Companies normally deal with down payment processes when selling complex equipment or services. Using a down payment process with a billing plan based on milestones for those sales can improve cash flow and relationships with customers. It allows you to monitor processes such as sales order history using standard SAP reports and transactions. A functional expert takes care of customizing prerequisites to run this process in the sales and distribution (SD) and Financial Accounting (FI) modules. Then the logistics and financials departments can set up the down payment process in SAP ERP Central Component (SAP ECC) 6.0.
Business Activities
Figure 1 is an overview of the main activities relevant to the down payment process:
- Enter the sales order with down payment details (i.e., price condition and billing plan)
- Create and print the down payment request in the SD module
- Post the FI down payment request in FI with reference to the SD down payment request
- Enter the customer’s billing in the SD module with evidence of the down payment plan
- Post the incoming down payments in FI
- Settle the down payments in FI
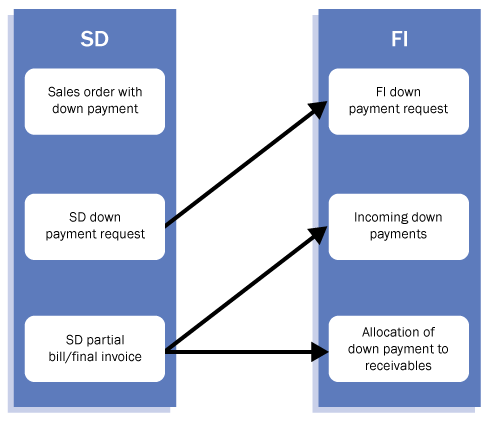
Figure 1
Main activities involved in the down payment process
Customizing Prerequisites
The following are the most important customizing settings to be checked in the SD and FI modules. Check the standard SAP settings and if something does not match the customer’s requirements, you can copy the standard SAP objects into Z objects and update them.
SD-Relevant Customizing
Before testing the down payment process using the milestone billing plan, you need to perform the following customizing steps.
- Maintain billing plan types for milestone billing. The billing plan type determines the billing rule (percentage or value down payment) for the down payment request. The system assigns billing type FAZ (payment request) defined in the standard system with billing category P. (The standard system has cancellation billing document type FAS for the billing type FAZ.) Use customizing transaction OVBO. The details are shown in Figure 2. Check if the value fields for the start date, online order, and FCode-OverScrn (default function code for the overview screen of the billing plan) match your requirements.
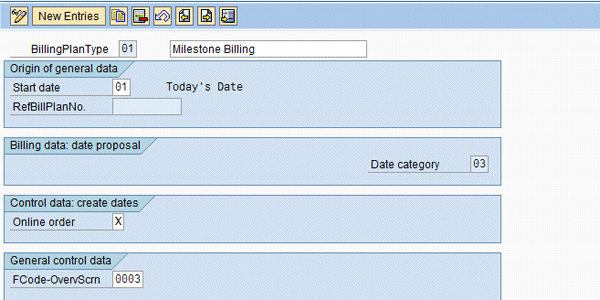
Figure 2
Display standard billing plant type 01
- Define date descriptions by entering the meaning of the codes, such as Rent or Maintenance. Use customizing transaction OVBN (Figure 3).
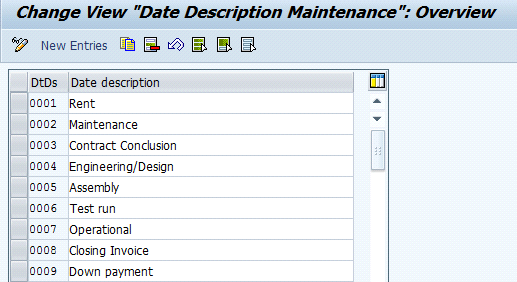
Figure 3
Define the date descriptions
- Define rules for determining the date. To define (or change and display) the rules for determining the date, use customizing transaction OVBS. The system provides the details in Figure 4.

Figure 4
Define rules for determining the date
- Maintain the date category for the billing plan type. Use customizing transaction OVBJ (Figure 5). Check if the values match the requirements for the Billing rule, Fixed date, Billing block, and Billing Type. If they do not match, change them and then click the save icon.
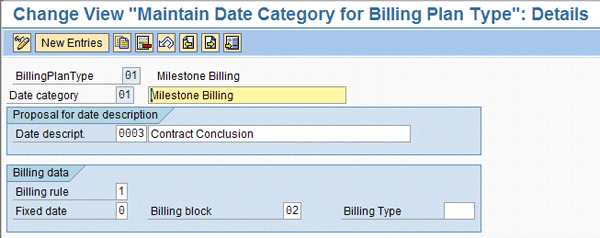
Figure 5
Define date category for billing plan type
- Allocate the date category to the billing plan type. Use customizing transaction OVBJ (Figure 6). Specify the values in the DD (default date category) column (i.e., 01 or 03).

Figure 6
Assign date category for billing plan
- Assign the billing plan type to the sales documents type. With this customizing step, you can assign a specific billing plan type to the company’s sales order type. To do so, use customizing transaction OVBP (Figure 7). Use the picking list available in the BillPlanTy field.

Figure 7
Assign billing plan type to sales order document type
- Assign the billing plan type to item categories by using customizing transaction OVBR (Figure 8). Enter the billing plan type and click the save icon.

Figure 8
Assign billing plan type to item category
- Maintain a pricing procedure with the condition type AZWR. In the standard system the condition type AZWR is delivered for the down payment value already provided but not yet calculated. You include this condition type in the relevant pricing procedure before the Output Tax, as shown in Figure 9. Enter condition 2 (item with pricing) and the calculation formula 48 (down payment clearing value must not be bigger than the item value) for the condition type AZWR.
Before the condition AZWR you can create a subtotal with the base value calculation formula 2 (net value). If the condition AZWR is changed manually, you can get information on the original system proposal from the subtotal. To do so, follow customizing menu path Sales and Distribution > Basic Functions > Pricing > Pricing Control > Define and Assign Pricing Procedures > Maintain pricing procedures. Then select procedure RVAA04 from the list of values in the table. Click the Control data button (Figure 9). Usually every company has its own custom pricing procedure.
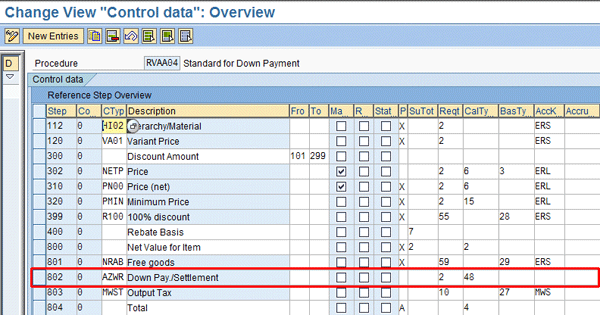
Figure 9
Check price procedure details for down payment
- Maintain the billing document. The standard system has billing type FAZ (down payment request) and FAS (for cancelling the billing type). Controlling the down payment is done using the billing category P of the billing type. A billing type becomes a down payment request when the billing category P is assigned. You have to maintain blocking reason 02 (complete confirmation missing) for the billing documents and assign it to billing type FAZ. If the billing document type FAZ doesn’t meet your requirements, then you can copy it into a custom document, for example ZAZ, using the copying function icon
 . Use customizing transaction VOFA (Figure 10) to display all the relevant customizing parameters for the down payment request document type. If needed you can update them based on your requests.

Figure 10
Display the main details of the billing type FAZ
- Maintain copying control using copying requirement 20, which represents a set of standard SAP rules that should be satisfied in order to copy a sales order line item into a billing line item. You must enter it in copying control at the item level for the down payment request. In the standard system, the order type TA for copying control is set up according to the billing type FAZ for the item category TAO. To display these settings, use customizing transaction VTFA (Figure 11). If these settings don’t match your requirements, then you can create a custom object and apply the relevant changes.

Figure 11
Display the item copy control between the billing type FAZ and standard customer order type OR
- Enter the copying requirement using copying requirement 23 in copying control at the item level for down payment clearing. In the standard system, order type TA for copying control is set up according to the billing type F2 for the item category TAO. To display these settings, use customizing transaction VTFA (Figure 12). If these settings do not match your requirements, then you can create a custom object and apply the relevant changes.
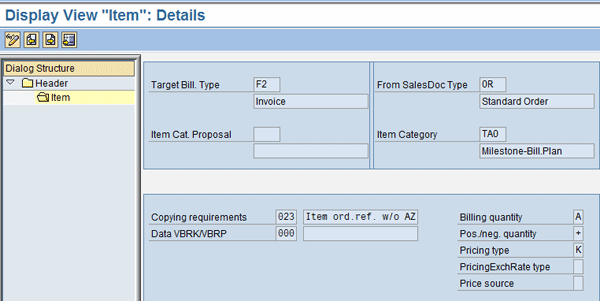
Figure 12
Display the item copy control between the billing type F2 and order type OR
FI-Relevant Customizing
A prerequisite for down payment processing is that you assign the account to the underlying sales document. To do this, change the field status settings in Customizing as follows.
- Set reconciliation accounts. Assign the reconciliation accounts, special G/L accounts, planning levels, and output tax clearings to the combination of Chart of Accounts/Account Type/Special G/L Ind. To do so, use customizing transaction OBXR as shown in Figure 13.

Figure 13
Define accounting configuration for special G/L account A
- Maintain accounting configuration using transaction OBXB (Figure 14). Double-click each relevant entry to maintain it.

Figure 14
Maintain the accounting configuration relevant for customer’s down payment
You must maintain the posting key relevant for the customer’s down payments using transactions ANB, ANF, ANZ, AUD, and MVA, detailed below. (Note that AUK and VVA are for vendor down payments while this article is only about customer down payments.)
The details to be specified, per each transaction, are listed in Figures 15, 16, 17, 18, and 19.
The transaction keys listed in these figures are those relevant for the down payment process. They are used to determine automatically the appropriate G/L accounts to use for financial postings. Transaction key ANB automatically determines the bank G/L (Figure 15).

Figure 15
Automatic posting details for transaction key ANB
Transaction key ANF automatically determines the down payment request G/L (Figure 16).

Figure 16
Automatic posting details for transaction key ANF
Transaction key ANZ automatically determines the final down payment G/L (Figure 17).

Figure 17
Automatic posting details for transaction key ANZ
Transaction key AUD automatically determines the customer down payment transfer posting G/L (Figure 18).

Figure 18
Automatic posting details for transaction key AUD
Transaction key MVA automatically determines the tax code G/L. In this case, it is 170010 as shown in Figure 19.

Figure 19
Automatic posting details for transaction key MVA
- Maintain the posting key using transaction OB41. For posting key 19 set the sales order as an optional field (Figure 20) by checking the Opt. entry check boxes. Having it as optional makes the posting key compatible with the G/L account. The other check boxes are checked by default. The user should change only the sales order value.

Figure 20
Status field group details for sales order at posting key/special G/L level
- Maintain the field status definition using transaction OB14. Set the sales order as an optional field for Field status variant 0001, Group G031 (Figure 21). All these boxes are marked by default, and the user only changes the value for the sales order.
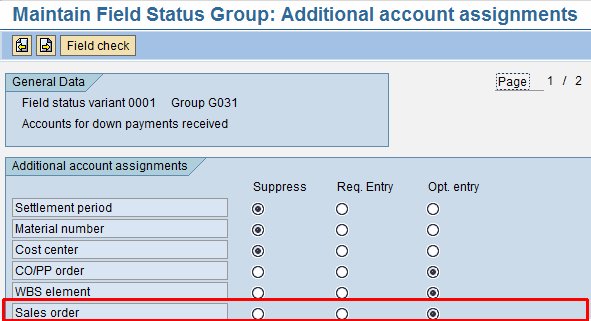
Figure 21
Status field Group details for sales order at status variant/Group/Account level
- Assign the company code to the field status variants using customizing transaction OBC5 (Figure 22). In my example, I assign just one company code to one country. The screen refers to company code 2000. In a real production environment, the user should link each company code with the appropriate field status variants.

Figure 22
Assign the company code to field status group 0001
Test the Down Payment Process
Following are the 11 steps you need to perform in the system to test the down payment process now that it is set up.
- Create a sales order
- Create a down payment request
- Display and print the down payment request
- Post the payment against the down payment request
- Create the outbound delivery
- Perform the picking of the outbound delivery
- Post the goods issue against the outbound delivery
- Create the final invoice
- Print the final invoice
- Display the financial document associated with the final invoice
- Display the sales order document flow
Let’s delve deeper into these activities.
1. Create a Sales Order
To create a sales order relevant for the down payment process, use the billing plan functionalities available at the sales order line item (and header) level. Use transaction VA01 or follow menu path Logistics > Sales and Distribution > Sales > Order > Create. To display the billing plan details, go to the billing plan tab of the sales order’s line item and look at the down payment amounts and due dates. Alternatively, you can select the sales order line item and choose Goto > Item > Billing Plan.
Figures 23 and 24 show the main details of the order from the billing plan and the price conditions points of view, respectively. To get to Figure 23, use transaction VA03 (sales order display). In Figure 23, the user validates the following details of the billing plan to ensure they meet business requirements:
- Billing dates
- Milestone details
- Billing values
- Rule in billing plan/invoice plan
- Billing status
- Payment terms
- Date category
- Billing type

Figure 23
Billing plan details of the sales order line item
The user next checks the screen shown in Figure 24 to ensure that price condition AZWR has been proposed. To get to Figure 24 use transactions VA01, VA02, or VA03 and then go to the Conditions tab of the sales order line item. In my example, I used transaction VA02.
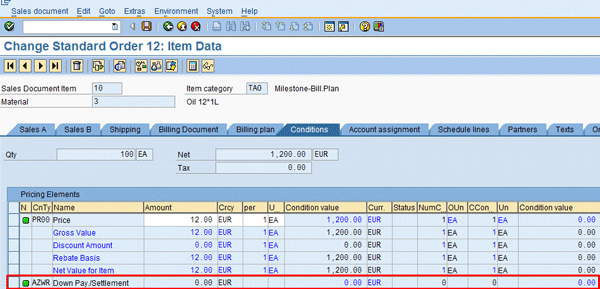
Figure 24
Sales order line item price condition details relevant to down payment
If you want to print the sales order, use transaction VA03, then enter the sales order document number. Follow menu path Sales document > Issue Output To. Select the message type BA00 from the pop-up screen and click the Print button.
2. Create a Down Payment Request
To create a down payment request in SD and FI, remove any billing block from the billing plan defined in the sales order using transaction VA02. Then use transaction VF04 or follow menu path Logistics > Sales and Distribution > Billing > Billing Document > Process Billing Due List. Specify the appropriate details in the report selection screen and run the report. For example, enter enterprise structure details such as your sales organization, billing date, and billing type. The system provides the details shown in Figure 25.

Figure 25
Billing due list details
Select the line item and click the save icon  . The system provides the information shown in Figure 26 (reporting the SD document number).

Figure 26
Down payment document generated in SD
3. Display and Print the Down Payment Request
To display and print the down payment request in SD, use transaction VF03 or follow menu path Logistics > Sales and Distribution > Billing > Billing Document > Display. Figure 27 shows the main details of the down payment request from a pricing point of view. The user needs to verify that the billing plan details defined in the sales order’s line item have been reported correctly in the billing line item (i.e., value, quantity, billing type and billing number range). Then the user saves the document by clicking the save icon.

Figure 27
Pricing details of the down payment request
Note that in the standard system, condition type AZWR is used for down payment processing. If you only want to carry out a partial settlement, you can select the down payment item to be settled in the billing document, branch to the pricing screen, and change the value of condition type AZWR. If needed, the user can manually change the proposed value of the condition type AZWR during the creation of the billing document.
To print the billing document, use either transaction VF31 or transaction VF03 with the message type RD00. Figure 28 shows the standard SAP sales order’s layout of the down payment request. This layout is usually customized based on the company’s business requirements.

Figure 28
Standard layout of the down payment request
4. Post the Payment Against the Down Payment Request
You can post down payments either manually or automatically in FI (payment program SAPF110, automatic debit or bank direct debit payment method). In this section, I post the customer down payment manually. To post the payment in FI with reference to the down payment request in SD, use transaction F-29 or follow menu path Accounting > Financial Accounting > Accounts Receivable > Document Entry > Down Payment > Down Payment.
Figure 29 shows the main details of the down payment. As a prerequisite you need to perform customizing for special general ledger transaction A with alternative general ledger account 113100. For more detail about this customizing setting, see the “Financial Accounting Settings.” section.

Figure 29
Down payment details
When you save the transaction using the save icon, the down payment is posted and the down payment request identified for the payment is cleared.
5. Create the Outbound Delivery
To create the outbound delivery with reference to the sales order, use transaction VL10C or follow menu path Logistics > Logistics Execution > Outbound Process > Goods Issue for Outbound Delivery > Outbound Delivery > Create > Collective Processing of Documents Due for Delivery > Sales Order Items. The screen displays the main logistic details defined for the outbound delivery (i.e., ship-to party, goods, quantity, and the status of the picking activities.
The user checks them, then clicks the save icon if they are correct. Figure 30 shows the main details of the outbound delivery document.
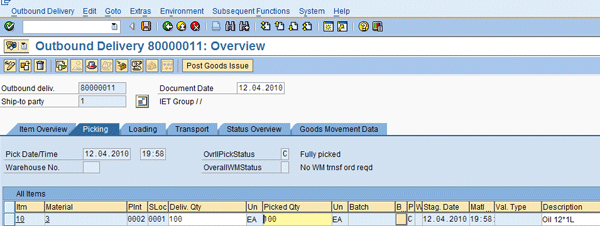
Figure 30
Display the outbound delivery main details
6. Perform the Picking of the Outbound Delivery
A subsequent phase of the shipping activities is to perform the picking from the warehouse.
The transaction to be used to perform this step depends on the SAP implementation that manages your warehouse. If only the Inventory Management (IM) module has been implemented, as in my example, you perform the picking using transaction VL02N or by following menu path Logistics > Sales and Distribution > Shipping and Transportation > Outbound Delivery > Change > Single Document. Enter the document number and press Enter to specify the picked quantity (Figure 31).
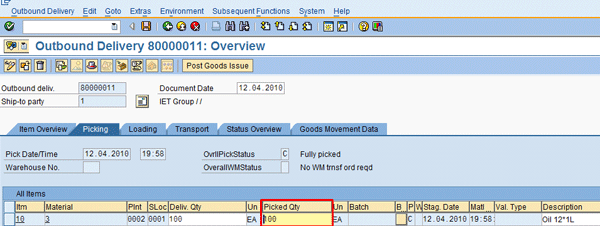
Figure 31
Picking of the outbound delivery
7. Post the Goods Issue Against the Outbound Delivery
To post the goods issue, use transaction VL02N or follow menu path Logistics > Logistics Execution > Outbound Process > Goods Issue for Outbound Delivery > Post Goods Issue > Outbound Delivery Single Document. Enter the delivery document number and press Enter. The system displays the screen shown in Figure 32, which shows the Post Goods Issue button available to perform the goods issue with reference to the outbound delivery document.

Figure 32
Post Goods Issue for outbound delivery
8. Create the Final Invoice
To create the final invoice with reference to the sales order, use transaction VF01 or follow menu path Logistics > Sales and Distribution > Sales > Order > Subsequent functions > Billing Document. Figures 33 and 34 show the main details of the outbound delivery document from the line item and pricing points of view. The accounts receivable department should make sure that the down payment amount has been deducted from the total billing amount. Note that there is an additional line item in the billing document for the down payment settlement, as highlighted in Figure 33. Then click the save icon.

Figure 33
Details about the invoice line items
As you can see, two items appear in the billing document: the amount from the first partial billing document and the down payment made by the customer that still needs to be cleared.

Figure 34
Details about the invoice price conditions
After you save the document, the system provides a similar document number range as reported in Figure 34: document 90000036.
9. Print the Final Invoice
The user can print the billing document using either transaction VF31 or transaction VF03.
To print the final invoice document using transaction VF31, specify the message type RD00 in the output type field and the billing document number in the billing document field.
Then use transaction VF03 or follow menu path Logistics > Sales and Distribution > Billing > Billing Document > Display. Enter the billing document number and choose More > Billing Document > Issue Output to. Select the relevant output (RD00). This is an option available in a pop-up screen. Choose the Print Preview button. Figure 35 shows the layout of the final invoice.

Figure 35
Layout of the final invoice
10. Display the Financial Document Associated with the Final Invoice
To display the final invoice document, use transaction VF03 or follow menu path Logistics > Sales and Distribution > Billing > Billing Document > Display. Enter the billing document number and click the Accounting button. The system shows the details (Figure 36).
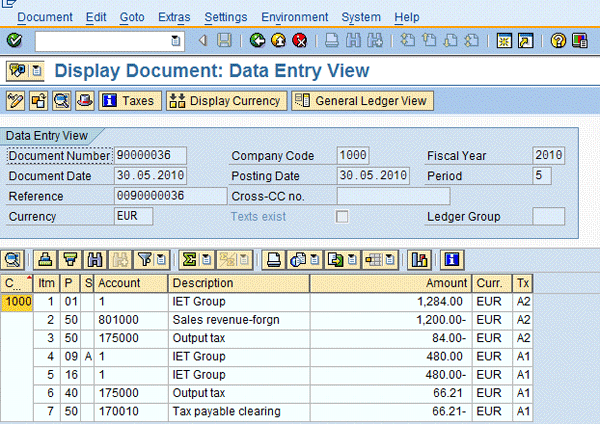
Figure 36
Final invoice financial details
11. Display the Sales Order Document Flow
To display the sales order document flow, use transaction VA03 or follow menu path Logistics > Sales and Distribution > Sales > Order > Display. Enter the appropriate sales order document number and click the display document flow icon  . The system shows the details (Figure 37).
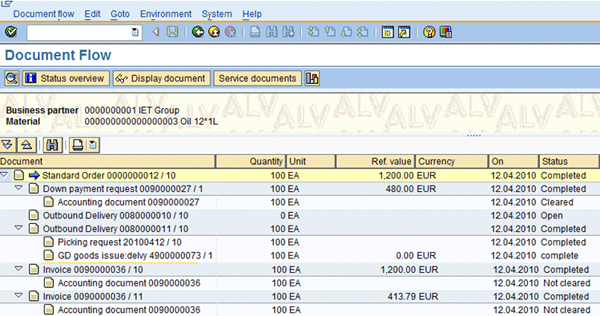
Figure 37
Sales order history

Gaetano Altavilla
Dr. Gaetano Altavilla is a senior SAP practice manager. His focus is on pre-sales, delivery of SAP application solutions for large international corporations, and SAP knowledge management in Europe, the Middle East, and Africa (EMEA).
In his 18 years of SAP application experience working for many multinational companies, such as Procter & Gamble and Hewlett-Packard, he has covered a wide range of ERP logistic areas, focusing on the MM, WM, SD, LES, PP, PP-PI, PLM (QM, PM, PS) modules, as welll as CRM (TFM), SRM (EBP), SCM (SAP APO), and MES (ME) components.
Dr. Altavilla holds a degree with first-class honors in mathematics from the University of Naples and is certified in many SAP modules: SAP Logistics Bootcamp, SAP MM, SD, LE (SHP/WM/LE), PP, PLM (PM, QM, PS), SRM, CRM, SCM (APO), SCM (TM), FI, CO, and Solution Manager. He also has experience in ABAP/4 and application link enabling (ALE) and IDocs. He has participated in numerous industry conferences, such as the SAP Skills Conference in Walldorf at SAP SE.
You may contact the author at Gaetano_altavilla@hotmail.com.
If you have comments about this article or publication, or would like to submit an article idea, please contact the editor.


