Learn the details on how you can leverage InfoSets within SAP ERP HCM to create your own specific HR transaction reports without having to create custom reports through programming. SAP InfoSets are used within SAP ERP HCM through the SAP-delivered ad-hoc query tool and can be a great option for power users. Follow this process when you want to create a reporting tool that can create user-specific HR transaction reports (queries).
Key Concept
SAP InfoSets within SAP ERP HCM is a common reporting tool that can be used to create customer-specific SAP HR transaction reports at your company. These ad-hoc reports created from InfoSets eliminate the need for custom reporting and give users the ability to create HR reports on the fly.
SAP ERP HCM delivers a standard SAP InfoSet; however, many users would like to be able to query on other infotypes and fields that are not delivered within the standard HR InfoSet. Many companies create their own SAP InfoSets to allow (and restrict) which infotypes users can report on ad hoc. Learning how to configure custom SAP InfoSets is a way to give reporting capabilities to your HR report users along with the ability to set permissions for what they can and cannot report on.
SAP InfoSets are most commonly used within SAP’s ad-hoc query tool (transaction code S_PHO_48000513, Figure 1). This tool allows users to create reports by choosing their own selection and output parameters based on the SAP InfoSet being used. SAP delivers standard InfoSets, but does not include all the key infotypes that companies use, particularly when it comes to country-specific infotypes. When you configure an InfoSet for your company, you need to determine which infotypes and fields can be reported on as well as who can use them. To set which users can use the InfoSets, you need to assign the InfoSet to a User Group within the SAP system and then assign the users to the relevant User Groups.
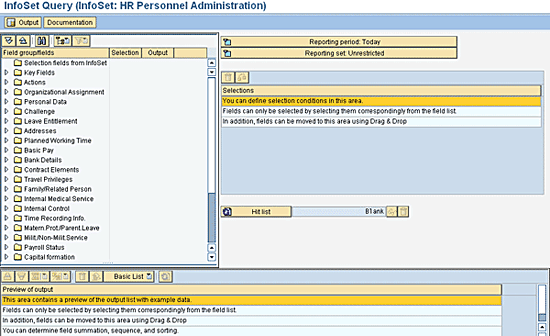
Figure 1
Initial screen for ad-hoc query
In addition, not only can companies create custom InfoSets to report on employee data (Personnel Administration [PA]), but they can create them for Organizational Management (OM) objects as well. Knowing the key steps to configure SAP InfoSets and common practices for configuration greatly helps companies make the best choices to suit their needs.
Creating the SAP InfoSet
SAP InfoSets are commonly created to read either a logical database or SAP tables within SAP ERP HCM. A logical database is the location in SAP ERP HCM where the data is stored for either the PA or OM modules. Three common logical databases to leverage for SAP ERP HCM are:
- PNP logical database: The PNP logical database in an SAP system stores all the data for employee-specific infotypes (PA). All global and country-specific data for a given employee can be queried by using the PNP logical database.
- PCH logical database: The PCH logical database stores all the OM objects in the SAP ERP HCM system. This is commonly used to query the OM objects and related infotypes that are used at your company. This logical database should be used for running queries against the company’s organizational structure.
- PNPCE logical database: The PNPCE logical database is used for PA or HR Master Data with Concurrent Employment (CE) or Management of Global Employment (MGE) activated. If a company has implemented CE or MGE, it should use this logical database to query against PA data rather than the PNP logical database.
Note
If there is any possibility that an organization may implement CE or MGE in the future, it would be best to start using the PNPCE logical database. This alleviates the need for companies to recreate the InfoSets in the PNPCE logical database when they want to start reporting on more complex employment scenarios. Companies do not have to have CE or MGE activated to use this database.
Finally, as mentioned, it’s also possible to create an InfoSet based on a specific SAP table or group of tables that link together. This can be particularly useful if a company wants to query against standard-delivered or custom configuration tables in SAP ERP HCM. This is commonly used when an SAP implementation wants to audit configuration within the SAP ERP HCM environment.
The following steps are the key to creating your SAP InfoSets related to the PNPCE logical database.
Step 1. To create an SAP InfoSet, first go to the SAP Query: Maintain InfoSet screen using transaction code SQ02 (Figure 2).

Figure 2
Initial screen to maintain an InfoSet (transaction code SQ02)
Step 2. Enter the InfoSet name and click the Create button.
Step 3. Enter the preferred InfoSet Name and click the green checkmark icon (Figure 3).
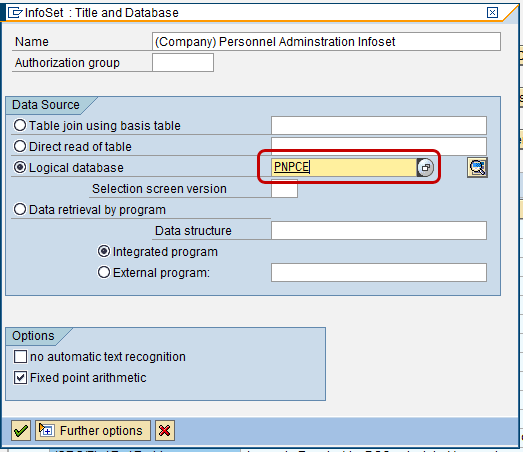
Figure 3
Create InfoSet screen where the user chooses if InfoSet is to read a logical database or an SAP table
Note
If you want to read a specific SAP table choose the Direct read of table radio button shown in Figure 3.
Step 4. Select the infotypes that you would like to associate to the InfoSet (Figure 4).
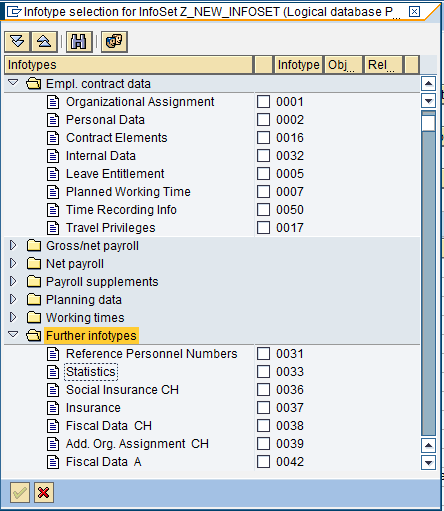
Figure 4
Infotype selection screen for InfoSet
Tip!
If you would like to include all the country-specific infotypes, expand the Further infotypes node as shown in Figure 4. You should only include infotypes that are being used by a company and not give permission to unused infotypes. The main reason for this is that it improves ease of use and makes only the key infotypes available.
Step 4 is a key step to understand as it is where the settings take place to permit specific infotypes to the InfoSet. If you have a requirement that certain users need to have access to different infotypes, you want to create a different InfoSet for each group. For example, many companies choose to have an HR power user group that can query on all available infotypes and to have a payroll user group that can access only payroll-specific infotypes. In this case, two InfoSets should be created with different infotypes being available per InfoSet.
Note
SAP roles and authorizations are checked as reports are executed. The need to separate out different sets of infotypes should be balanced with the ongoing overhead of maintaining multiple InfoSets.
By clicking an infotype in Figure 4, the user is allowed to select the infotype for reporting purposes in ad-hoc query (when this InfoSet is used).
Step 5. Choose the fields within each infotype that can and cannot be queried against (Figure 5).
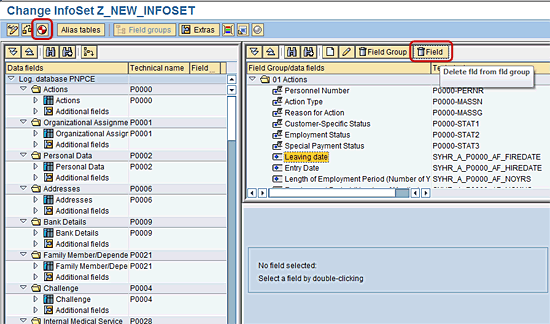
Figure 5
Change InfoSet selection screen where fields can be removed from the InfoSet
Tip!
Step 5 is a key step. Try to keep a consistent approach as to which fields are kept for each infotype; for example, start date, end date, last changed on, and last changed by fields should probably be included for every infotype. However, any fields that are hidden or not used in the organization should then be stripped out to reduce clutter.
Step 6. Once the infotype and Field selections are complete, click the generate icon (Figure 5).
Note
The user is prompted to save the InfoSet as a local object or into a transport package (Figure 5). Select the appropriate option and then save the InfoSet.
In Step 5, users are able to choose whether to include or exclude specific fields from infotypes in the InfoSet. For example, Figure 5 shows how to remove fields from the infotype by selecting the particular field and then choosing the Delete fld from fld group using the Field button.
Tip!
You should only include the key fields per infotype that are being used by a company and not give permissions to view or select any fields that are not in use. Many users often become confused about whether a field is used on a particular infotype. This is a way to improve the user experience.
Associating the InfoSet to a User Group
As mentioned above, InfoSets must be assigned to a User Group in order for users to use them in the ad-hoc query tool. The following steps assist with associating an InfoSet to a User Group.
Step 1. Select the applicable InfoSet and click the Role/User Group Assignment button (Figure 6).
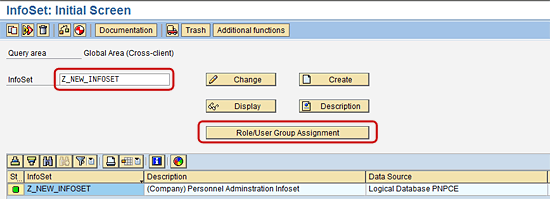
Figure 6
Initial screen to maintain an InfoSet (transaction code SQ02) and associate the InfoSet to a user group
Step 2. Choose the applicable user groups that should have permission to use the InfoSet (Figure 7). Then click the save icon.

Figure 7
InfoSet role assignment screen
Associating SAP Users to the Appropriate Reporting User Group
Once you have assigned the InfoSet to the appropriate user group, go to transaction code SQ03: User Groups: Initial Screen. This transaction allows users to add and remove users from a given user group leveraged by ad-hoc query. In addition, you can also use this transaction to create a new user group if needed. Many companies create their own user groups specific to the types of users using the ad-hoc query reporting tool. To create a new user group and associate the relevant InfoSet, follow these steps.
Step 1. Go to transaction code SQ03 to maintain user groups. Enter the name of the user group (Z_TEST_GROUP, in my example) and click the Create button (Figure 8).

Figure 8
Maintain User Group screen showing how to create a new user group
Step 2. Enter the desired description (Test User Group, in my example) for the new user group (Figure 9). Click the Save button.
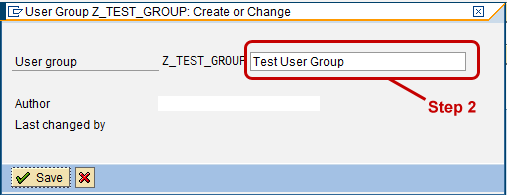
Figure 9
User group description screen
Step 3. Select the Assign users and InfoSets button as shown in Figure 8.
Step 4. Enter the SAP User Names that should have access to the InfoSets and then click the Assign InfoSets button (Figure 10).

Figure 10
Assign users and InfoSets to the user group screen
Step 5. In the Overview section (Figure 10), choose the appropriate InfoSets to which users should have access and click the Save button.
Tip!
The checking or assigning of new users to the User Group should be added to the task list of the security person who is responsible for setting up new users in the system. If this step is added into the standard new user creation process, it can be proactively done, rather than waiting until the new user tries to use the ad-hoc query tool.
Using the New InfoSet in Ad-Hoc Query
To use the new InfoSet, go to SAP’s ad-hoc query tool (transaction code S_PHO_48000513) and select the user group to which you associated your new InfoSet (Figure 11).
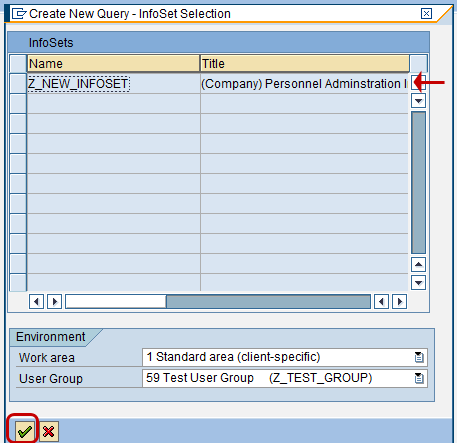
Figure 11
User group or InfoSet selection screen in the SAP ad-hoc query tool
Note
Be sure that you have permissioned the user to the User Group you are trying to use. If the user is not related to the User Group, you can go to transaction code SQ03 to assign it.
Once selected, you then are able to use the ad-hoc query tool with your new InfoSet.
System Performance Related to SAP InfoSets
As you can see, SAP InfoSets can allow companies to create ad-hoc HR transaction reports quickly and easily. Users who have access to this reporting tool should be considered a company power user as the ad-hoc query tool can have a big impact on system performance if there is a large population of employees or OM objects within the SAP ERP HCM environment.
Users should be properly trained on how to use the tool and not to query using a wild-card search with little to no selection criteria to narrow down the query results. Two good practices to follow are:
- Put in specific selection criteria. Using specific selections allows users to narrow down the report output results. For example, Figure 12 shows the users restricting HR transactions to users that have an Action Type of Z0 as of today’s system date.

Figure 12
Sample report in ad-hoc query
- Use the Hit list button to confirm search results. Based on the selection criteria used, the Hit list button returns how many employees or objects are contained in the report output. By limiting the number of results in the report, you improve overall system performance as the system is able to return results more quickly and accurately.
Mark S. Jackson
Mark Jackson has been working with SAP ERP HCM for more than 12 years and specializes in SuccessFactors Employee Central and the SAP ERP HCM Personnel Administration and Organizational Management modules. He has had numerous experiences with implementing and leading SAP ERP HCM and SuccessFactors globally and is a subject-matter expert in defining global templates for SAP/SuccessFactors implementations.
You may contact the author at Mark.S.Jackson@gmail.com.
If you have comments about this article or publication, or would like to submit an article idea, please contact the editor.


