Learn about the second phase in the enterprise risk management (ERM) process, risk identification. The knowledge about your business risks is spread across your organization and lines of business. A collaborative approach is required to identify and document all risks threatening your enterprise involving many different stakeholders. Discover how SAP BusinessObjects Risk Management 3.0 provides your risk managers with the means to document all key aspects of a risk and reach out to all relevant stakeholders via workflow-driven surveys to collect important information about your risks. Examine how any of your employees can propose a new risk in a self-service scenario for further investigation by your risk managers.
Key Concept
The documentation of a new risk in SAP BusinessObjects Risk Management 3.0 includes the drivers (i.e., root causes) and impacts (i.e., consequences) a risk event can have. Drivers and impacts are grouped in categories as part of the risk classification system. Once the risk drivers are identified, forward-looking key risk indicators (KRIs) need to be aligned with the drivers. The KRIs continuously monitor operational systems (both SAP and non-SAP) and raise alerts or trigger risk assessments before the risk occurs. As risks do not occur in silos, you also need to examine how risks influence each other across organizational boundaries in terms of the probability and impact of a risk event. Finally, for reporting and consolidation purposes, the application allows you to relate a risk to a number of underlying similar risks.
Within the data model of SAP BusinessObjects Risk Management 3.0, risks are created locally in the context of a selected organization within the organizational hierarchy. Optionally, you can relate a risk on a more granular level to a business activity or strategic objective assigned to the selected organization for more detailed risk monitoring and reporting. A risk itself is described by the drivers and impacts of a risk event (Figure 1). Drivers are root causes of the occurrence of a risk event. They are grouped in driver categories that you can maintain by following IMG menu path GRC Risk Management > Risk and Opportunity Attributes > Maintain Driver Categories. You can align drivers with forward-looking key risk indicators (KRIs), which monitor the risk environment for changes that make the risk event more likely to occur and raise early alerts or trigger risk assessments.
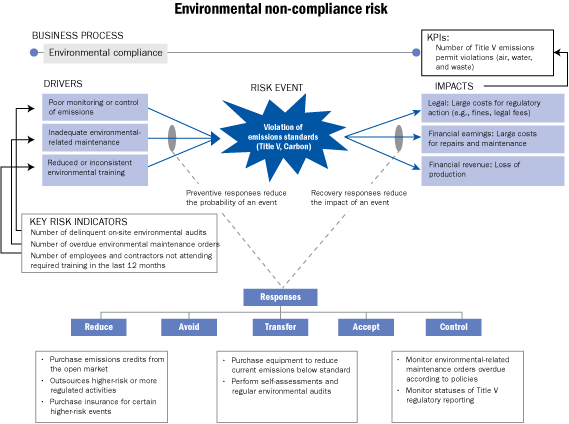
Figure 1
Example bow-tie diagram for the environmental non-compliance risk
You can group impacts of a risk event in impact categories by following IMG menu path GRC Risk Management > Risk and Opportunity Attributes > Maintain Impact Categories. The impacts may influence some of the key performance indicators (KPIs) you’re using to measure the achievement of your strategic objectives. The graphical representation of a risk — including its drivers, KRIs, impacts, influenced KPIs, and the risk responses that are assigned to the risk in the later risk response allocation phase — is called the bow-tie diagram (Figure 1). You can categorize the risk responses as preventive and recovery responses and group them in responses that reduce, avoid, transfer, accept, and control the risk.
Activities
The application distinguishes between different activity types (e.g., business processes, projects, and products) and groups activities into hierarchical activity categories. Both activity types and categories are created during the risk planning phase, whereas activities relevant for risk management often are identified during initial risk assessments, or tend to be more dynamic as the business keeps changing.
To create a new activity, log on to SAP NetWeaver Portal, navigate to GRC Risk Management > Risk Assessment > Activities, and click the Activity Management link. In the General tab, provide a name and select an organization unit and activity category (Figure 2). The selection of the activity category determines the activity type. Each activity type has a separate hierarchy of activity categories. If necessary, delimit the validity date of the new activity as needed (e.g., for projects) and provide a description and add constraints and assumptions.
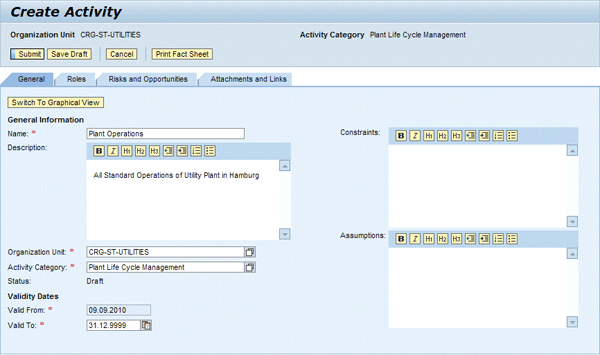
Figure 2
Create a new activity
In the Roles tab, assign users to the application role Activity Owner for the new activity. In the Risks and Opportunities tab, you can create new risks in the context of the new activity. I’ll cover risk creation in the next section. If you open an existing activity, the tab lists all risks and opportunities already documented for the selected activity.
In the Attachments and Links tab, you can attach documents and links to provide additional documentation. You can search the documentation if you implement the document search functionality requiring Search and Classification (TREX).
A useful feature is the Print Fact Sheet button, which generates a PDF with a summary of all available information on the selected activity including all general information, activity owner, and details on relevant risk assessments and risk responses (Figure 3). Similar print fact sheets are also available for risks.
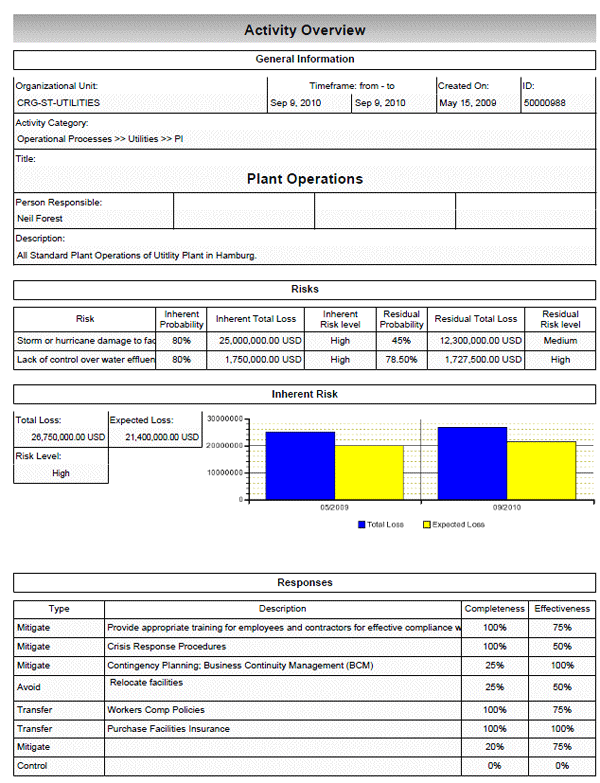
Figure 3
Activity print fact sheet
Create a New Risk as Risk Manager
When implementing SAP BusinessObjects Risk Management 3.0, you will most likely be able to refer back to existing risk information you’d like to bring into the system. Holders of the application role Unit Risk Manager for a given organization can create new risks for that organization in the application by navigating in the portal to GRC Risk Management > Risk Assessment > Risks and Opportunities and clicking the link Risk and Opportunity Management. In the pop-up window, they select whether they want to create the new risk with or without a central risk template. Central risk templates are created during risk planning and help standardize and streamline risk documentation. They already contain some predefined information such as potential drivers and impacts. A risk contains the following tabs (Figure 4):
- General
- Roles
- Key Risk Indicators
- Analysis
- Response Plans
- Risk Incidents
- Influenced Risks
- Underlying Risks
- Surveys
- Attachments and Links

Figure 4
Create a new risk
In the General tab, provide a name, description, and validity data. Then relate the risk to an organization and, optionally, to an objective or activity, and select a risk category. Risk categories provide a hierarchical structure for risk classification and are set up during risk planning. Then, you identify document drivers and impacts for the risk. You have to assign each driver and impact to a driver and impact category, respectively. In the Roles tab, assign users to the application Risk Owner for the new risk.
In the Key Risk Indicator tab, you can create KRI instances and business rules that are based on KRI data and trigger alerts or risk assessments when violated (Figure 5). You create a KRI instance assigning an existing KRI implementation to a specific risk. KRIs are implemented outside an organizational context in GRC Risk Management > Risk Monitoring > Key Risk Indicators > KRI Implementations. In this screen, you query against a remote system using an SAP Query, an SAP NetWeaver Business Warehouse (SAP NetWeaver BW) query, or a Web service. In the upper part of the Key Risk Indicators tab, click the Create button and enter the following data to create a KRI instance (Figure 6):
- KPI Instance Name
- KPI Implementation: Select from available KRI implementations
- Monitor Frequency: Frequency with which you want the KRI to monitor your system, such as Weekly, Daily, Monthly, or Quarterly
- Data Time Frame: Select the desired timeframe, such as a specific month or the current calendar year
- Next Execution Date and Last Execution Date: Select the execution dates for monitoring
- Historical Review Required: Select Yes if you want the previous KRI values kept in the database. In Figure 7, you can see the graphical representation of the data, which you can access by clicking the Show History button in Figure 5.
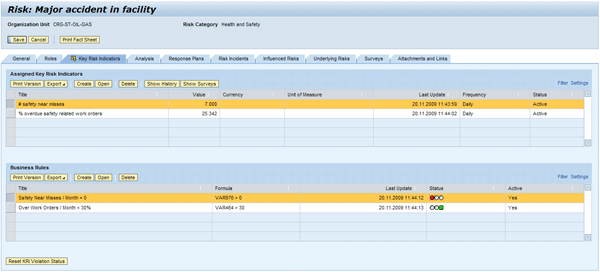
Figure 5
In the Key Risk Indicator tab, assign KRIs and business rules to the selected risk
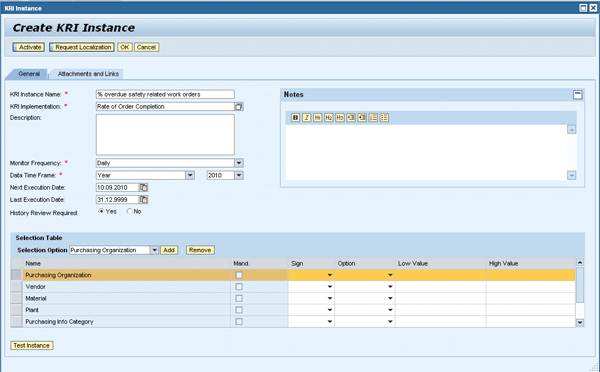
Figure 6
Assign a KRI implementation to a risk to create a KRI instance
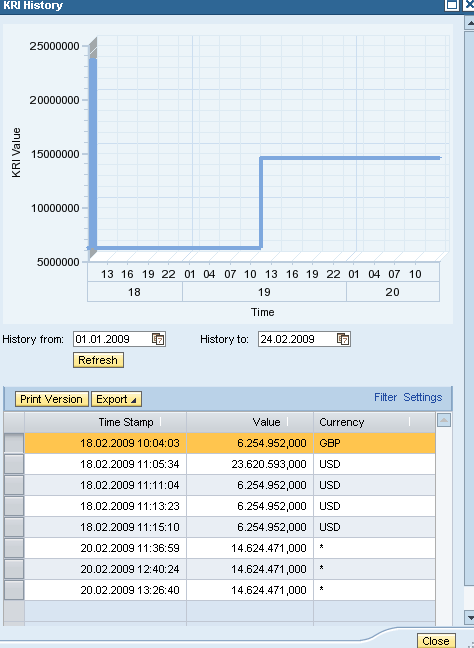
Figure 7
KRI history data
A KRI instance may require further data filtering for a more focused monitoring with respect to the organizational context of the selected risk. This is referred to as KRI localization. You can either enter further filters in the selection table or click the Request Localization button (Figure 6). The latter triggers a workflow task sent to the inbox of the holder of the application role that has been customized to receive the workflow tasks for the business event KRI Liaison. The recipient then performs the localization of the KRI in the selection table.
In the lower part of the Key Risk Indicator tab, you create business rules that are applied to the KRI data queried from your remote business systems. Figure 8 shows an example of a business rule checking the result from a KRI querying the number of safety near misses. If that number is greater than zero, by configuration the business rule flags the risk, sends a notification to the risk owner, and triggers a risk assessment workflow. A flagged risk shows a yellow lightning symbol on the Key Risk Indicator tab (Figure 5), which you can remove by clicking the Reset KRI Violation Status button on the bottom of the screen.

Figure 8
Define a business rule that doesn’t tolerate any safety near misses
The Analysis, Response Plans, and Risk Incident tabs refer to the risk analysis, risk response, and risk monitoring phases of the ERM process, respectively. Because I’m focusing on risk identification only, these tabs are outside the scope of the article.
In the Influenced Risk tab, you can model the relationship between the selected risk and other risks with the status as active in the application. An influence factor describes the tendency of the influenced risk to be observed together with the selected risk. Risk managers with authorization for both risks can document such an influence in qualitative or quantitative terms. During the risk analysis phase, influence factors are used as inputs for more advanced risk analysis features, such as scenario analysis and Monte Carlo simulations. Click the Create Influence Factor button and select a risk for which you want to document an influence (Figure 9). You can select risks from other organizations as long as you are holder of the Unit Risk Manager role for both organizations.
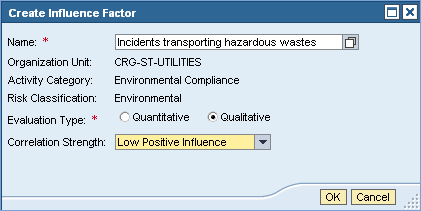
Figure 9
Create an influence factor with qualitative evaluation type
The application supports a qualitative and a quantitative evaluation type. The Correlation Strength field describes the tendency of the two risks to enforce or compensate for each other. Qualitative correlation strengths are selected from a drop-down list that you maintain by following IMG menu path GRC Risk Management > Master Data Setup > Maintain Influence Strength. If you choose the Quantitative evaluation type, you need to enter numeric values between -999.99 and 999.99 for the influence factors on impact and probability. Use negative values to document a compensating influence.
In the Underlying Risks tab, you can turn the selected risk into a parent risk to consolidate a group of underlying risks below that risk. This consolidation helps develop a risk hierarchy for consolidating and rolling up risk information across the organization structure. Reporting is also made simple by viewing risk levels of consolidated risk groups rather than the complete set of risks, which can be overwhelming for large enterprises. Note that risk analysis operations (e.g., estimation of impact and probability as well as risk response planning for the parent risk) are still performed manually and are not consolidated from the underlying risks. You add an underlying risk simply by clicking the Assign button in the Underlying Risks tab and selecting a risk from the list.
The Survey tab contains results from risk surveys (covered in the next section) and the Attachment and Links tab allows for attaching documents and links to provide additional information.
Surveys
Risk information is usually spread across the enterprise. It is a challenge for risk managers to collect all relevant risk information from a potentially large number of stakeholders to get a complete picture of the risk structure of your enterprise, identify top priority risks, and plan appropriate response strategies. To facilitate this collaborative process, SAP BusinessObjects Risk Management 3.0 comes with three different types of surveys:
- Activity survey: Intended to identify new risks and potential shortcomings related to an activity
- Risk survey: Intended to prepare a risk assessment or reassessment to reveal new facts that may affect the assessment
- Risk indicator survey: Intended to collect status information about existing KRI instances
The survey functionality uses SAP Interactive Forms by Adobe to support offline data entry. The survey recipient completes the survey offline and emails the completed form back to the system.
In addition, SAP BusinessObjects Risk Management contains validation workflows intended to request approvals from the responsible management. Such validations usually occur after the risk analysis and risk response phase, so I won’t discuss them here.
Figure 10 depicts the survey process in SAP BusinessObjects Risk Management 3.0, which consists of four steps:
- Create survey
- Schedule survey
- Complete survey
- Review survey

Figure 10
The survey process in SAP BusinessObjects Risk Management 3.0
SAP BusinessObjects Risk Management 3.0 comes with a question and survey library. This means that you can schedule surveys multiple times and for different parts of your enterprise, and reuse questions in multiple surveys. For that reason, before creating new surveys or questions in GRC Risk Management > Risk Assessment > Surveys you should review the library first. Figures 11 and 12 show the screens to create a new survey and a new question, respectively. You need to specify a title for the new survey and the survey category as Activity Survey, Risk Survey, or Risk Indicator Survey. Then add existing questions from the questions library, or create new questions by clicking the Actions button and selecting Create Question. Select for each question an answer type, which can be Rating (1 to 5), Yes/No/NA, Text, Percentage, or Amount. You can also assign to questions a category such as Activity Survey, Risk Survey, or Risk Indicator Survey and only use them in a survey of the respective category. Questions can be local with respect to the survey or available for other surveys — check the respective radio button in the question. You need to activate the survey before you can schedule it.

Figure 11
Create a new survey

Figure 12
Create new questions
Surveys are scheduled with the planner tool accessible via menu path GRC Risk Management > Risk Monitoring > Planner. In the first step of the guided procedure enter the plan details consisting of plan name, plan activity specifying the survey category, survey from the survey library, and the start and due date (Figure 13). In the second step, select the organizations you want to cover with the survey (Figure 14). In the third step, select activities, risks, or KRI instances from the previously selected organizations for which you want to conduct the survey (Figure 15). Finally, review the plan (Figure 16) and receive a confirmation upon activation of the plan.
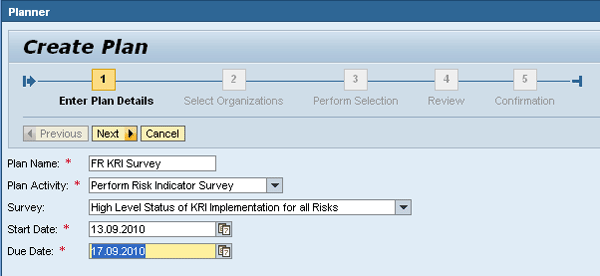
Figure 13
Schedule a survey — enter plan details
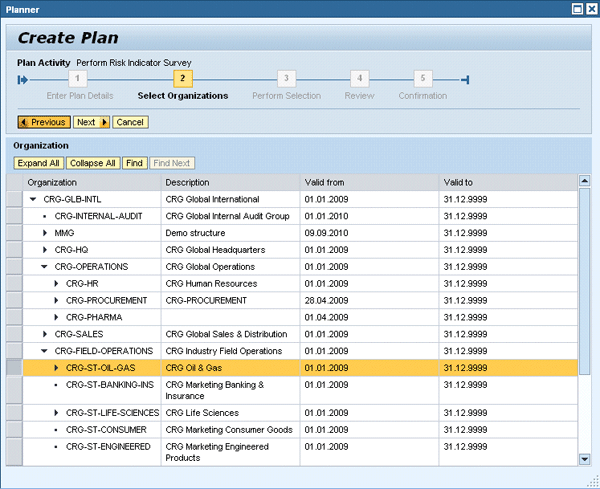
Figure 13
Schedule a survey — select organizations

Figure 15
Schedule a survey — perform selection
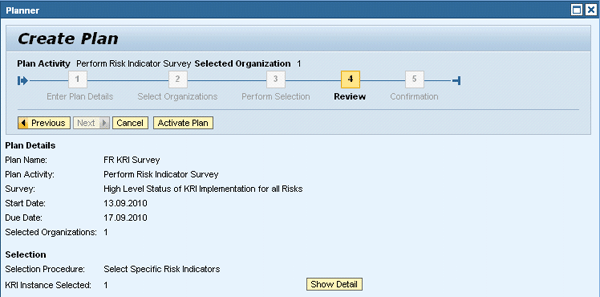
Figure 16
Schedule a survey — review
The system sends the survey as an SAP Interactive Form by Adobe via email to the recipients of the survey (Figure 17). The recipients are determined by the security model of the application as the holders of those application roles that were customized to receive the workflow tasks for the business events Activity Survey, Risk Survey, or KRI Survey, depending on the survey category. For more information on the security model refer to the security guide for this application available in SAP Service Marketplace (which requires user credentials to log on). The recipients complete the survey and return it to the system’s email address.

Figure 17
Surveys are sent via email as SAP Interactive Forms
The system adds the survey responses of each individual recipient to the respective activities or risks from where they can be viewed by authorized users such as holders of the Activity Owner or Risk Owner roles, respectively. Access the responses for a given survey from the Surveys tab for activity and risk surveys or from the Key Risk Indicator tab by clicking the Show Surveys button for risk indicator surveys. Select the survey in which you are interested from the drop-down list. The system lists the survey responses as a table with a row per survey participant and a column per question.
Self-Service Scenario to Propose New Risks
Your employees represent an additional valuable source for risk identification. They aren’t all risk experts, but they may make observations that are relevant for risk management. SAP BusinessObjects Risk Management 3.0 delivers an employee self-service scenario, which is accessible at GRC Risk Management > My Home > Ad-Hoc Tasks > Propose Risk, or can be easily integrated as a link in your corporate portal. Employees who want to propose a new risk only need to fill out a simple form selecting the organization, risk category, and activity (optional) as well as entering free text for the risk name and description (Figure 18). The holder of the Unit Risk Manager role of the selected organization receives a workflow task to validate the risk proposal with the option to approve or reject the risk proposal. If the proposed risk is a valid risk, the risk manager creates a new risk as explained earlier in this article.

Figure 18
Propose risk self-service
Frank Rambo, PhD
Frank Rambo, PhD, is managing a team within SAP’s Customer Solution Adoption (CSA) organization working with customers in the SAP analytics area with the objective to drive adoption of new, innovative solutions. Prior to this position, he worked eight years for SAP Germany as a senior consultant focusing on SAP security and identity management. Before he joined SAP in 1999, Frank worked as a physicist in an international research team. He lives in Hamburg, Germany.
You may contact the author at frank.rambo@sap.com.
If you have comments about this article or publication, or would like to submit an article idea, please contact the editor.


