The extractor checker can test extracted data at the source, allowing you to find data errors/inconsistencies at an early stage.
Key Concept
The extractor checker comes packaged in Service API (SAPI), which enables you to create generic DataSources via transaction RSO2. The extractor checker has been available since very early SAP releases (both SAP_APPL including the 3.X track and BW including the 2.X track). It can be considered release-independent. It does not require the source system to be connected to the target BW system. For more information about SAPI, go to SAP Service Marketplace. You search SAP notes using the keyword “SAPI.”
By running the extractor checker in the debug mode, you can learn a lot about the underlying application. I have been in situations where I had to work with application-specific standard extractors in areas that I’m only vaguely familiar with. Running the extractor checker in the debug mode has helped me identify the base tables without a lot of effort.
I have seen generic extractors delivering no data because of faulty logic/coding. The reaction on the BW side is usually one of bewilderment and disbelief. You can avoid this by running the extractor check before executing your InfoPackages from BW. I’ll show you how to use this tool in a more effective way and explain why you might want to use it more frequently.
Let’s watch the extractor checker (transaction RSA3) in action. Start with a standard business content extractor for master data. For this example, I picked a common DataSource (0MATERIAL_ATTR). This DataSource corresponds to the extractor that extracts material attributes from various material tables (in Material Management). Run transaction RSA3.
Enter the name of the DataSource. Since I know its technical name (0MATERIAL_ATTR), I enter it here. Technical names of standard business content DataSources generally bear some relationship to the name of the underlying object or application. By entering *MAT* in the DataSource field and then pressing F4, you are likely to get a list of DataSources for master data related to material. Select the one you are looking for (0MATERIAL_ATTR in this case) and press the Enter key. The resulting screen is shown in Figure 1.
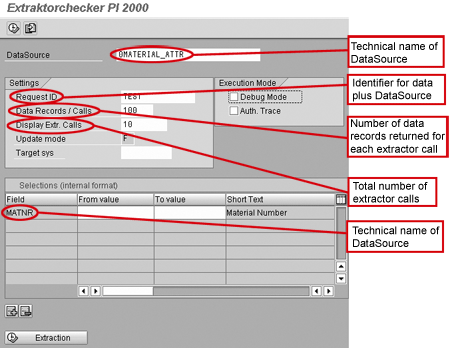
Figure 1
Initial extractor checker screen with SAP-suggested defaults
You can use this search procedure (a.k.a. wildcarding) for transaction DataSources, too. Technical names of transaction DataSources tend to start with the name of the underlying application. Technical names of HR DataSources generally start with HR, those of CO DataSources generally start with CO, and so on. For example, if you are not sure about the complete technical name of a transaction DataSource in standard Business Content but know it belongs to CO, you could do a wildcard search on “0CO*.”
The extractor checker comes up with certain defaults, which are really hard-coded values. These following values are hard-coded in subroutine/form 100_GETPARMS called from program SAPLRSFH:
- Request ID: This field is an identi fier for the specific combination of DataSource and data. It is hard-coded to TEST.
- Data Records/Call: This field (hard-coded to 100) is the number of records that are delivered for every call to the extractor.
- Display Extractor Calls: This field (hard-coded to 10) is the number of times that the extractor is called.
You can override the fields Data Records/Call and Display Extractor Calls. If you have a large volume of data, it does not make sense to break it into small packages. As an example, if you have 50,000 records, it might make more sense to set Data Records/Call to 5,000 and keep Display Extractor Calls at 10. This approach makes sense if you want to browse all the data instead of a sliver. If a sliver is all you want, you can stick to the SAP defaults.
DataSource 0MATERIAL_ATTR is capable of delivering only full updates (update mode F in Figure 1. This field is display only and therefore does not allow you to specify any other update mode.) You would be able to simulate delta extraction if an extractor is delta-enabled. For any DataSource, if you do not enter any values in the From value and To value selectable fields, you extract all the data from the underlying tables. DataSource 0MATERIAL_ATTR is no exception. If you do not limit your selection range, you pull the attributes for all the materials in your material master table (MARA). Before I show you how to limit the selection range, I want to find the number of materials in the (general) material master table.
Tip!
To find out the number of entries in any table, run transaction SE16. If you have authorization for this transaction, type in MARA and then click on the table contents icon. Click on the Number of Entries button and the number of entries in that table pops up, as shown in Figure 2. Note that in my example, I have 1,630 unique materials in the system.

Figure 2
Data browser screen showing number of records meeting selection criteria
Tip!
A common mistake using the data extractor is forgetting that the maximum number of records delivered in the checker is the product of Data Records/Call and Display Extractor Calls. If the defaults are left untouched (as is usually the case), the checker seems to deliver just 1,000 records even though the person running the check has verified or instinctively knows more than 1,000 data records exist.
Going back to the extractor checker screen, select the check box for Debug Mode, as shown in Figure 3. This feature of the extractor checker helps you debug any DataSource from the moment the relevant extractor function module is called through to the packaging of this data. I have used this feature on countless occasions and have not only been able to understand better how some complex extractors work but also to ferret out potential errors in logic. Having discovered 1,630 data records in the material master data table, I would like to change the data records default to 500 and the number of extractor calls to 4. The first three calls deliver 500 records each and the final call, 130 records.

Figure 3
Initial extractor checker screen with the Debug Mode selected
Now you are set to run this extractor in debug mode. Click on the Extraction button at the bottom left corner of the screen in Figure 3 or the execute icon on the top left corner. Figure 4 shows the resulting screen.
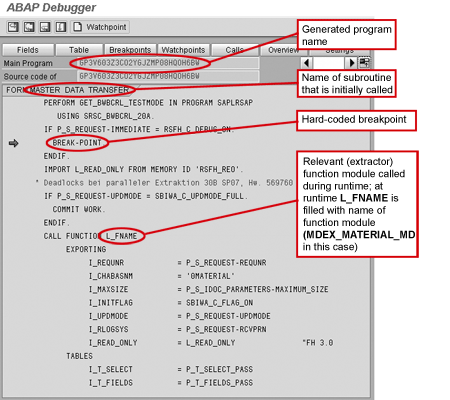
Figure 4
Extractor checker execution in debugger mode
Execution stops at the hard-coded breakpoint (the statement BREAK-POINT in the code in Figure 4) inside subroutine/form MASTER_DATA_TRANSFER. Here’s SAP’s rule of thumb: For DataSources that extract master data attributes and texts, the subroutine/form is invoked. For hierarchy DataSources, it is subroutine/form HIERARCHY_TRANSFER. For transaction DataSources, it is subroutine/form DATA_TRANSFER.
Tip!
Underneath the Debug Mode check box is the Auth. Trace check box. This check box is linked to whether you have set an authorization trace. An authorization trace is part of SAP’s system trace suite that enables developers/administrators to record SAP system-related activities. It enables developers/administrators to look at the authorization checks encountered during the execution of a certain transaction. You can turn this trace on (or off) by running transaction ST01 and then checking on or off the check box labeled Authorization check.
If the Authorization check check box is turned on for your user or all users in transaction ST01 and you have the Auth. Trace check box turned on in transaction RSA3, you are able to see your authorization trace once you run a test extraction. If you have the Auth. Trace check box turned on in RSA3 without the relevant check box turned on in transaction ST01, you are not be able to see any authorization trace once you run a test extraction.
Be careful with your traces in transaction ST01. Since it adds a lot of overhead on your application server, you may unintentionally slow down the system. Worse, if you do not limit this check to just your user (as happens often), it is on for everyone on the system, thereby adding a tremendous overhead to the application server. You may not even have the authorization to run transaction ST01, or, even if you have this transaction code in one of the roles assigned to your profile, you may not have the necessary authorization objects needed to modify the trace flags. If this is the case, ask your security/Basis administrator to activate the authorization trace check. If you do have the authorization, make sure that you activate the authorization check for your user only. Also, once you have checked your trace file, make sure that you turn off your traces or have your security/Basis administrator do so.
The relevant extractor function module is dynamically invoked when execution reaches the CALL FUNCTION L_FNAME block. The relevant extractor function module for DataSource 0MATERIAL_ATTR is MDEX_MATERIAL_MD, which is the function module called in this case. All standard business content extractors use the same mechanism, so it is important to understand the dynamic invocation of the appropriate extractor function module. You can obtain its name by double-clicking on the variable L_FNAME. The contents of the field show MDEX_MATERIAL_MD. As mentioned earlier, this is the extractor function module for DataSource 0MATERIAL_ATTR.
Tip!
Extractors for all generic DataSources ultimately call a function module to extract and package data. If the source is a table/view, function module RSA3_GEN_GET_DATA is called. If it’s a domain, function module RSA3_EXT_DOMA_EXTRACT is called. If it’s an SAP Query/InfoSet, function module AQBW_GET_DATA is called. If it’s a function module, the function module that is specified in the DataSource maintenance is called.
The initial call (Figure 5) does not return any data. This call is meant for data initialization. If you are interested in seeing the data being pulled from the respective master data tables and packaged, set two more breakpoints in your code, as shown in Figures 6 and 7. The extractor function module is called twice (following the initialization call in the previous diagram). The first call is made only if the initialization has been successful and is for extracting the first data package. For subsequent data packages, the extractor is invoked at a different place (as shown in Figures 6 and 7). This means that if your parameters are set in such a way that several packages need to be created, the extractor is invoked once (the first time) from the call shown in Figure 6 and for each subsequent package, from the call shown in Figure 7.
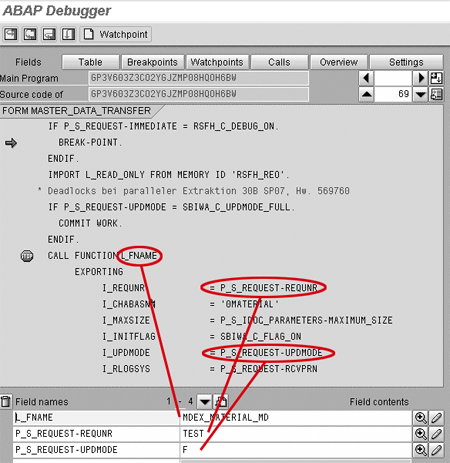
Figure 5
Dynamic invocation of extractor function module

Figure 6
Extractor function module call for retrieving first data package

Figure 7
Extractor function module call for retrieving subsequent data package
Now that you are ready to jump right into the extractor function module, press the continue (F8) key on your keyboard twice followed by the F5 key. Control is transferred into function module MDEX_MATERIAL_MD. A lot of the code either may not interest you or make sense to you. However, hidden in this code are valuable nuggets of information.
Scroll down until you see the code shown in Figure 8. It tells you what the base (master data) tables for the various InfoObjects are. You glean that MARA is the master data table for InfoObjects 0MATERIAL, ‘0ARTICLE’, and 0ME_MATERIAL. MARC is the master data table for InfoObjects 0MAT_PLANT and 0ART_PLANT. MARM is the master data table for InfoObject 0MAT_UNIT, and so on.
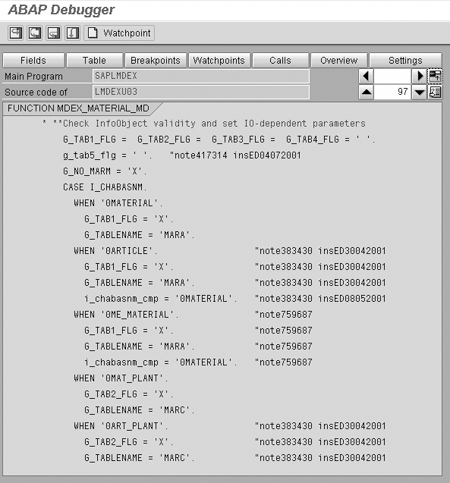
Figure 8
Important (material) master data tables in MDEX_MATERIAL_MD
This is valuable information if you are testing a business content extractor for an area/application you are not familiar with. Not all extractors may be so unambiguously coded, but with persistence, you should be able to find out the tables from which data (both master and transaction) are extracted. If you are new to an application or area, it is always very helpful to start off with the names of tables in which the data reside. If you know the names of the underlying tables, you can with little effort validate the data that is returned at the completion of a test extraction in the extractor checker.
Now that you are inside the extractor function module, you set another breakpoint, as shown in Figure 9.

Figure 9
Set another breakpoint in function module MDEX_MATERIAL_MD
Click on the continue icon or press F8 to the breakpoint shown in Figure 9. Reduce the size of display area for code by clicking on the toggle switch and double-click on (variable) G_COUNTER_DATAPAKID to get it into the Field names, as shown in Figure 10.

Figure 10
Incrementing global counter to keep track of the data packages
Most extractors have an internal counter that keeps track of the number of times data need to be extracted from the relevant master data/transaction data tables. In this example, since I set the number of calls to four, this counter will be incremented from one until it hits four. At that stage, I will have all the data that I had requested. Since I already verified that the material master (general) table MARA contains 1,630 records, I expect 500 records to be delivered in each of the first three calls and 130 records to be delivered in the fourth and final call. To see if that is the case, click on the Table button, then double-click on the name of the internal table E_T_BIW_MARA_S that is used to transfer the data out. In Figure 11, you can see that 500 records have been extracted to the internal table E_T_BIW_MARA_S.

Figure 11
Counter shows 500 records are extracted
If you continue to press the F8 key, you see the internal counter incremented each time and the 500 records being pulled for each of the first three calls. After the fourth call, you should see that the value of the counter is four and that 130 records have been extracted. Figures 12 and 13 are two different views: Figure 12 shows the debugger with the counter value and Figure 13 is of the debugger with the internal table value.
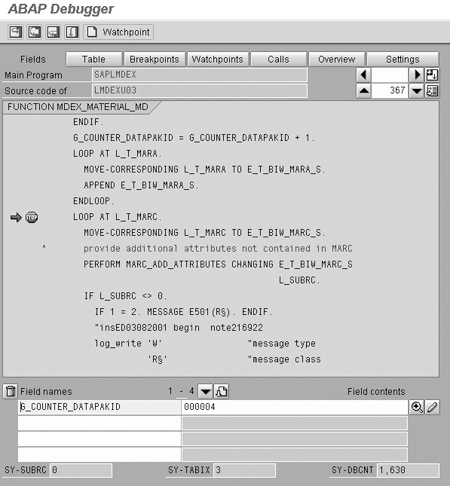
Figure 12
Four data packages extracted
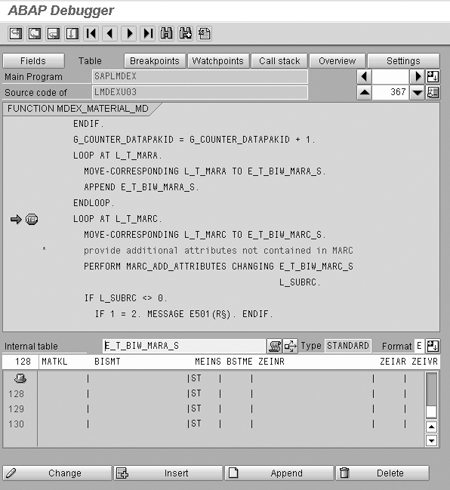
Figure 13
The fourth package contains 130 records
The next time you press F8, you should complete the extraction process, and indeed, that’s what happens, as shown in Figure 14.
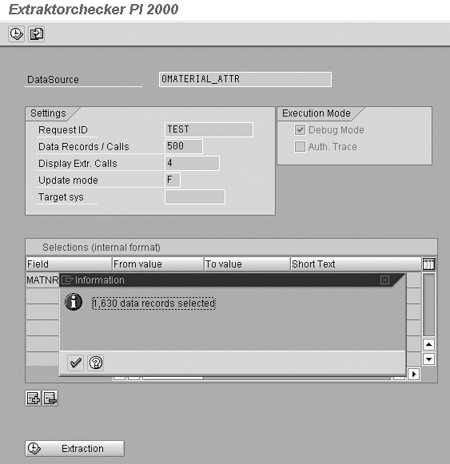
Figure 14
Extractor run complete, number of records extracted displayed
Clicking on the checkmark on the pop-up screen takes you back to the initial extractor checker screen. You see a new button, Display List. Click on it. The four data packages are displayed and you can double-click on any package to see its contents. You then can do an initial check and validation of data in the source system and spot errors and inconsistencies at an early stage.
Anurag Barua
Anurag Barua is an independent SAP advisor. He has 23 years of experience in conceiving, designing, managing, and implementing complex software solutions, including more than 17 years of experience with SAP applications. He has been associated with several SAP implementations in various capacities. His core SAP competencies include FI and Controlling FI/CO, logistics, SAP BW, SAP BusinessObjects, Enterprise Performance Management, SAP Solution Manager, Governance, Risk, and Compliance (GRC), and project management. He is a frequent speaker at SAPinsider conferences and contributes to several publications. He holds a BS in computer science and an MBA in finance. He is a PMI-certified PMP, a Certified Scrum Master (CSM), and is ITIL V3F certified.
You may contact the author at Anurag.barua@gmail.com.
If you have comments about this article or publication, or would like to submit an article idea, please contact the editor.


