Learn how to configure the workflow-driven change request management functionality in SAP GRC 10.0, which is designed to enforce control in the maintenance of master data.
Key Concept
Change Request Management is a control process aimed at ensuring that changes to master data are independently reviewed by appropriate personnel to ensure that the proposed modifications are not malicious and are in line with business needs and best practices. SAP GRC 10.0 provides support for an automated approval process when making changes to specific master data to ensure accountability for a user’s actions and to forestall malicious maintenance of master data objects.
Although the tight integration of the SAP GRC 10.0 solutions provides benefits to organizations, it also poses security and data inconsistency risks and challenges. This issue is especially true because malicious or unauthorized changes to a master data object can affect another master data object and also another application component (e.g., SAP Access Control, SAP Process Control, or SAP Risk Management). The obvious data dependencies and seamless integration among GRC 10.0 application components cause this security concern. Furthermore, uncontrolled maintenance of master data can cause audit issues because auditors are always concerned about the controls defined to safeguard authorized modification to master data.
SAP is aware of this downside and has put in place a framework driven by a workflow process to manage changes to master data. The following master data can be subjected to change request management in SAP BusinessObjects GRC 10.0 application components:
- Account Group
- Control Objective
- Control
- Central Risk
- Indirect-Entity Level Control
- Organization
- Process
- Subprocess
- Central Control
- Central Indirect Entity-Level Control Group
- Central Indirect Entity-Level Control
- Central Process
- Central Subprocess
The management of master data needs to be properly managed and controlled to avoid master data-related issues in the SAP GRC 10 applications and by extension, dependent systems.
I discuss the following activities as they relate to the configuration and operation of workflow-based change request management for master data:
- Activation of workflow for master data changes
- Maintenance of custom agent determination rules
- Initiation of change request
- Approval of change request
- Execution of change request
- Review modification to the master data
Before going any further, it is important to first ensure that standard workflow settings have been performed properly to avoid possible holdups later in the change request management process for master data maintenance. I assume that the minimal standard workflow configuration activities have been performed successfully in customizing, but here is a brief overview.
Automatic Workflow Customization
This customizing activity represents a number of defined tasks that need to be performed to ensure the proper functioning and operation of the workflow engine. Most of the activities in this group can be performed automatically. Here is a list of the activities:
- Maintain runtime environment
- Maintain definition environment
- Maintain additional settings and services
- Classify tasks as general
- Guided procedures
Ensure that all the activities are marked with a green check mark after configuration (Figure 1).

Figure 1
Activities under automatic workflow customizing
To perform these customization tasks, follow menu path SPRO > SAP Reference IMG > SAP Customizing Implementation Guide > Governance, Risk and Compliance > General Settings > Workflow > Perform Automatic Workflow Customizing or use transaction code SWU3.
Task-Specific Customization
In this customizing activity, you set the non-background task as a general task and also activate event linkage for the appropriate workflow tasks. Specifically, the following workflow templates are directly relevant to the maintenance of workflow for master data changes:
- WS 76300002 (Process: Master Data Change)
- WS 76300007 (Notify Workflow of Master Data Change)
To perform these customizing activities follow menu path SPRO > SAP Reference IMG > Governance, Risk and Compliance > General Settings > Workflow > Perform Task-Specific Customizing or use transaction code OOCU. The GRC folder (under the Application Component Abbr… column) acts as a repository for tasks and workflow relevant to the different application components, such as Process Control, Access Control, and Risk Management (Figure 2). Click the Assign Agents button beside the GRC folder to display a list of workflow tasks associated with the GRC folder.
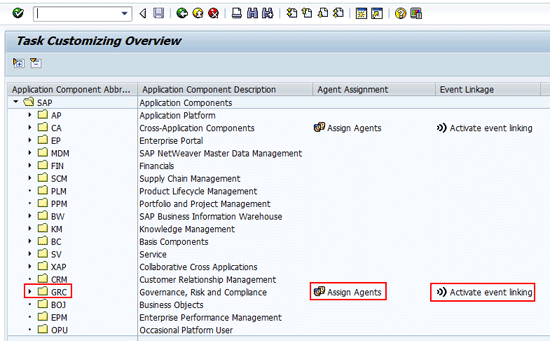
Figure 2
The initial screen for performing workflow task-specific customizing
Note
If the GRC folder is missing when you first access the screen, refresh the folders list using report RS_APPL_REFRESH via transaction code SE38.
In the next screen a list of tasks associated with the GRC application component folder appears (Figure 3).

Figure 3
Tasks associated with the GRC application component folder
Highlight the workflow template that you want to maintain and click the Attributes… button (Figure 4). In the dialog box that appears select the General Task radio button and press the Transfer button.
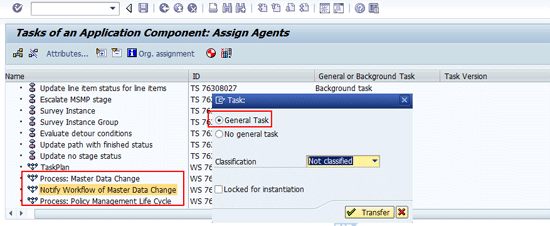
Figure 4
Maintain attributes of a task
To activate event linkage, click the Activate event linking option in Figure 2. The next screen lists the objects available for activating event linkages for various workflow events (Figure 5).
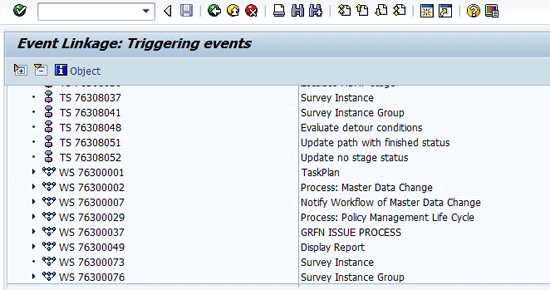
Figure 5
Activation of event linkage for workflow tasks
Navigate to the appropriate object and expand the listing. Ensure that the button on the right side of the screen is set to Activated as shown in Figure 6. If this button appears as Deactivated, click it to change the status to Activated.
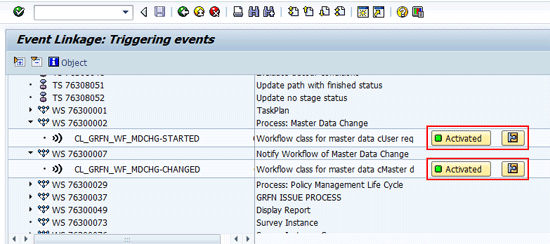
Figure 6
Activated event linkage
Click the detail view icon and set the parameters. For Linkage status, select No errors from the drop-down menu options. For Error feedback, choose Do not change linkage from the drop-down menu options (Figure 7).
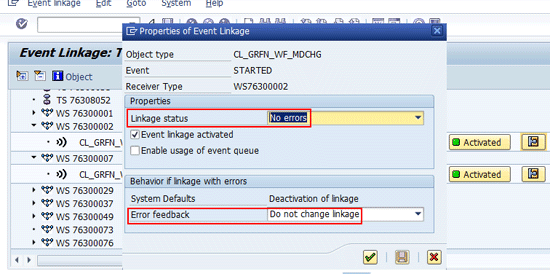
Figure 7
Maintain the properties of an event linkage
Activation of Workflow for Master Data Changes
In the standard system, workflow is not activated for any master data. However, as discussed earlier, the system allows you to activate workflow for changes to master data. In addition to activating the approval process for these changes, you can also activate the sending of notifications to the defined stakeholders of a master data when changes are made. You need to explicitly make this definition. To perform this customizing activity follow menu path SPRO > SAP Reference IMG > Governance, Risk and Compliance > Shared Master Data Settings > Activate Workflow for Master Data Changes. Click the New Entries button (Figure 8) and enter a value in the Entity ID field (e.g., PROCESS).
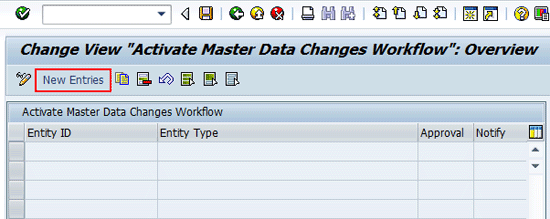
Figure 8
The initial screen for activating workflow for master data changes
The Entity Type field is autopopulated when you press Enter. Select the indicators under the Approval and Notify columns to activate the approval process and the notification for changes to master data, respectively, as shown in Figure 9.
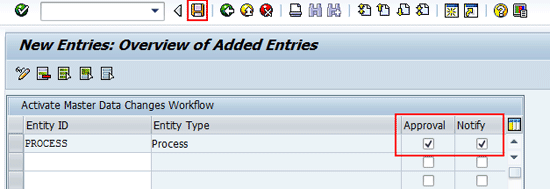
Figure 9
Activate workflow (approval and notification) for master data changes for an entity
Click the save icon. The next screen appears with a status message (Figure 10).
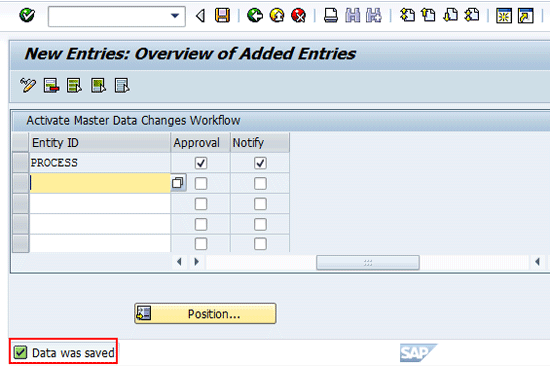
Figure 10
The status message for successful activation of workflow for changes to master data
If the setting is performed for almost all supported master data, you end up with a screen similar to the one shown in Figure 11.
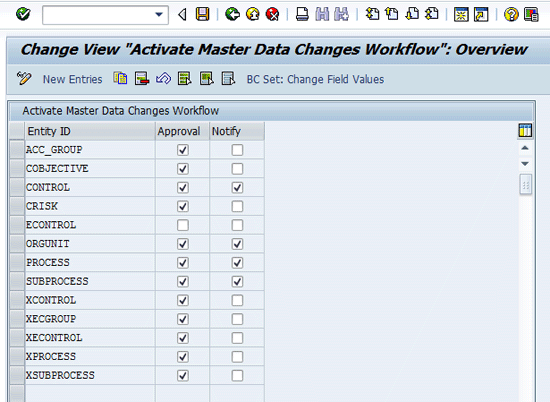
Figure 11
A typical screen for the activation of workflow for changes to master data
Maintain Custom Agent Determination Rules
Business events are placeholders used to determine recipients in workflow-centric business processes. The appropriate mapping of business events to defined roles drives these processes. This customizing activity is used to define roles that receive workflow and notifications for specific business events. The relevant business events in this context include:
- 0FN_MDCHG_APPR (Get the master data change approver who has the change authority of the object): This business event determines the recipient of a change request for master data changes.
- 0FN_MDCHG_NTFY (Get the notified person who has the display authority of the object): This business event defines the recipient of a notification when a master data change occurs.
To maintain who receives workflow requests and notifications related to changes to master data follow menu path SPRO > SAP Reference IMG > Governance, Risk and Compliance > General Settings > Workflow > Maintain Custom Agent Determination Rule. Figure 12 displays the customized business events table. This table allows you to map business events to recipient roles and entities. Furthermore, it allows you to sort your entries to prioritize and group recipient roles for business events. Click the New Entries button.
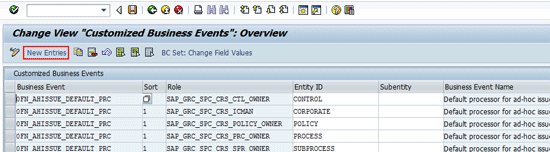
Figure 12
The customized business events table
Under the Business Event, Sort, Role, and Entity ID columns, enter the values for the fields. The Business Event Name field is autopopulated when you press the Enter key (Figure 13).
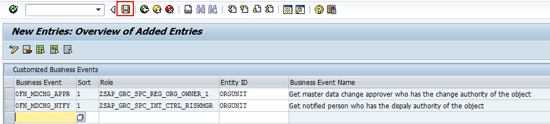
Figure 13
Maintain the customized business events table for a workflow-based master data change request
Click the save icon. The next screen appears with a status message (Figure 14).
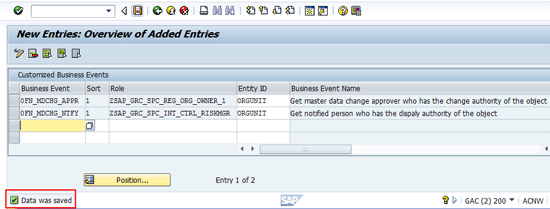
Figure 14
A saved entry in the customized business event table
The Business Scenario for Workflow-Based Change Request Management for Master Data
You have configured the standard workflow process, activated workflow for specific master data, and defined the recipients of change requests and notification messages. Your next step is to initiate a change request by maintaining master data and, consequently, obtaining approval before finally making the change. Basically, the work method for the workflow-centric change request management in SAP GRC 10.0 is summarized as follows:
- An initiator submits a request (with appropriate details) to make changes to the master data.
- The reviewer approves (or rejects) the change request.
- If the request is approved, the initiator makes the changes to the master data.
Note
I try to maintain the master data in the SAP GRC 10.0 work center, which is accessible via SAP NetWeaver Business Client (NWBC) or SAP NetWeaver Portal. The work center is a browser-based application that acts as the front-end tool for accessing SAP GRC 10.0 applications. I use a fictitious user, KENNY, as the initiator of the change request, and a fictitious user, PC10ADMIN, as the approver and recipient of workflow notifications.
Initiate a Change Request
Log in to the SAP GRC 10.0 work center via the front end (NWBC or SAP NetWeaver Portal) as the initiator of the change request (for example, KENNY) and access the Organizations section of the master data work center (Figure 15).

Figure 15
The Organizations section of the master data work center
Follow menu path Master Data > Organizations > Quick Links. Navigate to the organization unit that you intend to maintain, such as Sales in Figure 16. Click the Open button.
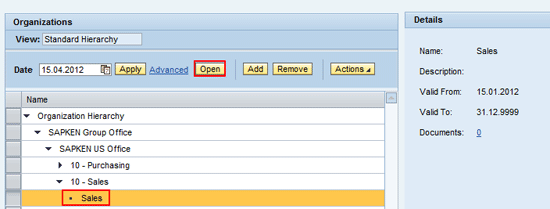
Figure 16
Path to access the organization unit to maintain in the work center
In the next screen you see that a new button (Request Change) is visible and activated. The Save button is grayed out (inactive), confirming that workflow for master data changes is activated for the application (Figure 17).
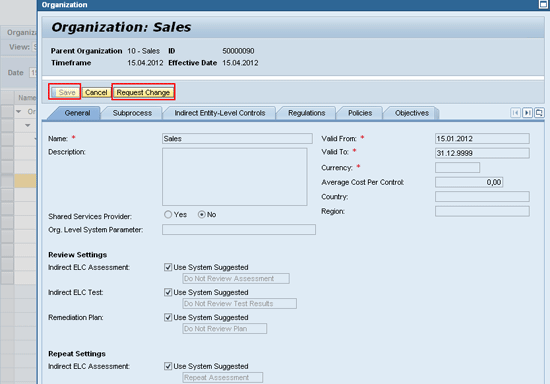
Figure 17
The activated workflow-based change request management for master data maintenance
If you have not activated workflow change request management for master data changes, the Save button is not grayed out, and the Request Change button does not appear on the screen.
Click the Request Change button to create a change request to maintain the master data, which results in a Change Request dialog box (Figure 18). The Change Request field allows you to describe the reason for the maintenance activity. The Change Request screen also allows you to define the field of the master data that you intend to change and the value you intend to define for the field. Enter values for the change request, fields to change, and propose changes as shown in Figure 18. In my example, you update the currency field to USD (United States dollar) and activate the Shared Services Provider setting for the sales organization unit. Click OK.

Figure 18
Define values for the change request
The next screen appears with a status message indicating that the change request was successfully submitted (Figure 19).
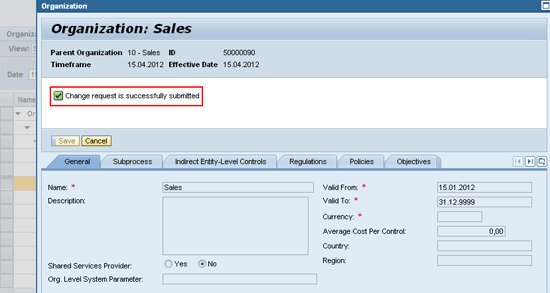
Figure 19
Status message for successful creation of change request for master data maintenance
If you (the same user who created the change request) open the organization unit (Sales, in my example) for maintenance again before it is approved, you receive a message indicating that you already submitted a change request for the object, but it is not approved. Note also that only the Cancel button is activated (Figure 20).
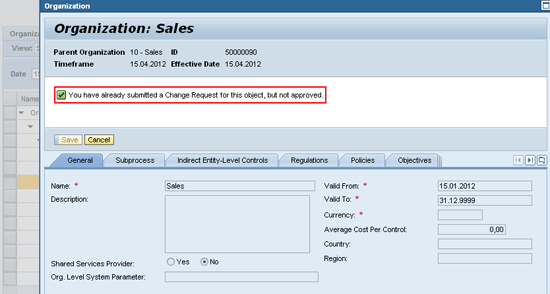
Figure 20
The status message indicating the existence of a change request for a master data initiated by the same user
If a different user tries to maintain an organization unit that has a pending change request associated with it, a screen appears with a status message with the name of the initiator. Only the Cancel button is activated (Figure 21).

Figure 21
The status message indicating the existence of a change request for a master data initiated by another user
Approve a Change Request
Log in to the SAP GRC 10.0 work center as the approver (for example, PC10ADMIN) and access the Work Inbox section of the My Home work center (Figure 22).
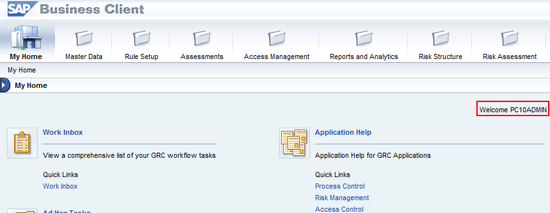
Figure 22
The Work Inbox section of the My Home work center for the approver
Follow menu path My Home > Work Inbox > Work Inbox quick link. The next screen lists the Workitems in the approver’s work inbox (Figure 23). The change request notification in the work inbox comes with the title Approve Change Request. The default screen contains information about the status of the request, when it was created, and who created it.
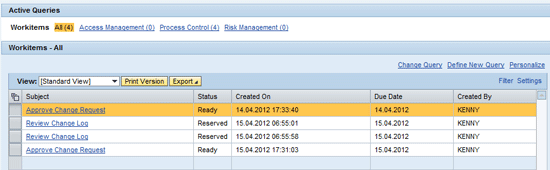
Figure 23
The work inbox of the approver of the change request for master data maintenance
Open a request by clicking a work inbox item. In the next screen, you can choose to approve or reject the request for changes to master data (Figure 24). This screen provides you with information about details of the change request as documented by the initiator. The Approval End Date field allows you to maintain the window period within which the initiator can continue to maintain the master data after the approval by the approver. The Comments field allows you to put in a note that is visible to the initiators when they access the corresponding work item in their work inbox following the action (approve or reject) of the approver.
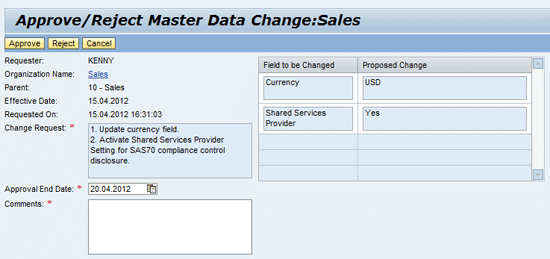
Figure 24
The approve or reject screen for master data maintenance
Change the Approval End date and enter a comment as shown in Figure 25. Click the Approve button.
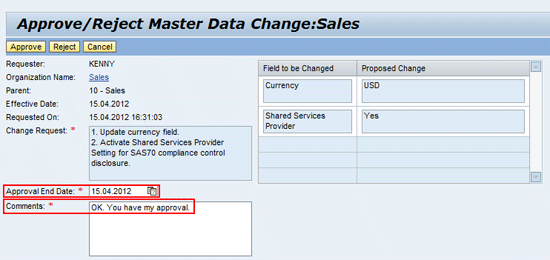
Figure 25
Maintain the Approval End Date and Comment fields before change request approval
Execute the Change Request
Log in to the SAP GRC 10.0 work center as the initiator (KENNY) and access the Work Inbox section of the My Home work center. Follow menu path My Home > Work Inbox > Work Inbox. Open the Workitem in the Work Inbox. The subject of the message is Organization Change Request is Approved or Organization Change Request is Rejected depending of the decision of the approver. In my example, I have the former message because it was approved (Figure 26).
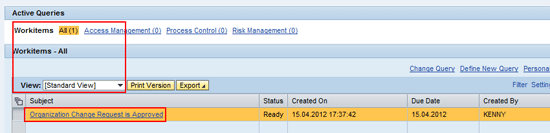
Figure 26
The Work Inbox of the initiator of the change request for master data maintenance
Open the work inbox item by clicking a work inbox item. You see a status message showing the approval status and an instruction to go ahead and perform the changes to the master data. Maintain the master data accordingly as shown in Figure 27.
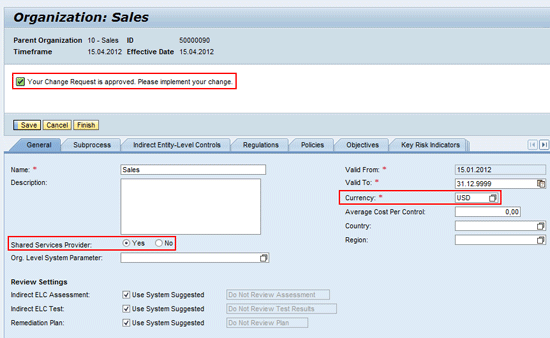
Figure 27
Notification to implement approved change request
In this window, you have the option to save your changes. If that is what you want to do, go back to the master data (Figure 18) and maintain it within the approved window period highlighted earlier (Figure 25). After you complete this task, a notification is sent to the respective stakeholders. If you click the Finish button (Figure 27), the change request is treated as closed, and notification is also sent to the respective stakeholder. If you need to maintain the master data again, create another change request.
First, click the Save button (Figure 27). The next screen (Figure 28) displays a change in status (from Ready to Reserved) of the work inbox entry (compare this data with the information in Figure 26).
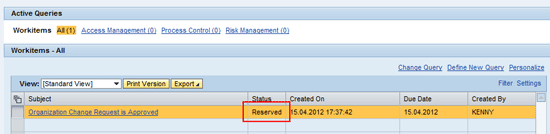
Figure 28
The status change for the change request notification in the work inbox
Because the change request is still open for the update, open the workitem in the work inbox again. The next screen appears (Figure 29). It includes updated field entries for the appropriate fields – Currency and Shared Services Provider. Note that you have a message that shows that you can still make changes to the master data.
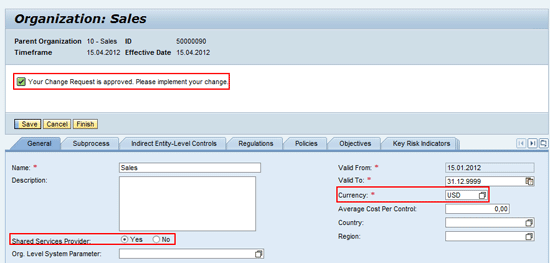
Figure 29
Implementation of a change request after the initial save operation
Now click the Finish button in Figure 29. The workitem leaves the work inbox of the initiator (Figure 30).
Figure 30
Deletion of a change request Workitem in the initiator’s work inbox
Review Modifications to the Master Data
Log in as the approver by following the steps in Figures 23 and 24.
Two notifications are generated for the change request in this example after the two actions (Save [Figure 27], with time stamp 17.44.35 and Finish [Figure 28], with time stamp 17.46.08) of the initiator on the change request as shown in Figure 31.
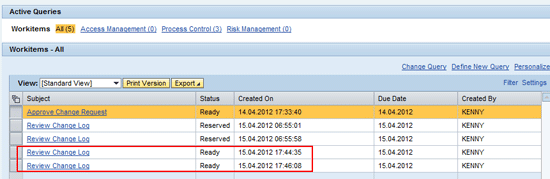
Figure 31
The work inbox of the approver after the save and finish operations of the initiator
Open a notification to review the change (as requested in the General tab – Figure 32) vis-a-vis the original request (in the Change Request tab – Figure 33).
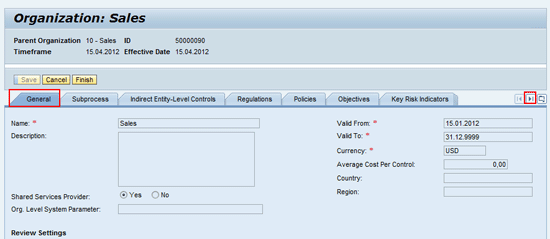
Figure 32
Change request effected in the general tab of the entity master data sheet
Navigate to the Change Request tab (Figure 33) by using the front arrow button circled in Figure 32.
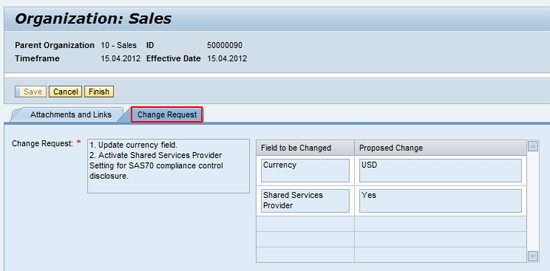
Figure 33
Proposed change request by the initiator in the change request tab of the entity master data sheet
Note
The Change Request tab is activated once a change request exists for an entity’s master data.
Choose Finish. After the window closes, the workitem in the work inbox disappears as shown in Figure 34.
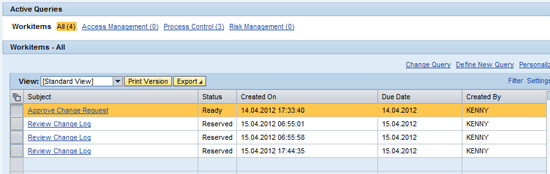
Figure 34
Deletion of the workitem in the approval’s work inbox following review of notification for master data changes
Kehinde Eseyin
Kehinde Eseyin is a security architect. He holds a bachelor’s degree in computer science. He has about 12 years of IT security, governance framework, IS risk, and compliance experience gained by working in numerous global organizations. Over the years, he has demonstrated competencies in security design, information assurance, cyber security, data privacy, threat and vulnerability management, penetration testing, business architecture, project management, IT audit, IS controls framework, and identity and access management.
You may contact the author at eseyinok@gmail.com.
If you have comments about this article or publication, or would like to submit an article idea, please contact the editor.