Learn how to configure settings for valuating detection actions, preventive actions, and effects in failure mode and effects analysis (FMEA). Receive tips on how to use the FMEA monitor to keep track of the progress of FMEAs.
Key Concept
A detection action stipulates the possibility of detecting a defect. A preventive action defines the preventive measure that is put in place to ensure reduction or elimination of the cause of defect. An effect reflects the damage or the loss that results from the defect in the product or the process.
Note
You need to ensure that two components are installed in your SAP ERP system to enable you to implement FMEA:
- Enhancement package 3.0 or higher
- Adobe Document Server (ADS)
Valuation of Detection Action
Figure 1 is the screen for a detection action. Notice that at the very bottom of Figure 1, the Start Action check box is not selected. This means that no detection action has taken place so far.

Figure 1
The Basic Data tab of a detection action
I scroll down the screen to the Status section (Figure 2).

Figure 2
The Status area of the detection action
In Figure 3, I enter the actual start and finish dates of the detection action and enter the level of completion as 100.0 percent to confirm completion of the detection action. In the meantime, I click the confirm icon that is located at the bottom of the screen in Figure 3 (on the right).

Figure 3
The Basic Data tab of the detection action after performing an action

Figure 4
The Status tab of the detection action

Figure 5
Set the system status for the detection action in the Status tab
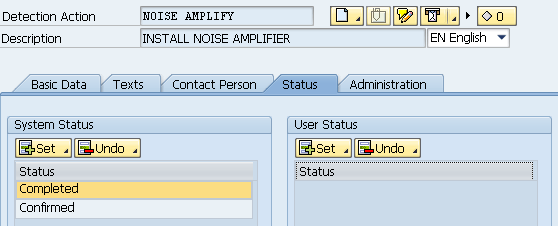
Figure 6
Status set to Completed for the detection action
Note
Before you set the detection action status as completed, make sure to check if the Target valuation is actually achieved and that you have incorporated it in the Basic Data tab of detection action (refer to Figure 1 again). Once you set the status of detection action to completed, you can no longer make any further changes.
Valuation of Preventive Action
I repeat all the steps for preventive action that I had just performed for the detection action. When I have performed all the steps for preventive action, I set the status to completed (to see how to set the status, refer back to Figure 5). The status is now listed as Completed as shown in Figure 7.
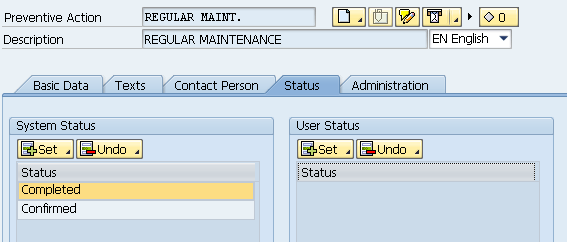
Figure 7
The Status tab of preventive action after setting the system status to Completed
Valuation of Effect
When you confirm in FMEA that you have performed the necessary detective and preventive actions to eliminate or reduce the occurrence of a defect in product or process, the final step is to enter valuation on how these two actions have (positively) affected the RPN by reducing it. Figure 8 appears when you click the cause (on the left side of the FMEA Gearbox) and then on the Basic Data tab of the cause.

Figure 8
Probabilities of occurrence and detection updated in the cause of the FMEA
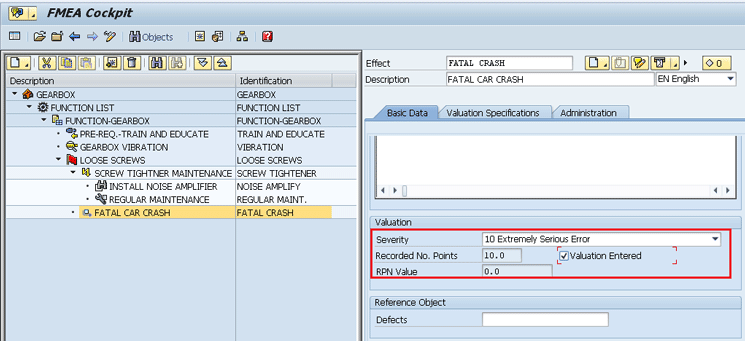
Figure 9
The Basic Data tab of an effect without RPN

Figure 10
The Result tab of the FMEA with automatic RPN calculation

Figure 11
RPN updated in the print preview (form layout) of the FMEA
FMEA Monitor
Leveraging the strength of information systems that SAP ERP provides in all areas of business processes, FMEA Monitor is available to facilitate the process owner in reporting and monitoring statuses and progress of FMEAs.
You can access the FMEA Monitor using transaction QM_FMEAMONITOR or menu path Logistics > Quality Management > Quality Planning > Failure Mode and Effects Analysis > Monitor (Figure 12).
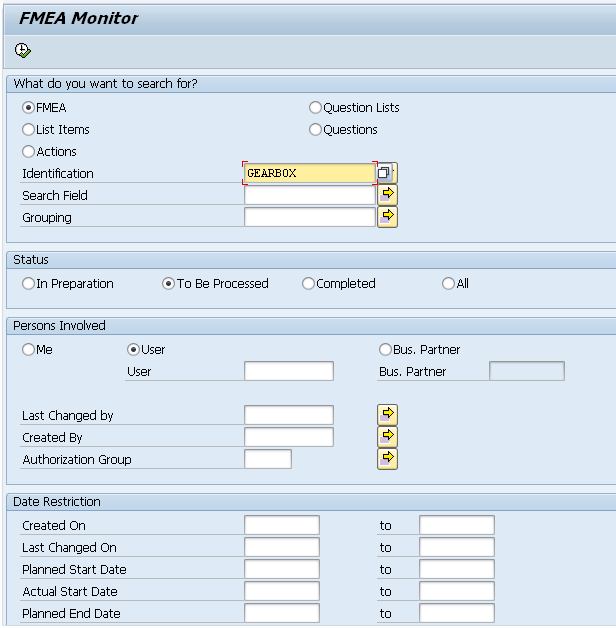
Figure 12
The initial screen of the FMEA Monitor

Figure 13
The detailed view of the FMEA Monitor
Control Plan
While a FMEA is a tool to record how a failure will affect the business process and what preventive or detection steps the process owner must ensure to reduce or eliminate failures, a control plan enables the company to have a working plan in place not only to avoid occurrence of failure in the first place but also to learn how to prevent it by taking the necessary reactionary steps.
To create a control plan, use transaction code QPCP or follow menu path Logistics > Quality Management > Quality Planning > Control Plan > Cockpit. This action opens the initial screen to create a new control plan (Figure 14). In this screen, you can simulate a control plan before its creation to identify and resolve any errors or issues before creating the actual control plan. This is possible when you click the Simulate icon. You can use a previously created control plan as a template to create a new control plan. This is possible when you enter the previously created control plan in the template area of Figure 14. This option enables the system to copy previously entered information into the new control plan, saving you time and effort with data entry.

Figure 14
The initial screen to create a control plan
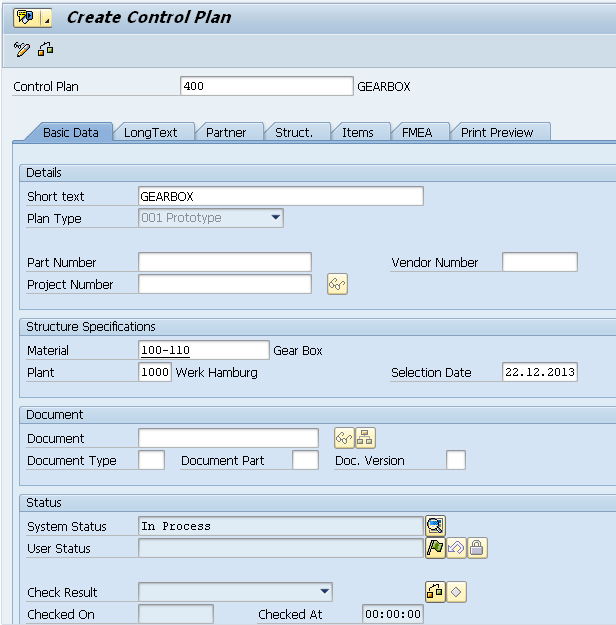
Figure 15
The Basic Data tab of the control plan

Figure 16
The Status area of the Basic Data tab of the control plan
Note
After you click the check icon, the system generates a green traffic light icon (the icon to the right of the check icon) to show that control plan is okay. The okay control plan is also shown in the Check Result field. Had there been any problem with the control plan, the green status light would have been yellow (warning) or red (error).
Next, I click the FMEA tab (Figure 15) of the control plan and view the data shown in Figure 17.

Figure 17
Assignment of FMEA GEARBOX in the FMEA tab of the control plan
In the FMEA column of Figure 17, I enter name of the FMEA Gearbox that I want to integrate with the control plan 400. The advantage of entering FMEA details during the initial stages of its creation helps as the system is then automatically able to not only integrate the control plan with FMEA but also brings up details from FMEA into the control plan. Next, I click the Items tab.
In the Items tab, I enter GearBox, 100-110, and Q in the fields under the Short text, Material, and Task List Type columns, respectively (Figure 18). I also enter the task list group number (245) and the group counter within task list 245 (1) in the fields under the Group and Group Counter columns, respectively. The task list type Q represents an inspection plan for material 100-110 within the task list group 245 and group counter 1. An inspection plan for a material denotes the physical or chemical attributes of a material that the company wants to inspect. In SAP ERP, these attributes are known as master inspection characteristics (MIC).

Figure 18
The Items tab

Figure 19
The Struct. (Structure) tab of the control plan
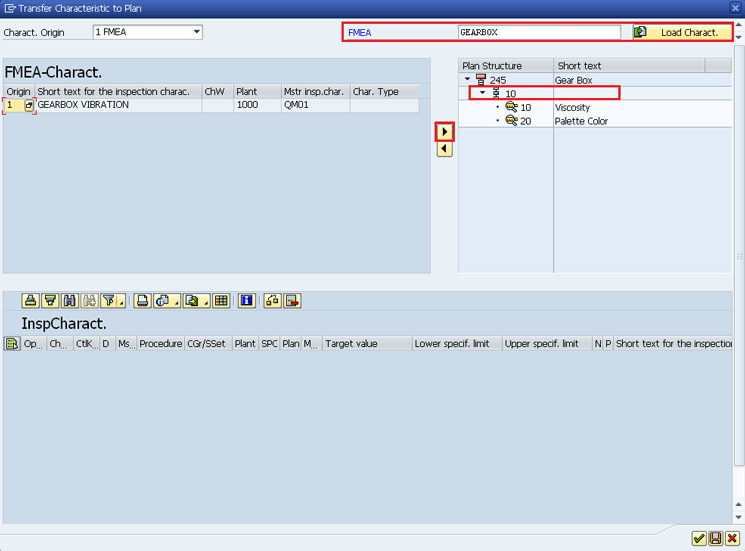
Figure 20
Transfer FMEA characteristics to the inspection plan
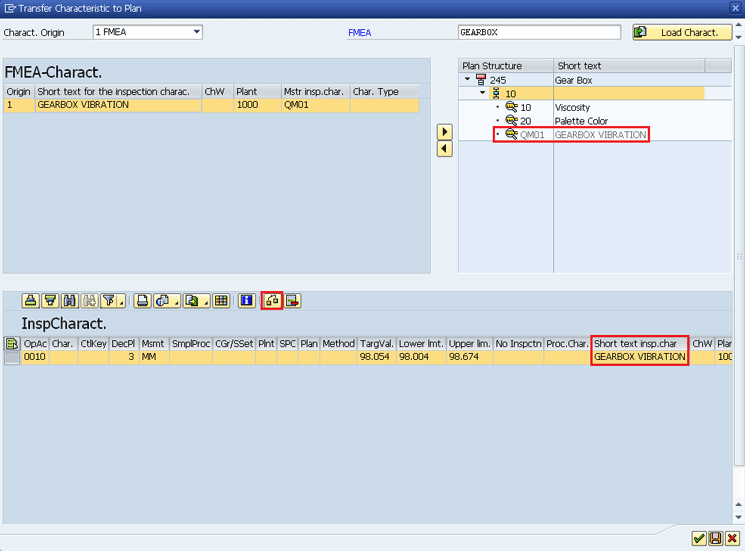
Figure 21
The FMEA characteristic transferred to inspection plan 245
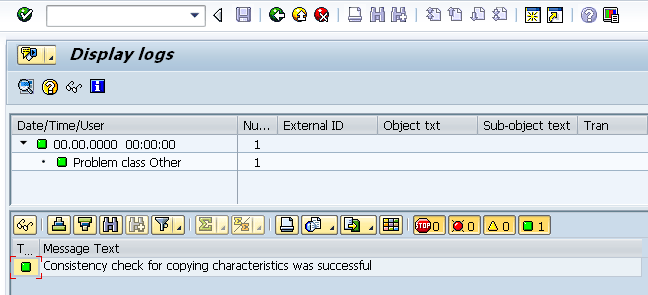
Figure 22
Consistency check for characteristics transfer

Figure 23
The control plan is released and the consistency check is successful

Figure 24
The FMEA tab with FMEA characteristics successfully transferred
Integration of the Control Plan with FMEA
To integrate the control plan with the FMEA, execute transaction code QM_FMEA. The screen that appears (Figure 25) shows the FMEA Gearbox. After I click the CP tab, I see that the system has successfully integrated the FMEA GEARBOX with control plan 400.

Figure 25
Integration of control plan 400 with the FMEA GEARBOX

Jawad Akhtar
Jawad Akhtar earned his chemical engineering degree from Missouri University of Science and Technology. He has 17 years of professional experience, of which nine years are in SAP. He has completed eight end-to-end SAP project implementation lifecycles in the areas of PP, QM, MM, PM, and DMS in the steel, automobile, chemical, fertilizer, FMCG, and building products industries. He also has worked as an SAP integration manager and an SAP project manager. He has been proactively involved in a business development and solution architect role for seven years. He is the author of Production Planning and Control with SAP ERP, it's filled with in-depth infomation on discrete, process, and repetitive manufacturing types. His profile on LinkedIn is at https://pk.linkedin.com/in/jawadakhtar. You may follow Jawad on Twitter @jawadahl. Currently, he is associated with AbacusConsulting as Head of SAP Delivery.
You may contact the author at jawad.akhtar@live.com.
If you have comments about this article or publication, or would like to submit an article idea, please contact the editor.


