Manager
Learn how to create a Business Blueprint structure in SAP Solution Manager 7.1 based on any word processing program. A new feature in 7.1, Content Upload Interface, allows you to upload the Business Blueprint structure along with its relevant data (e.g., transactions, configuration, developments) to SAP Solution Manager. Discover the step-by-step process for creating a Business Blueprint in SAP Solution Manager using the Content Upload Interface.
Key Concept
SAP Solution Manager 7.1 comes with many new interesting features and one of them is the new feature for a solution implementation known as Content Upload Interface. It helps you quickly create the Business Blueprint structure for an SAP Solution Manager project using a file processing program of your choice.
SAP Solution Manager is often the central tool to document the Business Blueprint for an SAP implementation, storing relevant documentation such as project documents, transactions, configuration documents, and developments. Before SAP Solution Manager 7.1, it was cumbersome to create a Business Blueprint hierarchy or structure in transaction SOLAR01 from scratch. It took a long time due to the involvement of multiple people from different areas (e.g., finance management, human resource management), and the time involved to get access for each of these users and train them to do the blueprinting via the Business Process Repository (BPR).
Content Upload Interface is an anticipated feature in many companies. I have spent weeks creating a Business Blueprint in SAP Solution Manager for multiple companies because gathering the data and adding these business scenarios in transaction SOLAR01 is so time consuming. Content Upload Interface provides the facility or luxury of uploading the entire project structure into the SAP Solution Manager system with an Excel (or other type of) file and thus saves a tremendous amount of time and effort.
With this feature, you can simply ask for input from the leads of various areas regarding the business scenarios or processes. You then combine this information in the format you require. You upload the data in another format and a structure is automatically created in SAP Solution Manager 7.1. It works for different types of projects, including implementation, maintenance, upgrade, and template projects. The biggest advantage here is you can format content for a project using a file processing program offline on a local system and later upload it to SAP Solution Manager.
Prerequisites
You must have an SAP Solution Manager project with proper logical components (i.e., the logical components are assigned to the same system to which the business scenarios and processes belong) and Landscape Management Database (LMDB) configured with transaction SOLMAN_SETUP. Content Upload Interface exists in transaction SOLAR_PROJECT_ADMIN, within which you can create a template file for structure creation. This is shared with respective business owners for input and later can be directly uploaded to the SAP Solution Manager system. In the background, the system creates a job and generates the entire hierarchy for SAP Solution Manager, saving the project team an enormous amount of effort.
You can upload and create the following types of information to an SAP Solution Manager project:
- Transaction SOLAR01 project hierarchy, project structure, or business process blueprint
- Project structure attributes
- Documents tab
- Transaction tab
- Business function tab
- Configuration tab
- Development tab
- Test cases tab
- Training material
To use the Content Upload Interface functionality, follow these 14 steps to create the Business Blueprint structure for the SAP Solution Manager project. Let’s proceed and create a sample structure in the SAP Solution Manager existing project.
Procedure
Step 1. Use transaction code SOLAR_PROJECT_ADMIN and choose your existing SAP Solution Manager project (Figure 1).
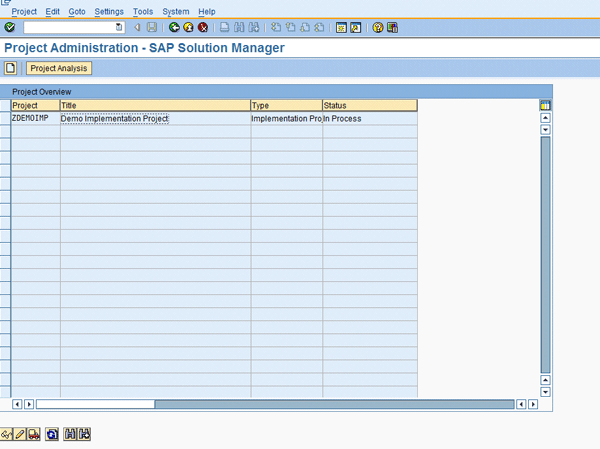
Figure 1
Initial Project Administration screen
Step 2. Double-click the project and go to change mode of the project (Figure 2).
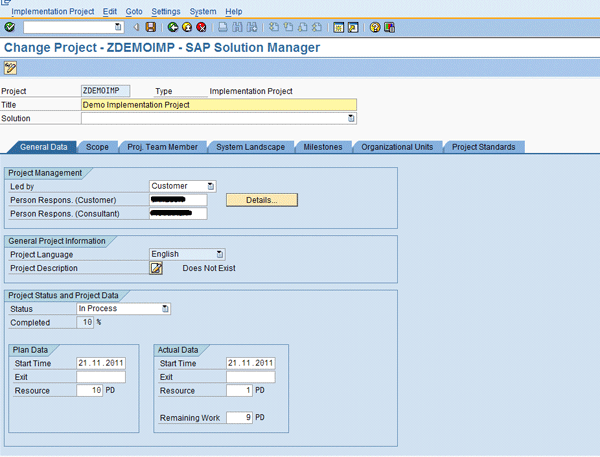
Figure 2
Change mode for project administration
Step 3. To generate the structure, you need to download a file that also provides the default format for uploading the data. Then follow menu path Edit > Fill Business Blueprint > Create Template File > Structure (Figure 3). This lets you create the file on your local machine.
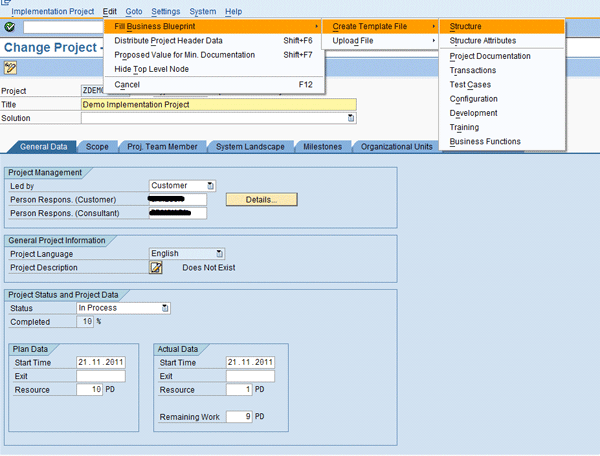
Figure 3
Structure template file creation path or downloading structure template
Step 4. Now choose the location where the file is to be stored on the local desktop (Figure 4). In my example, I’m storing it as an Excel file but you can choose another type if you’d prefer.

Figure 4
Storing file format selection option
Step 5. Open the file and click Yes through the pop-up window shown in Figure 5. The Excel file then appears (Figure 6). It states in what column you mentioned the business scenario, business process, and business process step with logical component information. If you are in the preparation stage and logical system information is not available, then you can enter Not Relevant in the Logical Component column and update it later in SAP Solution Manager. An asterisk refers to a comment-only field in Excel. When uploading, SAP Solution Manager ignores the asterisks.

Figure 5
Pop-up when opening Excel
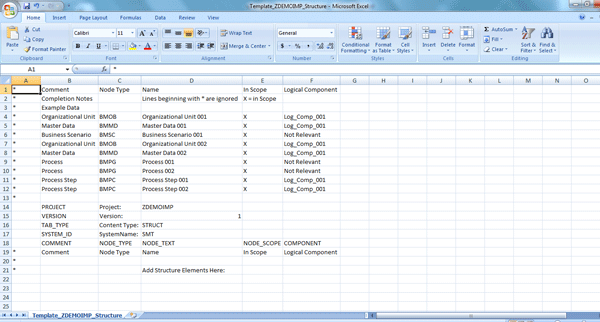
Figure 6
Structure template in Excel
Step 6. Once the above file is ready, you can send it to the respective business process experts or owners so that all the business scenarios and processes can be mapped in SAP Solution Manager. After receiving the filled template (Figure 7), you can directly upload it to your existing SAP Solution Manager project.
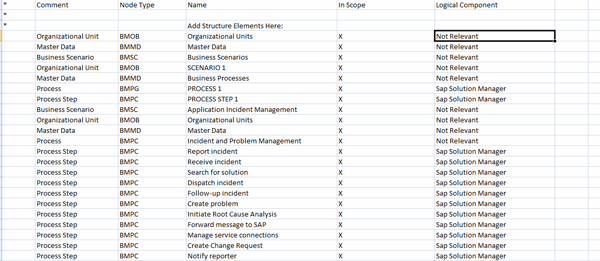
Figure 7
Finalized blueprint filled in Excel
Now use transaction SOLAR_PROJECT_ADMIN, choose the project, and go to change mode as you did in steps 1 and 2. Follow menu path Edit > Fill Business Blueprint > Upload File > Structure (Figure 8).
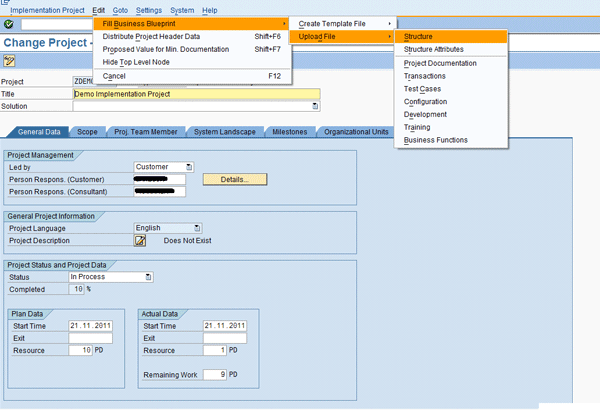
Figure 8
Uploading structure template
If the structure or Blueprint already exists, a pop-up screen appears (Figure 9). If you are sure and want to overwrite, then click the Yes button. The entire hierarchy with assignment is deleted if you do this, so be sure it’s what you want.
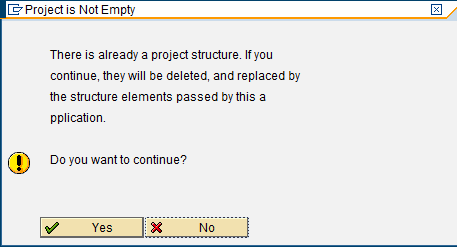
Figure 9
Overwrite confirmation pop-up window
Step 7. The Display logs message box appears (Figure 10). Confirm that there are no errors (or resolve them and re-upload the file if there are errors). A yellow icon denotes a warning — for example, if logical components are not relevant. Press Enter.
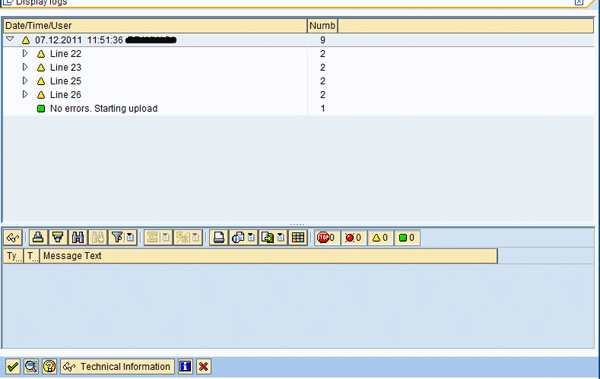
Figure 10
Display box
Step 8. An Information message appears (Figure 11). The system schedules a background job to create the project’s Business Blueprint structure.
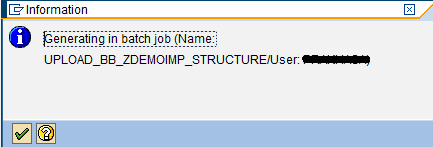
Figure 11
Information message
After the job is finished, the system produces the message shown in Figure 12. This is not instantaneous; it can take some time depending on the level of information you are using.
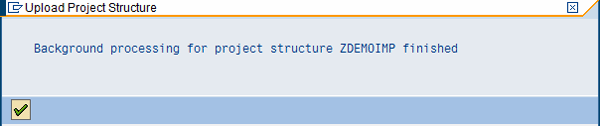
Figure 12
Confirmation message
Step 9. Once you have received the confirmation message, use transaction SOLAR01 and check the Business Blueprint for the project or use the Goto > Project > Business Blueprint shortcut within transaction SOLAR_PROJECT_ADMIN (Figure 13).
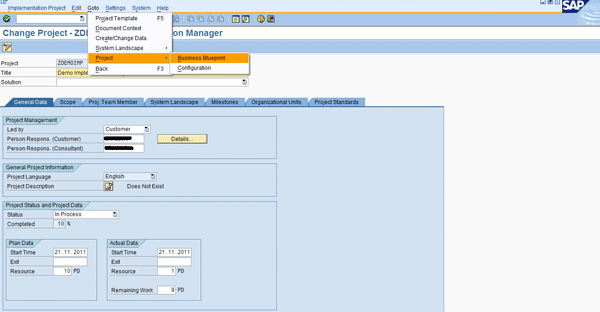
Figure 13
Business Blueprint path from project administration
Step 10. You can see the entire Business Blueprint structure as created based on the input in the Excel file (Figure 14).
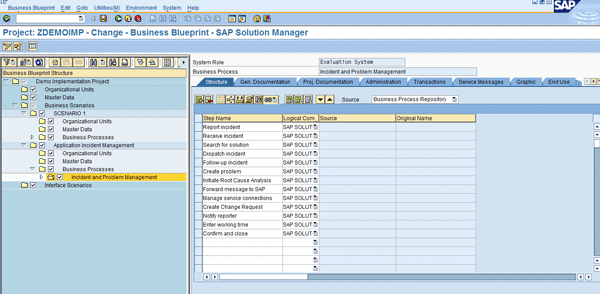
Figure 14
Generated Business Blueprint
The most important point is this feature still doesn’t support delta uploads so you can only upload during initial upload or initial Business Blueprint creation. Further, if you need to make a change, you have to do it directly in transaction SOLAR01.
To proceed further, let’s add transactions to the created structure. Table 1 shows a list of transaction types that you can add, such as SAP transactions, Business Server Pages (BSP) applications, or Web GUI transactions.
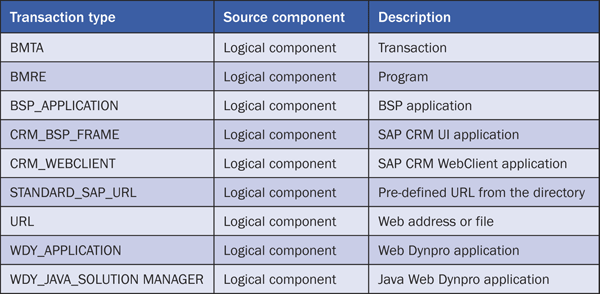
Table 1
Available transaction types
Step 11. Repeat steps 1 and 2 and go to change mode for your project. Follow menu path Edit > Fill Business Blueprint > Create Template File > Transactions (Figure 15). Save the Excel-formatted file to your local desktop and then distribute it further for inputs.
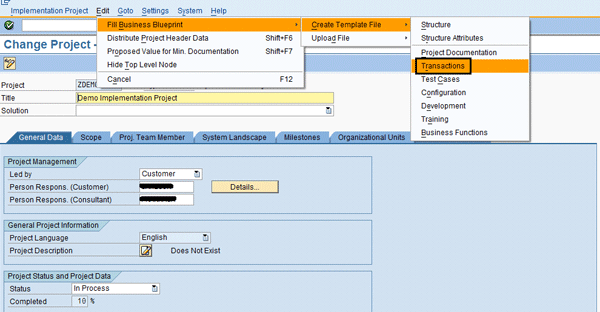
Figure 15
Path for uploading transactions
Step 12. The file looks as shown in Figure 16 with the structure you created already filled in. You just need to get the transaction code information for the structure.
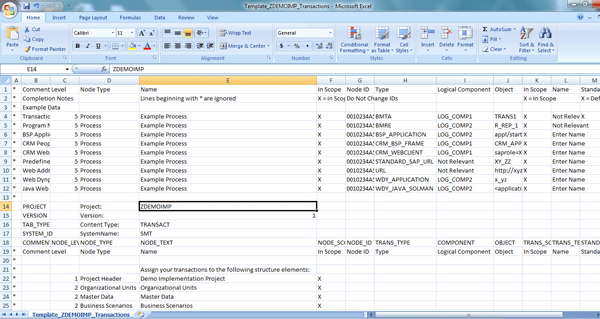
Figure 16
Transactions template
Step 13. Once you get the inputs, cross-check them and upload them via the SAP menu path Edit > Fill Business Blueprint > Upload File > Transactions (Figure 17).
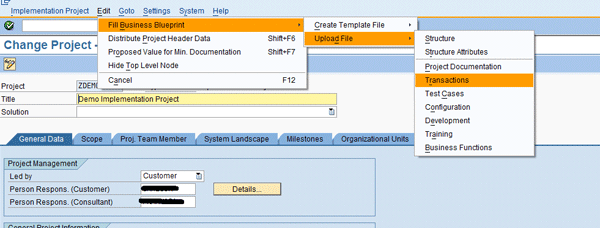
Figure 17
Upload path for transactions in Excel
Step 14. Provide the path and upload the file. The rest of the process is the same as I’ve shown you. Again the system creates a background job to update the transactions. As shown in Figure 13, you can go to the Business Blueprint or directly enter transaction SOLAR01 and check the transactions added to the structure.
You can repeat the same process and use it to create or upload:
- Structure attributes
- Test cases
- Configuration
- Development
- Training
- Business functions
Prakhar Saxena
Prakhar Saxena is an SAP Solution Manager-certified consultant with more than six years of experience. He currently works with Capgemini India Pvt Ltd as an SAP Solution Manager SME and is involved with SAP Solution Manager Implementations and upgrades across the world for various clients. He has worked extensively with Project Management, Test Management, Solution Documentation Assistant, Service Desk, and Change Request Management. He has also built proof of concepts (POCs) and demos for various companies around the world.
You may contact the author at prakhar_alld@yahoo.co.in.
If you have comments about this article or publication, or would like to submit an article idea, please contact the editor.