Manager
SAPexperts/HANA
With the release of SAP HANA many organizations are actively planning the migration of their current SAP systems to SAP HANA. Knowing how to configure Solution Manager to monitor their SAP HANA systems is incredibly important, especially as Solution Manager 7.1 is the only option for monitoring SAP HANA. Learn how to configure Solution Manager 7.1 Technical Monitoring for your new SAP HANA databases.
Key Concept
Technical Monitoring is designed to provide alerts on the critical components of your SAP landscape, allowing you to respond quickly to urgent situations that need immediate attention. Alerts are provided on four levels: Host, database, central instance, and dialog instance. The alerts are further divided into four categories: Configuration, availability, performance, and exceptions.
The ability to monitor an SAP system’s database is the key to ensuring the stability and performance of that database. Solution Manager offers a central location to monitor SAP HANA. It also provides key performance, diagnostics, and availability metrics, including the ability to send alerts based on those performance and availability metrics. Beyond technical monitoring Solution Manager also delivers early-watch alerts, root-cause analysis, and database administration tools. Solution Manager is a vital tool provided by SAP that you already have; the next step is to configure Solution Manager with your SAP HANA database.
To successfully implement the instructions contained in this article you must have experience in a few basic areas.
- It is essential to know how to use the SUSE Linux Enterprise Server operating system. Currently it is the only operating system supported to run SAP HANA.
- You must have experience using SAP HANA Studio.
- You must be experienced in using Solution Manager 7.1. In addition, you must understand how the System Landscape Directory (SLD) and the Landscape Management Database (LMDB) work within Solution Manager, as well as understand the process of the managed system configuration and how to set up Technical Monitoring.
- You must also be experienced in installing Solution Manager Diagnostic Agents and Host Agents. They are an integral part of the entire Technical Monitoring infrastructure.
- You also must be adept at installing SAP Notes. There are a number of required SAP Notes for both SAP HANA and Solution Manager 7.1.
Note
To ensure that all monitoring is completely functional, I also recommend upgrading your Solution Manager system to Support Package (SP) 08 (although the minimum requirement to monitor SAP HANA is SP04).
Note
For your reference, here are a few Web sites that are helpful in completing the configuration process:
This article provides step-by-step instructions for configuring Solution Manager 7.1 Technical Monitoring to monitor your SAP HANA database, and provides a reliable source for any issues you may have during the configuration process.
This guide is broken up into two sections.
Part 1: Connect SAP HANA to Solution Manager 7.1
To connect SAP HANA to Solution Manager 7.1 follow these three steps:
- Install the diagnostic agent and host agent on the SAP HANA server.
- Configure and test the connectivity between the host agent and HANA Studio.
- Enable the SAP operating system collector for SAP HANA Process Monitoring.
Part 2: Configure Solution Manager 7.1 to Monitor SAP HANA
To configure your Solution Manager 7.1 system to monitor SAP HANA you must do the following:
- Install the SAP HANA database client on the Solution Manager 7.1 server.
- Configure the SAP HANA database in the LMDB.
- Complete the manager system configuration for your SAP HANA database.
- Set up Solution Manager 7.1 Technical Monitoring.
- Test the functionality of Solution Manager 7.1 Technical Monitoring.
Part 1: Connect SAP HANA to Solution Manager 7.1
First I discuss the five steps needed to connect the two modules. The first step for connecting SAP HANA to Solution Manager 7.1 is to set up the SAP HANA database server for Solution Manager 7.1 Technical Monitoring.
Step 1. Install the Latest Diagnostic Agent and Host Agent on the SAP HANA Server
Ensure you use the latest diagnostic agent for the SUSE Linux Operating System; download it if you haven’t already and follow the installation guide instructions provided in SAP Note 1829024 – Inst. 7.30 SP3 Diagnostics Agent Installation. If you have multiple HANA databases running on one server, install a diagnostic agent for each HANA database.
Ensure that you have the latest host agent installed on the HANA server. Do this by navigating to /usr/sap/hostctrl/exe, and run the command ./saphostexec – version. At a minimum you should have SAP Host Agent 7.20 SP147 (per SAP Note 1365123) installed. The latest version available is SP160. If you need to upgrade the host agent, follow the instructions provided in SAP Note 1031096 (Installing Package SAPHOSTAGENT).
Step 2. Configure Connectivity Between the Host Agent and HANA Studio
The next step is to create a monitoring user in HANA Studio with the following roles: Public and monitoring (Figure 1). For Solution Manager 7.1 this user is required to be able to monitor SAP HANA. Once you have created the required user (MONITOR) for monitoring HANA, log in to the HANA Studio with the user monitor to set a permanent password for that user.

Figure 1
Create a user to monitor SAP HANA
Log in to the SAP HANA server operating system as the SAP Administrator User (SIDADM). Navigate to the SAP HANA database client directory: usr/sap/hdbclient. The SAP HANA database client is required software and should already be installed on the HANA server.
Save the new user in the HANA Database User Store (HDBUSERSTORE) to allow the host agent access to the HANA database. To do this, use this command: hdbuserstore SET <SID>SAPDBCTRL <hostname>:3$$15 <MONITORUSER> <password>. Verify that the user was successfully added to the user store. To do this, use the following command: hdbuserstore LIST <SID>SAPDBCTRL.

Figure 2
Verify that the user was added to the HDBUserStore
Now you have to give the host agent access to the SAP HANA database for monitoring. You do this by setting the LD_LIBRARY environment variable to usr/sap/hostctrl/exe. Activate the new environment variable by restarting the SAP HANA server. Then you need to test the host agent’s access to SAP HANA Studio. Use the OS user ROOT and navigate to the following directory: usr/sap/hostctrl/exe. Run the following command: sapdbctrl status <SID> -t hdb, and edit the Host Agent Profile. Insert all the diagnostic agent and SIDADM users by using the following context: service/admin_users DAAADM SIDADM (Figure 3).
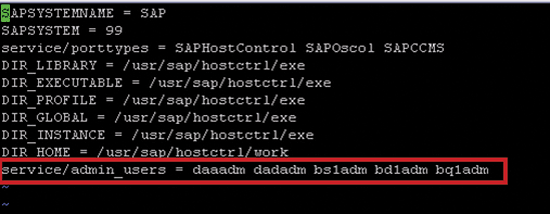
Figure 3
Add the diagnostic agent and system administrative users to the host agent profile
Next you need to activate the changes to the host agent by restarting the host agent. You do this by navigating to the directory /usr/sap/hostctrl/exe, and running the following command: saphostexec –restart. Then test the functionality of the outside discovery for Technical Monitoring. Use the operating system user ROOT and navigate to the Hostagent directory: /usr/sap/hostctrl/exe. Run the following command: saphostctrl -function GetDatabaseProperties -dbname <SID> -dbtype hdb. This results in the screen shown in Figure 4, where you verify the functionality of outside discovery. The duty of outside discovery is to collect or discover information about the monitored system and report it to Solution Manager. Outside discovery collects detailed information on the host and database, and this information is required for the SAP Solution Manager system to perform its functions.
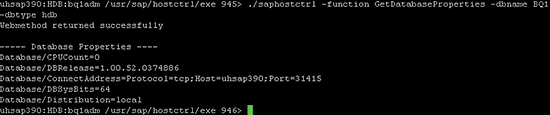
Figure 4
Verify that the host agent has access to the SAP HANA database via OS user ROOT
Test the functionality of the outside discovery of the HANA database status using the SIDADM user. Navigate to the host agent directory: /usr/sap/hostctrl/exe. Then run the following command: saphostctrl -function GetDatabaseStatus -dbname HDB -dbtype hdb (Figure 5).
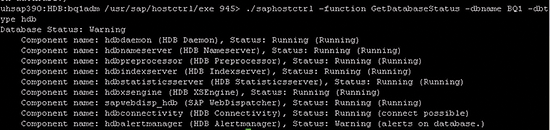
Figure 5
Verify the host agent has access to the SAP HANA database via OS user SIDADM
Step 3. Enable the SAP Operating System Collector for SAP HANA Process Monitoring
Next you need to enable the SAP Operating System Collector (saposcol) for SAP HANA process monitoring. This allows for detailed operating system monitoring specifically for SAP HANA. First download and unzip the attachment SAP_HANA_Unix_procmon.zip from SAP Note 1747682. Then copy the file SAP_HANA_Unix_procmon.ini under the directory /usr/sap/tmp/procmon/. (Note that you first must create the directory if it does not yet exist.) This file configures the list of processes that must be monitored (CPU and memory) by saposcol. To enable it, restart the host agent and the Diagnostic Agent.
Part 2. Configure Solution Manager 7.1 to Monitor SAP HANA
Now that you have completed the steps for connecting the SAP HANA system to the Solution Manager 7.1 system, it’s time to configure Solution Manager 7.1 to monitor SAP HANA.
Step 1. Install the SAP HANA Database Client on the Solution Manager 7.1 Host
The next step is to install the SAP HANA database client on the Solution Manager 7.1 host.
First, install the HANA database client software. Follow SAP Note 1664432 (DBA Cockpit: SAP HANA database as remote database) and SAP Note 1625203 (saphostagent/sapdbctrl for NewDB). Log in to the Solution Manager Server as operating system user ROOT, and run the following command: hdbinst -a client -p /usr/sap/<SID>/hdbclient. Set the variable PATH to hdbclient at this installation location: /usr/sap/<SID>/hdbclient. Restart the Solution Manager 7.1 host to activate the new environment variable.
Step 2. Configure the SAP HANA Database in the LMDB
Ensure your system running on SAP HANA is reporting to the Solution Manager SLD in Solution Manager LMDB. Verify this by checking the configuration in transaction code RZ70.
Next, maintain each HANA database within Solution Manager’s LMDB. Log in to Solution Manager with SAP GUI and execute transaction code LMDB (Figure 6). Select the technical system type; in this case, SAP HANA Database. Select the Extended System ID and then click the Edit button, which opens the screen in Figure 7.
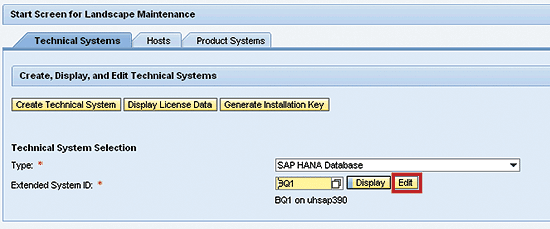
Figure 6
Choose the technical system to edit

Figure 7
Add the necessary software to your SAP HANA database
In Figure 7 you add the necessary HANA products to the HANA database. First, select the Software button on the left side of the screen. Then, in the right side of the screen, click the Add button. In the screen that appears (Figure 8) type SAP HANA in the search field. Select the Search button, which displays your results in the bottom portion of the screen shown in Figure 8.
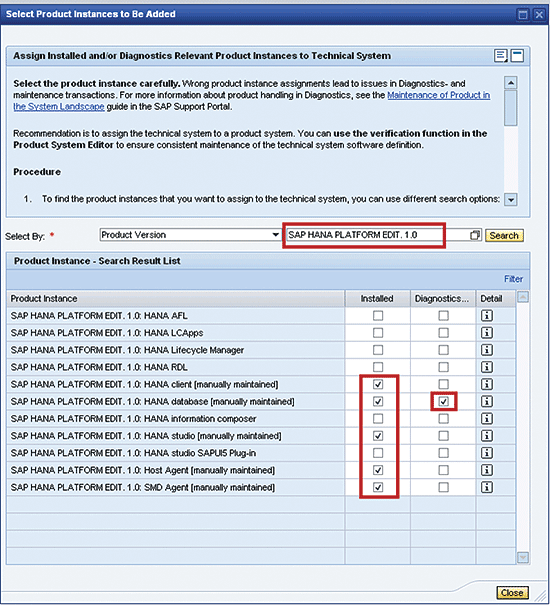
Figure 8
Select the SAP HANA software that is installed
In the drop-down list of Product Instance options, select Installed for all the products you have installed. It is either SAP HANA Platform Edition 1.0 or SAP HANA Enterprise Edition. If you do not know which software package you installed, ask your Basis administrator. Then select the software that is diagnostically relevant for monitoring (in my example, SAP HANA Platform Edit. 1.0: HANA database). Click the Close button. In the next screen (Figure 9) check your changes and then click the Save button.
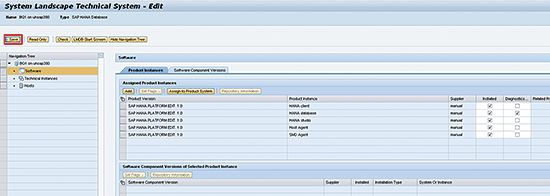
Figure 9
Check your changes and save them
Step 3. Complete Managed System Configuration for the SAP HANA Database and Technical System
Next you must complete managed system configuration for both your new system and the SAP HANA database. The steps below show how to complete the managed system configuration step for the HANA database, which finishes the process of connecting Solution Manager to your system and allows Technical Monitoring to function properly. You must be proficient in completing managed system configuration to complete this process.
Log in to Solution Manager. Execute transaction code SOLMAN_SETUP via the SAP GUI (Figure 10). Select the Managed Systems Configuration option and, under the second Technical Scenarios tab, select the Scenarios Operations button. Then click the Create Scenario option.

Figure 10
Create a new technical scenario
In the screen that appears (Figure 11), select the technical scenario type SharePoint from the drop-down options, and then enter the name and description of your system. I recommend using the system ID and system type in both fields. Click the Continue button.
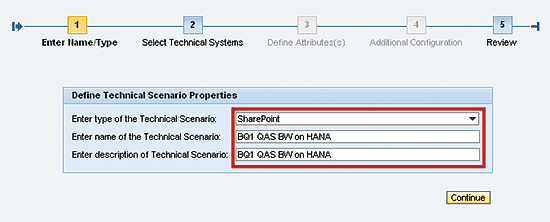
Figure 11
Provide a name and type for your new technical scenario
In the screen that appears (Figure 12), select the Add Technical System(s) button, which opens the screen shown in Figure 13.
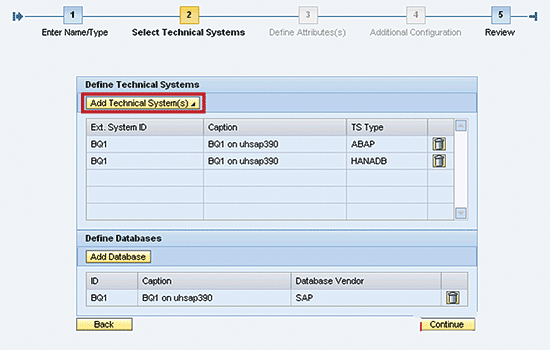
Figure 12
Add your technical system
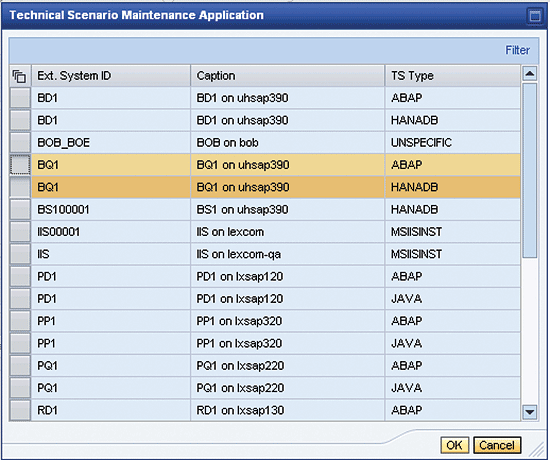
Figure 13
Select the system(s) you want to add
In Figure 13 check your changes (based on the entries that you made in Figure 11). Then select the appropriate system IDs (by selecting the gray boxes to the right of the ID names). Click the OK button (Figure 14).
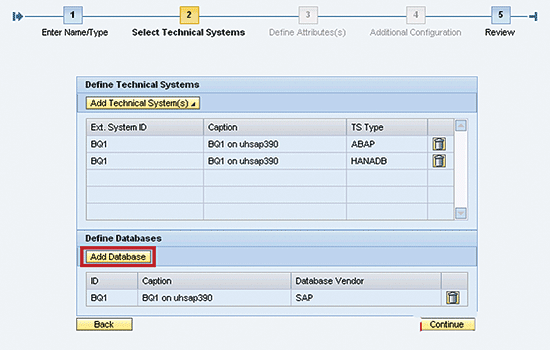
Figure 14
Add your new HANA database
In Figure 14 click the Add Database button. In the screen that appears (Figure 15) select the appropriate HANA Database (by selecting the gray boxes to the right of the ID names), and again click the OK button. This takes you back to the screen shown in Figure 16.
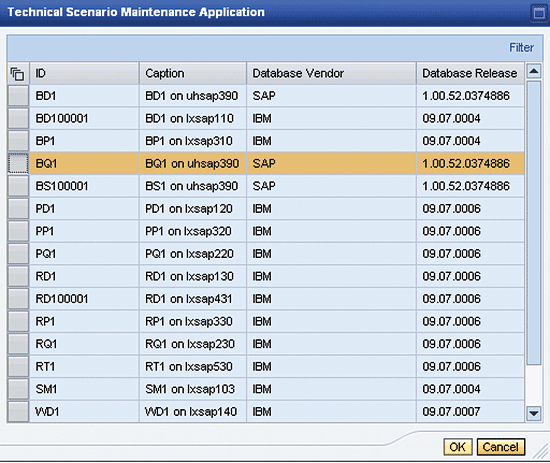
Figure 15
Select your HANA database
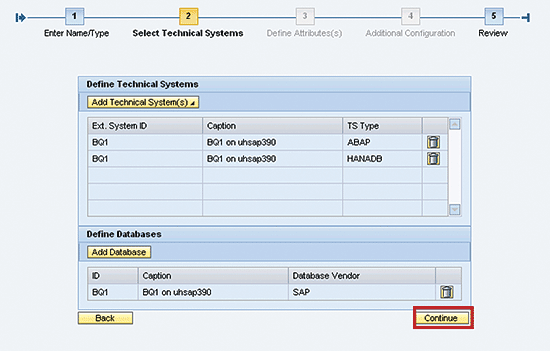
Figure 16
Check your changes to the technical scenario
Review your changes (Figure 16), and click the Continue button. In the screen that results (Figure 17), review your changes to the configuration. Then click the Save button to save your new Technical Scenario.
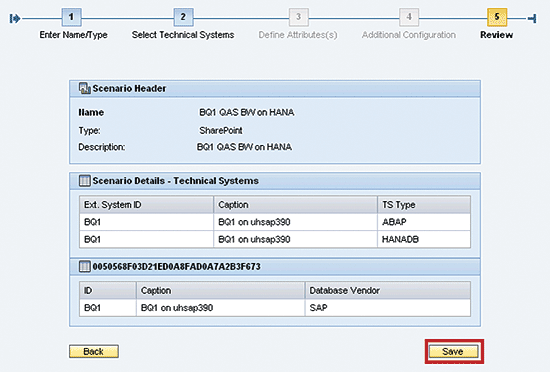
Figure 17
Review the configuration and save
Next you want to select the new scenario for your system running on SAP HANA. Under the Technical Scenarios tab select your new technical scenario by highlighting the appropriate line (Figure 18) — in my example BQ1 QAS BW on HANA. Then click the Configure Scenario button, which results in the screen shown in Figure 19.
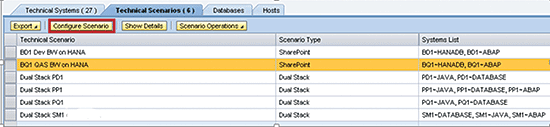
Figure 18
Select your new technical scenario
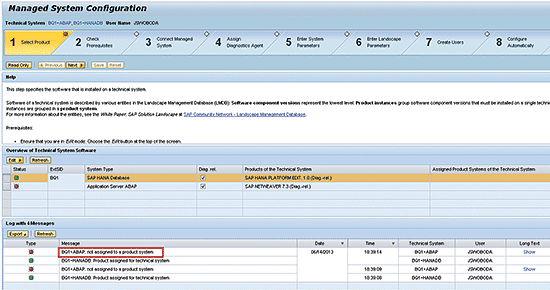
Figure 19
Assign the new system to a product system in the LMDB
Here you begin editing your system in the LMDB. As you can see in the screen, the HANA system is not assigned to a product system. (A product system allows multiple systems to be assigned to a single product.) You must assign the system to a product system and select the software that is diagnostically relevant within the LMDB. Select the EDIT button, which opens the screen in Figure 20.
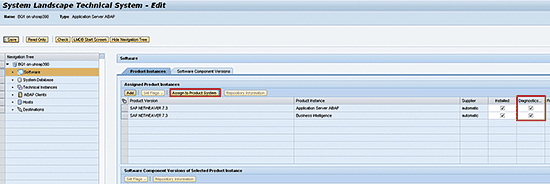
Figure 20
Select the diagnostically relevant products
Select the Diagnostics… check box for both products you want to add and make diagnostically relevant. Then click the Assign to Product System button. This opens the screen shown in Figure 21.
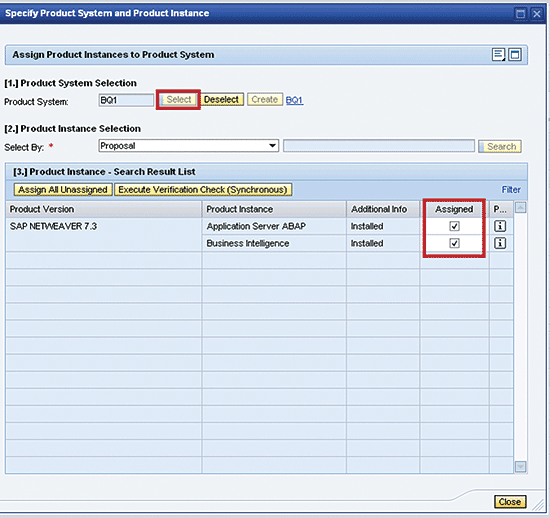
Figure 21
Assign the technical system to a product system
Here you assign your system to a product system. Click the Select button to select your system (BQ1). Then select the check boxes for all the software to assign to your product system, and click the Close button (Figure 22).
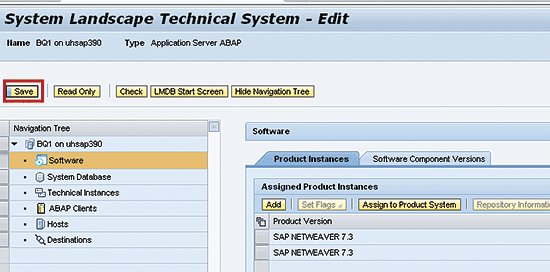
Figure 22
Save the changes to your technical system
Check your changes in the screen shown in Figure 22, and then click the Save button to save your changes. This takes you back the previous screen (Figure 23). Click the Refresh button. In the Status column at the bottom of the screen, green squares appear, signifying that your changes have been made successfully.
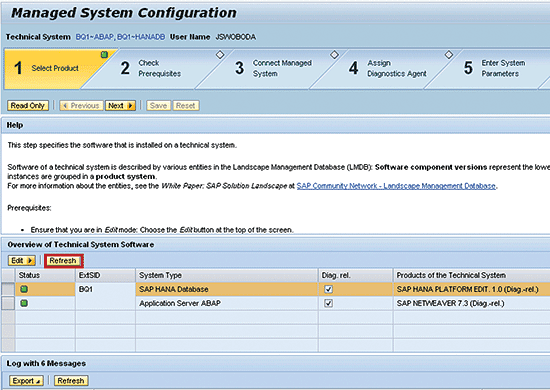
Figure 23
Verify the status for your technical system
Continue with the rest of the steps in managed system configuration. All the steps must be complete before you proceed and activate technical monitoring for your system.
Step 4. Set Up Solution Manager 7.1 Technical Monitoring for the System Powered by HANA
Next you need to activate Technical Monitoring for the SAP HANA database. Navigate to transaction code SOLMAN_SETUP (Figure 24) and select Technical Monitoring on the left side of the screen.
Note
Keep in mind that you must have completed all the steps I previously wrote about before doing this.
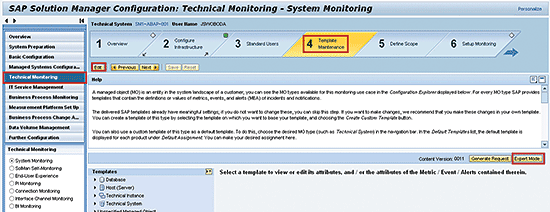
Figure 24
Maintain your Technical Monitoring template
On the right side of the screen, select the fourth step, Template Maintenance. Click the Edit button and then the Expert Mode button, which results in the screen in Figure 25.
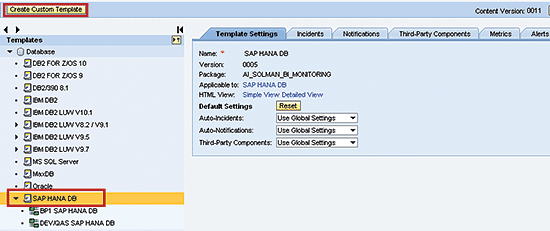
Figure 25
Create a custom template for the SAP HANA database
Here you create a custom template for the HANA database. A template is a collection of metrics and alerts. You must create a custom template so that you can make changes to the template, if required, in the future. Select the SAP HANA DB template (Figure 25) and click the Create Custom Template button. This opens the screen on the right side of Figure 25 where you can review your new template. Click the save icon to save your new template.
Now select the fifth step, Define Scope (Figure 26) or click the Next button.
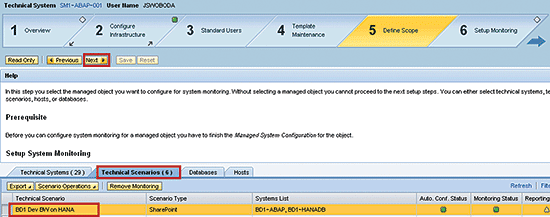
Figure 26
Select the technical scenario you configured previously
In the section at the bottom of the screen, select the technical scenario you created earlier (BD1 Dev BW on HANA in this example), and click the Next button. This takes you to the sixth step (Setup Monitoring), shown in Figure 27.
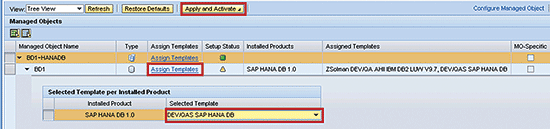
Figure 27
Assign your new custom template
In Setup Monitoring, you want to assign your custom template to the SAP HANA database. Select the Assign Templates link which opens the pop-up screen at the bottom of Figure 27, where you can assign the custom template you created. Click the Apply and Activate button and then the Next button, which takes you to the seventh (and final) step: Reporting (Figure 28).
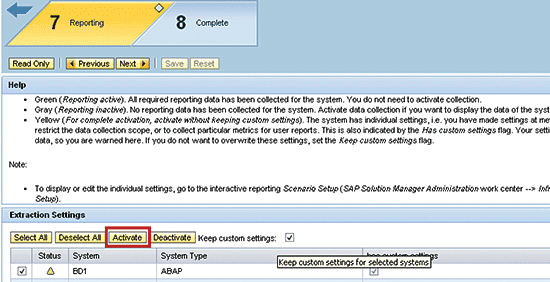
Figure 28
Activate Technical Monitoring reporting for your system
In step 7, Reporting, click the Activate button to activate reporting for your system powered by SAP HANA.
Step 5. Test the Functionality of Solution Manager 7.1 Technical Monitoring
Now it’s time to validate the Technical Monitoring functionality. Navigate to transaction code SOLMAN_WORKCENTER (Figure 29) and select the Technical Monitoring Tab. On the left side of the screen select System Monitoring, which opens the screen on the right. Here you select your system running on HANA and then click the System Monitoring button.
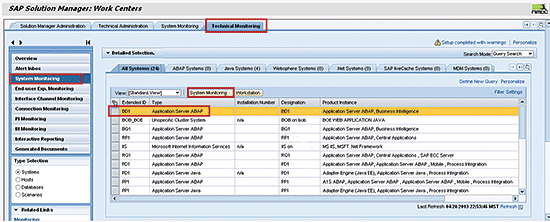
Figure 29
Choose your system running on HANA and display system monitoring
This results in the screen in Figure 30. Select any portion of the highlighted screen in the figure, which opens the screen in Figure 31. This shows the status of all the technical monitoring metrics that are active for your system running on HANA.

Figure 30
Validate that Technical Monitoring is Functioning (select your system)
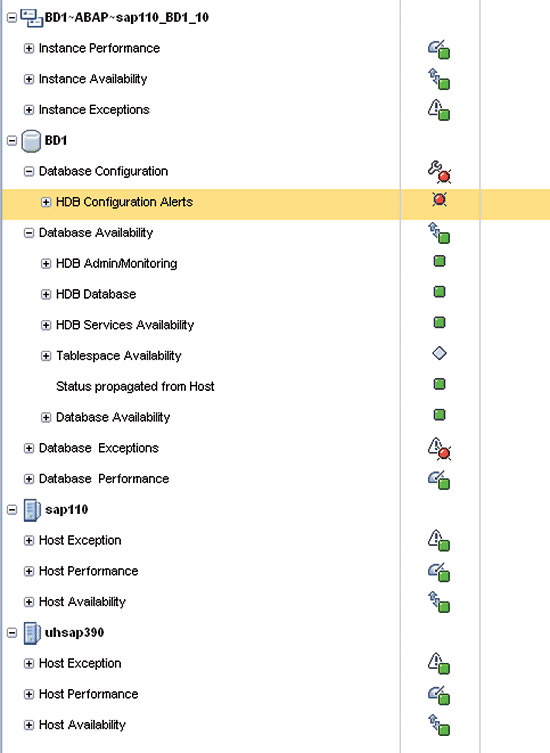
Figure 31
Check the status of your system’s Technical Monitoring metrics
Next to your selected system, you should see green, yellow, or red status symbols for the different categories for your system powered by HANA (Figure 30). These colors provide verification that Technical Monitoring is functioning properly for your system (or not). If you see a gray diamond there is an issue with the data and for some (for now) unknown reason the data is not being reported to Solution Manager. If this happens, review the steps outlined in this article and ensure that all of them have been completed successfully. When the status indicators are all green, you know that all the steps in Managed System Configuration for your system are complete.
Jereme Swoboda
Jereme Swoboda is an experienced SAP Solution Manager and NetWeaver consultant focusing on proactive technical monitoring of SAP and non-SAP systems, supporting critical business processes. He has tremendous experience pairing real-world scenarios with Solution Manager’s Technical Monitoring capabilities. He is an expert at collecting requirements, creating a monitoring strategy, and then putting that strategy to work for SAP customers. Jereme has had the opportunity to work on a variety of platforms for companies large and small integrating Solution Manager 7.1.
You may contact the author at jereme.swoboda@benimbl.com.
If you have comments about this article or publication, or would like to submit an article idea, please contact the editor.