Learn how to configure the SAP system for employees holding multiple positions in an organization, with each position reporting to different supervisors and with different cost centers for each position. See how to define relationship A008 to show the right organization structure. Follow the configuration steps involved in completing this in SAP ERP HCM, which also helps build a more accurate organizational structure and reporting relationship.
Key Concept
The organizational structure in the SAP system is the key building block for many processes related to workflow, reporting structure, and integration with other modules within the SAP ERP Central Component (ECC) system. The method in this article should not to be confused with the concurrent employment functionality that requires different enhancement packages. Also, the concurrent employment functionality is for employees who have multiple positions with different wage rates and who report to different supervisors. In this scenario, however, the employees have the same wage rates, and employees holding multiple positions can be configured in the standard system.
In large organizations executive assistants often serve as a shared resource reporting to multiple executives. They work part-time for each executive, but the multiple positions add up to one full-time position to make their full-time employment equal 100 percent.
The requirement in this article is to hire employees holding multiple positions at the same rate of pay, but who report to different supervisors. In some organizations (as in my example, above), one person may hold multiple positions across multiple organizational units, and, as a result, the cost of the employee is shared by these different organizational units and he or she has multiple supervisors. By using this configuration method you can accurately capture this functionality (employee holding multiple positions) in standard SAP functionality.
Note
Although you can use the cost distribution infotype, in this article I recommend using the relationship A008 (holder relationship) approach discussed below instead to reflect the accurate organization structure. In my article scenario, each position the employee holds also reports to different supervisors, so it affects more than just the cost center. The cost distribution approach is adequate for tracking the cost of the position, but my recommended approach satisfies this requirement and also shows the reporting structure of the employee holding different positions. In addition, in this case the users wanted to be able to see the organizational structures for each of these positions, which they can if they use this method.
It is not necessary that both of the positions held by the employee be from different cost centers; both positions can be in a single cost center, and then there is no need to maintain a cost distribution infotype. This approach helps to get accurate reporting and organization structures.
How to Set Up Employees Holding Multiple Positions in the SAP System
Create a position using transaction code PP01 and the required relationships are created.
Note
There are different ways to create Organizational Management (OM) objects in SAP ERP HCM. Transaction code PP01 is the most commonly used method, but you can also use PPOME or PPOM_OLD.
Some of the required relationships for this position in this scenario are listed in Table 1.

Table 1
Examples of the most frequently used OM relationships
Table 2 is a list of the relationships and what they mean in SAP ERP HCM.
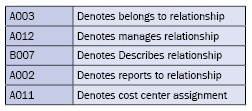
Table 2
SAP ERP HCM OM relationships
You can configure these relationships in table T777E (Figure 1). Follow menu path Personnel Management > Organizational Management > Basic settings > Data Model Enhancement > Relationship Maintenance > Maintain Relationships. These relationships are required to build the reporting relationship and the organizational structure.
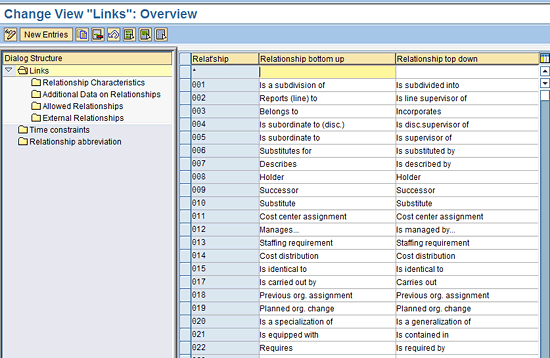
Figure 1
Table T777E (allowed relationship)
Step 1. Create the First Position for the Employee
To create the first position for the employee use transaction code PP01. In the screen that appears (Figure 2) select the Position Object Type from the drop-down menu, highlight the Object line (infotype 1000), and click the create icon  .
.
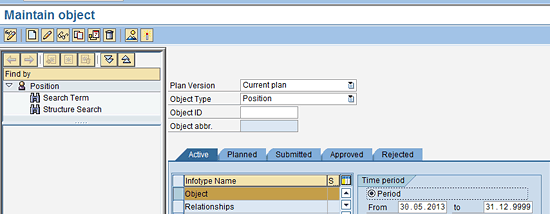
Figure 2
Create the first position using transaction code PP01
Once the object is created through transaction code PP01 (Figure 3), click the save icon to save the object.

Figure 3
Transaction code PP01 view
In the next screen (Figure 4) note that the system generates object IDs based on the number ranges defined.
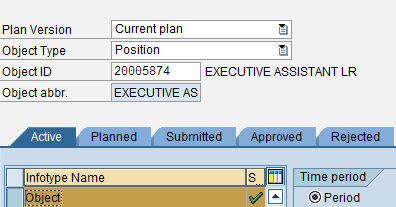
Figure 4
Transaction code PP01 view after the first position is created
After you create the position, you have to create all the required relationships (Figure 1). These relationships are critical for the system to be able to create the organization structure in the SAP system.
Using relationship A008 you can build the integration between person and position, which is the integration point between OM and Personnel Administration (PA). Through this relationship you connect the employee to the position. After you create this relationship, OM and PA are connected. The holder relationship explains who the holder of the position is.
You can connect the position to the person and assign the staffing percentage at the same time. In my example, 33 percent is the staffing percentage (Figure 5).
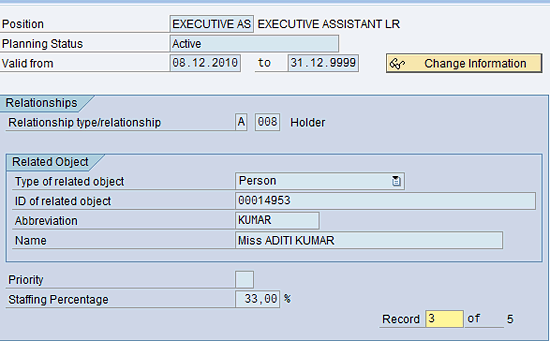
Figure 5
Create the holder relationship
Step 2. Create the Second Position for the Employee
Now create the second position using transaction code PP01. Again, note that the system generated the object ID based on the number ranges defined in the system (Figure 6).
Figure 6
Transaction code P013 view after creating the second position
Choose the object (infotype 1000) and click the display icon  (not shown in Figure 6).
In the next screen you see the full view of the second position created for the employee, which displays the abbreviation, name, and language of the object (Figure 7).
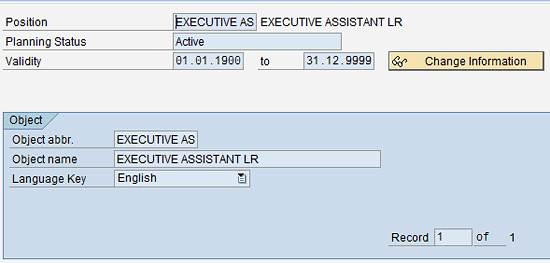
Figure 7
Create the second position (transaction code P013 view)
To create the holder relationship, click the Relationships tab. Select the Relationship type/relationship (A008) for the second position via infotype 1001 (relationship), then click the create icon (Figure 8). This is a very important step in this process as it creates the integration between OM and PA.

Figure 8
Create the holder relationship for the second position (infotype 1001)
After you create this relationship, OM and PA are connected, and the holder relationship explains who holds the position. Then you capture the staffing percentage of this position. In my example it is 33 percent.
Step 3. Create the Third Position for the Employee
Use transaction code PP01 and object Type Position (Figure 9) to create the third position for the employee (Figure 10).
Figure 9
Transaction code PP01view for creating the third object position with a new ID

Figure 10
Create the third position
Then create relationship A0008 for the third position (Figure 11). After you create this relationship, OM and PA are connected, and the holder relationship explains who the holder of the position is. In this case I make the staffing position percentage 34 percent (this, added to the other two staffing percentages—both set at 33 percent—brings the total for this position to 100 percent).
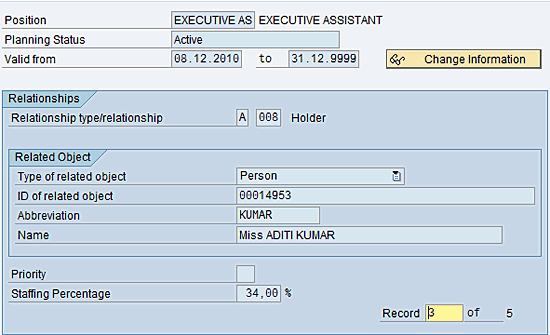
Figure 11
Create the holder relationship for the third position
Display Employee Master Data – Organizational Assignment
After you complete the OM relationship data setup for all three positions, check to see how this relationship is displayed in the employee record. You can view the employee file via transaction code PA20 (Figure 12).

Figure 12
The employee file
In the Basic Personal Data tab, enter the personnel number of the person holding multiple positions (in the Personnel No. field) and enter the infotype number in the Infotype field (in this case, 0001) for the organizational assignment infotype.
Once infotype 0001 is displayed, click the Org Structure button to display the three different positions held by this employee. In the pop-up screens shown in Figure 13 you see the information that you created for this employee contained in infotype 0001 and all three positions held by the employee.
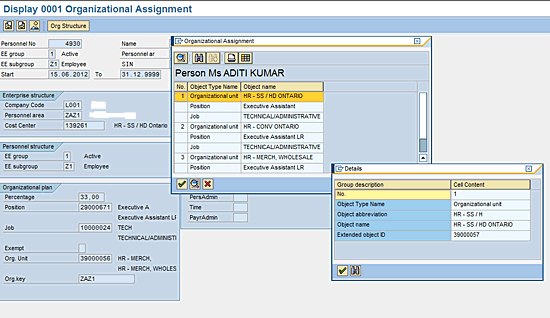
Figure 13
Infotype 0001 information for one employee with three positions
Organizational Structure View
You can view a snapshot of the different positions held by this employee via transaction code PPOME. Transaction PPOME also allows you to do a search based on any OM object for any employee (Figure 14).
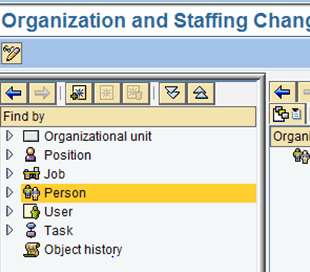
Figure 14
The initial search screen for transaction code PPOME
Figure 15 shows you the search screen for the object P. Enter the employee name in the Last name and First name fields, and click the arrows to the right to start the search.

Figure 15
Search for person screen
The search displays all three positions held by the employee (Figure 16).

Figure 16
Organizational structure view of the employee’s three positions
Organizational Structure Tree View
You can view the different structures to which this employee is assigned via transaction code PPOS_OLD. In this example the employee is assigned to three different unique structures simultaneously (Figures 17, 18, and 19): executive assistant to three different executives (Miss Sharon, Miss Nan, and Mr. Dan).
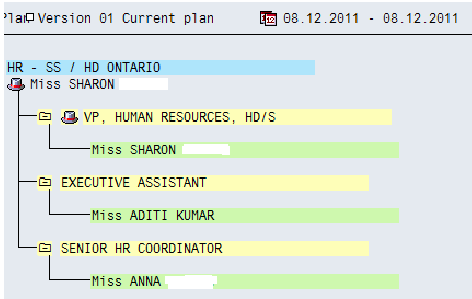
Figure 17
Employee organizational structure for position one

Figure 18
Employee organizational structure for position two
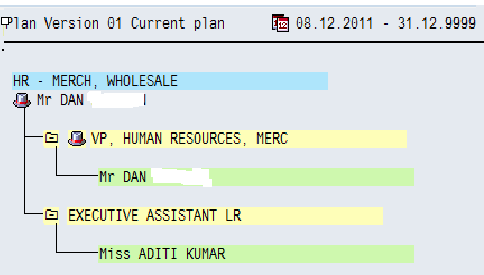
Figure 19
Employee organization structure for position three
Criteria Needed to Run Queries on Employees Holding Multiple Positions
To run an employee holding multiple positions report, use transaction code SE16 and table HRP 1001 (Figure 20). Enter the object type (P), the object ID (PERNR), the infotype number (1001), and the subtype (B008). Click the execute icon  to view the output screen (Figure 21).

Figure 20
The selection screen for table HRP 1001

Figure 21
The data browser view for table HRP1001 output after execution
Note
In the screen in Figure 20, do not enter PERNR in the OBJID field. This is because that selection restricts the report to that PERNR alone, and the purpose of the report is to pull all the PERNR who have multiple positions.
You can see the sample report output in Figure 22. This data is the same as what is displayed in table HRP 1001 (Figure 21).

Figure 22
A sample report
You have the option in the SAP system to generate these reports in a variety of formats, such as Excel, plain text, or HTML. To generate this report (Figure 22) using ad hoc query, you need the following logic (Figure 20):
Table or infotype: HRP1001
Object: P
Relationship: B008
Mohan Paul Varghese
Mohan Paul Varghese is an Advisory Manager with PwC based in Seattle, WA. He has been helping clients implement SAP ERP HCM on-premise/in the cloud for more than 15 years. He has been involved in large, full-scale SAP ERP HCM implementations using the breadth and depth of SAP modules. Prior to PwC ,Paul worked with SAP, Accenture, and HP.
You may contact the author at Mohanpaulv@hotmail.com.
If you have comments about this article or publication, or would like to submit an article idea, please contact the editor.