When you check a process chain in transaction SM37, all the jobs have the same name, so it’s difficult to differentiate among them. However, you can create a variant for your job that provides it with a unique name so that you can view or check your job easily.
Key Concept
BI business analysts and production support teams usually verify if a certain job is completed by looking it up in transaction SM37 (job overview). However, process chain technology does not offer a way to identify a job uniquely. The same basic job runs all the process chains, so your process chain is indistinguishable from all others.
Say you have a process chain that is active and runs on a schedule. When you use transaction SM37 to check on the job run status, all the jobs have the name BI_PROCESS_ LOADING. This tells you nothing about your process chain because all process chains generate the same job name after they run. You can try to identify the run by the time displayed for the entry, but this is inefficient.
Let me share with you a little-known way to overcome the meaningless job names that appear in transaction SM37. The solution is to create a job variant that you can schedule with the scheduler’s start condition, a variant of transaction SM36 that is available in all Basis systems.
My example involves using a job variant to assign the name G/L MASTER DATA to one of the BI_PROCESS_ LOADING jobs. You first obtain the technical name of your process chain. Then you create a variant for RSPROCESS. Next, delete any scheduled starts for your process chain. Finally, schedule the job. These four steps provide you with a way to check your process chains quickly before you lock them down and hand them over to production support. When you finish, confirm that the new name appears by going back to transaction SM37. This process works in SAP BW 3.5 and later, including SAP NetWeaver BI 7.0.
Create a Job Variant
It is critical to establish a naming convention before you start these steps so that you can tell the process chain, variant, and job apart. Best practices dictate that any name that comes up in a dump or listing should be descriptive. When you are looking through a list of failed jobs, you want to see a job name that tells you what the job is. If no job name is assigned, the system attaches a long, unintelligible GUID.
Step 1. Obtain the technical name of your process chain. Use transaction code RSPC. Click on the display components icon  to display the folders that contain the individual process chains. Next, select your process chain and click on the process chain maintenance icon
  . When the graphic screen opens, go to the top toolbar and select Process Chain>Attributes>Name. A pop-up screen appears with your process chain name and description (Figure 1). Note the technical name circled in the upper left corner of the screen.

Figure 1
Technical name appears at the top left corner
Step 2. Create a variant of RSPROCESS. This is the standard SAP program that runs process chains. In transaction SE38, enter RSPROCESS for the Program, and then click on the Variants button. This opens the ABAP: Variants – Initial Screen in which you enter the process chain’s technical name, in this case ZPC_G/L_MD. Then click on the Create button (Figure 2).

Figure 2
Enter the process chain’s technical name
On the Maintain Variant screen that appears, enter CHAIN for the Process Type. In the Process Variant field, enter your chain’s technical name (ZPC_G/L_MD), which becomes the variant’s name. Then click on the Attributes button to access the Variant Attributes screen (Figure 3). Enter a description of the variant’s Meaning, such as General ledger Master Data. Then click on the save icon. Note the exact variant name because you need it for verification after you complete this step. You have now created a variant of ABAP program RSPROCESS.
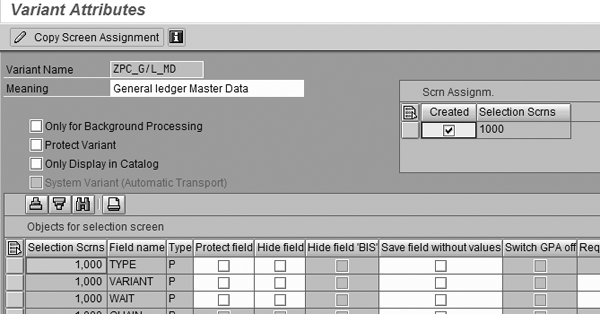
Figure 3
Enter a description for your variant
Step 3. Delete any existing scheduled starts for your process chain. If the start process contains a previously established start date, transaction SM37 shows that you scheduled the job, but you won’t see any entries to indicate if the system loaded the InfoPackages or created requests.
Go to transaction RSPC and open the folder that has your process chain’s name in it. Double-click on your process chain to access the Network Display screen. Next, double-click on the start process, which is always the first box in the network. This opens the Maintain Start Process screen. Select Direct Scheduling and click on the Change Selections button.
In the screen that appears, click on the Immediate button to change any existing scheduling. You may wonder why you should click on the Immediate button if you don’t want the process to start right away. By clicking on this button, you are telling the start process that the nature of the start is immediate — when the scheduling specifies a date and time, the system launches the job immediately at that time without any conditions. This also allows the scheduler to start the job as scheduled. Make sure that the Periodic job check box is not selected.
Step 4. Schedule the job. In transaction SM36 enter the job name RSPROCESS and then click on the Job wizard button. On the initial job wizard page, click on the Continue button. Next, the wizard asks you to enter a Job Name (Figure 4). The job name you create must be different from the variant name, which is more of a technical name. Make sure this is descriptive because this is the name that you see when you run transaction SM37. In my example, I used G/L MASTER DATA for the job name.
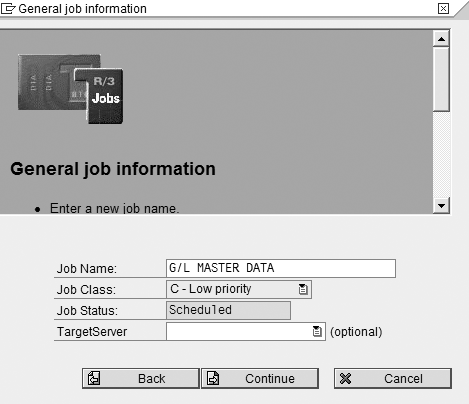
Figure 4
Enter a Job Name
Leave the TargetServer field empty and click on the Continue button. Note that the Job Class default is C - Low priority. You can change this if your job requires a higher priority.
In the screen that appears, select ABAP program step and click on the Continue button. On this next screen, enter the ABAP program name RSPROCESS and the name of the previously created variant, ZPC_GL_MD, as shown in Figure 5. Click on the Continue button to skip the next screen, which is called Multi-Step Jobs.
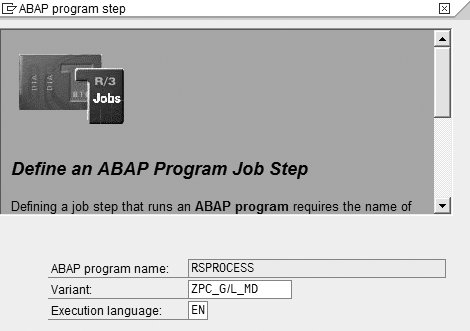
Figure 5
Enter the program name RSPROCESS and the variant name
The next screen after that is the Job definition: Start conditions screen. Typically, you schedule a job to run at a specific day and time by selecting Date/time as the start condition. The screen in Figure 6 appears. If you want the chain to run regularly, select the Period check box to open a page that gives you options such as daily or weekly. When you’re finished in this screen, click on the Continue button. If everything is correct, click on the Complete button.
Note
Alternatively, you can set a job to run immediately, which is the norm for testers who want to evaluate results on the spot.
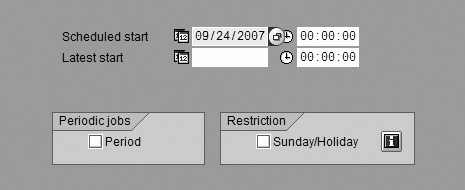
Figure 6
Define a date/time start condition
Confirm the Process
You have now created a variant for your process chain and successfully scheduled it. To make sure that you can view the new name, enter transaction SM37 to list all the jobs. Next, enter your SAP user name and the date on which you want to see what is scheduled. Select the Released status. The message in Figure 7 appears. Scheduling a job in BW means that you have created a job that will be scheduled for running. However, until it is released to BW Scheduler, nothing happens to it.

Figure 7
Job with Released status
Return back to the list of jobs. The resulting list should include your new job name. Place your cursor on the job name and then click on the Step button to display the variant name you chose earlier (Figure 8) . Then place your cursor on the Parameters entry, which is the variant name, and select GOTO>Variant. The screen that appears indicates the variant name(ZPC_G/L_MD), as shown in Figure 9.

Figure 8
The variant ZPC_G/L_MD appears for RSPROCESS
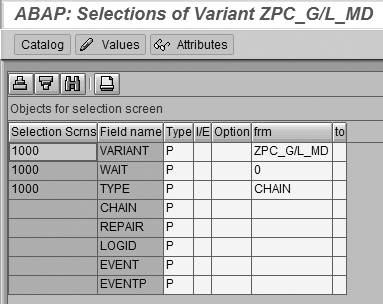
Figure 9
The variant name and type
Tip!
If the variant name does not appear in the frm column in Figure 9, click on the Values button. This takes you to the variant maintenance screen in which you can enter the variant name. The variant name may not appear if the variant wasn’t created properly in step 2 of the “Create a Job Variant” section.
To confirm your scheduled date and time, select Job>Repeat scheduling. When you run transaction SM37 to list your various jobs, G/L MASTER DATA now appears instead of BI_PROCESS_LOADING (Figure 10).

Figure 10
The log entry name of the variant you created
You can also apply this process to data transfer processes (DTPs) in SAP NetWeaver BI 7.0. DTPs don’t appear to offer any means to schedule in the background. When running job lists in transaction SM37, you again get a listing of jobs whose names are invariably long series of numbers and letters. Returning to step 2, when you create your variant, you have the option to enter a DTP process rather than a process chain. The program is still RSPROCESS and the subsequent steps are largely the same
Note
For more information about this topic, consider attending the SAP Education course BW360 "BW Performance and Administration" for BW 3.5 or BW 360 "SAP BI Performance and Administration" for SAP NetWeaver BI 7.0.
J Michael McNally
J. Michael McNally is an independent consultant working mainly on SAP NetWeaver BI implementations. He began working with R/3 in functional configuration in Service Management in 1996. Prior to that, he was a business process management consultant for four years where he worked on large business process data modeling and analysis studies. Earlier he spent almost a decade with Ernst & Young and PricewaterhouseCoopers as a management consultant, focusing his efforts in manufacturing, accounting, supply chain, and human resource projects.
You may contact the author at editor@bi-expertonline.com.
If you have comments about this article or publication, or would like to submit an article idea, please contact the editor.