Manager
Many organizations want to migrate to using Solution Manager for implementations. As part of this migration, projects often face the challenge of how to get their existing documentation into their Solution Manager system without having to upload documents one at a time. Solution Manager offers a utility that can help by loading business process hierarchy structures, transaction codes, and even documents from Excel spreadsheets directly into Solution Manager.
Key Concept
With the release of SAP Solution Manager 7.1, SAP has provided some handy utilities to help you take advantage of Solution Manager’s implementation capabilities more quickly.The Fill Business Blueprint process in Solution Manager allows you to create a business process hierarchy from an Excel template. From there, you can load many documents at once via a background job by using the Solution Manager-provided Excel template.
Organizations are often faced with the challenge of getting their existing documentation and implementation scope into a Solution Manager project. Transaction code SOLAR01 (Business Blueprint) provides a myriad of capabilities for building a solid business process scope with all the processes, transactions, solution documentation, and other valuable information that describes the SAP solution. What if you have already implemented your SAP system and want to migrate to Solution Manager for future projects, and have all your business documents and scope information stored elsewhere? Rebuilding your scope and loading your documents one at a time manually would be time consuming and burdensome.
Fortunately, the Fill Business Blueprint capabilities in Solution Manager allow you to accelerate the migration of your existing content into your Solution Manager project. Many projects find it easier to capture the initial project in Excel. For this exercise, I am using existing data to build and load the business process hierarchy (BPH) into a Solution Manager project. Once the BPH is built, you can export it and then use the new BPH structure to map and load existing process documents to the Project Documentation tab in the Solution Manager project.
Note
To see how to create and load empty shell documents from a standard
project template, see my quick tip "Generate Document Shells from a
Standard Template." You can replicate a document template as many times
as you want with an easy Windows command.
- Create an empty project in Solution Manager
- Export the project structure template
- Populate the template with your existing business scope
- Upload the BPH
- Export the project documentation template
- Populate the template with the names and locations of your existing process documentation
- Upload the process documentation
- Run the Project Analysis report to verify document assignments
Step 1. Create an Empty Project in Solution Manager
If you do not already have an existing Solution Manager project, use transaction code SOLAR_PROJECT_ADMIN to create a new project. In the main screen of the transaction, select Project > Create. The techniques described in this article are the same for either template or implementation projects, but I’ll use an implementation project for this example. Enter a project name and description, set the project language and save (Figure 1).
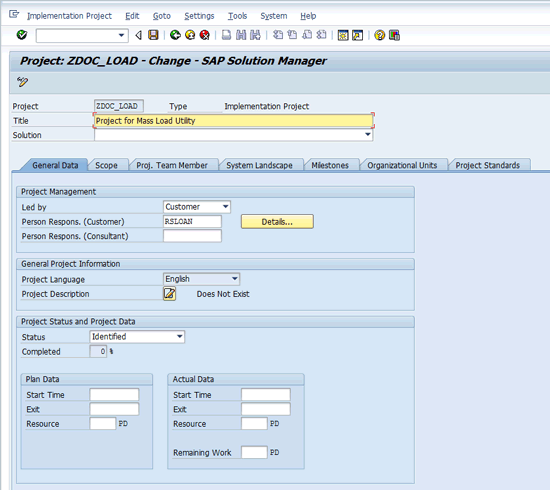
Figure 1
Create the implementation project for the Fill Business Blueprint exercise
Next, add the logical components that are used in your project structure. The logical components must be assigned to the project header prior to loading any structure elements that reference the components. Figure 2 shows the System Landscape tab with the SAP R/3 component assigned. This is the logical component that is referenced in the same Excel template that will be loaded into the system.
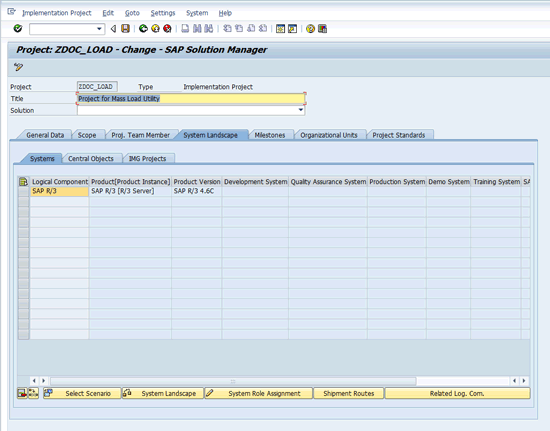
Figure 2
Add the logical components to the System Landscape tab
Next, confirm that you have the project document types you need. When loading documents into Solution Manager, one of the key attributes is the document type. Document type assignments are made on the Project Standards tab. On the Project Standards tab click the Documentation Types subtab (Figure 3).
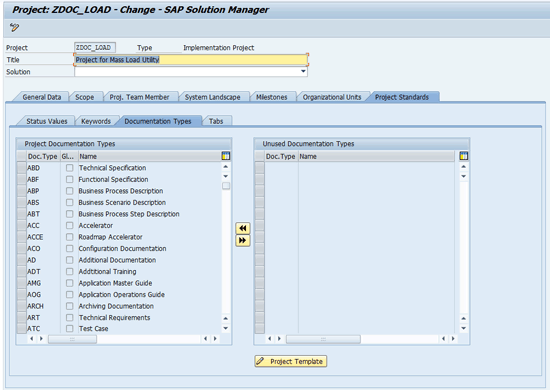
Figure 3
Documentation Types subtab
In Figure 3, you can see that there are many document types assigned to the project by default. You can remove the ones you don’t need, or add any custom document types that already have been created.
Step 2. Export the Project Structure Template
Step 3. Populate the Template with Your Existing Business Scope
Open the saved Excel template so that you can begin filling in your desired BPH structure. Figure 4 shows the Excel Text Import Wizard. I’ve found accepting the defaults and clicking the Finish button works just fine.
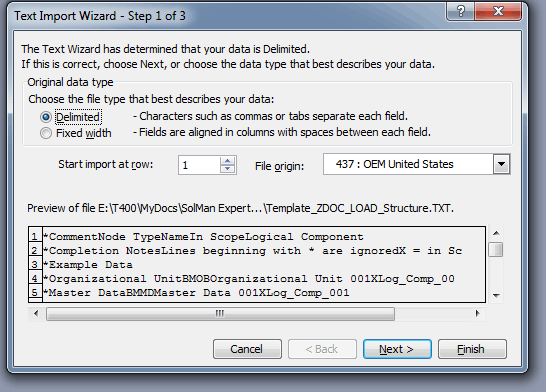
Figure 4
Excel Text Import Wizard
Figure 5 shows the Excel template. At first glance, it may appear that it is a lot of technical stuff that doesn’t help you get the data into the system in the way that you want. In the next few paragraphs I’ll show you how to navigate and take advantage of this template to load your own BPH into Solution Manager.
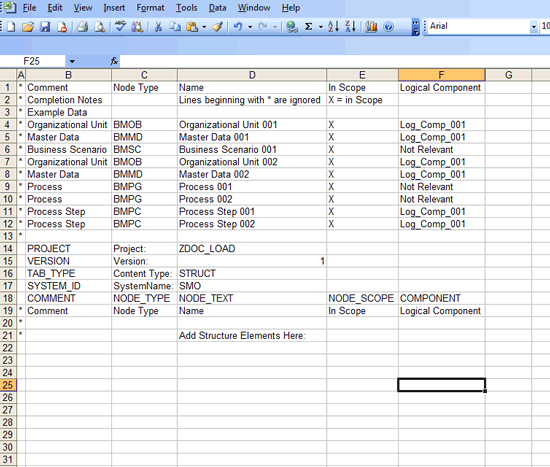
Figure 5
Excel template for loading the BPH structure
Solution Manager ignores all the rows in your spreadsheet that have an * in column A. Putting the * in column A makes that row of the spreadsheet a comment row. Note rows 4 through 12 in column B. This is a list of the different node types of the BPH.
You’re probably familiar with the concept of doing business process decomposition in which you break down a business process from scenario (e.g., order to cash) to its component processes (e.g., order management, delivery management, and invoicing), and further decompose the processes into discrete business steps (e.g., create standard order, change standard order, and create return order). Collectively, the scenario, processes, and steps come together in a hierarchical structure to form the Process section of the BPH.
Figure 6 shows what a BPH might look like based on this description. Figure 7 shows you how to populate the Excel template to achieve a BPH like the one above.
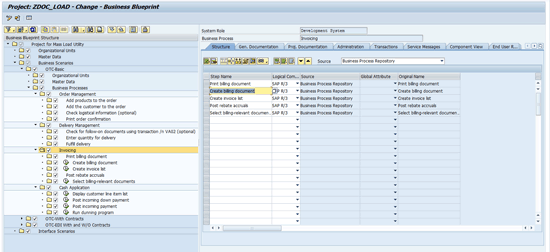
Figure 6
BPH for an order-to-cash scenario

Figure 7
Excel template populated to load BPH structure for a basic order-to-cash scenario
Note how the structure is flattened into a single column. The differentiation between scenario, processes, and steps is indicated by the node type in column B. Rows 4 through 12 shows the reference information you need to map the node type values to the node data that starts in row 22.
Step 4. Upload the BPH
To upload this structure into Solution Manager use transaction code SOLAR_PROJECT_ADMIN. Select your target project and open it in change mode. When the project change screen is displayed, follow menu path Edit > Fill Business Blueprint > Upload File > Structure.
The system prompts you for where to find your load file. Be sure you have saved your Excel template in .txt format and have closed Excel to avoid any file locks. Once the upload file is selected, Solution Manager pre-processes the file searching for errors. If the file passes the pre-processing checks, it displays a green square in the log review window (Figure 8).
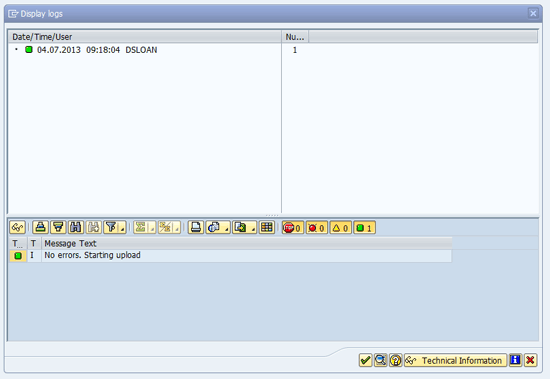
Figure 8
Preprocess log showing no errors in the upload file
Press Enter. Solution Manager schedules a background job to load the structure from the Excel input file (Figure 9).
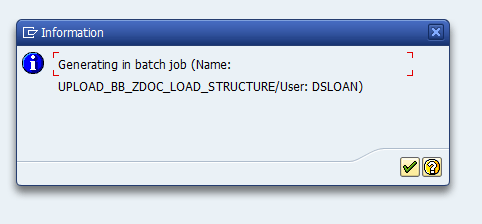
Figure 9
Notification of background job creation
When the batch job completes, the BPH structure has been loaded into the project. Use transaction code SOLAR01 to review the newly created structure. Figure 10 shows the uploaded BPH structure.
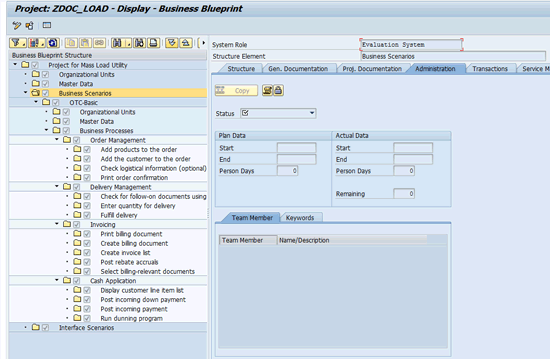
Figure 10
BPH structure after upload from Excel template
Step 5. Export the Project Documentation Template
Now that the structure is in place, you can export a new Excel template in preparation for loading the project documentation. Return to transaction SOLAR_PROJECT_ADMIN to export the template. Follow menu path Edit > Fill Business Blueprint > Create Template File > Project Documentation. As before, Solution Manager prompts for a place to download the template (Figure 11).
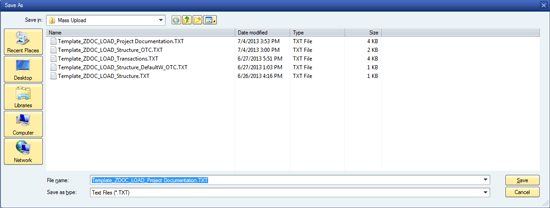
Figure 11
Storing the Excel template for project documentation
When you launch Excel and open the newly downloaded template, you’ll notice that it looks considerably different from the one for the structure upload. Figure 12 shows the template used for uploading documents to a Solution Manager project.
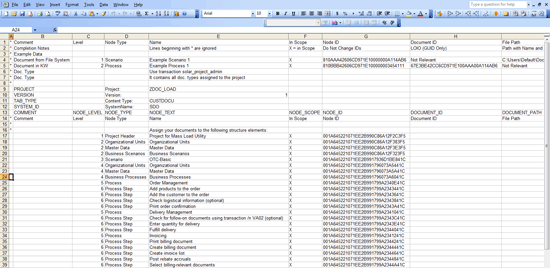
Figure 12
Template for loading documents into Solution Manager
Step 6. Populate the Template with the Names and Locations of Your Existing Process Documentation
Note that this template does not use the node type. The key value that Solution Manager uses to map your uploaded content to the project is the node ID. This is a unique number generated and assigned to individual nodes whenever the BPH is modified.
The document load template contains a series of fields that tell Solution Manager what to load to the project and how to populate specific attributes of the documents. You use the following fields to map the documents to be uploaded:
- Document ID (optional field): This is not used when loading documents into Solution Manager. If you want to map an existing Solution Manager document to your project, then you use the logical information object (LOIO) of the document in Solution Manager. If you use the LOIO in this field, the other fields on this list are not relevant.
- File Path (required field): This is where on your computer the document to be loaded is stored. You need to include the entire path and actual file name as it appears in the folder on your computer.
- Name (required field): This is the name that you see in Solution Manager for the document. It does not have to match the file name of the source file used in the File Path field.
- Doc. Type (required field): This is the Solution Manager document type. This document type must be assigned to your project in transaction code SOLAR_PROJECT_ADMIN.
- Person Responsible (required field): Enter the Solution Manager user ID of the person responsible for the document.
- Blueprint-Relevant (optional field): Put an X in this column if you want the document to be marked as blueprint relevant. This indicator tells Solution Manager to include this document in the blueprint document that can be generated from transaction code SOLAR01.
- Technical Name (optional field): The technical name field is a free text field that is language independent. It can be used to allow for standardized searches.
- Priority (optional field): Solution Manager has five standard priority values: Blank, Low, Medium, High, and Very High. If you need additional values, you can add them in configuration.
- Keywords (optional field): Keywords are assigned to the project in transaction code SOLAR_PROJECT_ADMIN. Multiple keywords can be assigned to a document separated by commas (e.g., Keyword1, Keyword2, and Keyword3).
Populate the Excel template with the information for your project and perform the upload process. Figure 13 shows an example of a populated template to load documents to the example project.
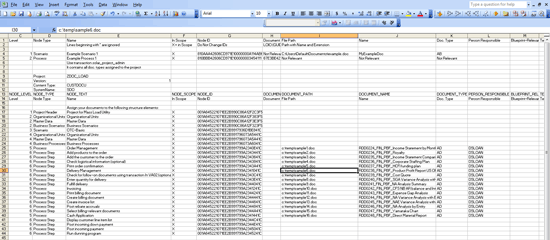
Figure 13
Example document load template
In the example in Figure 13, only the required fields have been populated for brevity.
If you need to load more than one document on a given node of the BPH, simply duplicate the row in Excel and populate the new row with the next document. You can repeat this process as many times as necessary to load multiple documents to a given BPH node.
Step 7. Upload the Process Documentation
Once you’ve populated the Excel template, you can upload the documents to the Solution Manager project. Be sure that you save the Excel file as a .txt file and close Excel to avoid locks.
Using transaction code SOLAR_PROJECT_ADMIN, follow menu path Edit > Fill Business Blueprint > Upload File > Project Documentation. Solution Manager prompts you for the file that contains the Excel template that you just populated (Figure 14).
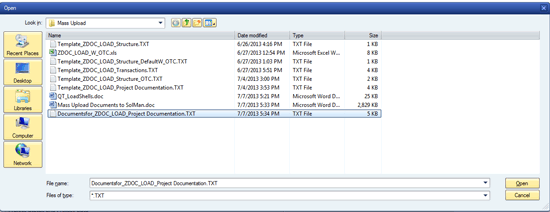
Figure 14
Select the Excel file for driving the upload of documentation
Once you’ve selected the Excel file, Solution Manager processes the file and uploads it to an import buffer in Solution Manager. As before with the BPH structure load, a log file is displayed when the Excel file is finished the pre-processing (Figure 15).

Figure 15
Log file displayed at the end of the Excel preprocessing
Next, Solution Manager generates a background job to load and assign the documents to the BPH structure (Figure 16).
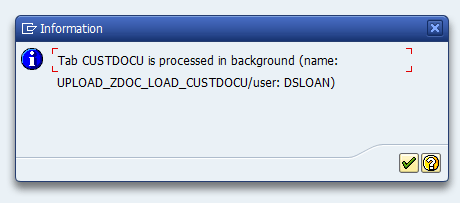
Figure 16
Background job created to upload and assign documents to the BPH structure in the project
Figure 17 shows the job completion message for the background job.
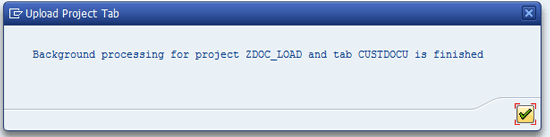
Figure 17
Background job is complete
When the background job has finished, the documents are assigned to your project. Using transaction code SOLAR01, you can view the documents that have been assigned. Figure 18 shows the BPH project with the documents attached.
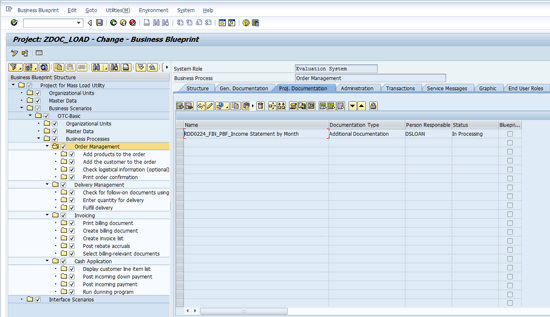
Figure 18
Project ZDOC_LOAD with document assigned to the Project Documentation tab
Step 8. Run the Project Analysis Report to Verify Document Assignments
To see a list of all the documents assigned to the project you can use the Project Analysis feature. Follow menu path Environment > Project Analysis > Assignments > Documentation.
Solution Manager prompts you for selection criteria. Click the execute icon and the transaction is filled with the defaults. You see all the documents assigned to the project. Figure 19 shows the input selection options.
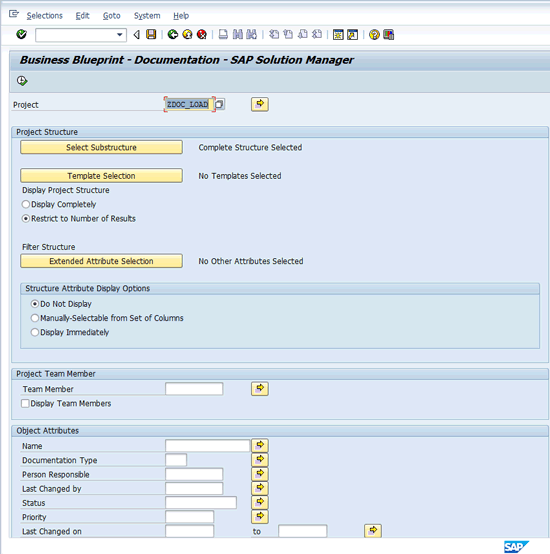
Figure 19
Selection options for document assignment project analysis
Figure 20 shows the results of running with the default selection options.
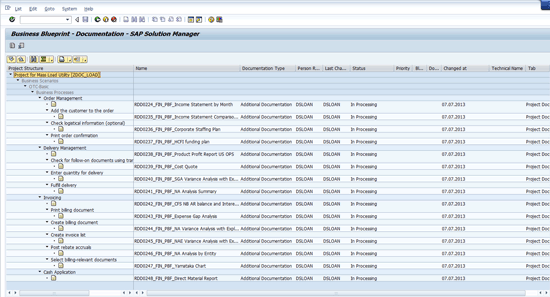
Figure 20
Document assignment display
Notice how the document assignment matches what was populated in the Excel sheet.
Note
You can navigate back to the project BPH nodes by double-clicking the
document name from this screen. However, if you were in change mode in
transaction code SOLAR01 when you executed this report, you are
presented with the BPH view in display only if you select a document on
the BPH node you were on when you launched this report. This is because
Solution Manager views the running of this report from transaction code
SOLAR01 the same way as if you opened another SAP GUI session.
Consequently, you have the project structure node locked in your
previous session.RE
You have now seen how to create a BPH and load project documentation via a background process using Excel templates provided by Solution Manager.
If you need to load additional documents, you have to reload all the documents previously loaded. This is because the background process removes all the documents assigned on the Project Documentation tab when it starts. Therefore, it is important that you thoroughly check the documentation after it is loaded. Using the document loading procedures I described after you have released the project to the team can cause loss of work.
D. Russell Sloan
D. Russell Sloan is a specialist in project and program governance for IBM. He focuses on the use of SAP Solution Manager for global rollout projects for IBM’s largest customers, having worked with SAP software since 1996. Russell has degrees in accounting and information systems and has been a team and project leader for SAP projects for more than 14 years. He has been developing and deploying software systems for over 30 years.
You may contact the author at solmanruss@gmail.com.
If you have comments about this article or publication, or would like to submit an article idea, please contact the editor.