Fast entry enables you to simultaneously create and edit the same infotype or subtype record for multiple employees. Using a substitution example, the author explains how to optimize the fast entry functionality.
One of the most common questions that individuals have when they look at the SAP HR module is how to simultaneously create and edit the same infotype or subtype record for more than one employee. To assist individuals in doing this, SAP created fast entry.
While the fast entry functionality can be used for most Personnel Administration (PA) infotypes, I will focus on fast entry for substitutions (infotype 2003). In my example, a manager has 10 hourly employees reporting to him. These individuals all have a work schedule rule on planned working time (infotype 0007). The work schedule rule indicates that these individuals work a fixed shift — a first shift eight-hour daily work schedule Monday through Friday. The manager has requested that his employees work a second shift, eight-hour day on Monday, December 8, 2003. The company uses positive time recording and has a special rule in the time evaluation schema that identifies a shift one versus a shift two schedule based upon the employee’s planned daily work schedule for the day. This means that employees are compensated with the values derived from their daily work schedule on infotype 0007. The only way to circumvent the infotype 0007 record would be to create a substitution (infotype 2003) record for the day in question. The manager has the following options available:
- Create a new infotype 0007 (planned working time) infotype record for December 8, 2003, using a second shift, eight-hour day. If the manager elects this option, he would need to create a second infotype 0007 (planned working time) record that would delimit the December 8, 2003, through December 31, 9999, record with a December 9, 2003, through December 31, 9999, record. This record would place the employees back to their regular first shift, eight-hour day.
- The manager could go to transaction PA30 (maintain master data), pull up each employee individually, and create a substitution (infotype 2003) record for them indicating that they worked a second shift, eight-hour day on December 8, 2003. If the manager creates a substitution infotype, it directly overrides what the planned working time infotype states for December 8, 2003.
- The manager could use fast entry (transaction PA70) and select all his hourly employees at one time to create all 10 second-shift, eight-hour substitution (infotype 2003) records.
For my example, I’m going to say that the manager has decided to use the standard R/3 fast entry functionality. First, I’ll describe the components that make up fast entry.
How Does Fast Entry Work?
If you go to the fast entry main screen, you see various options. First, your company may or may not have configured infotypes into the fast entry infotypes menu. (See Figure 1, reference 1.) Infotypes do not have to be listed in the menu to use the fast entry functionality. If your company wants to create entries in the fast entry infotypes menu, a member of your configuration team can go into the IMG via menu path Personnel Management > Personnel Administration > Customizing Procedures > Infotype Menus to complete the necessary configuration entries.
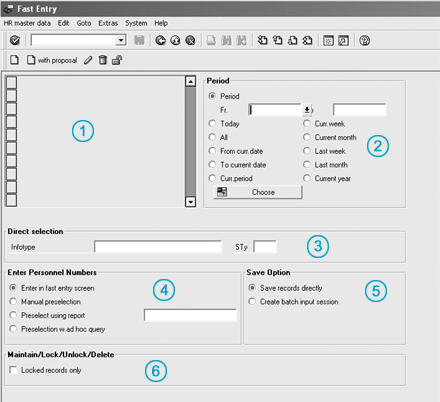
Figure 1
Fast entry main screen
In the Period section, you can identify a default validity begin and end date for the infotype/subtype records that you will create (Figure 1, reference 2.) You can enter the infotype number or the name of the infotype directly into the Direct selection infotype field. If the infotype uses subtypes, you can also enter a subtype into the Direct selection STy (subtype) field (Figure 1, reference 3.) Once you have made the entry, you can identify how you want to select individuals for fast entry processing. You can use one of the following options (Figure 1, reference 4):
- Enter in fast entry screen: Using this option, you can enter personnel numbers on the same screen where you record your infotype field values (Figure 2).
- Manual preselection: This option allows the user to enter the personnel numbers manually, as the user does with the Enter in fast entry screen option. Individuals using manual preselection need to go to a second screen to enter the infotype field values (Figure 3).
- Preselect using report: A report selection screen helps filter the data for the individual whose records you are creating (Figure 4). A member of the technical team would have to create a preselection report if you do not want to use the R/3 standard report RPLFST01. If a member of your technical team creates a custom preselection report, he or she needs to register it in T588Q (screen types for fast entry table) as well as the T588R (selection reports for fast data entry table). The benefit of using a preselection report is that the user can pull up multiple individuals based on specific master data characteristics. Let’s go back to my example. The manager wants to pull up his 10 hourly employees. If he has a preselection report, he can select his organization on the preselection screen. This allows him to pull up his 10 employees’ personnel numbers without having to key them in manually.
- Preselection w. ad hoc query: This option allows individuals to use an Ad Hoc Query to help select the personnel numbers for processing (Figure 5). This is similar to the preselect option, with the main difference being that you do not need to create a preselection report. Instead, you set up InfoSets, which consist of master data fields that are available for users with the Ad-hoc Query Designer functionality. Once you select the fields for which you want to filter data, the values are returned to the fast entry screen. The manager then can select the organizational unit. The Ad Hoc Query returns the list of personnel numbers to the fast entry screen, saving the manager time.
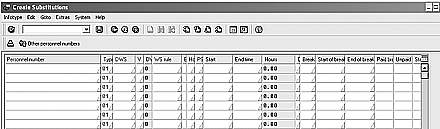
Figure 2
Create Substitutions in fast entry screen

Figure 3
Fast Entry manual preselection
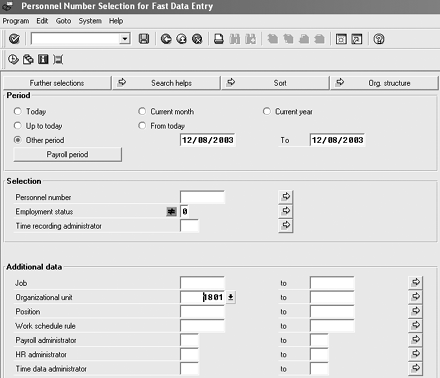
Figure 4
Preselection via report RPLFST01

Figure 5
Preselection with Ad-hoc Query Designer
You can now indicate if you want to save the infotype records directly or if you want to create a batch job that can be run at a later time (Figure 1, reference 5).
Finally, you select the Locked records only indicator (Figure 1, reference 6). Locked records in personnel management are records that have been created, but are not considered valid for proposes of time evaluation or payroll processing. Say the manager does not realize that he can use fast entry. Instead, he goes to transaction PA30 (maintain master data) and manually creates the substitution records for his employees. When he creates the substitution records, he is unsure if he is using the correct values. Therefore, he locks the records. After he verifies the values he has entered are correct, he needs to go back into the system and unlock each of those records. He could go back to the PA30 transaction, or he could use the PA70 (fast entry) transaction. The manager decides to use the PA70 screen and selects the locked records only function. This allows him to process all personnel numbers that are locked for the selected infotype at the same time. This means that he can unlock all data records at once.
Note
The infotype MPnnnn00 default is determined by T588M configuration (Figure 6). Individuals using the fast entry screen or the create with proposal screen need to be aware that fast entry functionality differs from the maintain master data functionality. If you use transaction PA30, the substitution infotype 2003 screen may differ from the screen someone else sees. In the US, a company might use every field on infotype 2003. However, in Canada, the same company might not use every field. Therefore, a member of the technical configuration group would set up values on table T588M indicating that users in Canada would see only the clock-in and clock- out times, whereas individuals in the US would see every field on infotype 2003. PA30 can process the two T588M records correctly. The fast entry transaction PA70 cannot process multiple T588M records. Instead, fast entry functionality only reads the first T588M record. Therefore, Canada and the US users would see the same infotype 2003 screen for the main fast entry screen even through they see different infotype 2003 screens through transaction PA30.

Figure 6
Fast entry logic screen flow
Once you key in your selection choices on the main fast entry screen, you select either the create icon or the create with proposal icon. The difference between these two options is that the create with proposal option allows you to enter generic default field entries on the main fast entry screen (which is the same screen that you saw in the Enter in Fast Entry Screen in Figure 2). The default field entries then are transferred to the main fast entry screen. You can change the values for specific individuals if required. Going back to my example, say the daily work schedule for a second shift, eight-hour day is called 0009. If you were to use the create with proposal screen, the manager could key in the daily work schedule 0009 on the proposal screen. When the manager selects the green right arrow forward icon from the proposal screen, the main fast entry screen is displayed. In the daily work schedule rule column of the main fast entry screen, the manager sees the daily work schedule 0009 displayed down the entire screen. This allows the manager to key the information faster and to be more accurate, since he does not have to rekey the daily work schedule rule 10 times. If the manager selects the create icon directly from the PA70 screen, he has to enter the daily work schedule rule 10 times. Let’s refer to my substitutions example to understand these options better.
Create with Proposal for Infotype 2003 — Substitutions
In my example, the manager wants to create a substitution for 10 employees that would result in a second shift, eight-hour day on December 8, 2003. Say that he has decided to use the create with proposals functionality. He selects infotype 2003 from the direct infotype selection field on the main fast entry screen. In the Enter Personnel Numbers section, he leaves the default radio button set to Enter in fast entry screen. He enters December 8, 2003, in the Period Fr. field. He leaves all other screen default values as they were and selects the create with proposal icon. The infotype 2003 substitution screen 5100 displays. He keys in the PS (personnel subgroup) Grouping field value for the employees and the Substitution type. He keys in Daily work schedule 0009, which is the second shift, eight-hour day (Figure 7). The final step is to click on the copy default values icon.
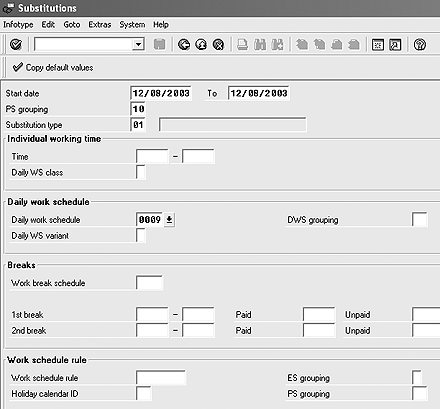
Figure 7
Substitutions with proposal
The substitutions 5101 screen now displays with the default values from the 5100 screen. The manager can enter the personnel numbers and change any of the default data (Figure 8). Now the manager can click on the save icon. Since he did not indicate that the records should be created in batch mode via the fast entry main transaction PA70 screen, the infotype 2003 records are automatically saved. If the manager goes to the PA20 (display master data) screen, he can pull up one of the 10 employees and verify that a substitution record for December 8, 2003, places him or her into the daily work schedule 0009.
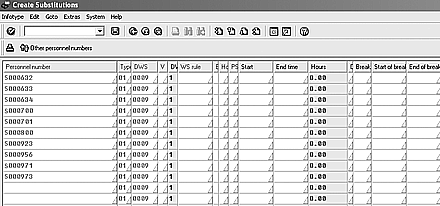
Figure 8
Substitutions screen 5101
Dawn Burns
Dawn Burns is an SAP-certified human resources senior consultant and Quality Assurance Manager and HR Consultant with Howrey LLP. She is a former SAP Human Resources instructor for SAP America and has more than 12 years of experience in human resources and information technology.
If you have comments about this article or publication, or would like to submit an article idea, please contact the editor.