Enhance Return on Investment by Customizing SAP SuccessFactors Employee Central Using the Metadata Framework
There is always a need in any HRMS system to provide options for storing company-specific information and a workflow-based approval mechanism to support it. Company-specific instructions and warnings are two examples of information that need workflow-based approvals and, once reviewed and approved, this information needs to be displayed to the employees and managers in the system. For example, a warning message would be sent to an employee who has been late three times, saying that the next occurrence of tardiness will result in punitive action—say, docked pay. During workflow, this information is displayed only to the manager—once it’s approved by the manager and the up-line manager, it is made visible to the employee on the portlet.
Another requirement across all HRMS systems is to provide for the storage and display of information that is processed in a system other than the core HRMS system. Two examples are time accounts (absence or quota-related information) and pay slips, if the time or the payroll components are managed in a system other than the core HRMS system.
In both of the above cases there is a need to customize the solution as both vary from one company to another. Similarly, some other related information that is managed by organizations is the language skills of an employee or the need to provide training to update an employee’s work skills or education.
Explore related questions
The Metadata Framework in Employee Central provides an option to custom develop a solution based on an organization’s needs for both the above scenarios, and can be expanded to meet other similar requirements.
These enhanced features of the Metadata Framework allow you to:
- Create custom portlets for enhancing or introducing functionalities not available in the standard product.
- Define business rules, workflows, and validations associated with the new functionality.
- Report on the customized functionality, along with the standard functionality/portlet, using the Online Report Designer (ORD) advanced reporting functionality. (This functionality is discussed in greater detail in the part two of this article.)
These three features together provide a platform to build an end-to-end custom solution. They open the doors for users to not only configure the standard product, but also to customize solutions, thereby leading to a more integrated custom solution and, in turn, derive a better return on investment.
Let’s take a look at these features using a real-life example: displaying period-based absence information from a third-party system in a custom SAP SuccessFactors portlet.
Scenario: Displaying Period-Based Absence Information from a Third-Party System in a Custom SAP SuccessFactors Portlet
In this example, let’s assume that a company is using a third-party system (outside of SAP SuccessFactors) to maintain absence quota and leave-related information. However, the business wants to have a single screen within SAP SuccessFactors where employees can access all their HR-related information. In addition, they need to see this information for different periods (for example, such as current period [month], current year, and last year). Therefore, this data needs to be stored in SuccessFactors and made accessible to users.
To address this requirement, take the following steps to set up the system:
- Configure the Metadata Framework objects
- Create a new picklist for absence periods
- Create the absence records object (that holds the actual absences of the employee)
- Create a picklist for absence types
- Associate the header and detail objects
- Define the user interface (UI) object
- Attach the UI to the employee files
- Provide employees with read-only access to absence records
- Import absence data from the third-party system (using a batch job)
Step 1. Configure the Metadata Framework Objects
As each period of absence (current period, previous period, current year, and previous year) can have multiple absence records, you need to define two generic objects. The first object contains the employee and period data (header) while the second object has the absence data (detail) for the period defined in the first object. To configure the two objects, follow menu path Admin Center > Company Settings > Configure Object Definitions. This opens the screen shown in Figure 1 where you select Object Definition from the Create New drop-down options.
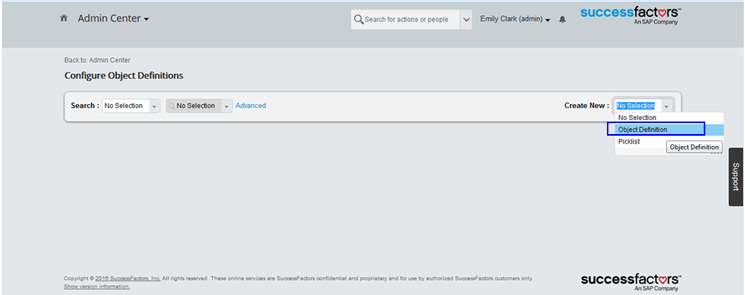
After you select the Object Definition, the screen in Figure 2 opens in which you enter data in the following fields:
- Code field: Provide a unique name for the custom object.
- Label field: Provide the name that needs to be associated with the object for display purposes.
- Fields section: Here you add fields that are required for the custom object. The externalCode field has to be defined as a data type user. This ensures that when the object is attached to the employee files, the object is associated with a unique user (employee). In this example, we define two fields: User and Picklist (absence period).
Other system-generated fields such as mdSystemLastModifed are present by default and should be retained. These fields can be used for audits and general reports. (e.g., all records modified by a particular user ID or after a particular date can be fetched in ORD reporting using these fields as filters).

On the bottom of the same screen, security needs to be enabled by making the following entries:
- Secured: Yes
- Permission Category: MDF Foundation Objects
- RBP Subject User Field: Enter the value externalCode (this means that the user, defined in the first custom field, defines the authorization of the object).
This configuration ensures that all the fields on the document can be controlled for view, update, and delete access using Role Based Permissions (described later in this article).
Save your entries for the new object definition by clicking the Save button at the bottom of the screen (not shown).
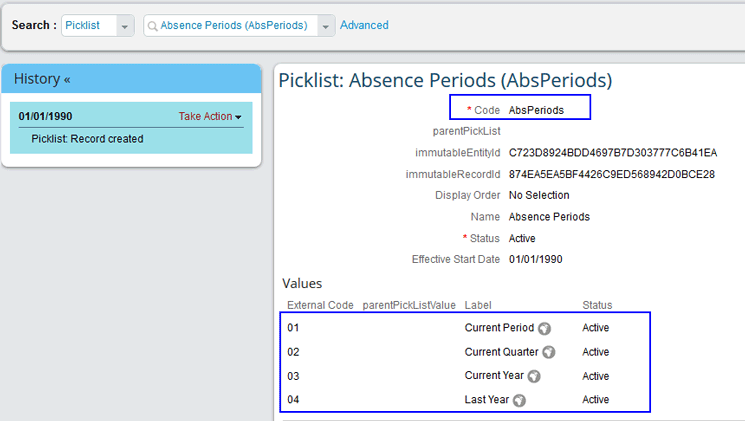
Step 2. Create a Picklist for Absence Periods
As per the requirements, only a defined set of period types is possible. Hence a picklist needs to be defined, which ensures that the incoming interface brings in predefined period types only.
To create a picklist, in Figure 1 (the Configure Object Definitions screen) select Picklist from the Create New drop-down options. This action opens the screen in Figure 3 in which you make the following entries:
- Code field: Provide a unique name for the picklist. Since our example relates to different absence periods, in this example we call it AbsPeriods.
- Display Order field: This field is used to control the order in which these options show up in the drop-down list. Values can be displayed in alphabetical or numerical order based on the external code value. In this scenario, the values need to be displayed in the same order as they are saved in the document; therefore, Display Order is set to No Selection. If the display order is based on a numeric or an alphabetic value of the options, then a selection is required.
- Name field: Provide a descriptive label for the picklist—in this example, Absence Periods.
- Status field: In this case, set the status as active as this ensures that the picklist is valid and can be used in any of the object definitions in the system.
- Effective Start Date: Enter the earliest date for which absence records are expected in the system (for example, January 1, 1990).
- Values section: Here you define the various period options (for example, Current Period) with a unique External Code for each option (e.g., 01, 02, 03, and 04), to be associated with the picklist.
Step 3. Create the Absence Records Object
Here you create the absence records object that holds the actual absences of the employee. The Absence Period defined in step 1 serves as the header for each period (quarter), while the absence records object defined in this step holds the actual absences that serve as the details of the portlet.
Again, in Figure 1, select Object Definition from the Create New drop-down options. In the Object Definition screen that opens (Figure 4), you define the following fields for the object:
- externalCode: This is the record number; you set this to be automatically generated (Auto Number).
- AbsenceType: Set this as Picklist as the absences are held in a picklist file that is uploaded into the system.
- cust_StartDate: Set Data Type as Date
- cust_EndDate: Set Data Type as Date
- cust_NoOfDays: Set Data Type as Decimal (so that it can store numbers with decimals)
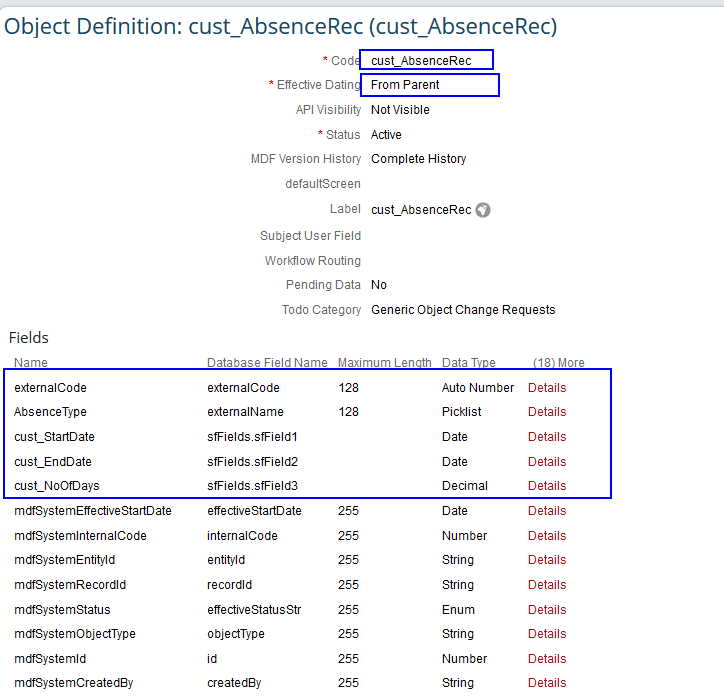
Follow the same steps as you did earlier to define the security and save the object.
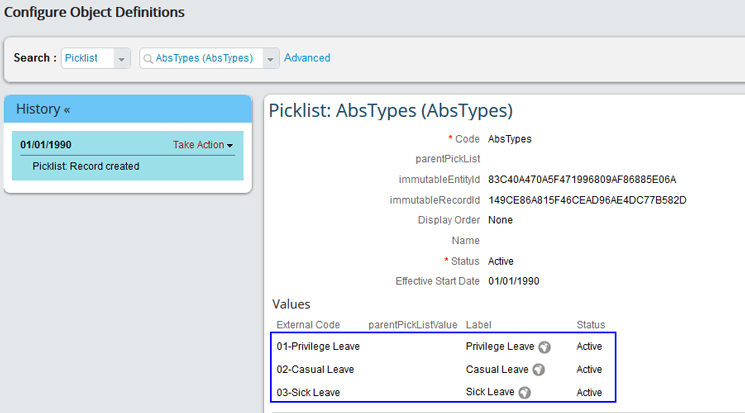
Step 4. Create a Picklist for Absence Types
To ensure that only valid absence types are accepted and maintained in SAP SuccessFactors, a picklist for the same is defined in the system. Any value other than these, if interfaced on the file, is errored out when the data is imported, thus maintaining data integrity.
Following the same steps as in step 2, create the picklist for the valid absence types as follows (Figure 5):
- Provide a unique name for the picklist in the Code field (e.g., AbsTypes)
- Update the name that is used as the label for the picklist if it has to be different from the text in the Code field.
- Set the status as Active (only then the picklist can be used)
- Define the various period options (e.g., Privilege Leave) with a unique External Code (e.g., 01–Privilege Leave—e.g., paid vacation) for each option to be associated with the picklist. The option also can be set as Privilege Leave instead of 01–Privilege Leave. It depends on the company’s requirements, whether it would like to see both the code and text or only the text in the drop-down options.
Step 5. Associate the Header and Detail Objects
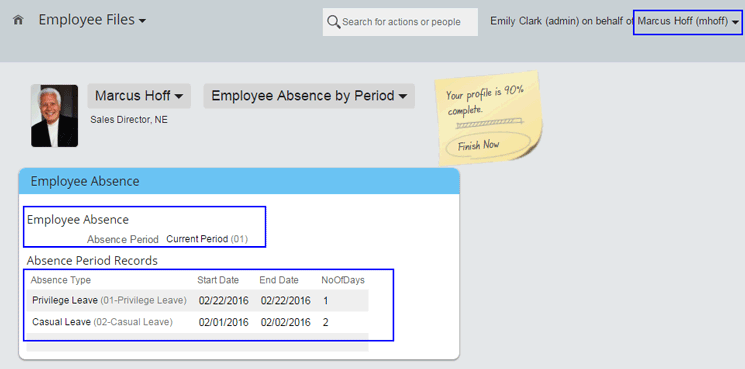
Now let’s look at Figure 6, which shows the expected output in header and detail format. In this section, we show the steps for configuring this kind of output, and this screen display is the result of taking these steps.
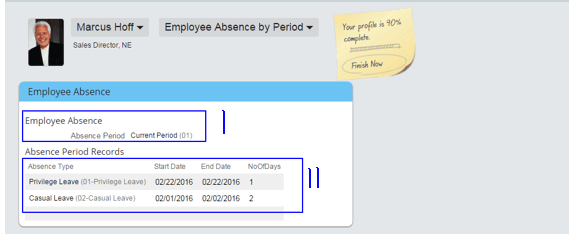
The first section shows the Employee Absence and only a given period (e.g., the current period). In the second section, the Absence Period Records area, only the related absence records show up (e.g., Absence Type, Privilege Leave, and Casual Leave [e.g., paid sick leave]).
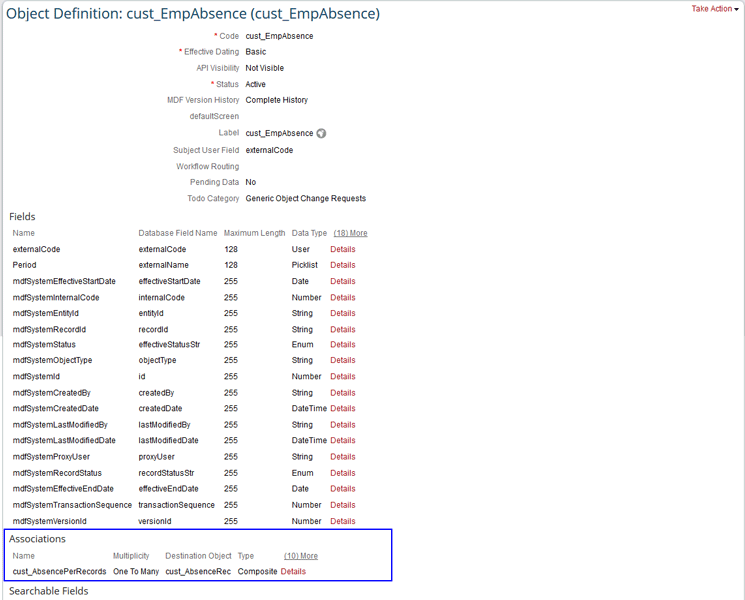
To get this functionality, follow the same steps as done earlier to create the header and detail objects. Once created, you then need to associate them. To select an existing object to edit, follow menu path Admin Center > Company Settings > Configure Object Definitions. In the screen that opens (Figure 1), select the header object (e.g., cust_EmpAbs, created earlier) from the Advanced field list of drop-downs (on the top left).
In the screen that opens (Figure 7), go to the Associations section at the bottom and link it with the Absence Records Object (cust_AbsenceRec) created earlier. You do this by clicking the Details link and selecting the destination object as cust_AbsenceRec.
Step 6. Define the UI Object
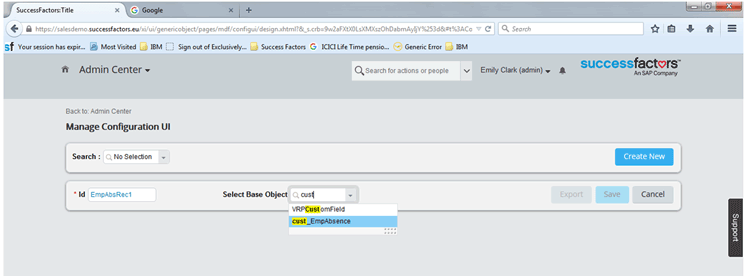
Now that you have defined the objects that hold the data, you need to define the Metadata Framework UI to display these objects together in a UI screen. This Metadata Framework is then associated with a portlet. Follow menu path Admin Center > Employee Files > Manage Configuration UI. In the screen that opens (not shown), click the Create New button to create a new configuration UI.
In the next screen (Figure 8), provide the following details:
- Id field: Enter the ID of the UI object. All the UI objects are to be uniquely defined in the system so that they can be inserted in the portlet of employee files (detailed in step 7 of this article).
- Select Base Object field: Select the already defined object to be associated with the UI, in this case, cust_EmpAbsence.
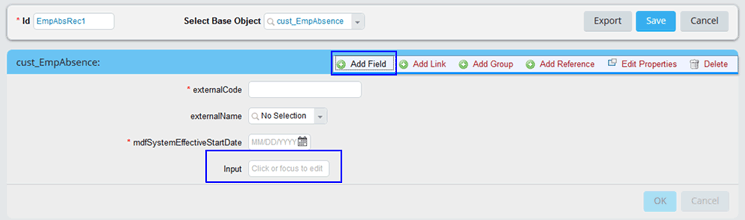
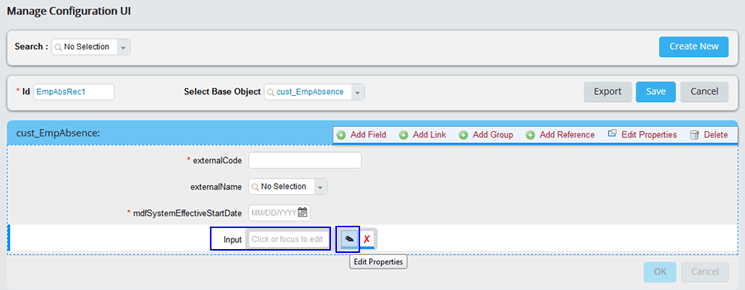
Once you’ve selected the new base object, the screen in Figure 9 opens. Here you click the Add Field button to add as many fields as are required to be displayed in the portal.
You can edit the properties of the UI object by hovering your mouse over a field and clicking the Edit Properties option that appears, or by clicking the edit (pencil) icon (Figure 10). Doing either opens the Properties pop-up shown in Figure 11.
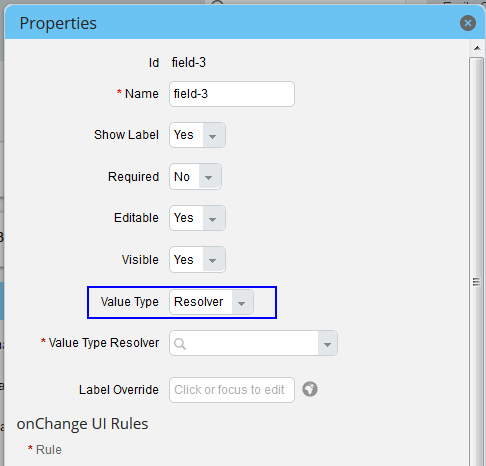
In the Properties dialog, make the following settings:
- Value Type: This should be set to set to Resolver. On setting this value, the custom object fields automatically show up in the drop-down of the next field, Value Type Resolver. This is a fast and easy way to map the custom object fields to the UI object fields.
- Value Type Resolver: This field is defined for the custom object (Figure 2) that needs to be associated with this UI field. This ensures that the field of the custom object is visible in the portal. This field is auto-populated (Figure 12) when you select Resolver as the Value Type (in step 1).
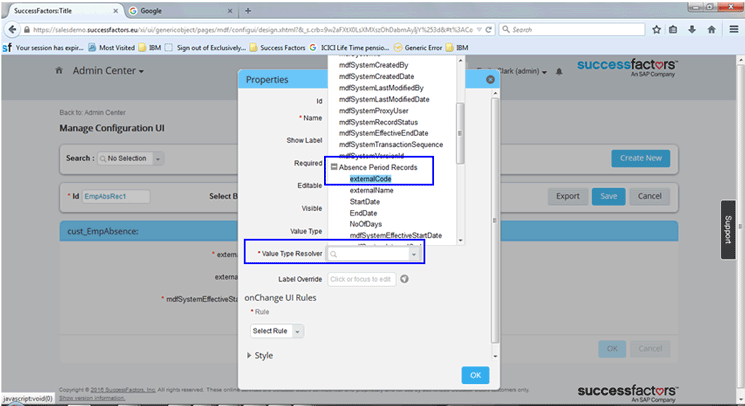
Figure 13 shows the new custom object as it is now displayed in the employee portal.
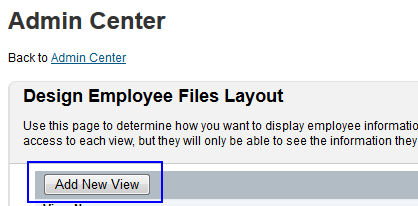
Step 7. Attach the UI to the Employee Files
To display the UI object in the portal as a portlet, you need to attach it to the Employee Files. To set up the UI, follow menu path Admin Center > Employee Files > Configure Employee Files. In the screen that opens (Figure 14), attach the UI to the employee files so that the user can access it from the front end. You do this by clicking the Add New View button.
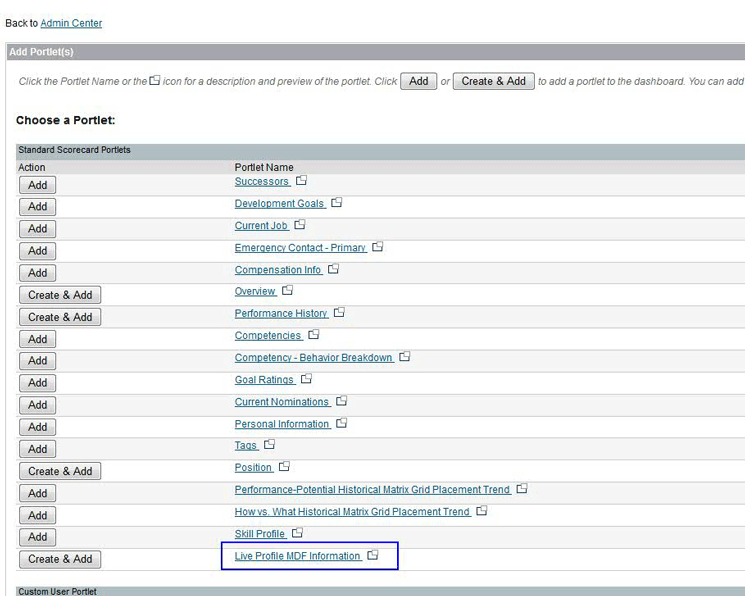
This action opens a screen (Figure 15) in which you give the new dashboard a relevant name (in this case, Employee Absence by Period). Then click the Insert Portlet button on the left.

This action expands the screen with the available options, shown in Figure 16. Select the Create & Add button next to the Live Metadata Framework Information line.
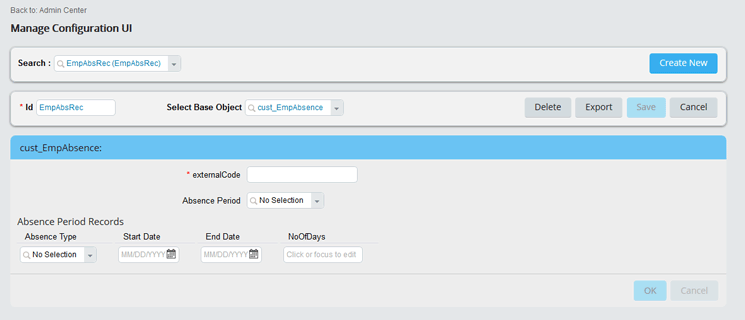
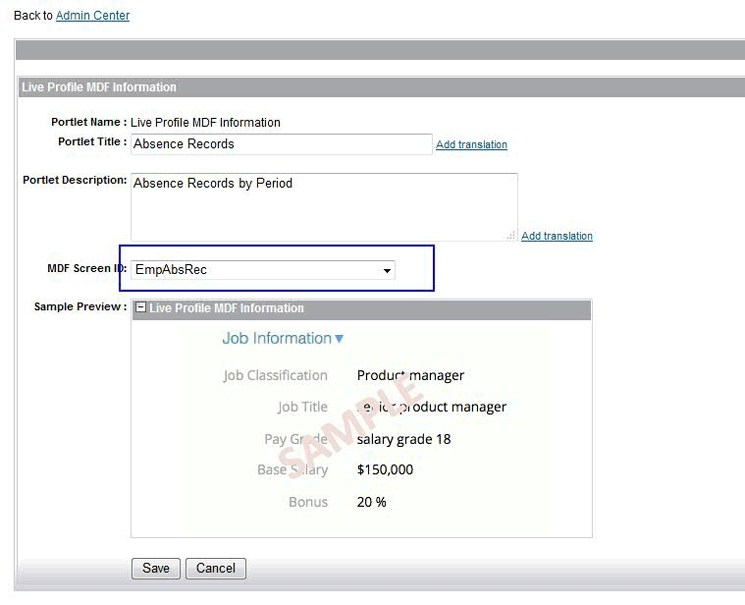
In the screen that opens (Figure 17), select the Metadata Framework UI object (in this example, EmpAbsRec) from the MDF Screen ID field drop-down options. Then click the Save button.
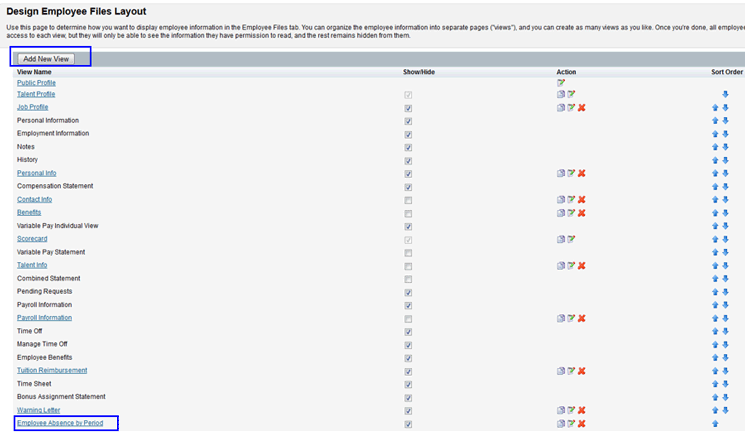
A new entry is created at the end of the employee files layout, Employee Absence by Period (Figure 18).
Step 8. Assign the Role for the Metadata Framework Object
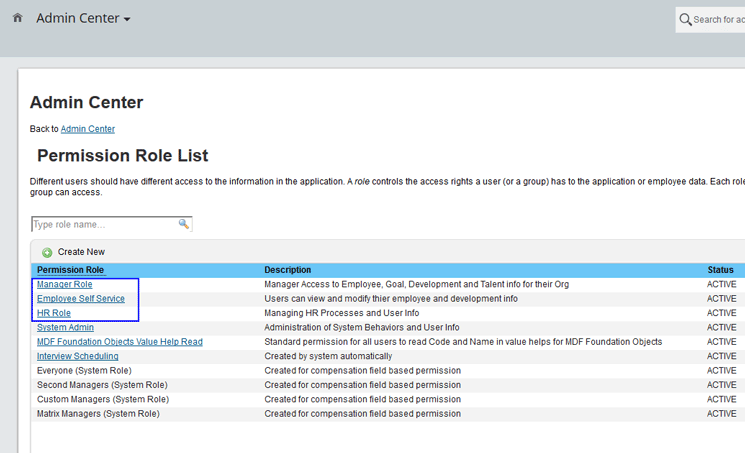
In this step, we define the authorization of the custom object (created in step 1) to users based on the role assigned to them. Go to Admin Center > Set User Permission > Manage Permission Roles, and the screen in Figure 19 opens. Click the Permission Role to be updated, in this case, Manager Role.
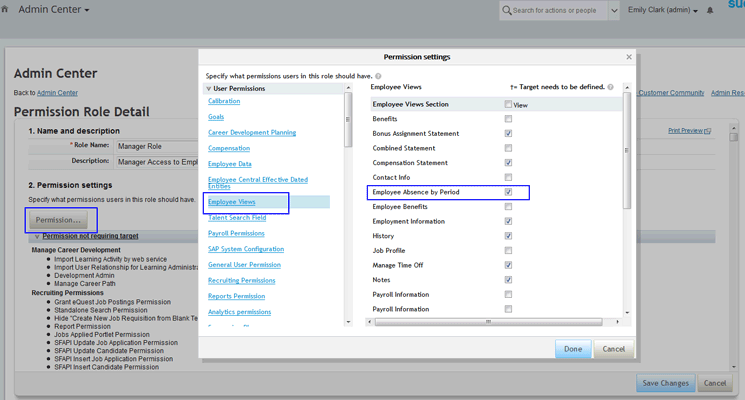
Click the Permission… button, then the Employee Views link. In the Employee Views column that opens on the right, select the Employee Absence by Period check box (Figure 20). This makes the view visible in the employee files layout.
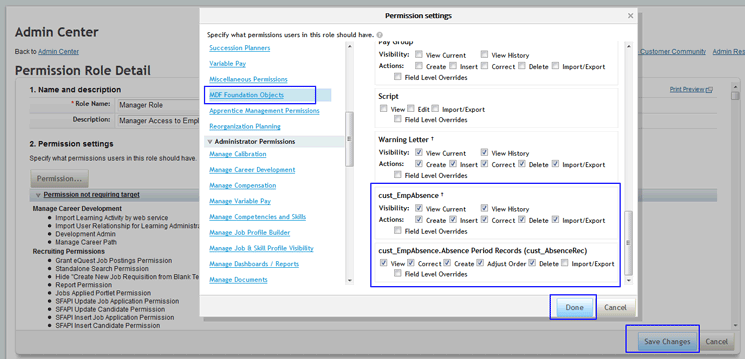
While in the same pop-up window, in the User Permissions section (on the left) scroll down to the MDF Foundation Objects option and select it (Figure 21). In the screen that expands on the right, which lists the defined custom objects, select the permissions to be granted. When you’ve made your required selections, click the Done button. The pop-up screen closes, and, in the next screen, click the Save Changes button.
The new Employee Absence Period and Absence Record objects are defined, and the system can now receive records from the target system.
Step 9. Import Absence Data from the Third-Party System
Since the business needs to interface the data from the third-party system, you need to set up a job to import the data from the third-party system into SuccessFactors. For this, a batch job is scheduled to receive the inbound files for the Absence Records of the employees.
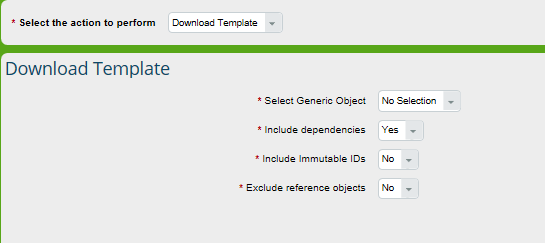
Using the Metadata Framework, download the file template for the object you created. Follow menu path Admin Center > Employee Files > Import and Export Data > Download Template.
In the screen that opens (Figure 22), pick cust_EmpAbsence from the Select Generic Object drop-down options, and select Yes for Include dependencies (because there is a parent/child relationship between the two objects: cust_EmpAbsence [parent] and cust_AbsenceRec [child]). Click the Download button (not shown) and the system prompts you to download the template for the object to be used to upload the data in the system. After filling the information in the required format, it’s time to set up the job.
Next, log in to Provisioning, select the instance, go to Manage Scheduled Jobs, and click the Create New Job button. This opens the screen shown in Figures 23 and 24. Figure 23 shows the Job Definition and Server Access sections, whereas Figure 24 shows the File Access and Job Occurrence and Notification section of the screen. Let’s look at each of these in more detail.
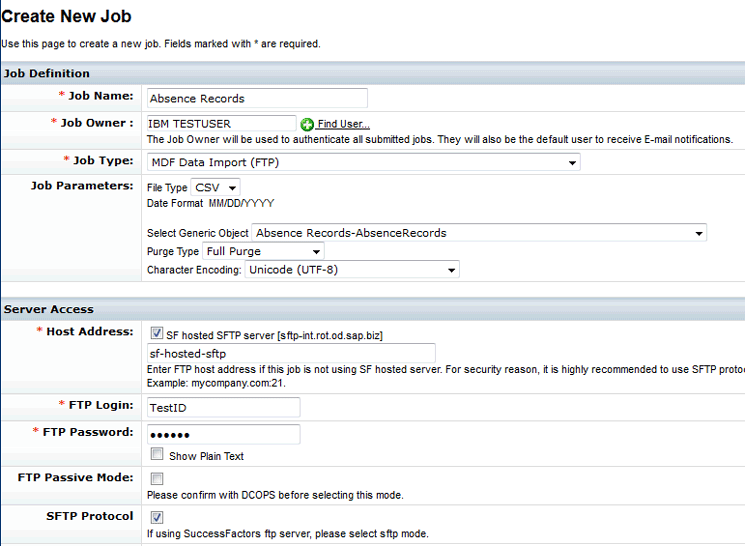
In the Job Definition and Server Access sections (Figure 23), make the following entries:
- Job Name and Job Owner: Enter the valid name of the job and the job owner who is the default user to receive email notifications related the job.
- Job Parameters: Select the file type as CSV and the object created in the above example. Purge Type: There are two options, Full Purge (which removes all previous records and imports a new set of records) and Incremental Load (which only adds new records on top of existing records). For this example, select Full Purge.
- Server Access: Enter the login credentials of the SFTP server where the file to be imported is stored.
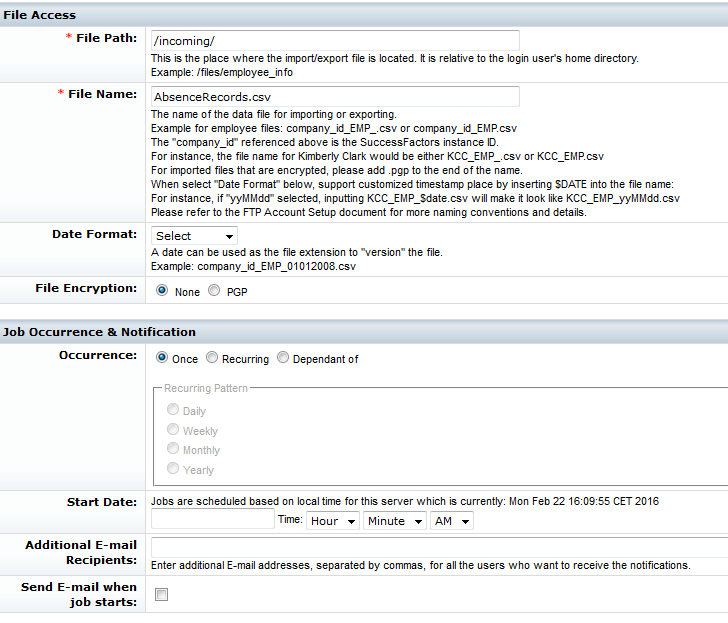
In the File Access and Job Occurrence & Notification sections (Figure 24), make the following entries:
- File Access: Enter the file path of the folder in which the inbound file is stored.
- File Name: Enter the actual name of the file.
- Date Format: For an outbound file, you may suffix the file name with the date such as XXXXX_DDMMYYYY.csv.
- File Encryption: You have the option to encrypt outbound files, but this option is not applicable for inbound files.
- The Job Occurrence & Notification section: This is where you determine if the job is scheduled only once or recurring. If it’s recurring, you may choose the frequency from the options available. You can also schedule the job to run during a certain date and time. (It is important to note that the time of the job is based on the server time and not on the time of the location of the client.) Lastly, enter the email addresses for all the users to whom the information needs to be sent when the job is completed. If the users need to be informed when the job starts, select the Send E-mail when job starts check box.
Make the required entries in both screens, and then click Create Job button (not shown). After the job completes, employees are now able to view their records by selecting various periods in the UI (Figure 25).
Thus, data in external third-party systems can be interfaced into the SuccessFactors system and made available to the employee for viewing.