Manager
Walk through all the necessary steps you need to perform on your managed systems to set up and use Solution Manager Diagnostics.
Key Concept
Managed systems are SAP systems that are centrally controlled by SAP Solution Manager. These can be, for example, SAP ERP or SAP Customer Relationship Management (SAP CRM). Managed systems are also known as satellite systems.
Before you perform the steps in this article, you should follow the SAP Solution Manager basic configuration steps that I described in my article “The New Way to Set Up Diagnostics: Guided Procedures in SAP Solution Manager 7.0 with SAP Enhancement Package 1.” That article is a precursor to this one.
The first step in this process is to configure a managed system. You can configure ABAP or non-ABAP systems. In SAP Solution Manager, start by entering transaction SOMAN_SETUP. This opens the Solution Manager Diagnostics (SMD) guided procedures. Click the Managed System Configuration button on the left side of the screen (Figure 1).
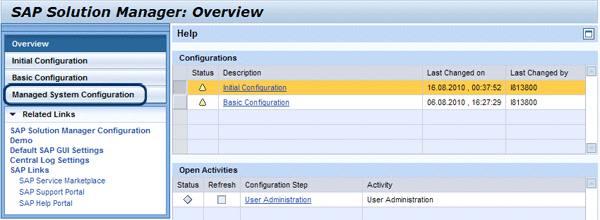
Figure 1
Managed system configuration initial screen
In the Managed System Configuration screen, select a structure node for the managed system for which you want to set up SMD and click the Configure Technical System button (Figure 2). A new guided procedure window opens in which you can configure managed systems to guide you through all the required steps. In this example, I’m going to set up a dual stack Java and ABAP SAP NetWeaver Process Integration (SAP NetWeaver PI) 7.1 P71 system client 001.

Figure 2
Select a managed system to configure
Managed system configuration is comprised of six steps that I will walk you through:
- Step 1: Connect the managed system
- Step 2: Check prerequisites
- Step 3: Perform manual configuration
- Step 4: Configure diagnostics
- Step 5: Perform Wily Introscope configuration
- Step 6: Create logical components
Note
The configuration in the text and screenprints in this article are based on SAP Solution Manager 7.0 with SAP enhancement package 1 and Support Package 20, running on Microsoft Server 2003 SP2 with a MSSQL 2005 SP2 database. The new functionality SOLMAN_SETUP is introduced with SAP Solution Manager enhancement package 1 or Support Package 18. There are no changes to the details or screenprints in this article in Support Packages 23 or 24.
Step 1. Connect the Managed System
SAP Solution Manager creates several RFC connections per managed system. Enter an administration user with a password for SAP Solution Manager and for the managed system. By default, the system creates the following RFC connections (which, apart from the trusted and the logon connections, use a technical user of type System):
- READ: Destination for the basic SAP Solution Manager functions
- TMW: Destination to manage change requests
- BACK: Destination returns information to SAP Solution Manager (e.g., for the EarlyWatch Alert)
- Trusted: Destination for dialog access to the managed system without logging on. To create this connection, you need the same user in the managed system as the source system. This user needs the authorization S_RFCACL (which is not in SAP_ALL) in both systems (Figure 3).
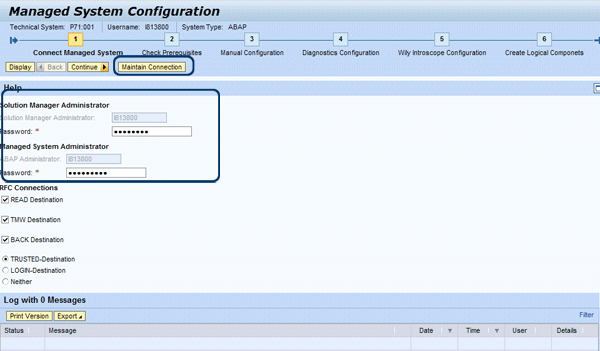
Figure 3
Create RFC connections
The results, including any errors, are displayed under the log table. In my example, there are no errors. Click the Continue button to go to the next step.
Step 2. Check Prerequisites
SAP Solution Manager checks the prerequisites configuration for SMD on the managed system. If requirements are not met the system displays the requests under the log table. To perform this check, click the Execute All button on the Check Prerequisites page (Figure 4).

Figure 4
Check prerequisites
The message “Batch-Job released. Name: SMSetup Job: AGS_MS_CHECK_PREQ Number: 02092900 – Refresh needed” appears as the system performs the job in the background to perform the necessary steps to check prerequisites (Figure 5). Depending on your system, this step might take few minutes to complete. To refresh the page automatically and check the status of the AGS_MS_CHECK_PREQ background job, check off the Refresh check box and the system refreshes in five seconds (five seconds is the default).
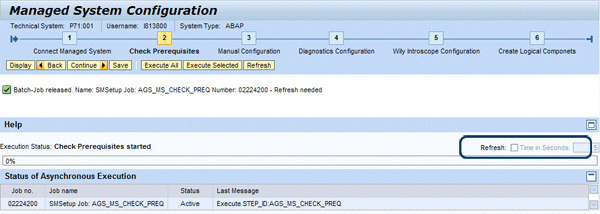
Figure 5
Set refresh to automatic
If the managed system doesn’t fulfill the SMD prerequisites, errors are displayed in the log table. In my case, the managed system fulfills all the prerequisites (Figure 6).

Figure 6
Check prerequisites results
Step 3. Perform Manual Configuration
Install Diagnostics Agent is the first manual configuration item that you see. The Solution Manager Diagnostics agent (SMD agent) is a central component installed on the managed system used for data retrieval, performing analysis functions, and monitoring. The SMD agent runs as it own instance on the managed system and is based on Java technology. As of SAP NetWeaver 7.0 SR3-based installations, the agent is automatically installed with the managed system. For installations performed with prior releases of SAP NetWeaver, the installation needs to be done manually.
When new updates are applied to the SAP Solution Manager system, all the SMD agents installed on the managed system are also updated automatically. All Diagnostics agents are managed centrally, which makes the administrator’s job easier. In this case, I’m going to download and install the SMD agent manually from the SAP Service Marketplace. Before you begin, review the hardware requirements for SMD agents in Table 1.

Table 1
Requirements for SMD
First, download the SMD agent. Navigate to https://service.sap.com/swdc > Download > SAP Support Packages > Entry by Application Group > SAP Technology Components > SAP SOLUTION MANAGER > SAP SOLUTION MANAGER 7.0 EHP1 > Entry by Component > Agents for Managed systems > DIAGNOSTICS AGENT 7.11 > Windows Server on x64 64bit > DIAGNOSTICSAGENT711_0-20005957.SAR. Extract the SMD agent’s SAR file using SAPCAR via command line using the command sapcar -xvf DIAGNOSTICSAGENT711_0-20005957.SAR (Figure 7).
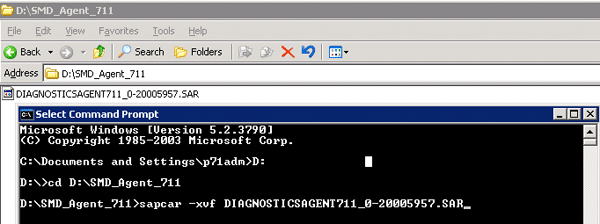
Figure 7
Extract the SMD agent using SAPCAR
The SAP Java Virtual Machine (SAP JVM) is not delivered with Java Cryptography Extension (JCE) jurisdiction policy files. The delivery of these is subject to import restrictions in some countries. The JCE jurisdiction policy files must be available before you install the SMD agent so that SAPinst can install them. You can download the JCE jurisdiction policy files as described in SAP Note 1240081.
Go to https://www.oracle.com/technetwork/java/javase/downloads/index-jdk5-jsp-142662.html > Other Downloads > Java Cryptography Extension (JCE) Unlimited Strength Jurisdiction Policy Files 5.0 (Figure 8).
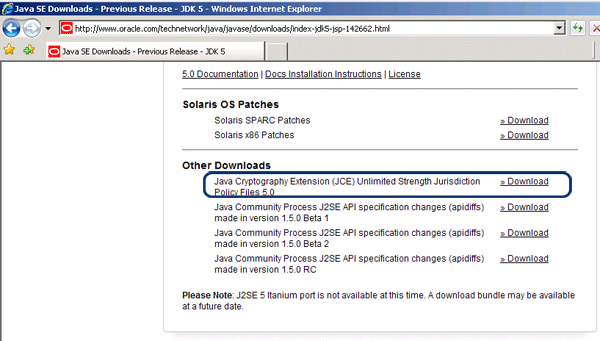
Figure 8
Download JCE from Oracle
Set the JCE zip file as an environment variable using the following command in your Microsoft Windows system: set JCE_POLICY_ZIP= D:SMD_Agent_711jce_policy-1_5_0.zip (Figure 9).

Figure 9
Set the JCE Zip as environment variable
Now that both the SMD agent and JCE are downloaded, you can install the SMD agent using SAPinst. Start SAPinst by navigating to the same folder where DIAGNOSTICSAGENT711_0-20005957.SAR was extracted and double-click sapinst.exe (Figure 10).

Figure 10
Start SAPinst
A welcome screen appears and the installation wizard begins. In the welcome screen, follow menu path Solution Manager Diagnostics Agent > Standalone Engines > Solution Manager Diagnostics > Solution Manager Diagnostics Agent and then click the Next button (Figure 11).
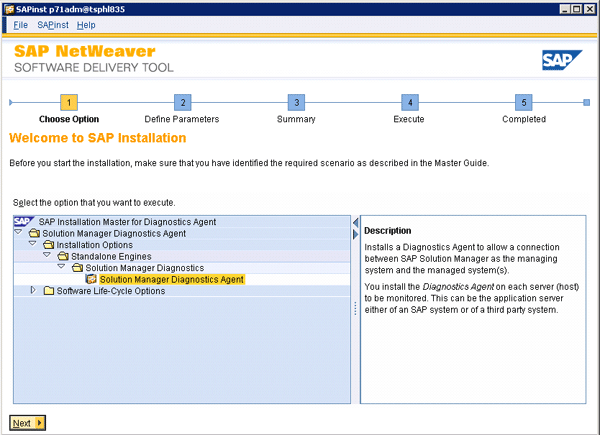
Figure 11
Diagnostics agent welcome screen
Follow the wizard steps and enter the required parameters. Enter the SMD agent’s Virtual Host name and click the Next button (Figure 12).
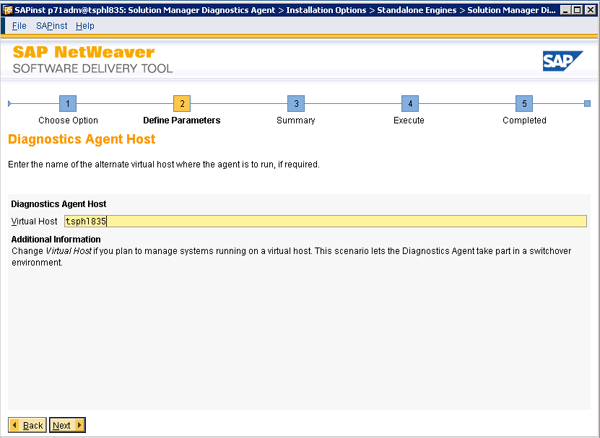
Figure 12
Enter host name
SAPinst sets the system ID of the SMD agent to DAA by default. Leave this as DAA and choose the location where you want the case directory for the SMD agent. In my example, the destination drive is the D: drive. To continue with installation, click the Next button (Figure 13).
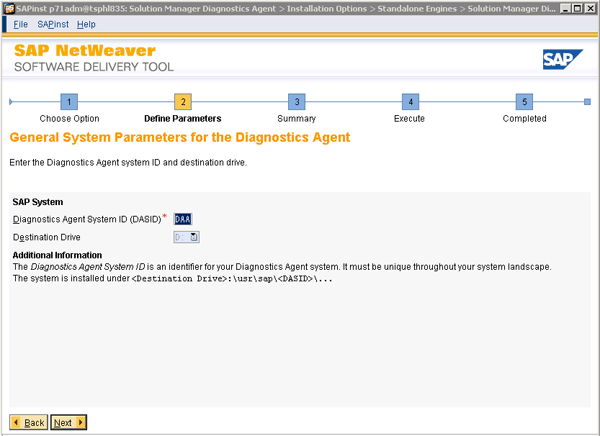
Figure 13
Agent ID and directory selection
In the next screen, browse to the SAP Solution Manager agent directory, select the SAP Unicode Kernel 711 directory, and click the Next button (Figure 14).
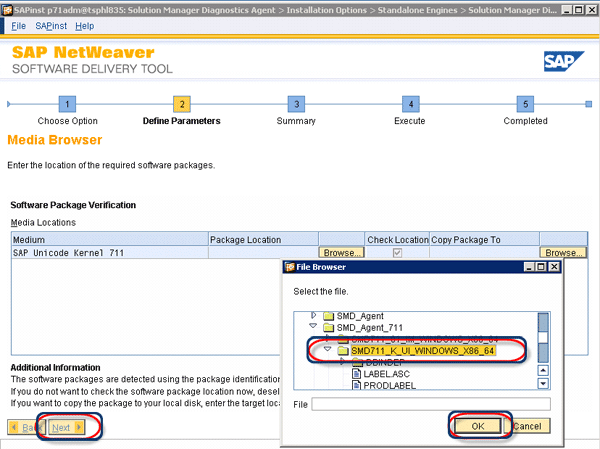
Figure 14
Select SAP Unicode Kernel 711 for the directory
You need to select the Java cryptography extension (JCE) unlimited strength jurisdiction policy files for the Java Development Kit (JDK) you downloaded earlier. Browse to find and select the jce_policy-1_5_0.zip file and click the Next button to continue (Figure 15).
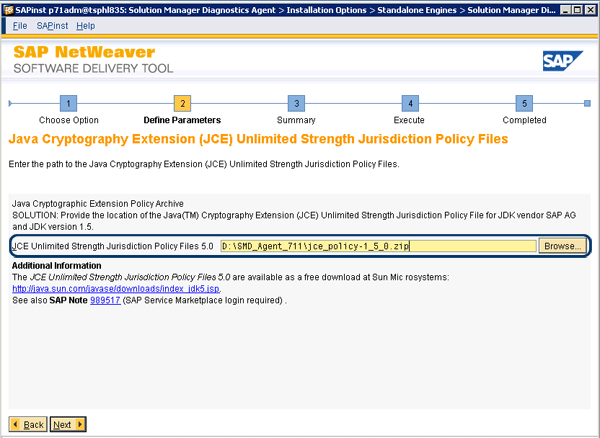
Figure 15
Select Java Cryptography Extension
Because the system runs on the local host, in the next step you can leave the default settings as Local Domain and click the Next button (Figure 16).
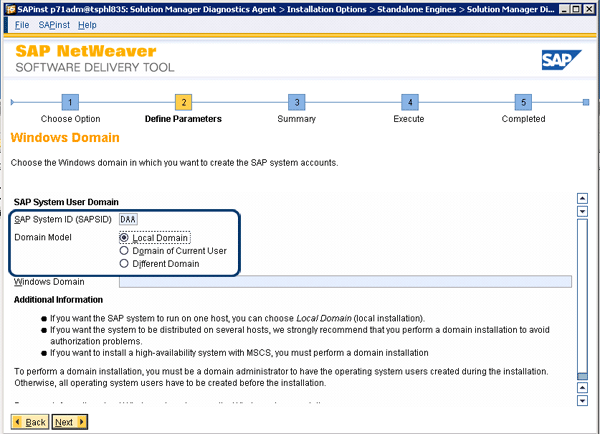
Figure 16
Select Local Domain and continue
Specify the password for DAAadm and SAPServiceDAA users. These two users are created during the install. The SMD agent user DAAadm is used to manage the SMD agent’s system. It is created on the primary application server instance host and on every additional application server instance host. For security reasons, SAPinst creates this user by default as a local user that is not a member of the local administrators group. The SAPServiceDAA user is the Microsoft Windows account used to run the SMD agent system at the operation system level. Enter the passwords and click the Next button (Figure 17). In the next screen, leave the Prerequisite Checker’s xml file as default and click the Next button to continue (Figure 18).
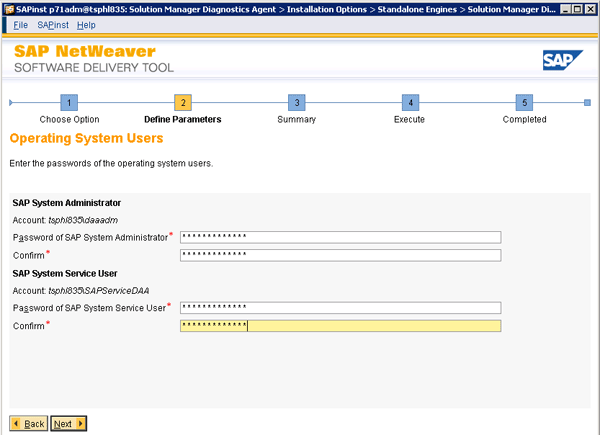
Figure 17
Enter the passwords for operations system users
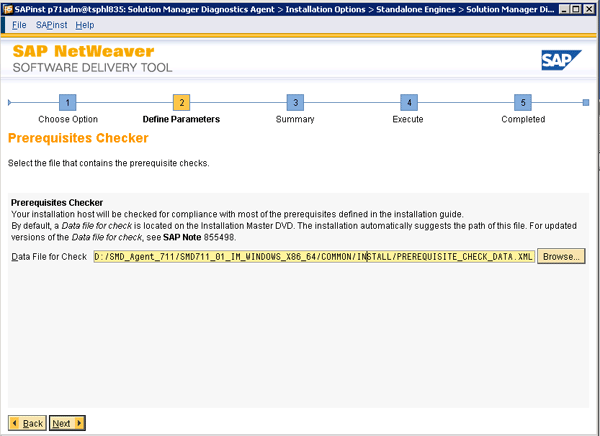
Figure 18
Prerequisite Checker settings
The instance number is a technical identifier for controlling internal processes such as assigned memory. This number must be unique for this installation host. The listed instances shown in Figure 19 exist on this host. Enter the number of the Diagnostics Agent Instance and click the Next button.
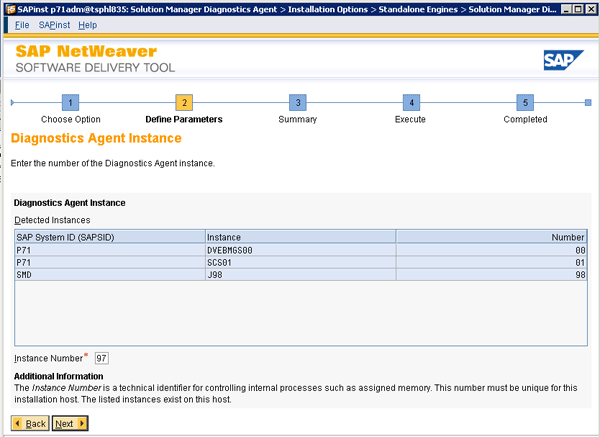
Figure 19
Enter the number of the Diagnostics Agent Instance
Before starting the installation, make sure you have identified which installation strategy you want to use. This means that you need to choose one of the two following scenarios:
- SLD registration: In this scenario, the SMD agent registers itself into the production SLD assigned to the managed system on which the agent will be installed. This scenario should be used if SAP Solution Manager is not yet installed.
- Direct SAP Solution Manager registration: In this scenario, the SMD agent establishes a direct connection to the SAP Solution Manager system.
In this case, I obviously use direct SAP Solution Manager registration because SAP Solution Manager is up and running already. Select No SLD destination and click the Next button to continue (Figure 20).
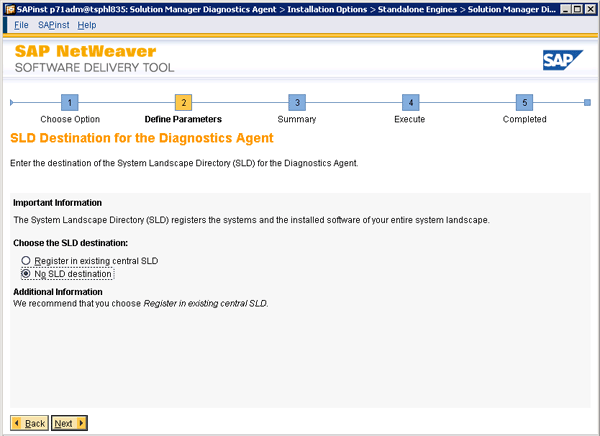
Figure 20
Select No SLD destination
The SMD agent connects directly to the SAP Solution Manager system. There are two ways to connect it to SAP Solution Manager. By default, the connection is done via the message server, which is recommended by SAP and what I chose to do for my example next. It allows you to rely on the Java EE engine to dispatch to one of the dispatcher nodes. However, you can also make the connection via the Java EE dispatcher node, though this implies that the node is running and I will not be covering this option in this article.
Select Lookup HTTP Connection via Message Server (Figure 21). This option connects the SMD agent to SAP Solution Manager via the message server. In this case, you rely on the Java EE engine to dispatch to one of the dispatchers. Click the Next button (Figure 21).
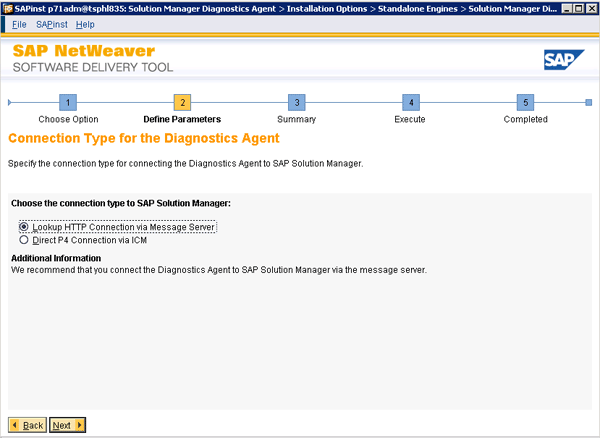
Figure 21
Select the Lookup HTTP Connection via Message Server option
Enter the following parameters:
- Host: Fully qualified name of your SAP Solution Manager system
- HTTP Message Server Port: 8101
- Administrator user and password: SAP recommends that you use the SMD_ADMIN user created during the SMD setup wizard step
Click the Next button to install the SMD agent. All the steps executed during the setup phase are tested. If a problem occurs, an error message pops up; it is not recommended that you begin SMD agent installation if the setup check fails (Figure 22).

Figure 22
Enter SAP Solution Manager information to connect the agent
Once the connection information is validated for the SMD agent, the install wizard determines which files need to be unpacked (Figure 23). The wizard automatically unpacks all the files to the SAP global host directory.
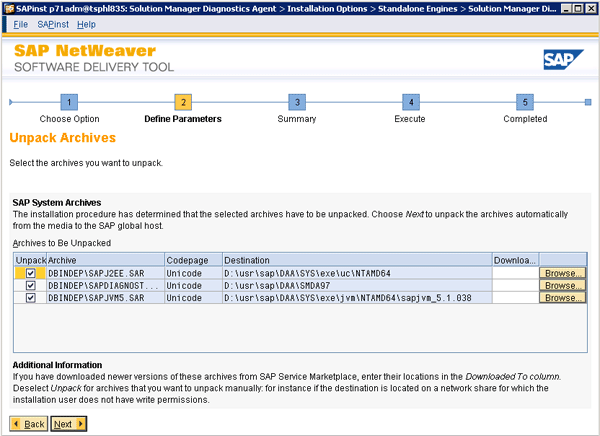
Figure 23
SAPINST unpacks the SAP files needed for an SMD agent
The wizard has all the information needed to install the agent at this step. By clicking the Next button, the SMD agent is installed (Figure 24).
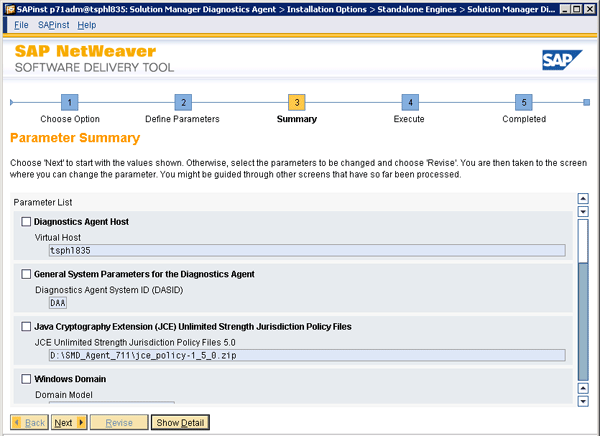
Figure 24
Install the SMD agent
As there was no error during the install, a pop-up message appears showing that the SMD agent install completed successfully. Click the OK button to confirm the installation (Figure 25).
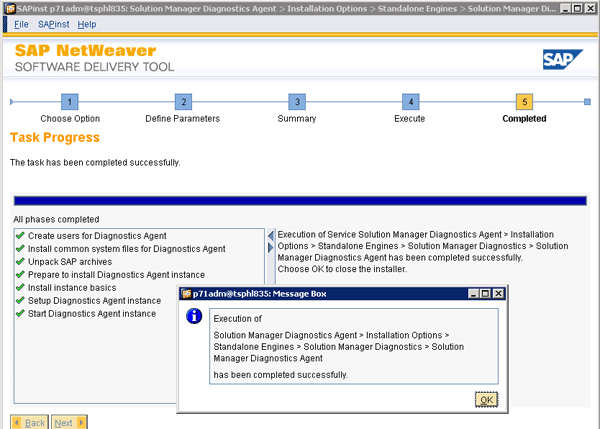
Figure 25
Diagnostics agent installation has been completed successfully
Now that the install activity has been performed, change the execution status in the Execution Status column to Performed and then click the Save button (Figure 26).
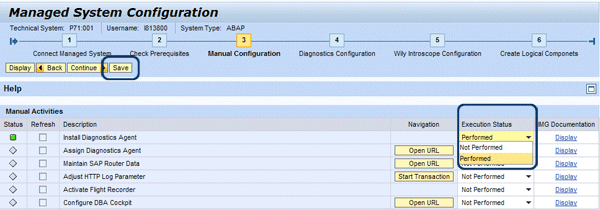
Figure 26
Set activity status to performed
Use the Assign Diagnostics Agent manual activity only if the SMD agent has been automatically installed with an SAP NetWeaver system installation based on SR3 DVDs set or later, because the SMD agent must be connected to SAP Solution Manager. In this case, I am going to skip this step and leave the status Not Performed for Assign Diagnostics Agent as well as Maintain SAP Router Data (Figure 27).
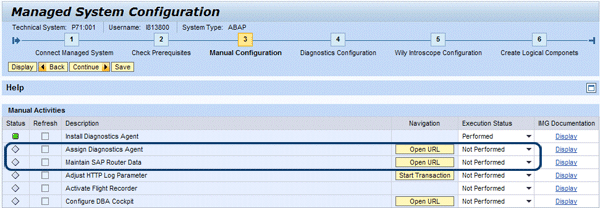
Figure 27
Skip the Assign Diagnostics Agent and Maintain SAP Router Data activities
Adjust HTTP Log Parameter is the next manual configuration activity. To enable the analysis of logs written by the Internet Communication Manager (ICM) with End-to-end Root Cause Analysis, you need to maintain an additional parameter. This is only needed for ABAP systems. Because the managed system is dual-stack ABAP and Java, I need to perform this activity.
On the managed system, use transaction RZ10 and edit the profile by selecting the Extended maintenance radio button and clicking the Change button to enter edit mode (Figure 28).
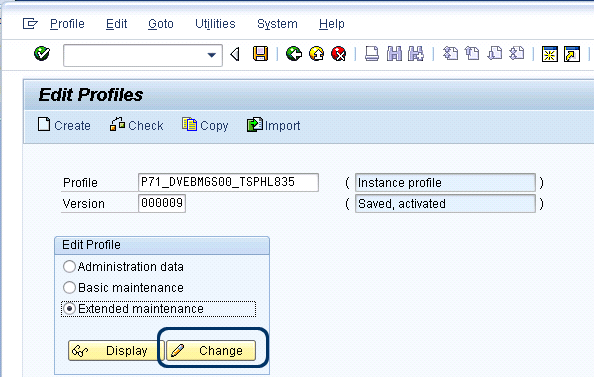
Figure 28
Edit default profile
In the screen that appears, set the parameter icm/HTTP/logging_0 to PREFIX=/, LOGFILE=icmhttp.log, LOGFORMAT=SAPSMD, MAXSIZEKB=10240, SWITCHTF=day, FILEWRAP=on and click the Copy button to save it (Figure 29).

Figure 29
Set the ICM parameter
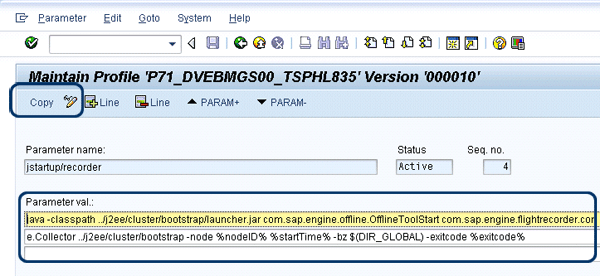
The next manual configuration activity is Activate Flight Recorder. Set the following profile parameter in the screen shown in Figure 28 and then click the Copy link (Figure 30):
Parameter name jstartup/recorder with Parameter val. java -classpath ../j2ee/cluster/bootstrap/launcher.jar com.sap.engine.offline.OfflineToolStart com.sap.engine.flightrecorder.core.Collector ../j2ee/cluster/bootstrap -node
%nodeID% %startTime% -bz $(DIR_GLOBAL) -exitcode %exitcode%.
Save and activate the profile as shown in Figure 31. Restarting the ICM service is required to take this profile parameter modification into account. Note that this restart should be planned carefully and coordinated with the business before the ICM service is restarted (i.e., whichever business is using SAP NetWeaver PI).

Figure 31
Save and activate default system profile
Configure DBA Cockpit is the next manual configuration activity. The SAP Solution Manager DBA cockpit is the successor of transactions ST04, DB02, and DB50, which used to be performed manually on the managed system to monitor databases (and can still be used as a manual activity, but it can also be done automatically in a centralized fashion, which reduces the amount of time for this process). The main purpose of the SAP Solution Manager DBA cockpit is to centrally monitor all the managed system’s databases from one single screen. Open the DBA Cockpit Configuration Wizard by clicking the description of the activity in the main manual configuration screen. Select the managed system you want to connect from the details that appear automatically when you select the system. Then, click the Next button to continue (Figure 32).

Figure 32
Select database system
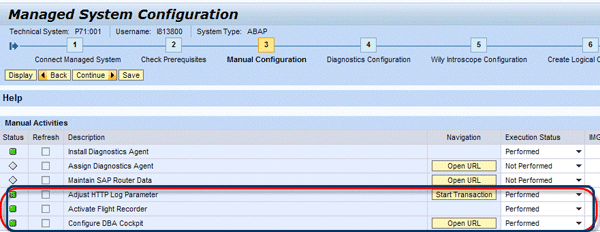
Fill in the connection information of the database you want to connect by providing the user and password for setting up the database connection. Click the Next button to set up the connection. Now you can set the activity status to Performed for Adjust HTTP Log Parameter, Activate Flight Recorder, and Configure DBA Cockpit (Figure 33).
Step 4. Configure Diagnostics
Not all of the activities shown on the diagnostics configuration screen are required. In this case, I am only going to configure one activity: Configure Diagnostics. Click the Open URL button in Figure 34 and a new managed systems setup wizard window opens.

Figure 34
Configure only the Configure Diagnostics activity
The diagnostics configuration setup is comprised of four different steps: system selection, setup parameters, summary/setup and configuration, and setup results. I’ll go through each step in detail.
System Selection
Define the systems that you are configuring. After selecting the system you want to connect, check the Show Instances check box to display the system setup status per instance. Once a system has been selected, you can influence the product and product version of the managed system by opening the details of the selected system (if your system is marked as not diagnostics relevant, you can manually override this by deselecting the appropriate check box). This may be necessary if the parameters cannot be calculated automatically. In this example, the SAP NETWEAVER PI 7.1 system is selected. To continue, click the Setup P71 (ABAP, JAVA) button (Figure 35).

Figure 35
System selection screen
Setup Parameters
The following parameters used during configuration must be entered in the screen shown in Figure 36:
- J2EE Connect Parameters: J2EE parameters are requested for a J2EE system only. In this case, this includes the message server host, port, and login credentials for the J2EE administrator.
- ABAP Connect Parameters: ABAP parameters are requested for an ABAP system only. In this case, enter the ABAP user with the SAP_ALL profile.
- Load Balancer: Information to access the load balancer and generate URLs for jump-in functionalities of the managed systems

Figure 36
Enter the setup parameters
For each selected instance, the agent name and the installation path must be entered by selecting the Details view (click the arrow to expand the Details section). Enter the appropriate agent name in the Agent field (Figure 36). For each instance of the system running on different hosts, an SMD agent should be assigned a connected path in the System Install Path field. The installation path in the Instance Path field of the selected instance is the ITS server information. This is only valid for an ABAP system.
Summary of Steps and Setup and Configuration
Select the steps to be executed during the setup. In this case, all the steps selected in Figure 37 are executed.
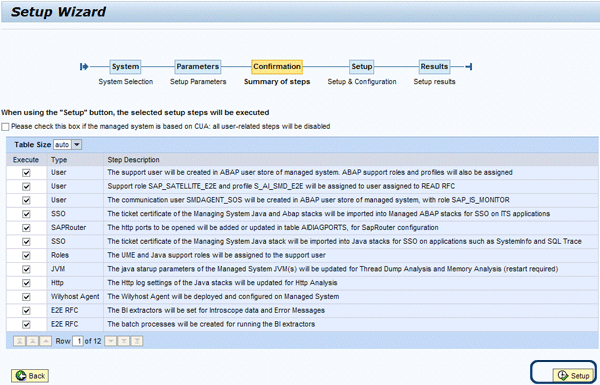
Figure 37
Steps that are executed
Setup Results
The results of the setup execution for the selected steps show any errors. In this example, there are some warnings but you can ignore them as they are not critical errors (Figure 38).

Figure 38
Managed system setup wizard results
Step 5. Perform Wily Introscope Configuration
The Introscope Bytecode Agent runs on managed systems based on J2EE engines to report data to the Introscope Enterprise Manager. SMD provides an administration tool, the Wily Introscope Agent, that handles the setup of these Introscope Bytecode Agents. The deployment and configuration of these agents are performed remotely with the assistance of SMD. To configure the Wily Introscope Agent, click the Open URL button (Figure 39).

Figure 39
Configure the Wily Introscope Agent
Next, you make Introscope Agent settings (Figure 40). In the drop-down list, you can select the instance SID corresponding to SAP NetWeaver PI. The J2EE server nodes are then displayed in the table. In this case, I selected Process Integration P71 (P71~JAVA in Figure 40). Click the Apply button and the setup wizard sets up the Introscope Agent in the SAP NetWeaver PI system.

Figure 40
Set up the Wily Introscope Agent
The automatic maintenance of visual administrator parameters is not supported for SAP NetWeaver systems based on SAP J2EE 7.10. You can manually maintain the profile parameters according to the list in SAP Note 797147 and check this note for more information. For the exact parameters for your configuration, see the step in the note called Introscope Configuration of the SAP Solution Manager Configuration Application for Managed Systems.
To start the SAP J2EE configuration tool to add the Introscope configuration, log in to your managed operating system and navigate to D:usrsapP71DVEBMGS00j2eeconfigtool (Figure 41).
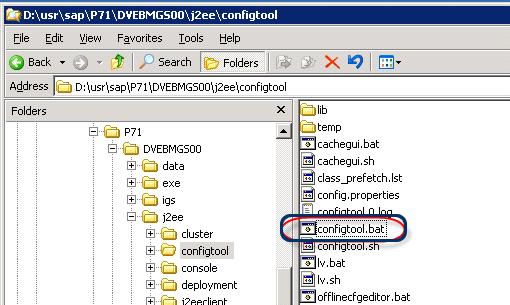
Figure 41
Open the configuration tool for SAP J2EE
Select the server to change in the Servers tab (Figure 42). Then, navigate to the VM Parameters tab. In the Custom parameters area, add the following new Java parameters after clicking the New button:
- javaagent:D:/usr/sap/SMD/J98/SMDAgent/applications.config/com.sap.smd.agent.application.wily/BytecodeAgent/
ISAGENT.8.1.0.0-2009-06-05/wily/Agent.jar
- Dcom.wily.introscope.agent.agentName=P71_DVEBMGS00_server0
- Dcom.wily.introscope.agentProfile=D:/usr/sap/SMD/J98/SMDAgent/applications.config/com.sap.smd.agent.application.
wily/BytecodeAgent/ISAGENT.8.1.0.0-2009-06-05/wily/IntroscopeAgent.profile

Figure 42
Enter Wily Introscope Agent Java parameters
Step 6. Create Logical Components
A logical component is an administrative entity that assigns logical systems (in your entire system landscape and across projects) to the following:
- A main instance of a product with a product version. For example, this could be the main instance SAP NetWeaver PI Server of the product SAP NetWeaver PI 7.1.
- The system roles or phases in a project. For example, this could be the role development system for the configuration.
Click the Create a New Logical Component button and the wizard creates a new row in an assignment table, in which the SAP product versions are pre-assigned based on the system selected during setup (Figure 43). In the new row, enter a name for the new logical component, the system role, and then click the Save Logical Components button (Figure 44).

Create a new logical component

Figure 44
Enter name and role of the logical component
With the creation of the logical components, you have concluded the managed system configuration for SMD.
Labinot Bytyqi
Labinot Bytyqi graduated with a degree in computer science and business management and a minor in economics from George Fox University in 2005. Currently, he is pursuing a master’s degree in information technology management. Labinot joined SAP in 2007 as a technical consultant with more than eight years of information technology experience and SAP consulting, particularly in the application lifecycle management area, where he was a lead for an SAP Solution Manager and extensions practice in the West region. Labinot currently is responsible for field services software sales portfolio business development and strategy, as well as for SAP Extended Diagnostics by CA Wily.
You may contact the author at labinot.bytyqi@sap.com.
If you have comments about this article or publication, or would like to submit an article idea, please contact the editor.


