Understanding the structure of infotype headers and how to change them to meet your needs can improve efficiency and allow users to browse data more effectively. The author explains the steps involved in creating and modifying headers, including optional configuration if you want to take advantage of functionality such as the use of passport photos or graphics in your headers.
When viewing or maintaining employee data on HR infotypes in R/3, how often do you look at the header information during your action? Do you require different header information for applicant data than you do for employee data? If you are like most R/3 users, you probably rely heavily on infotype headers when working on infotypes, but don’t put much thought into why they contain the fields that they do or even how they work. Understanding header structures and how to change them to meet your needs can improve efficiency and allow users to browse data more effectively.
Infotype headers serve as a snapshot of the person whose record is being viewed or changed. The contents in the headers may vary from infotype to infotype, subtype to subtype, or even country to country. The information in the header itself can also differ based on whether you prefer the data to be shown as of the system date or as of the effective date of the infotype being viewed. In this article, I will explain the steps involved in creating and modifying infotype headers in R/3.
Infotype Headers
In Personnel Administration (PA) screens, the first three lines at the top of the screen hold the infotype header. Headers are configurable and allow you to control not only the fields that are displayed, but also the physical layout and sequence of those fields. Since Release 4.5A, nearly any infotype field in the standard system, as well as any customer-defined fields stored in infotype structures, can be used as output.
To create or change infotype header configuration, access the IMG menu path Personnel Management>Personnel Administration>Customizing User Interfaces>Change Screen Header. The following six steps for creating or maintaining headers include optional configuration. Which steps apply to your own work depends on how much you want to take advantage of functionality such as the use of passport photos or graphics in your headers.
Note
Infotype headers are country-specific. Before accessing the IMG step to configure values for a particular country, make sure you have set your own user parameter MOL to the correct country code. Steps such as assigning a header modifier require you to have set your country version first. For example, to modify headers for Canada, you should be sure your MOL parameter is set to 07 prior to entering the configuration. You can maintain your own user parameters via transaction SU3.
Creating a Header
Let’s walk through the creation of a header that will be used on infotype 0006 (Addresses). The goal is to create a header in which the majority of the header data such as organizational assignment elements will appear based on the beginning date of the infotype 0006 record being viewed. However, the value of the ZIP code field that you will add to the header will be based on the system date rather than the beginning date, creating a single header that contains fields based on both the system and record begin date.
Step 1. Assign a header structure per infotype (V_582A_B). The first step allows you to assign a header to each infotype in PA. You can also determine whether you want the data shown in the header fields to be valid as of the current system date or as of the effective date of the infotype you are viewing.
To use the current system date, leave the Choose data field unchecked (blank). To instruct the system to use the effective date of the infotype itself when determining which values to display, check the Choose data field box. In your configuration (Figure 1), assign a new screen header value of 05 to infotype 0006 and check the Choose data box to display header data on this infotype based on the begin date of the record being displayed.
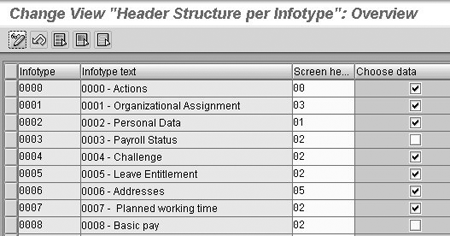
Figure 1
Header structure per infotype configuration in V_582A_B
Step 2. Assign a header modifier (V_T588I). In this country-specific step, you assign a header modifier (basically, the number of a specific header definition) to each combination of header and transaction class. Transaction class is used to indicate where data is stored in the database based on the type of person being maintained. Transaction class A refers to PA data elements and transaction class B indicates recruitment elements for applicant processes. By using a transaction class, you can define different headers for applicants and for employees. This distinction between applicant headers and employee headers is helpful, especially if you want to display different fields that apply to one or the other — for example, applicant status. For the configuration of your new header (Figure 2), assign a Header mod. of 99 to header 05 for Trclass A. In this example, you’ll use an existing Header mod. of 24 for Trclass B.
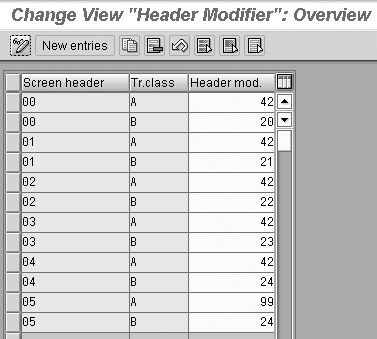
Figure 2
Header modifier configuration in V_T588I
Step 3. Define the infotype header. This is the most important step in the Change Screen Header process. Here, you not only define which infotype or subtype fields appears in the header, but you also determine the type of field output you want (short text, long text, etc.) and the placement of those fields on the first three lines of the screen. Table 1 outlines the configuration fields that make up the infotype header definition in table T588J. Figure 3 shows the fields and placement for our new custom header. Note that I have decided to use a custom keyword of ZIP for the ZIP code field (PSTLZ). The word “Zip” then appears as the field description in the header rather than the standard data dictionary short description of “Postal Code.” (Step 6 contains instructions on creating a custom keyword.)
| Header Modifier: The number of the header you wish to use. The headers were defined in Step 2. |
| Line: The line number (1, 2, or 3) on which you will be placing the output field in your header. |
| Column: The exact lineal location for the beginning of the field output in your header. The column measurements start at the far left with a value of 0 and increase in increments of one as you go to the right. |
| Infotype: The infotype number that contains the field you wish to output. |
| Subtype: Optional output field. You can specify a particular subtype of the infotype configured above. |
| Field name: The technical field name that is stored on the infotype you have specified above. |
| Field type: The field type controls the type of output for the field in question. Available options for field type include the use of actual field contents, short and long field descriptions and technical field names. |
| Keyword: You can specify an optional keyword in connection with field types TXT and TXD and thereby use different field name descriptors from the ABAP Dictionary. |
| Length: The length, in spaces, of the field output in the header. If you enter a value of zero and there is enough space in the header, the entire field value displays. |
Conversion indicator: The optional conversion indicator can also be used to control output. Possible entry values are:
<blank> no conversion required
01 display leading zeros (for P0000-PERID, for example)
02 concatenate with next field
03 hide country-dependent editing of personnel ID (for P0002-PERID, for example) |
| Table 1 |
Fields contained in table T588J |
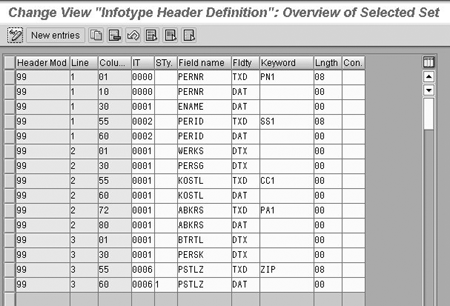
Figure 3
Infotype header definition configuration in table T588J
Once you have configured the header, you can view the layout itself in linear terms to ensure you have proper field placement. To do this, place your cursor on any line in table T588J that belongs to the header you wish to check and press the button labeled Single test. This produces a graphical representation of the output and allows you to see the full header layout.
After you have verified format and configuration and want to complete your configuration, you must generate the header before it can be used. Prior to generating, it is a good idea to check the header configuration for errors by using the check button at the bottom of the infotype header definition screen. If you have any syntax errors in your configuration, this check identifies them. Once you are certain there are no errors, press the generate button on the header definition screen to force immediate generation.
Step 4. Configure a passport photo. The use of photos or graphics in headers is optional in R/3 and requires the files to be stored in an optical archive. If you choose to configure this step, you must determine the document type that is identified in the system table (table T77S0) for the Photo setting. The default setting for the Photo document type is HRICOLFOTO. Your own entry should match the document type you use to link to your photos in the optical archive. If you plan to use photos, you should use a value of PIC in the Field type for the PERNR entry in the infotype header definition (table T588J). You should also note that when planning your header layout, photos use all three lines in your header.
Step 5. Infotype header data selection control (table T588H). This optional step controls the effective dates by which your data is chosen, independently of the Choose data setting that you established in step 1. The primary benefit of using the data selection indicator is to allow some fields in the header to display based on the system date and others in the same header to display values effective on the record begin date.
When configuring this step, enter a combination of header modifier and infotype/subtype. If the Data sel. field is checked, the data that is valid on the start date of the infotype being viewed appears. Leaving this field unchecked causes the system date to be used for displaying data. If you do not configure anything in this table, the Choose data setting from V_582A_B (step 1) is used.
In step 1, you configured infotype 0006 to display data based on the record begin date. For your configuration now in table T588H (see Figure 4), you want any header data in header modifier 99 that is based on infotype 0006, subtype 1, to be displayed by the system date. Indicate this in your configuration by leaving the data selection field unchecked for the infotype 0006, subtype 1, combination. This configuration allows you to display the ZIP code field based on the system date, and the remainder of the header fields based on the record effective date. This way, the current ZIP code is always displayed in the header.
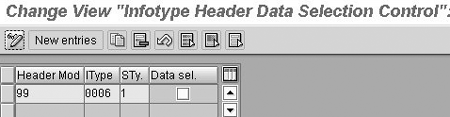
Figure 4
Infotype header definition configuration in table T588J
Step 6. Create your own key fields or long texts. Finally, this optional configuration step allows you to create field names in table T588L that are different from the ones in the DDIC entry in displaying your headers. Keywords are only applicable for field types TXT and TXD. Custom key fields are restricted to just field types TXT and TXD because these two types refer to the field name from the ABAP Dictionary. It would not make sense to apply custom key fields to field types that only output data values such as DTX. In your configuration (Figure 5), you create a keyword called ZIP that displays a value of Zip when used in a header.
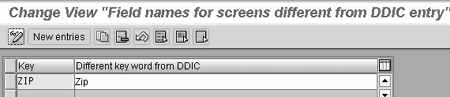
Figure 5
Configuring keywords that differ from DDIC in table T588L
Now, let’s see the configuration in action. Figures 6 and 7 show two infotype 0006 headers for the same employee for two different effective dates. Notice the header placement of the ZIP code field you configured earlier. In these two screen headers, the organizational assignment data in the header changes based on the begin date of the record. But, in both cases, the ZIP code is displayed based on the system date, even though the ZIP code in the master data for that employee changed over time. This is a good example of a header that contains data effective from both the system date and the record begin date.

Figure 6
Custom header configuration for a record with an effective date of 01/02/2003 through 12/31/9999
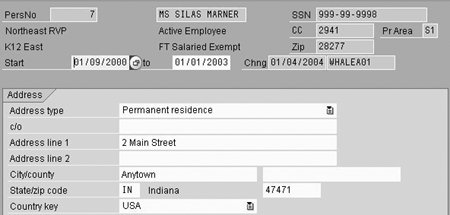
Figure 7
Custom header configuration for a record effective date of 01/09/2000 through 01/01/2003
Properly designed headers can not only make a user’s work easier, but can also allow you to be in compliance with local country- or company-specific requirements for displaying data. Whether you need to display a specific data element from one region in your header or are prohibited from displaying certain data in another country because of data privacy laws, you can better meet your user needs by developing an awareness of how infotype headers function and how they can be modified.
A.J. Whalen
A.J. Whalen has successfully combined more than two decades of global business expertise with in-depth experience in the strategic development, management, and delivery of large-scale projects and education for SAP ERP HCM. Prior to his current role as SAP Marketing Director at Velocity Technology Solutions, he served as lead consultant for several global SAP implementations and engagements as well as an SAP Conference Producer for Wellesley Information Services. A.J. has been invited to speak at nine annual SAP educational events and holds an MBA degree from the Stern School of Business at New York University.
You may contact the author at whalen.aj@gmail.com.
If you have comments about this article or publication, or would like to submit an article idea, please contact the editor.


 Premium
