Learn how to create, implement, and maintain a solid authorizations concept using transaction SUIM.
Key Concept
You can use transaction SUIM (user information system) to verify different authorizations-related functionalities. It can verify authorizations assigned to a specific user or multiple users. SUIM can also verify contents of roles and compare authorizations of two user IDs or two roles. For example, say two users within the same team have exactly the same authorizations. One user can complete all her tasks, yet the other user is getting error messages about missing authorizations. You can run a comparison to verify whether there are any differences between the user IDs and specify what the differences are.
Transaction SUIM (user information system) can help you create and implement a solid authorizations concept, thus protecting your system from possible misuse. After you have defined the critical authorizations or combinations, you can generate multiple reports on roles and authorizations for monitoring purposes. This enables solid Sarbanes-Oxley and auditing compliance because by running the reports you can verify that all users have the correct authorizations at all times.
I’ll highlight transaction SUIM’s use for three example reports. I chose these three because they are all needed for monitoring purposes:
- Critical authorizations (such as access to salary data or access to a Social Security number)
- User IDs that have not been used in a long time
- Passwords that either have never been changed or haven’t been changed in a long time
Report 1: Critical Authorizations
The critical authorizations process limits the number of users who can access sensitive data. This sensitive data should be protected from misuse, either intentional or accidental. Before starting your report, it is vital that you first understand what your company has deemed a critical authorization, determine which critical authorizations you want to investigate, and then decide who should have access to them.
Use transaction SUIM and open the User node by clicking the downward triangle. Select the report With Critical Authorizations. The system opens the List of Users with Critical Authorizations screen. Click the Critical Authorizations button at the top. This is where the process of defining critical authorizations begins and ends. The “Variants for Critical Authorizations”: Overview screen is where you choose the basis for reporting (Figure 1).

Figure 1
The first selection screen for determining critical authorizations
On the left side you see four selections (under Dialog Structure), and on the right side you see the Variants for Critical Authorizations, which have already been defined in the system earlier. Perform the four steps required to run the reports on critical authorizations from the screen.
Step 1. Create critical authorizations (or a critical authorization if only one critical authorization is defined). SAP default values cover only a very small number of possible values for critical authorizations. Double-click the Critical Authorization button. The system opens the Critical Authorization fields with SAP default values (Figure 2). Here you can see both the SAP default values (the ones that begin with SAP) and the company-specific values (if they have already been created), which are named with something other than SAP at the beginning. All other records, for example the ones beginning with Z, are company-specific ones.

Figure 2
A report using Logon Date and Password Change criterion
Now you need to create a custom critical authorization. The SAP-standard values (critical authorizations) provide very little information. To be able to report on the company-specific critical authorizations, you need to create a custom critical authorization. Fortunately, this is actually easier than it sounds; just create a new record. Start by clicking the New Entries button. The system then opens the New Entries: Overview of Added Entries screen, which is similar to Figures 1 and 2 except that the fields are now blank (Figure 3).

Figure 3
New Entries screen with empty fields
Step 2. Populate Critical Authorization with your own authorization data. When you create the new entries, specify the Authorization ID (i.e., the name of the critical authorization), Text (i.e., the description of the critical authorization), and Color (i.e., the color to be shown in the report for this specific critical authorization). You can leave the remaining fields empty. Click the save icon to save the entries.
The authorization data is the data you require for your specific needs. In this case, you are listing transaction codes so you need to know which ones are critical. If you need help with your codes, go to https://help.sap.com.
Highlight the critical authorization you want to investigate (e.g., Z_TRANSACTIONS) by clicking the empty field next to it (i.e., the small blue one on the left). The naming convention can be almost anything you want; just don’t begin with SAP. Here you are creating something that is company specific, not SAP specific. After highlighting the name, double-click the Authorization Data folder in the Dialog Structure (under the node Critical Authorization).
The system takes you back to the Change View “Authorization Data”: Overview screen (Figure 4). Here you specify the data for populating the critical authorization with proper contents in order to find the exact authorizations you want. You can also see the Color (Green), Transaction Code (no data chosen), and Text (Sensitive transactions). All these are brought from the screen filled in earlier. Under Authorization Data you can see different empty fields (e.g., Group). The intention is to fill in the required information to all empty fields (specified in detail later). You need to specify:
- Group: Any Z-beginning name
- Object*: Authorization object needed for the authorization data
- Field Name: Existing field name (technical name) for authorization object chosen in the Object field
- From: Field data for authorization object (S_TCODE)
- To: Field data for authorization object (S_TCODE)
- AND/OR*: Field data for sensitive transactions
- Text: Automatically populated according to the data chosen for Object field
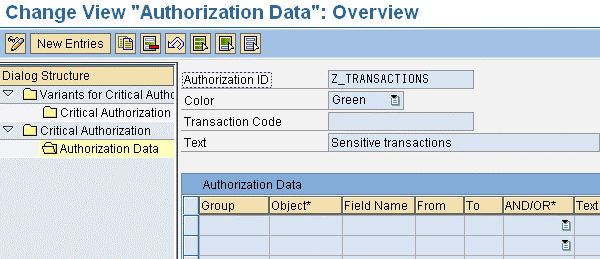
Figure 4
Specified data required to populate the critical authorization
The first thing you need to do is create a whole new group. Do this by entering a name in the Group field. The name can be anything you like, but I recommend that you begin it with Z, which means that it is company-specific authorization data.
After you’ve specified the Group field, you need to specify the name of the authorization object in the Object field to gain access to the critical authorization. Here, object refers to the authorization object, which is one of the basic principles of the whole authorizations concept. Authorizations to transactions are always defined with authorization object S_TCODE.
After the authorization object has been specified in the Object field, the system defaults automatically to all possible values for the Field Name field, such as TCD. TCD refers to the value for object S_TCODE (an authorization object). There are always different values for different authorization objects. For S_TCODE, there is only one value, TCD. You can choose it either by typing it directly to the Field Name field, or you can open the search functionality by clicking any empty field below the Field Name field. The system automatically shows a search icon in the right corner of the field. You can click this button to list all possible values. In my example, the authorization object S_TCODE includes only one field, which is TCD. You can apply the name to the field by choosing from the opened list.
Next, enter the values for the From and To fields. Usually this means that you enter dates, but in this specific case, the From and To fields refer to transaction codes to be listed as critical authorizations. There is no search functionality, so you have to know the critical transactions. If you use single values (such as transaction SE16 or SU01), use only the From field (as specified in this article). If you need to use ranges (for example From: SE* To: SI*), you can define the beginning (in this case SE*) and the end (in this case SI*). You need to specify the data for as many rows as you want to list the sensitive transactions. In this case, the field values are exactly the same for every other field except the From field, where you need to apply each sensitive transaction separately (one for each row). What you are doing at this point is listing the transaction codes that your company says provide access to sensitive information.
Finally, define data for the AND/OR* field. With sensitive transactions, getting access to even one of them can be regarded as critical. This is the reason why you need to choose OR in the AND/OR* field. What you enter depends on what you hope to accomplish. If it is critical to have access according to even one row (from all the rows defined), then you have to choose OR. This means that if the user has access to any of the rows defined, then the user’s authorizations can be seen as critical. On the other hand, if it is critical only if the user has access to all authorizations defined here (in this case transactions), that is all rows together, then you specify AND.
Filling in the AND/OR* field completes this step. Figure 5 shows what the screen should look like. After all authorization data has been applied to the specific fields, save the entries.
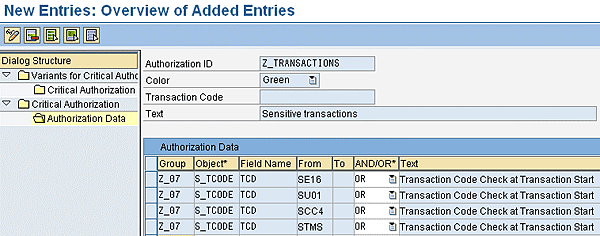
Figure 5
Populating the fields completes the step
Step 3. Define the variant and its text. Now you need to create a new company-specific variant. The new variant helps you to report on your critical authorizations. After you have saved all your entries, click the green arrow (at the top of the screen) to go back to the first selection screen, where you can see the Dialog Structure on the left side of the screen. Double-click Variants for Critical Authorization (under the top node Dialog Structure). Click the New Entries button that appears in the top left corner of the screen to bring up the New Entries: Overview of Added Entries screen (Figure 6). It shows the Dialog Structure on the left and the new fields for the Variants for Critical Authorizations.

Figure 6
Define the variant and the text
Enter a variant for your critical authorization and text that describes the variant to accompany it. For example, I added Z_CRITICAL_TRANSACT (for Variant for Critical Autho…) and Critical transaction codes (for Text).
Click the save icon after specifying the entries, and then highlight the Variant for Critical Autho field (Figure 7). To populate the variant with proper data, you need to highlight the variant by clicking the empty field on the left, next to the text Z_CRITICAL_TRANSACT.

Figure 7
The fields populated with the proper data
After saving the new data, the screen data needs to be highlighted to populate the variant with proper data. Clicking the empty field on the left of Z_CRITICAL_TRANSACT highlights the row.
Step 4. Populate the variant for critical authorization. To complete the steps of specifying the critical authorizations and reporting on them, you need to populate the earlier created company-specific variant with real company-specific critical authorization data. Double-click the Critical Authorization line. The system opens a blank Critical Authorization field (Figure 8). This screen is used for populating the variant (created in step 3) with the proper data. The Dialog Structure and the four steps are listed on the left. The variant (created in step 3) is on the right. Now you need to add the data used for populating the blank fields below the variant.
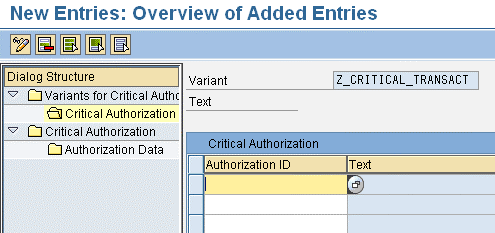
Figure 8
Populate the variant
Begin by highlighting the variant (refer to Figure 7) and double-clicking Critical Authorization. The New Entries button becomes visible again in the top-left corner of the screen (although it is not visible in the screenprint). Click the New Entries button and populate the fields with the proper data.
You have to use either the critical authorizations specified in step 1 to populate the fields or you can use the search functionality (if you click the empty row under Authorization ID, the search functionality button opens on the right side of the field) to choose the critical authorizations for populating the variant with the proper data. You can use any critical authorizations defined in step 1 (either your company-specific data or the SAP standard data). After you have chosen all the data, save the entries. Then, return to the first selection screen by clicking the green arrow or pressing F3 three times to reach the first selection screen (Figure 9).

Figure 9
Choose either Critical Authorizations or Critical Combinations for reporting purposes
Use the following selection criteria to run a report on Critical Authorizations:
- Variant Name: For Critical Combinations Variant (this is an option, which has not been described in this article) or For Critical Authorizations Variant (use and steps for creating this functionality have been described in detail earlier in this article)
- Selection Criteria for User: Includes user criteria such as User (single user or multiple number of users), User group, and User Group (General); and Display Only Valid Users (to display only active user IDs)
- List Format: Title (not required to use) and Layout (not required to use)
You can use a combination of any of these criteria to run reports on critical authorizations.
After you’ve clicked Critical Authorizations, the List of Users with Critical Authorizations screen is the first selection screen that opens. For reporting purposes, there are two options. Choose the For Critical Authorizations variant under the Variant Name. For reporting you can use any fields specified under Selection Criteria for User. You can also use the fields under List Format, but this is not described here.
First, open the search functionality to list all variants for critical authorizations by clicking just once on one of the empty fields next to the For Critical Authorizations Variant to open the search functionality (on the right side of the field). With this functionality, the only way to report on critical authorizations is to use the variant created (step 3) and populated (step 4) with the data created in steps 1 and 2.
Figure 10 shows the lists for all the variants for critical authorizations. As mentioned earlier, all reporting on critical authorizations is based on variants. The list includes both SAP-standard variants (all SAP-beginning ones) and the company-specific ones (all other).

Figure 10
Report of the critical authorizations
Double-click Z_CRITICAL_TRANSACT to run the reports on this variant. The system goes back to the List of Users with Critical Authorizations screen (Figure 9). The only difference is that now it includes the variant (Z_CRITICAL_TRANSACT) in the For Critical Authorizations variant field. This does not provide any information in itself, but you can use the variant to run reports on any criteria specified in the Selection Criteria for User area. You can use the selection criteria below to run reports on the variant chosen above. The variant includes the data specified earlier (critical transaction codes with the OR functionality).
You can use the following criteria:
- User
- User Group (or User Group (General) – they’re both the same)
- Reference user
- User ID alias
- Role
- Profile name
Use any of these options to run the reports listed above. It is also possible to run reports with:
- Only valid users
- Multiple selection criteria
In the Selection Criteria for User check box there is a selection box for Display Only Valid Users. The Multiple Selection Criteria screen opens with a yellow arrow next to each criterion in the Selection Criteria for User box area. If the report needs to be run for all valid users, place a check in the Display Only Valid Users check box. Then, click the execute icon to run the report.
Figure 11 shows the results that come up, including:
- ID of critical authorizations or text of critical authorization (with the chosen color)
- User name, complete name, group, validity dates, and user type
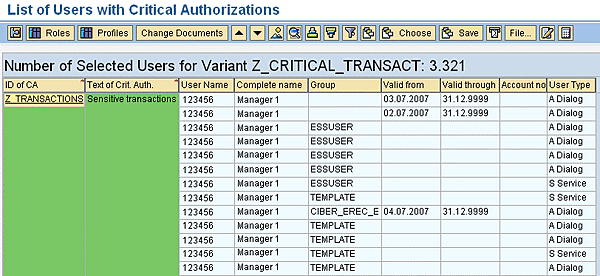
Figure 11
The result of the report on Users with Critical Authorizations
This screen lists the number of selected users for variant Z_CRITICAL_TRANSACT. The number of users receiving authorizations according to the selected criteria is 3321.
This screen also lists the following information:
- ID of Critical Authorization: Z_TRANSACTIONS
- Text of Critical Authorization: Sensitive transactions
- User name
- Complete name
- Group (user group, if any specified)
- Valid from (date)
- Valid through (date)
- Account number (if any specified)
- User type
Report 2: User IDs That Have Not Been Used for a Long Time
For monitoring purposes, you might need to run a report on user IDs that have not been used for a long time. For example, say you have been asked to figure out how much the company has been investing in license fees annually. The company is paying license fees for each active user ID, so it necessary to know which IDs are inactive. You then can delete or delimit them and save the company money. Transaction SUIM helps you run this kind of report.
Use transaction SUIM and open the User node to see the report By Logon Date and Password Change. Highlight By Logon Date and Password Change and click the execute icon. Then you get the report List of Users According to Logon Date and Password Change screen (Figure 12).

Figure 12
Selection criteria for the List of Users report
This screen lists the different selection criteria for the report List of Users According to Logon Date and Password Change. You can use the following criteria for reporting:
- Standard Selection
- Selection by Validity of User
- Selection by Status of the User
- Selection by Logon Attempts
- Selection by User Type
- Selection by Status of the Password
You can use any combination of the tabs as selection criteria. For example, you might run the report using any or all of the following selection criteria:
- Users with 90 days since last logon
- Valid users only
- Users not locked
- Users with valid password
- Dialog users (someone who can log on to both the SAP back-end system and portal)
After you enter the search criterion you want, press F8 to execute. The system then brings up the search information (Figure 13).

Figure 13
Results of certain criterion for the report
This screen lists the records according to the selection criteria chosen earlier (above). It shows the following information:
- System name, client, checked by (user), check date and time
- Profile parameters of instance
- Selection criteria
- User (user ID)
- Group (group of the user)
- User type
- Creator (user ID used for creating the specific user ID)
- Created on (date)
- Valid from (date)
- Valid through (date)
- Logon (last logon date)
- Logon (last logon time)
- Password (validity of the password specified with green check)
- Password (valid until)
- Lock (user ID locked specified with green check)
- Incorrect Logons (number of potentially incorrect logons)
Report 3: Passwords That Have Not Been Changed in a Long Time
Another report you might have to run is one on passwords that have never been changed or that haven’t been changed for a long time. Since it’s extremely important to keep the passwords confidential, it is vital that you change the passwords every now and then (e.g., every 30 days).
You can also find this report in the user information system. Enter transaction SUIM and open the User node. Highlight By Logon Date and Password Change and click the execute icon. This brings you back to the List of Users According to Logon Date and Password Change screen (Figure 12).
Again, you can search by any of the criteria in the tabs highlighted and listed above. For example, you might want to run the report using these selection criteria:
- Users with 30 days since last password change
- Valid users today, users not locked, dialog users, users with valid, initial, or inactivated password
After you have entered the search criterion you want, press F8 to execute. The system then brings up the search information (Figure 14).
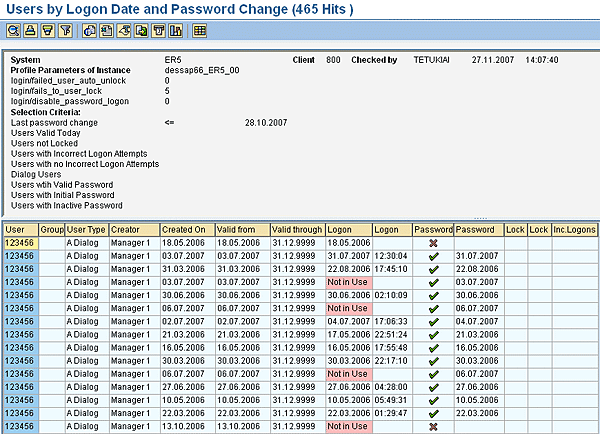
Figure 14
A report using Logon Date and Password Change criterion
Figure 14 lists the information for the report Users by Logon Date and Password Change. It shows that there are 465 hits for this specific report. This report lists the following information:
- System, Client, Checked by, checked by date and checked by time
- Profile Parameters of Instance
- Selection Criteria
- User: User ID
- Group: group of the User ID if any
- User Type
- Creator: user ID used for creating the user ID specified
- Created On: date for creating the user ID
- Valid from: date
- Valid through: date
- Logon: last logon with the user ID if ever used
- Logon: last logon time if any
- Password: valid password specified with green checkmark
- Password: last date the password was changed, if ever
- Lock: user ID locked specified with green checkmark
- Incorrect Logons: number of incorrect logons if any
Tero Tukiainen
Tero Tukiainen is the managing partner of SAPORT Consulting Inc, which he founded in 2009. He is an SAP HR-certified consultant who has specialized in SAP security and authorizations since 2000. Tero has spoken at SAP HR conferences in both Europe and the US since 2005.
You may contact the author at tero.tukiainen@saport.fi.
If you have comments about this article or publication, or would like to submit an article idea, please contact the editor.


