Access BW reports from mySAP CRM People-Centric UI with the click of a button. Find out how you can create a custom button for your toolbar. Then see how to assign a user-defined Business Server Page to pass the BW link to mySAP CRM, which allows you to view the BW report in a pop-up window when you click on the custom button.
Key Concept
The user interface framework of an access class incorporates standardized interfaces to access the business model. The access class stores the business logic that you can attach to screen layouts.
In a recent project, CRM business users requested a user-friendly way to display demographics data (stored in BW) for a customer (account). The users already had a link in the Account Name column that I configured to launch opportunities for the selected account. The users wanted a new button to give them an additional way to launch an application outside of mySAP CRM.
My solution was to display the BW report in a pop-up window within mySAP CRM People-Centric User Interface (UI). The user selects the account in the search area and then clicks on a button labeled Demographics to launch the BW report only for the requested customer account. (For the example in the article, I created a custom button labeled ACC URL2.) The users could also access this report in a Web browser via a hyperlink. My challenge was devising a way to send the customer account number dynamically to BW.
In the company’s system, SAP Enterprise Portal 5.0 connects mySAP CRM 4.0 and SAP BW 3.1 through single sign-on. There is a trusted relationship between SAP Enterprise Portal and mySAP CRM and another trusted relationship between SAP Enterprise Portal and BW. Business users who want to view the BW report must have the proper security authorization in BW. These users should have the same user ID in both systems so that when they launch the BW report from mySAP CRM, the system does not prompt them for another sign-on.
On my team, we had a CRM functional role and a CRM developer role. The CRM functional role has security roles that include modifying field groups and application layout. The CRM developer role has the security roles applicable for an ABAP developer, including access to transactions SE80, SE11, SE24, and SE38 and role S_DEVELOP. You could assign both roles to one person or assign two different people to the functional and developer roles. To implement this solution, I used ABAP Workbench and applied CRM Customizing option knowledge in transaction code SPRO.
Note
While this article describes mySAP CRM 4.0, this process applies to mySAP CRM 2005 as well.
The design included a new button in the toolbar of the main window with an event linked to this button and an application link button to launch a new pop-up window. Then I used code modifications to call a custom Business Server Page (BSP) to pass user-defined links to launch the BW report. I also had to resolve a time-stamp issue that caused an error. I accomplished this plan with a four-part process:
• Create a button and link to a pop-up window
• Call a BSP from the access class
• Create a user-defined BSP application
• Create a custom preview
Create a Button and Link to a Pop-Up Window
In the steps below, you create the button that users click on to view the BW report and then assign an event to the button.
Step 1. Create a user-defined structure. You use this structure to lay out the pop-up window, which you’ll use in step 4. The CRM developer usually performs this step via transaction SE11. Create data structure ZCRMT_BSP_ACTION_OTF_PREVW (Figure 1). For Component enter .INCLUDE and for Component type enter CRMT_BSP_PREVIEW.

Figure 1
Create data structure ZCRMT_BSP_ACTION_OTF_PREVW in transaction SE11
Step 2. Create the field group and field group structure. You use the field group to display the screen layout in the pop-up window. In this step, the CRM functional team member goes to transaction SPRO and follows IMG menu path Customer Relationship Management>Layout of User Interface (People-centric UI)>Application Element>Field Group>Field group. In the screen that appears (Figure 2) create the Field Group Z_ACC_URL2 with the Structure Name ZCRMT_BSP_ACTION_OTF_PREVW. In the Compress column, set the compression option to No compression.

Figure 2
Create field group Z_ACC_URL2
After you create the field group, you then create the field group structure, which includes specific details about what to display and how to display it. Follow the IMG menu path Customer Relationship Management>Layout of User Interface (People-centric UI)>Application Element>Field Group>Field group Structure (Figure 3).

Figure 3
Screen in which you enter the parameters of the Field Group structure
First, create a record for field group Z_ACC_URL2. For View enter ZSALES. This selects the view for your users. For Screenposition enter 10 (starting position). Under the Field Group tab, enter URL for the Field Name and select INPF Inputfield for Fieldtype. Under the Object Link tab, select L Internet Link for URL Type and No Data Loss Popup for Unlock Object.
Step 3. Create an event and add a button to the toolbar. You link the event to the button that you create on the toolbar. In this example, the event triggers the pop-up window to appear. Again, the CRM functional person usually performs this step. Go to transaction SPRO and follow the IMG menu path Customer Relationship Management>Layout of User Interface (People-centric UI)>Application Element>Event (Figure 4).

Figure 4
Create the event ZACC_URL2
In the Event field above the Event tab, enter ZACC_URL2. For Usage select A Layout-Relevant and for Unlock Object select No Data Loss Popup. In the Text field, enter ACC URL2.
Next, you add a button to the toolbar by following the IMG menu path Customer Relationship Management>Layout of User Interface (People-centric UI)> Application Element>Toolbar Group>Toolbar Structure. Access structure ACC_OIC, which is a standard toolbar group for accounts. You reuse ACC_OIC for the implementation. For View enter ZSALES and for Event enter ZACC_URL2. For the Description, which determines the text that appears on the button, enter ACC URL2.
The ACC_OIC structure sequence used values from 10 to 70 in increments of 10. I chose 80 as my next value for the new button.
Step 4. Define the application layout. This configuration ties together the customer accounts application, button, and event. The CRM functional team member, working in transaction SPRO, follows the IMG menu path Customer Relationship Management>Layout of User Interface (People-centric UI)>Application/Layout>Define Application Layout (Figure 5). In the screen that appears, enter or select the following:
Application: CRMM_ACCOUNT
View: ZSALES
Event: ZACC_URL2
Position: W New Window
Scrn Elmnt Type: PREV Form Preview
Field Group: Z_ACC_URL2
Toolbar Group: ACC_OIC
Structure Name: ZCRMT_BSP_ACTION_OTF_PREVW (This is display only and appears automatically after you select the field group.)

Figure 5
Define the application layout to link the new button and event with the customer account
Call a BSP from the Access Class
Once the steps above are complete, you then set up the system to call a user-defined BSP from the customer accounts application. These next steps allow the access class to pass the user-defined BSP name to the application.
Step 1. Create the access class, set the interface object, and modify the read method. The CRM developer performs this step via transaction SE24 (Class Builder). In the Properties tab of the Class Builder screen, create the access class ZCL_CRM_BSP_ACC_URL. In the Instantiation field, choose Public. Select the Final check box. All other selections are default. Then, click on the Interfaces tab. Enter the Interface object as IF_CRM_BSP_MODEL_ACCESS_IL. This is a standard SAP structure, so the system assigns the description by default.
Next, click on the Methods tab. Here you modify and implement method IF_CRM_BSP_MODEL_ACCESS_IL~READ. In People-Centric UI programming, you use the read method to select data from application tables and pass it to the field group structure. For this scenario I’m using the read method to pass the BSP name to the field group structure. Figure 6 shows the ABAP code you need to add to method IF_CRM_BSP_MODEL_ACCESS_IL~READ.
DATA:
LS_SCREEN_STRUCTURE TYPE ZCRMT_BSP_ACTION_OTF_PREVW,
LT_SCREEN_STRUCTURE TYPE TABLE OF ZCRMT_BSP_ACTION_OTF_PREVW,
DOC_URL TYPE STRING,
DUMMY TYPE TIHTTPNVP,
URL(450) TYPE C,
START_PAGE TYPE STRING,
GV_APPLICATION TYPE STRING.
* For screen structure below, fill the BSP application
IF IV_SCREEN_STRUCTURE_NAME EQ ‘ZCRMT_BSP_ACTION_OTF_PREVW’.
* Fill BSP application and Page
GV_APPLICATION = ‘ZSFAREPORT2’.
START_PAGE = ‘REPORT.HTM’.
* SAP standard class to get the URL for the BSP application
CALL METHOD CL_HTTP_EXT_WEBAPP=>CREATE_URL_FOR_BSP_APPLICATION
EXPORTING
BSP_APPLICATION = GV_APPLICATION
BSP_START_PAGE = START_PAGE
BSP_START_PARAMETERS = DUMMY
IMPORTING
ABS_URL = DOC_URL.
IF SY-SUBRC = 0.
URL = DOC_URL.
CLEAR: LS_SCREEN_STRUCTURE.
MOVE URL TO LS_SCREEN_STRUCTURE-URL.
INSERT LS_SCREEN_STRUCTURE INTO TABLE LT_SCREEN_STRUCTURE.
ET_SCREEN_STRUCTURE = LT_SCREEN_STRUCTURE.
ENDIF.
ENDIF.
Figure 6 ABAP code to add to method IF_CRM_BSP_MODEL_ACCESS_IL~READ
Step 2. Define the application set.Toolbar GroupsTab Page GroupsSearch GroupsIn transaction SPRO, the CRM functional team member follows the IMG menu path Customer Relationship Management>Layout of User Interface (People-centric UI)>Application Element>Application Set. Create a Model Access object for the structure. The UI framework uses standardized interfaces to access the business model. The business logic should already exist separately from the UI. The interfaces define abstract methods to access existing business objects in a homogeneous manner. Application developers are required to develop model access classes by implementing the interface. This allows the application to call the class that you created in step 1.
Create a User-Defined BSP Application
Creating a user-defined BSP application allows you to flexibly modify a CRM application. This BSP passes the BW report hyperlink to the mySAP CRM system.
Step 1. Create the BSP application and page with flow logic. In this step, the CRM developer, working in transaction SE80, creates the BSP application you want to call in the pop-up window. In the top of the circled area in Figure 7 select BSP Application from the drop-down menu. For the bottom field, enter ZSFAREPORT2.

Figure 7
Create the BSP application
Place your cursor over the BSP name and right-click. This allows you to create Pages with Flow Logic with the name report.htm (Figure 8). Double-click on report.htm to modify the htm page. Click on the Properties tab. For the Description, enter Report. For Compression, select None. In the Status tab, select Stateful from Now On. Choose Until Page Change for Lifetime.
Click on the Page Attributes tab. In this screen, enter the Attribute as gv_url, the TypingMethod as type, and the Associate type as CHAR1024. The system automatically fills in the description Character 1024.
Click on the Layout tab. In the blank area enter the code shown in Figure 9. This code redirects the BSP page to the URL that is coded in the BSP. Save and then activate the BSP by right-clicking on the BSP name and selecting the Activate option.
<%@page language=”abap” %>
<%— Redirect to a different url —%>
<html>
<head>
<script type=”text/javascript”>
</script>
</head>
<body onload=”document.focus()”> <script type=”text/javascript” language=”javascript”>
<!—
var url = document.location.href
var urlnew = ‘<%= gv_url %>’
document.focus() if (url.indexOf(“~”) == -1) {
document.location = urlnew
}
//—>
</script>
</body>
<%— end customized function to open popup —%>
</html>
|
| Figure 9 |
ABAP code to redirect the BSP page to the URL that you have coded in the BSP |
Click on the Event Handler tab. Select OnInitialization from the drop-down menu under the tab name. This is where you call the BW report hyperlink. I translated the variables that I had to fill in the CRM system as follows (in bold):
https://<host>.<server>:<port>/sap/bw/BEx?&sap-client=<sap client>&saplanguage=EN&bsplanguage=EN&cmd=ldoc&TEMPLATE_ID=<bw report name>&var_name_1=zvsagse&VAR_VALUE_EXT_1=<account number>
In the link above, <host>, <server>, and <port> are for the BW server, depending on whether the development, quality, test, or production instance calls the report. <sap client> is the BW client.<bw report name> is the report or object created in BW. <account number> is the CRM customer number, account number, or business partner number.
Figure 10 shows sample ABAP code for this purpose. While the code is specific for the example project, you can reuse the bolded elements in your own project. You use this code in the event handler method Oninitialization.
case sy-sysid.
    when ‘CRD’.
     lv_host = ‘sap010’.
     lv_destination = ‘BWDLCNT200’.
    when ‘CRQ’.
     lv_host = ‘sap011’.
     lv_destination = ‘BWQCLNT200’.
    when ‘CRP’.
     lv_host = ‘sap024’.
     lv_destination = ‘BWPCLNT200’.
    when others.
     lv_host = ‘sap010’.
     lv_destination = ‘BWDLCNT200’.
   endcase.   concatenate
    ‘https://’
    lv_host
    ‘.uuu.com:8003/sap/bw/BEx?&sap-client=200&saplanguage=EN&bsplanguage=EN’
    ‘&cmd=ldoc&TEMPLATE_ID=ZMII_FACT_SHEET&var_name_
1=zvsagse&VAR_VALUE_EXT_1=’
    lv_account
    ‘&var_name_2=zcufacid&var_value_ext_2=’
    lv_facility
    ‘&var_name_3=zcufaclt&var_value_ext_3=’
    lv_facility
    ‘&var_name_4=zrelfc&var_value_ext_4=’
    lv_facility
     into gv_url.
|
| Figure 10 |
ABAP code to call the hyperlink to the BW report |
Create a Custom Preview
With the previous steps I achieved 99 percent of the development goal. A minor issue existed with the time stamp when I called window type “preview.” If you tried to access a mySAP CRM account at this point by clicking on the ACC URL2 button, it would launch a new window but would display an error. The workaround in the following steps corrects this problem. The CRM developer normally performs this process.
Go to transaction SE24. First, create the custom preview class by copying class CL_CRM_BSP_FRAME_PREVIEW as ZCL_CRM_BSP_FRAME_PREVIEW. Enter ZCL_CRM_BSP_FRAME_PREVIEW in the Class interface field to create the class. In the Properties tab, select Public for Instantiation and check the Final check box.
Next, you create the attribute in class ZCL_CRM_BSP_FRAME_PREVIEW. Click on the Attributes tab and enter GV_EVENT in the Attribute column (Figure 11). GV_EVENT is a variable that captures the event triggered with the DO_GET_DATA method and passes it to the DO_REQUEST method. In the Level column, enter Instantiation, for Visibility enter Public, and for Associated Type, enter CRMT_BSP_EVENT.
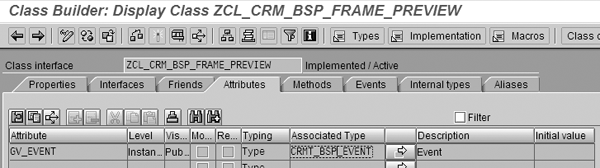
Figure 11
Enter GV_EVENT in the Attribute column
Once you’ve created the attribute GV_ EVENT, you need to populate it. In class ZCL_CRM_BSP_FRAME_ PREVIEW select the Methods tab. In the screen that appears, enter IF_CRM_ BSP_FRAME_ COM~DO_GET_DATA in the Method field. At the end of code append the following:
GV_EVENT = GS_BLUEPRINT_ENTRY-EVENT.
After you append the code, select Menu then Method>Activate.
After populating the GV_EVENT attribute, you use it to exclude the time stamp for the event you created in step 3 in the “Create a Button and Link to a Pop-Up Window” section. Click on the Methods tab again and this time enter DO_REQUEST in the Method field. Add the lines of code in bold in Figure 12.
IF GV_EVENT = ‘ZACC_URL2’.
ELSE.
GET TIME STAMP FIELD LV_F.
*always pass to iframe different URL, otherwise it’s not called with
*data handling
LV_TIMESTAMP = LV_F. CONCATENATE GV_URL ‘×tamp=’ LV_TIMESTAMP INTO GV_URL.
ENDIF.
|
| Figure 12 |
ABAP code to exclude the time stamp for your event |
After you have modified the code, go to transaction SE80. In this step, you copy CRM_PREVIEW to the ZCRM_PREVIEW BSP. In the Properties tab, enter ZCRM_PREVIEW in the BSP Application field. Check the check boxes for Stateful and Supports Portal Integration.
Now you assign custom class ZCL_CRM_BSP_FRAME_PREVIEW to this new BSP. In the BSP ZCRM_PREVIEW, select Controller>preview.do in the frame on the left side of the screen (Figure 13). On the right side of the screen, change the Controller Class to ZCL_CRM_BSP_FRAME_PREVIEW. Some of the selections highlighted are default options. You should confirm these settings if they are different.

Figure 13
Assign custom class ZCL_CRM_BSP_FRAME_PREVIEW to the new BSP
To allow ZCL_CRM_BSP_FRAME_PREVIEW instead of CL_CRM_BSP_FRAME_PREVIEW, you maintain table CRMV_BL_SCRTYP. In transaction SM30, change the Internal name from CRM_PREVIEW to ZCRM_PREVIEW. Then, save the options by selecting Table View>Save.
You’re finished! Figure 14 shows the main People-Centric UI screen for a business user in mySAP CRM. This user has selected account 90. When the user clicks on the ACC_URL2 button, it launches a pop-up screen that contains the BW report (Figure 15).

Figure 14
Main People-Centric UI screen with the new ACC URL2 button

Figure 15
BW report pop-up screen
Amar Kumthekar
Amar Kumthekar has 10 years of SAP R/3 and SAP NetWeaver experience in the automotive, healthcare, and software industries. In the last couple of years he has contributed to multiple mySAP CRM implementations. He is an active participant in ASUG SAP CRM forums. Now based in San Diego, Amar is a manager in an application management organization at a Fortune 20 company. He is also responsible for leading the SAP technical development team for its SAP R/3 projects.
You may contact the author at amarkumthekar@yahoo.com.
If you have comments about this article or publication, or would like to submit an article idea, please contact the editor.