Manager
Learn how to use SAP Solution Manager 7.1 to run a comparison and adjustment of structure nodes between solutions and projects as well as keep your productive SAP solutions and projects synchronized and up to date.
Key Concept
SAP Solution Manager provides a compare and adjust feature to identify the differences between the structure and business content assigned to a project and its source. Before SAP Solution Manager 7.1, this comparison was available only between a project and another project, a project and a template, or a project and the Business Process Repository (BPR) — but not between a project and a solution. Having this feature valid for solutions can help users adjust their solutions whenever necessary, especially when they create new implementation or upgrade projects using the solution as a source and need to ensure that the solution is updated after the project finishes.
One of the last steps of a project’s go-live phase is the handover of its technical and business process information to operations to be reused in other SAP Solution Manager processes in the following application life cycle phases. The project information is transferred into a productive solution in the Solution Directory and can then be maintained by the production support team.
A solution is an integration of productive systems, software components, business processes, documentation, and interfaces. It can be used as a source for a new SAP Solution Manager project. It provides the system landscape and business processes structure for scenarios such as system monitoring and business process operations, keeps training documentation, and enables collaboration with SAP Active Global Support. It provides solution information, for instance, for SAP Engagement and Service Delivery sessions, which are services offered by SAP with predefined contents that cover the entire life cycle of the software, from implementation to operation and optimization to upgrade.
I’ll show you how SAP Solution Manager 7.1 allows the comparison and adjustment between projects and solutions, and how to identify changes to any predecessors and successors. This article is based on SAP Solution Manager 7.1 Support Package 01. I’ll start by showing you the differences in functionality between SAP Solution Manager 7.0 and 7.1.
Release Differences
Figure 1 shows the old screen of the Solution Overview available in releases of SAP Solution Manager earlier than 7.1, which could be accessed using transactions DSWP and SOLUTION_MANAGER. Figures 2 and 3 show the Solution Overview in the Work Center, which can be accessed via the SAP Solution Manager Administration Work Center in both releases of SAP Solution Manager. In these screens, you’re seeing SAP Solution Manager 7.1.

Figure 1
Old screen of Solution Overview, available until SAP Solution Manager 7.0

Figure 2
Main screen of SAP Solution Manager Administration Work Center in SAP Solution Manager 7.1

Figure 3
Solution Overview in SAP Solution Manager Administration Work Center in SAP Solution Manager 7.1
In SAP Solution Manager 7.1, transactions DSWP and SOLUTION_MANAGER are obsolete. In SAP Solution Manager 7.0, SAP Solution Manager Administration Work Center corresponds to authorization role SAP_SMWORK_SETUP. In SAP Solution Manager 7.1, it corresponds to authorization role SAP_SMWORK_SM_ADMIN.
Compare and Adjust
When you create a project using a project template or the SAP Business Process Repository (BPR) as the source for the project’s structure, you may need to check from time to time if the selected source was changed to keep your project up to date, or to be able to undo the changes you made in the project and reset to the original version copied from the source.
You may need, for instance, to roll back a rollout project to its template, or update an implementation project with a new version of the BPR. You can compare scenarios, processes, process steps, configuration nodes, and interface nodes of your project using the compare and adjust functionality of SAP Solution Manager. Before release 7.1, it was only possible to compare projects against their predecessors and the predecessors needed to be a template, the BPR, or other projects. If a solution was used as the source for a new project, or a project was used as the source for a solution, this functionality was not available, making the comparison a manual task and taking too much time for companies to keep their solutions and projects synchronized.
For instance, if your productive solution was the source of a new project and it was not updated after the project finished, you can miss the improvements implemented in the project. A productive solution represents all system landscapes and business processes currently active in the company. If later you want to use the Solution Documentation Assistant for this solution to evaluate your productive business processes and prepare for an upgrade, the changes made in the project will not be part of the analysis. Solution Documentation Assistant analyzes and rates business process structures documented in SAP Solution Manager. For more information on Solution Documentation Assistant, refer to the help Solution Documentation.
If you create a solution based on a project, a template, or the BPR, you may need to adjust your solution if the source is updated. Solutions are used in other phases of the life cycle, so they must always be up to date, representing the current stage of your productive systems. After you have a solution created, you may need to use it to create new projects (e.g., implementation project, upgrade project), to implement new business processes for your company, or upgrade your SAP solution to a new release.
When creating the new project structure, you can copy the whole content or only some of the structure scenarios and business processes from your productive solution, depending on the project scope. You can also make changes. When the project goes live, those changes must be included in the productive solution. Then you need to periodically ensure that your solution and projects are synchronized, which means compare them against predecessors and successors.
Note
This compare and adjust functionality compares only the assignment of business content to structure elements. Changes to business content itself are not identified, such as changes to URLs, Business Configuration Sets (BC Sets), documents’ contents, or updates of the Computer Aided Test Tool (CATT) or extended Computer Aided Test Tool (eCATT).
Steps to Compare and Adjust Your Solution and Projects
To be able to identify changes against a solution and a project in SAP Solution Manager 7.1, you first need to activate the comparison mode for both the solution and project. This makes the changes identified by icons on the structure nodes and tab pages. Use the following process.
Step 1. You can access the Solution Directory from the implementation and upgrade work center in two areas. For one, go to the Evaluate node in SAP Solution Manager and click Access Solution Directory (Figure 4). For another, go to the Going Live Preparation node and click Go to Solution Directory in the Cut Over to Operations block (Figure 5). Alternatively, you can use transaction SOLMAN_DIRECTORY. Any of these options brings up the screen in Figure 6.
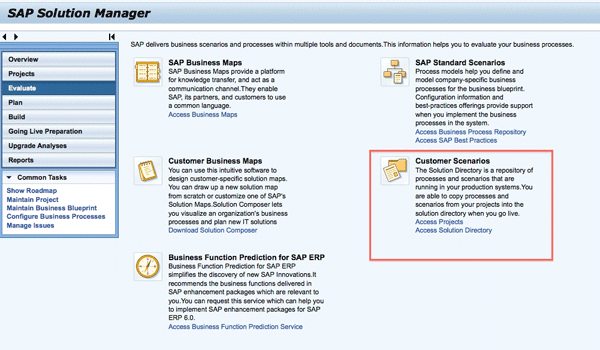
Figure 4
Access the Solution Directory in the evaluation phase
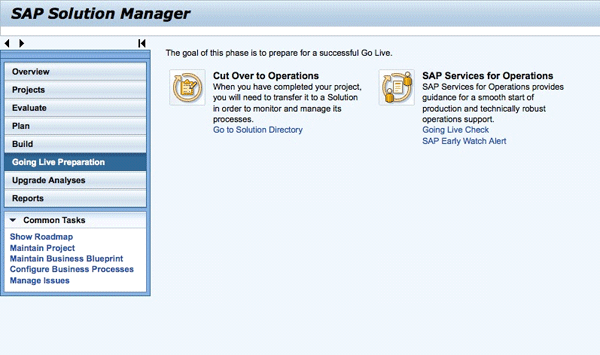
Figure 5
Access the Solution Directory in the go-live phase
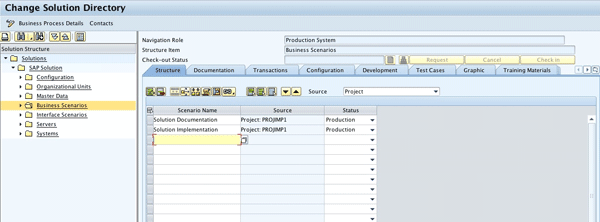
Figure 6
Solution Directory
Step 2. Select the menu option Utilities > Settings, as shown in Figure 7. This is the menu bar of the screen in Figure 6.

Figure 7
Menu option to set up the compare and adjust functionality
Step 3. In the resulting pop-up screen, select the Comparison Mode Active check box (Figure 8).
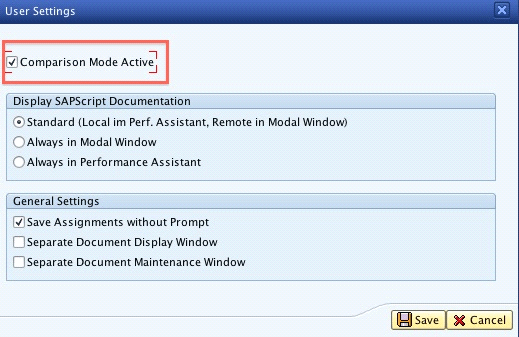
Figure 8
Set up comparison mode to be active in user settings
Step 4. You also find the User Settings dialog box available in the project business blueprint and configuration. Use transaction SOLAR01 or SOLAR02, or from the implementation and upgrade work center, select the project line and click Goto > Business Blueprint or Goto > Configuration (Figure 9).

Figure 9
Access the business blueprint from the implementation and upgrade work center
Step 5. Select menu option Utilities > Settings and select the Comparison Mode Active check box (Figure 10).

Figure 10
User settings in transaction SOLAR01
If you decide to hide the icons that identify the changes in the structure nodes and tab pages, just deactivate the comparison mode.
You can start the comparison by selecting a project or a solution. You execute a program that starts a batch job, and this batch job flags the structure nodes and tab pages of the selected project or solution. I will show you how to compare a solution, assuming that a project was created using the solution as the source and now the solution must be updated.
Step 1. In the Solution Directory (previously shown in Figures 6 and 7), select menu option Utilities > Compare Solution (Figure 11). If you want to compare a project instead, you can go to the Business Blueprint or Configuration transactions and select menu option Utilities > Compare Project.

Figure 11
Start the solution comparison
Step 2. The compare and adjust program opens with the parameter Solution pre-selected. You can also execute this program using transaction SA_PROJECT_UPGRADE.
Step 3. Select the comparison options in the selection screen as shown in Figure 12.
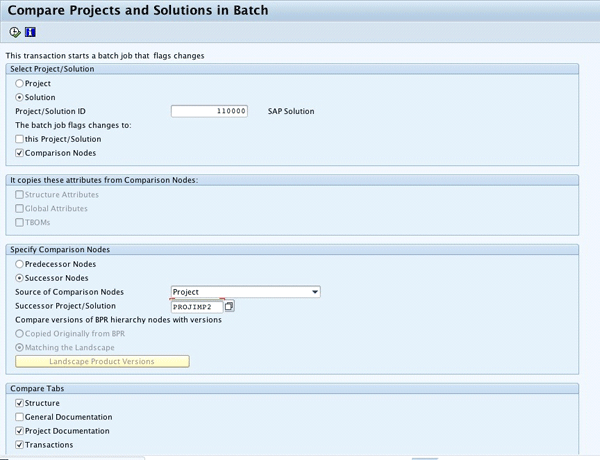
Figure 12
Compare and adjust batch job program
The comparison options are described below:
- Select Project/Solution: Select which project or solution will have the changes marked by the batch job. You can also specify whether to consider the changes made in the selected project or solution or in the comparison node (or in both).
- It copies these attributes from Comparison Nodes: This selection block is only valid if you select Predecessor comparison nodes in the Specify Comparison Nodes topic. If you set the Structure Attributes selection, the batch job copies all structure attribute values from the predecessor nodes, overwriting the nodes of the selected project or solution. If you set the Global Attributes selection, the batch job copies all global attribute values from the predecessor nodes, overwriting the nodes of the selected project or solution. If you set the Copy TBOMs selection, the batch job copies all the TBOMs of the transactions from the predecessor nodes overwriting the nodes of the selected project or solution.
- Specify Comparison Nodes: The comparison node is the node with which a hierarchy node is compared. It can be the source or target node of a previous copy. In this selection block, you can specify whether the comparison node is a predecessor or a successor node. A predecessor node is a node from which the node of the selected project or solution was copied directly (direct predecessor) or indirectly (copy of a copy). If you used the BPR as the source of your project or solution, you want to compare against the BPR predecessor. You can select the version of BPR structure nodes originally copied by clicking the Copied Originally from BPR selection option or let the batch job compare using the product versions that currently exist in the project or solution landscape. If you want to compare against a version of another landscape-dependent product, you need to add a logical component with this version to your project or solution system landscape. Click the Landscape Product Versions button to select this product version. A successor node is a node to which the node of the selected project or solution was copied directly. If you select Successor Node, you need to specify the name of the successor project or solution to restrict the number of possible comparison nodes. In this example, I’m selecting the Successor option and specifying the Project created from the solution as the entry in Source of Comparison Nodes. The options related to versions of BPR and the selection block related to attributes (It copies these attributes from Comparison Nodes) are disregarded because they are only valid for predecessor comparison nodes.
- Compare Tabs: You can flag the tab pages you want to compare. Only tabs marked as visible in the project administration or solution settings are considered. Note that a solution has only one tab for documentation, which is a summary of all the project and general documentation that exists in the source project that was used to create the solution. When comparing a solution against a project you need to explicitly select the documentation tab page to be compared. Documents from the tab page that you have not chosen are marked as new during the comparison.
- Activate comparison mode for selected users: This is the last selection block. As you can in Figure 13, you can activate comparison mode for users listed in the selection screen.

Figure 13
Activate comparison mode for selected users
Step 4. After you specify your comparison parameters, you can run the program. As the program runs in the background, a job is created. When you execute the program, a dialog box pops up, showing the name of the job created (Figure 14). If you prefer, you can save a variant and schedule the program to run periodically. The job result is a log that can be displayed using transaction SM37. In Figure 15 you can see an example.
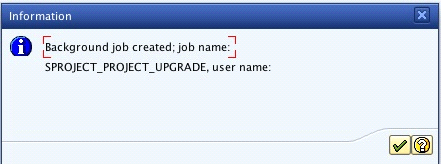
Figure 14
Comparison job scheduled
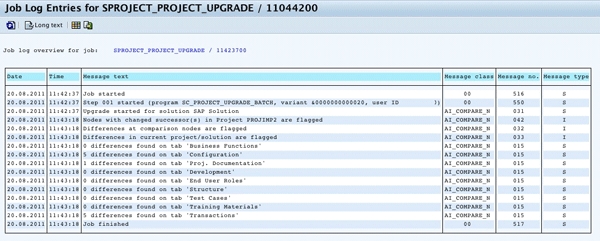
Figure 15
Transaction SM37: Comparison job result
Step 5. Now you can check your solution to identify all the structure nodes that were changed. In this example, you see the changes made to the project initially created using the solution as source (i.e., to the solution’s successor). Structure nodes and tabs in which there are differences are marked with the comparison found changes icon  . Navigate to the marked tabs and select the compare and adjust icon
  . As you can see in Figure 16, a dialog box appears. In the left pane, it shows what was changed in the successor project and you can then select the lines of changes that you want to copy to the solution and click the adjust selected entries icon
  . The selected changes are copied to the right pane. Press Enter and the changes are copied to the current tab. To complete the adjustment, click the complete icon
  . Save the solution to confirm the changes.
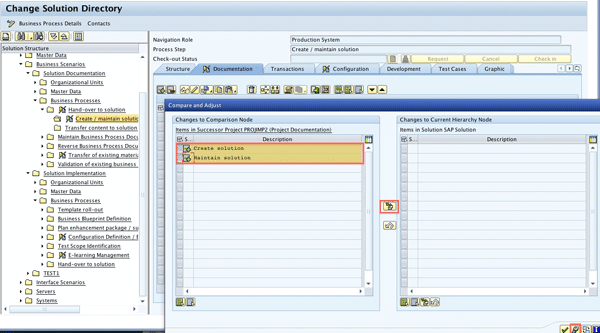
Figure 16
Adjust the changes marked by the batch job in the solution
You can perform the comparison as many times as needed, and you can compare against a predecessor or against a successor. You just need to change the selection screen options of transaction SA_PROJECT_UPGRADE.
Note
You can find more information about compare and adjust functionality on
this SAP Help document. For a compare and adjust presentation and simulation, check the Learning Map for Template Management in the
SAP Support Portal.
Raquel Cunha
Raquel Cunha is an independent consultant who has worked with SAP solutions in Latin America and Europe since 1998. She started as an ABAP developer and has also worked as an ABAP team leader and HR application consultant. Raquel has a bachelor’s degree in computer science and is certified on ABAP and ITIL V2 and V3. She changed her focus to SAP Solution Manager, with particular emphasis on Service Desk and ChaRM, and has been implementing Solution Manager in four different countries since 2005. Raquel is currently an SAP Mentor.
If you have comments about this article or publication, or would like to submit an article idea, please contact the editor.


