You can create your own hierarchies for custom InfoObjects and populate them to meet unique business requirements. This requires only one extraction, transformation, and loading step.
Key Concept
A directly populating hierarchy is possible from a DataSource of the hierarchy type only. There is no standard mechanism for creating such sources. R/3 allows you to create user-defined hierarchies based on one data element. You can use a hierarchy DataSource as a basis for direct populating. This is limited to R/3 source systems and allows populating single InfoObject hierarchies only.
Recently, I had to generate a hierarchy based on three custom InfoObjects: Flank, Department, and Production_Machine loaded from non-SAP DataSources (Oracle tables) through DB Connect. The hierarchy relation (parent-child) between them was presented as an attribute of the child InfoObject. The Department (child) InfoObject contains Flank (parent) as an attribute, and the Production_Machine (child) InfoObject contains Department (parent) as an attribute.
I had two options. Using the standard method, I could generate a flat file reflecting the hierarchy content (ABAP program) and load hierarchy from it, or enhance a workaround for directly populating non-business content R/3 single-object hierarchies. I chose the second option because of the disadvantages of loading flat files (two-step process, difficult to synchronize, poor accessibility). Both of these options require the same development efforts.
The proposed method generates a hierarchy DataSource and populates it in BW. This allows populating a hierarchy for every InfoObject from different information sources in one extraction, transformation, and loading (ETL) step.
You might also use my technique when a merged company results in two independent SAP R/3 systems. In this situation, BW plays the role of an integration platform. You might integrate two business content hierarchies (organizational units, for instance) from the separate SAP R/3 systems into one mixed hierarchy.
My solution is based on the user exit EXIT_SAPLRSAP_004, which you implement in BW. This method works for BW 3.x and SAP NetWeaver 2004s. It requires basic ABAP coding knowledge. In SAP NetWeaver 2004s, expect some minor changes related to navigational routines. For example, you can generate a hierarchy DataSource from the InfoObject tree instead of the InfoSource tree (in BW 3.x).
On the other hand, it supplies opportunities for using different information source types such as tables, files, BW objects, and business logic. Any source that you can access from the Basis layer of the system is acceptable.
The idea behind my method is loading an InfoObject hierarchy to itself (Figure 1). After the extraction and loading steps, you get the same hierarchy content as you had beforehand. In spite of real data processing, this looks like a phantom ETL process.
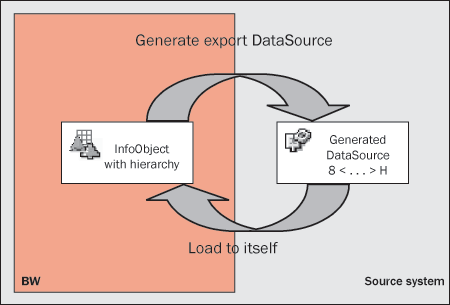
Figure 1
Load a hierarchy to itself
If you activate the RSAP0001 user exit (via transaction CMOD), the data passes through it and you get a wide-ranging customizing opportunity from the EXIT_SAPLRSAP_004 user exit (Figure 2).

Figure 2
Load a hierarchy to itself through user exit
Step-by-Step Instructions
The solution includes the steps that Figure 3 shows. The proposed solution applies for each hierarchy object and is similar for every one except for implementing the ABAP code. I will give detailed explanations for each step and general tips for coding user exits.

Figure 3
Solution steps
There are different hierarchy types: simple and multiple InfoObjects with text nodes, intervals, and time dependency. I chose two hierarchy types (simple InfoObject with text nodes and interval hierarchies) that cover the most useful cases. I also created and populated a one-character InfoObject ZCHAR that contains alpha-numeric characters (Figure 4). Follow transaction RSA1>Modeling>InfoObjects>Change.
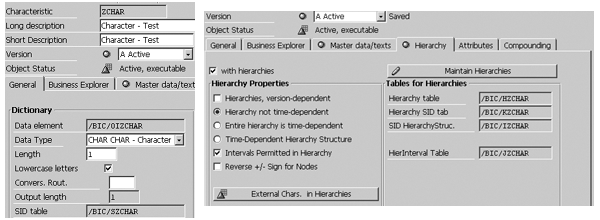
Figure 4
A sample InfoObject showing the General and Hierarchy tab views
Figure 5 shows ZCHAR_DETAIL, a simple InfoObject hierarchy sorted alphabetically and grouped under the higher-level text nodes in order of the character type: alpha (upper or lower case) or digit character. ZCHAR_RANGE is an interval hierarchy divided into three interval ranges in order of the character type: upper case, lower case, and digits. Both of the hierarchies reflect the current InfoObject master data content. I’ll walk you through the steps to create ZCHAR_DETAIL. You can create ZCHAR_RANGE on your own in the same manner.

Figure 5
The sample hierarchies
Step 1. Create a hierarchy with at least one node. Click on the Maintain Hierarchies button or right-click on the ZCHAR InfoObject in the screen of InfoObjects tree (Figure 4). Fill in the fields of the Create Hierarchy screen as Figure 6 shows. After confirmation, you see the screen in Figure 7.
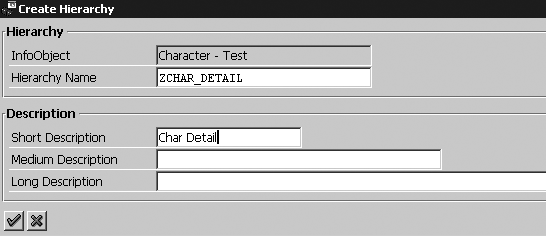
Figure 6
Create an InfoObject’s hierarchy

Figure 7
Empty hierarchy
To activate the hierarchy, define at least one node. The loading process overwrites this node, so it does not matter which node you create here. Let’s define a text node. Click on the Text Node button in Figure 7 and populate the InfoObject field with Hierarchy node(s), Hierarchy node(s) field with Dummy, and Short Description field with Dummy. This creates a dummy node in your hierarchy (Figure 8). Create the second hierarchy in the same manner. The InfoObject tree fragment looks like Figure 9.
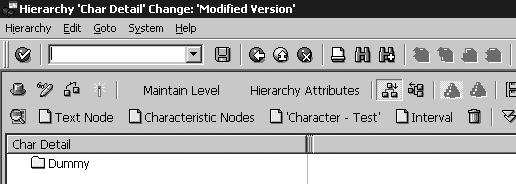
Figure 8
Hierarchy content after creating a text node
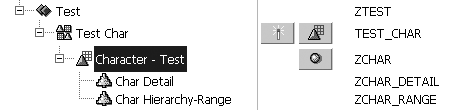
Figure 9
Hierarchies of the ZCHAR InfoObject
Step 2. Create an InfoSource for the InfoObject. Select InfoSources in the modeling window of Administrator Workbench (RSA1). Navigate to the application component you want to join to a new InfoSource (Figure 10). Select it, right-click, and choose Create InfoSource. Fill in the Create InfoSource screen (Figure 11).You should choose the Direct Update of Master Data button because you want to create a hierarchy DataSource.
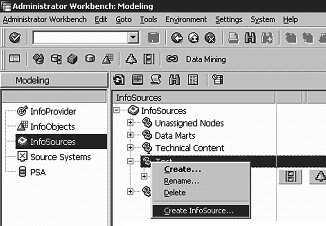
Figure 10
Create an InfoSource for the ZCHAR InfoObject
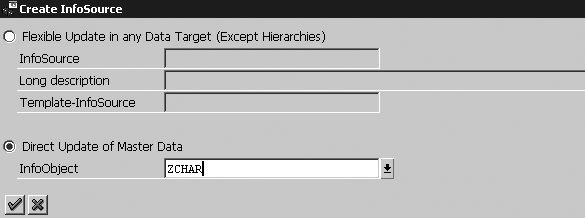
Figure 11
Choose Direct Update of Master Data for the ZCHAR InfoObject
Step 3. Generate the Export DataSource. In Administrator Workbench, select the ZCHAR InfoSource. Right-click on it and choose Generate Export DataSource (Figure 12). As a result, BW generates a hierarchy DataSource. You can see it in transaction RSA6 under the node BW>DM>DM-IO (Figure 13). The generated hierarchy DataSource is named 8ZCHARH.

Figure 12
Generate the export DataSource for ZCHAR InfoSource
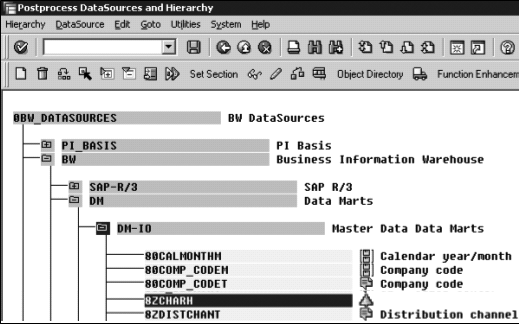
Figure 13
Generated 8ZCHARH DataSource
Step 4. Replicate the DataSources in the current BW source system for the application tree node. I call the source system Myself BW-QA Strauss. In the Modeling screen of Administrator Workbench, right-click on Master Data Data Marts (Figure 14).

Figure 14
Replicate master data DataSources in the current source system
Step 5. Assign the InfoSource to the replicated DataSource. The replicated DataSource has the name 8InfoObjectH, 8ZCHAR8 in my example. Select the ZCHAR InfoSource in the InfoSource tree. Right-click on it and choose Assign DataSource. Select the current BW system as the source system. 8ZCHARH appears in the list of DataSources. Choose it, and then map InfoObject ZCHAR to field ZCHAR as Figure 15 shows. Choose your Source System and DataSource.
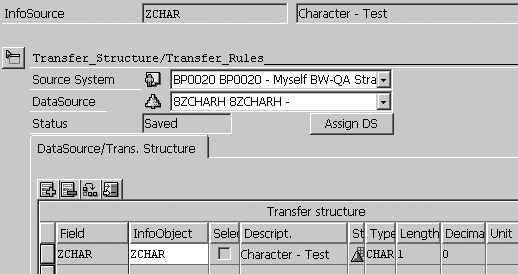
Figure 15
Assign ZCHAR InfoSource to the replicated 8ZCHARH DataSource
Step 6. Create an InfoPackage for hierarchy upload. Create two InfoPackages for uploading ZCHAR_DETAIL and ZCHAR_RANGE. Populate the InfoPackage with the InfoPackage name, InfoSource, DataSource, and Source System (Figure 16). Also, check the box marked …and Flag for Activation or Activate It. Create a separate InfoPackage for each hierarchy. After executing the InfoPackage, you see the screen in Figure 17. It looks much like the original hierarchy (Figure 8).
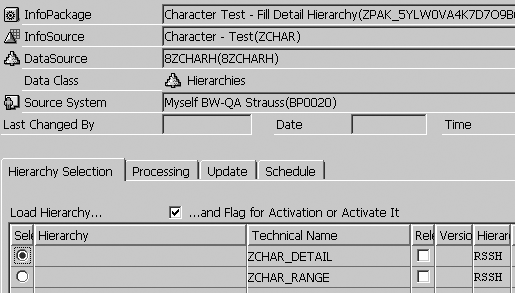
Figure 16
Create an InfoPackage for ZCHAR_DETAIL hierarchy uploading
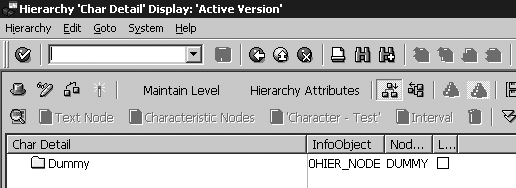
Figure 17
ZCHAR_DETAIL hierarchy after executing InfoPackage
Step 7. Write the ABAP code in user exit EXIT_SAPLRSAP_004 to fill the hierarchy. To activate EXIT_SAPLRSAP_004, assign the RSAP0001 enhancement to any project using transaction CMOD (Figure 18). Select the Components button and click on the Change button. Check off the EXIT_SAPLRSAP_004 line.
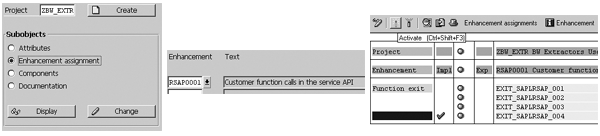
Figure 18
Activate user exit EXIT_SAPLRSAP_004
Write the user exit code in the ZXRSAU04 include. I’ll suggest general rules for implementing the EXIT_SAPLRSAP_004 user exit (Figure 19), but the code you use differs based on your requirements.
FUNCTION EXIT_SAPLRSAP_004.
*"———————————————————————————————————
*"*"Lokale Schnittstelle:
*"  IMPORTING
*"   VALUE(I_DATASOURCE) TYPE RSAOT_OLTPSOURCE
*"   VALUE(I_S_HIEBAS) TYPE RSAP_S_HIEBAS
*"   VALUE(I_S_HIEFLAG) TYPE RSAP_S_HIEFLAG
*"   VALUE(I_S_HIER_SEL) TYPE RSAP_S_HIER_LIST
*"   VALUE(I_S_HEADER3) OPTIONAL
*"  TABLES
*"   I_T_LANGU  TYPE SBIWA_T_LANGU
*"   C_T_HIETEXT  TYPE RSAP_T_HIETEXT
*"   C_T_HIENODE  TYPE RSAP_T_HIENODE
*"   C_T_FOLDERT  TYPE RSAP_T_FOLDERT
*"   C_T_HIEINTV  TYPE RSAP_T_HIEINTV
*"   C_T_HIENODE3 OPTIONAL
*"   C_T_HIEINTV3 OPTIONAL
*"   C_T_MESSAGES STRUCTURE BALMI OPTIONAL
*"  EXCEPTIONS
*"   RSAP_CUSTOMER_EXIT_ERROR
*"---------------------------------------------
INCLUDE ZXRSAU04.   " The customer's code should be written in this Include
ENDFUNCTION.
|
| Figure 19 |
EXIT_SAPLRSAP_004 function module interface |
After you activate the RSAP0001 enhancement, BW executes the EXIT_SAPLRSAP_004 user exit for all hierarchy DataSources and all hierarchies. Prevent needless execution by separating a specific hierarchy using the parameter I_DATASOURCE for the DataSource name and I_S_HIER_SEL-HIENM for the hierarchy name.
The C_T_HIENODE table contains the hierarchy nodes data (Tables 1 and 2). I’ll briefly explain some other fields so you can decide how to fill them:
IOBJNM: InfoObject name (0HIER_NODE for a text node)
NODENAME: node content (unique InfoObject or text node value)
NODEID: node identifier (unique number)
TLEVEL: node hierarchy level
PARENTID: upper level node ID (0, root node)
INTERVL: X for interval nodes
DATEFROM: valid date from (for time-dependent nodes)
DATETO: valid date to (for time-dependent nodes)
| 0HIER_NODE |
ALPHA_NUMERY |
1
|
1
|
0
|
| 0HIER_NODE |
ALPHA |
2
|
2
|
1
|
| 0HIER_NODE |
ALPHA_UPPER |
3
|
3
|
2
|
| 0HIER_NODE |
ALPHA_LOWER |
4
|
3
|
2
|
| 0HIER_NODE |
DIGIT |
5
|
2
|
1
|
| ZCHAR |
A |
6
|
4
|
3
|
| . . . |
|
|
|
|
| ZCHAR |
C |
|
4
|
4
|
| . . . |
|
|
|
|
| ZCHAR |
2 |
|
3
|
5
|
|
| Table 1 |
C_T_HIENODE table for ZCHAR_DETAIL hierarchy |
| 0HIER_NODE |
CHAR_RANGE |
1
|
1
|
0
|
|
| ZCHAR |
A-W |
2
|
2
|
1
|
x
|
| ZCHAR |
c-z |
3
|
2
|
1
|
x
|
| ZCHAR |
2-6 |
4
|
2
|
1
|
x
|
|
| Table 2 |
C_T_HIENODE table for ZCHAR_RANGE hierarchy |
The C_T_FOLDERT table contains the language-supported description for text nodes (Tables 3 and 4). Some of the key fields include:
LANGU: description language (E for English)
NODENAME: node content (equal to C_T_HIENODE-NODENAME)
IOBJNM: InfoObject name (equal to C_T_HIENODE-IOBJNM)
TXTSH: short description in LANGU language
| 0HIER_NODE |
ALPHA_NUMERY |
E |
Alpha-Numeric Chars |
| 0HIER_NODE |
ALPHA |
E |
Alpha Chars |
| 0HIER_NODE |
ALPHA_UPPER |
E |
Upper Case |
| 0HIER_NODE |
ALPHA_LOWER |
E |
Lower Case |
| 0HIER_NODE |
DIGIT |
E |
Digits |
|
| Table 3 |
C_T_FOLDERT table for ZCHAR_DETAIL hierarchy |
| 0HIER_NODE |
CHAR_RANGE |
E |
Chars Ranges |
|
| Table 4 |
C_T_FOLDERT table for ZCHAR_RANGE hierarchy |
The C_T_HIEINTV parameter contains value ranges for interval nodes (Table 5). You may need to adapt these fields:
NODEID: node identifier (equal to C_T_HIENODE-NODEID)
LEAFFROM: InfoObject’s low value
LEAFTO: InfoObject’s high value
|
|
| Table 5 |
C_T_HIEINTV table for ZCHAR_RANGE hierarchy |
Without modification, the interface tables contain values the DataSource supplies. In my case, they reflect the current hierarchy content. I’ll clear them and fill as if populating a hierarchy from scratch.
When populating the interface tables, keep several factors in mind. The IOBJNM field contains the InfoObject’s technical name. If a hierarchy allows external InfoObjects, then you must fill in their names. Use the 0HIER_NODE value for a text node. The NODENAME field contains the InfoObject’s value for an InfoObject node, technical node name for a text node, and concatenation string - for InfoObject interval node. NODEID is a node identifier. Each node must have a unique number, but the order is not important. PARENTID is a NOTEID of the parent node. Set 0 for a root node. Finally, TLEVEL is a hierarchy level. Set 1 for a root node. Fill it accurately — BW is sensitive to disharmony between the child-parent relation and hierarchy level.
I’ve posted example contents of the ZXRSAU04 include, which you can download via this link. In this code, I selected the ZCHAR InfoObject values from its master data table /BIC/PZCHAR.
Step 8. Execute the InfoPackage to populate the hierarchy. After executing the InfoPackage (step 6), the ZCHAR InfoObject reflects the two dynamically populated hierarchies (Figures 20 and 21). Perform step 8 only to populate your hierarchies.
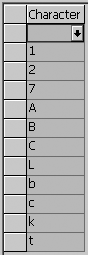
Figure 20
Characteristic values
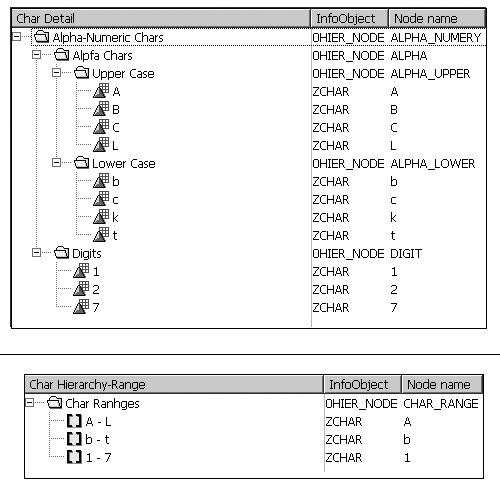
Figure 21
Generated hierarchies corresponding to the InfoObject content
Michael Shtulaizen
Michael Shtulaizen is the SAP NetWeaver technical manager of Strauss Group Ltd., Israel. He has been working with SAP BW since 2002. He has rich development experience in SAP environments (more than 10 years) that allows him to propose original solutions in SAP NetWeaver BW systems.
You may contact the author at Michael.Shtulaizen@Strauss-Group.com.
If you have comments about this article or publication, or would like to submit an article idea, please contact the editor.