See how to use the newly integrated SAP Interactive Forms software by Adobe to create forms for common business processes such as creating dunning letters.
Key Concept
SAP Interactive Forms software by Adobe, a product suite co-developed by Adobe Systems and SAP, is available starting with SAP NetWeaver 2004 and SAP NetWeaver Application Server (NetWeaver AS) 6.40. Its two major components are Adobe Document Services (ADS) and Adobe LiveCycle Designer (ALC). ADS is the collective name of the Web services. In non-interactive scenarios, it generates PDF forms at runtime. In interactive scenarios, it extracts XML data from the front end (the form) and transmits it to the system. ALC allows users to design the layout and bindings of the form. You can design a form using either the conventional ABAP Development Workbench or the new SAP NetWeaver Developer Studio.
Whether you are a novice or have some exposure to Adobe forms, a grasp of several key concepts is required to make effective use of SAP Interactive Forms by Adobe. I introduced you to the functionality and to the standard SAP templates in “A Sneak Peek into the Standard Templates of Adobe Interactive Forms.” Now I’ll take you through the steps for designing a simple, non- interactive PDF-based Adobe form using the example of a dunning letter.
Note
You need Adobe Reader, a free downloadable piece of software, to browse and print files that are in the PDF format. The latest release of Adobe Reader is version 8.0. Prior to version 6.0, it was called Acrobat Reader.
Anatomy of an Adobe Form
First let’s look at the major components of a form. To design your form, you use an application called Form Builder, enabled by Adobe LiveCycle Designer (ALC) and now integrated in SAP NetWeaver.
For the simple, non-interactive print scenario in my example, you use Adobe functionality that’s integrated in SAP’s ABAP Development Workbench. You launch Form Builder within this framework via transaction SFP, which displays a screen similar to the one shown in Figure 1. When you design a form, you carry out two activities: design the interface of the form and design its components (context and layout). The two options displayed in Figure 1 — Interface and Form — correspond to these two activities.
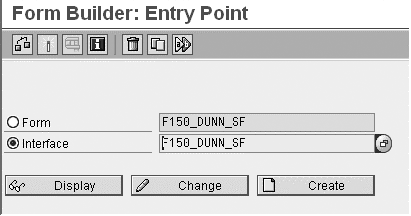
Figure 1
The major components of Form Builder
Form Interface
After you enter the technical name of the interface (F150_DUNN_SF for the interface for dunning letters) and click on the Display button, you see a screen similar to Figure 2. An interface represents the framework of your form and is the channel through which the form gets its data when the calling application invokes the form. In your form interface, you specify the import and export parameters and exceptions. In addition to creating your form interface, you also create global definitions, initializations, and currency/quantity fields.
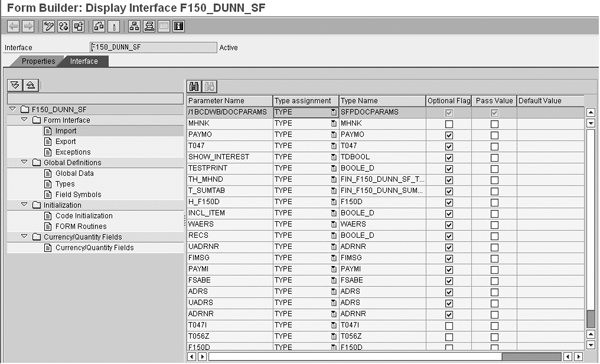
Figure 2
Figure 2 Form Builder interface for dunning letters
While a complete discussion on global definitions and initializations is beyond the scope of this article, and is not necessary when you are designing a simple form, it is worthwhile to understand the need for specifying the currency/quantity fields. Any currency/quantity field that you wish to include in your form must display the correct unit of currency or quantity. If the system cannot derive this automatically, you need to specify the containers (such as tables) from which your form needs to obtain data.
Components of a Form
A form has two components: the context and the layout. Let’s look closely at each of these two options because they are important when designing the form.
The context is the intermediate stage between creation of the interface and design of the form. When you select Form in Figure 1 and then click on the Display button, a screen similar to the one shown in Figure 3 appears.
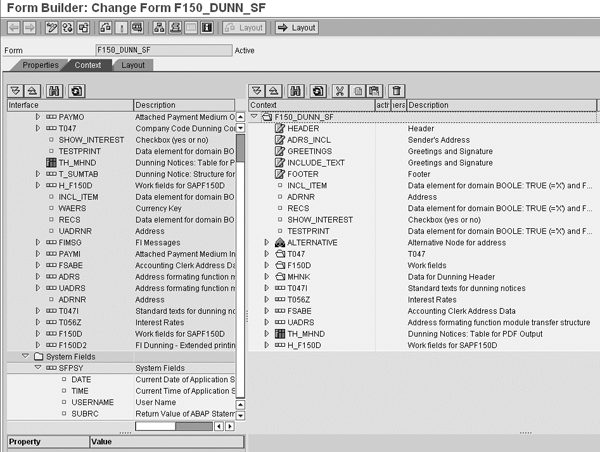
Figure 3
Context view in Form Builder
The system displays the context view by default. The screen is split into two panels. The Interface panel on the left displays any of the components of your interface that you have already designed. The Context panel on the right is the area in which you drag and drop the elements that you need from the left. You can drop entire nodes or individual components. In other words, the left panel is the source and the right panel is the destination.
When you design an interface in the context view, all elements of the interface that have individual components (such as fields for tables and structures) are available for dragging and dropping. You can access these individual components by expanding each node, which allows you to pull only those fields that you need for your output. For example, for a dunning letter the structure PAYMO contains numerous fields related to payment media output. Your dunning letter may need just a handful of these.
Additionally, the system provides certain fields such as date, time, and user name by default under the SFPSY node. Nodes and elements have properties, some of which you can change (e.g., description, active/inactive for output).
The layout is the second component of a form. You can get to it either by selecting the Layout tab or clicking on the Layout button. The system displays the layout editor (Figure 4).
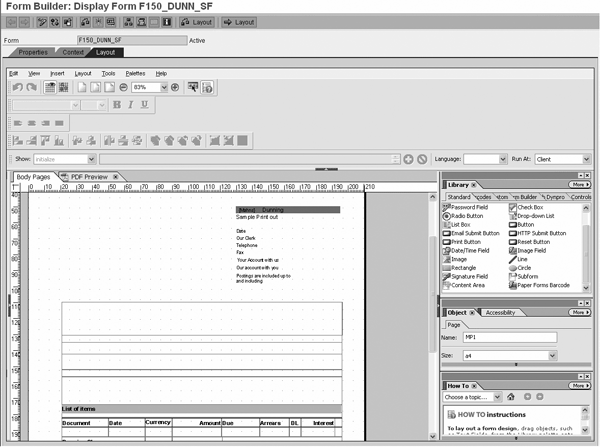
Figure 4
Layout view of dunning letter form
As the name suggests, you design the actual layout of the form here by dragging and dropping various fields and objects from the Library and setting properties for each of these fields and objects. Note that you shouldn’t try to do this at the current stage of the process because you are in the display mode of the form; you need to be in change mode to make the appropriate edits. Furthermore, even if you were in change mode, you shouldn’t be making changes to this template because it is a standard SAP template. I recommend copying it to the customer namespace and creating your own template, which I’ll describe later.
Note
It might sound as if I am stating the obvious but if you are relatively new to this tool, you need to know that you cannot design the context (or the layout) without pointing your form to an interface. In other words, the existence of an interface that your form can link to is a prerequisite for designing the context and the layout for the form.
The layout editor in Form Builder is a cluttered interface, but don’t let the features and capabilities overwhelm you. One way to alleviate this is to pull the various windows on the right panel to other areas of the screen. This is possible because these windows are non-modal and detachable. One of the most useful features I’ve found on this view is the ability to get “how to” instructions on some common activities such as creating new fields or adding items to a drop-down list. You can see this in the bottom right of Figure 4.
Create an Offline PDF Form
Now I’ll look at creating an offline form that mirrors a common financial business process or activity.
I have chosen one of the most common processes — dunning letters. Whether your enterprise produces a needle or a rocket, chances are that you have an accounts receivable (AR) department. When you have an AR department, you are virtually assured of sending out dunning letters to errant customers. I’ll provide you with some basic steps that can help you get started. Although a complete “how to” is neither in the scope of this article nor feasible, this information is a good starting point.
Note
An interactive scenario requires an understanding of technologies such as XML, Web Dynpro, and ABAP Dynpro. The recipient of the form fills in the fields and returns the form to the sender. The necessary fields in the sender’s system are updated automatically.
SAP provides standard templates for many application areas. Press the F4 key to browse and select standard SAP templates, and then copy the template you select. The technical name of the standard SAP interface template for dunning letters is F150_DUNN_SF. Click on the copy icon and copy the template to ZF150_DUNN_SF in the customer namespace — this copies over all the components from the template (Figure 5).

Figure 5
Copy an existing interface to a new one
At this stage, you need to look closely at the components of the interface and determine if you have all the necessary elements. As you saw in Figure 2, you define several things in the form interface including the import and export parameters and exceptions, global data, and initialization routines.
How do you know what information to include in your interface? The answer lies in the business process around dunning — the information that you need to include and in which format you want to display it.
Note
If you have not previously implemented this form with Smart Forms, you should refer to the requirements and specifications document and also the actual dunning letter.
In Figure 6, I’ve presented an example of a layout used by a fictitious company (The Excellent Company) for sending out dunning notices.
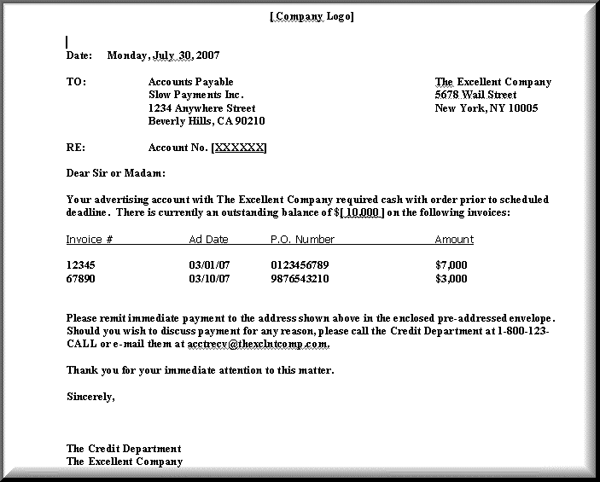
Figure 6
Format of a sample dunning letter
Now, let’s go back to transaction SFP. Create a form by giving it a technical name and then assign an interface to it when you are prompted to do so. The interface you need to assign is the one you created earlier: ZF150_DUNN_SF. The system presents the context view from Figure 3, which shows you an exact replica of your interface on the left panel. It is your responsibility to move all of the desired fields to the context panel on the right (Figure 7). You can also add new elements based on your needs. The elements on this context panel determine what data passes to your form if a binding is in place. Bindings connect fields on the form with the actual table fields that provide the data. I’ll discuss this in more detail later.
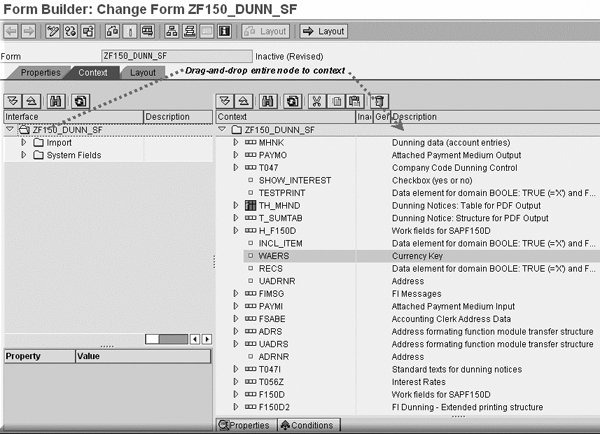
Figure 7
Context of dunning letter form
I recommend that you drag and drop the entire top node from the interface panel to the context panel, especially when you are relatively new to this tool. When you do this, all the hierarchies along with their individual components are copied over to the context panel. It should be easier for you to then remove a node or component that is unnecessary by positioning your cursor on the unneeded component and clicking on the trash can icon to delete it or highlighting the element and selecting the Inactive status in the properties. You may need to add certain other elements such as texts or addresses, which you can do by right-clicking on the element and using the context menu. Now, let’s switch to the Layout view to create the layout and the bindings.
Click on the Layout tab and you can see that the screen is split into several sections. You can suppress, move around, and resize the various panels and windows based on your needs. In the left vertical panel, you are presented with a hierarchy view and a data view. The hierarchy view corresponds to the elements on the layout. At this point, nothing is in the hierarchy except the skeleton because you do not have any elements on the layout (Figure 8).
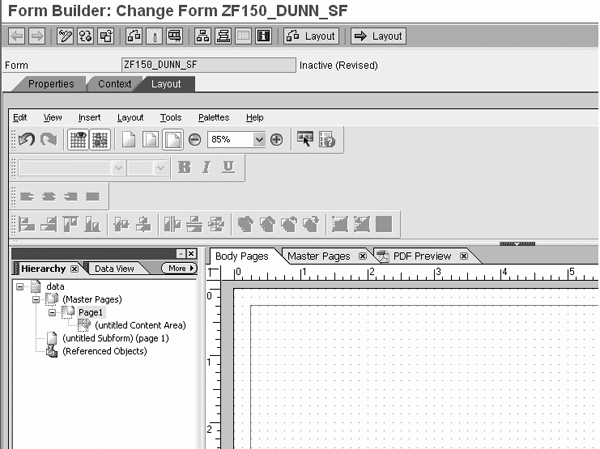
Figure 8
Blank hierarchy view in form layout
The data view, on the other hand, corresponds exactly to the hierarchy of fields in the context. If you add a new field, you see it in the data view. Any deactivated fields would not show up in the data view. As an example, I deactivated the client (technical name MANDT) field for table T047 in the context view. When I go to the data view, the client field no longer shows up under the field hierarchy for table T047 (Figure 9).
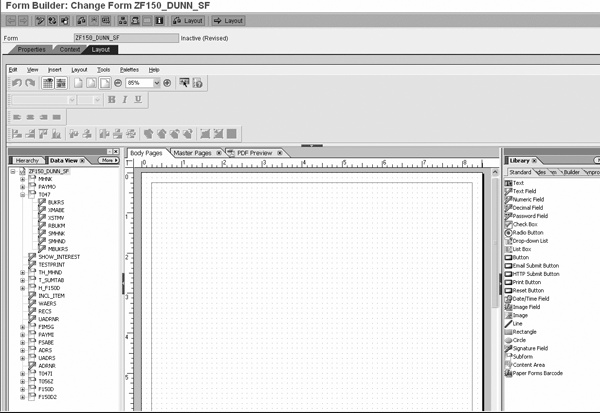
Figure 9
Data view in form layout
Add Design Elements to Your Dunning Letter Layout
In the dunning letter in Figure 6, you saw that the company’s logo needs to be at the top. I’ll demonstrate how simple it is to do this. In the view shown in Figure 9, click on the Master Pages tab. From the Library palette on the right, drag the Image button and drop it on the layout designer in the desired location (per the requirements of your dunning letter). Once there, double-click on the container and insert the desired image from the folder in which it resides (Figure 10). After I select my desired image, the system inserts it as part of the master page template, which means that this logo appears on all pages (Figure 11).
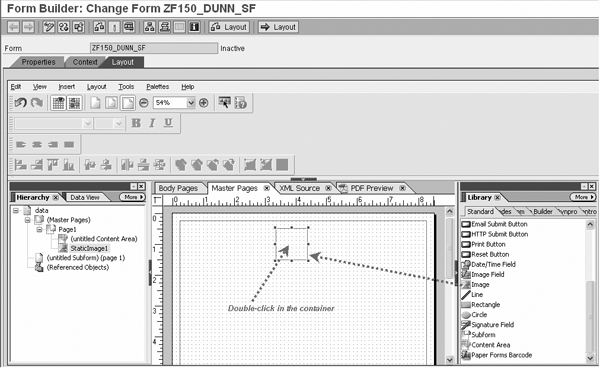
Figure 10
Insert an image in the layout
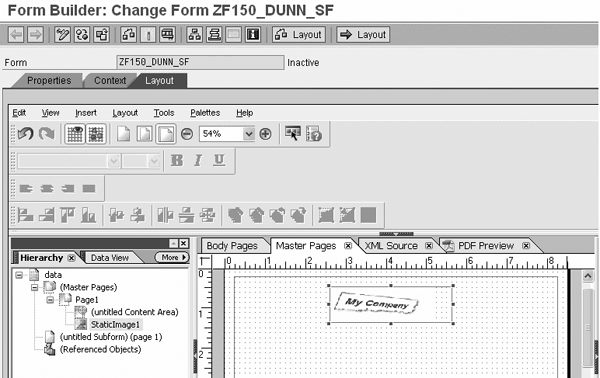
Figure 11
Company logo inserted into master page of form
Notice that the metadata is updated dynamically on the hierarchy view on the left. StaticImage1, the default name for this image, is now included in the hierarchy of the master page.
The next element in your dunning letter is a line that reads Date: and displays the current date (Figure 12). Drag and drop the date field from the data view on the left side to the form layout. In the Object palette, set the desired properties such as appearance and time zone. Then go to the Value tab of the Object palette and select the type. Because this field is display only, I select type Calculated – Read Only. If you want to use a calculation script, you can select Calculation Script. Then select Runtime Property: and choose Current Date/Time. This tells the system to automatically insert the current date and time for you.
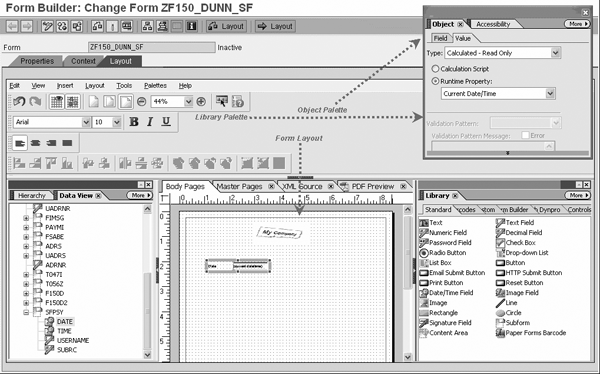
Figure 12
Add required elements to the form layout
Note
When you bind a Data Dictionary field (from the left panel) to a field in the form, a left arrow appears next to that field symbolizing the data binding. That happened in the case of the time field. However, the left arrow disappeared when I selected Runtime Property: because I detached the Data Dictionary field from the field on the form.
At any given time, you can do a PDF preview of your form layout by clicking on the PDF Preview tab (Figure 13). The system populates the date field with the current date. For better visibility, I closed all of the other palettes prior to selecting the PDF preview.
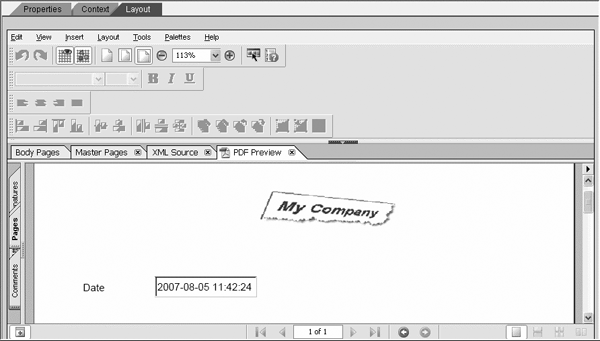
Figure 13
PDF preview of your form
After you have added all the necessary elements and the processing logic, you need to carry out one final step before you can actually print your form in the PDF format. This involves ABAP programming and you need an ABAP developer — ideally, someone who is experienced developing forms and using SmartForms and SAPscript — to take care of it. Very good documentation exists on SAP’s Help Portal on all aspects of handling forms from an application program and a discussion of these aspects here would be redundant. The URL for this documentation is https://help.sap.com/sap help_nw 70/helpdata/en/45/1a13bf2c2504a8e 10000000a155369/frameset.htm. Expand the top-level node SAP Interactive Forms by Adobe and then go to PDF-Based Print Forms > Calling Forms in an Application Form.
Helpful References
Anurag Barua
Anurag Barua is an independent SAP advisor. He has 23 years of experience in conceiving, designing, managing, and implementing complex software solutions, including more than 17 years of experience with SAP applications. He has been associated with several SAP implementations in various capacities. His core SAP competencies include FI and Controlling FI/CO, logistics, SAP BW, SAP BusinessObjects, Enterprise Performance Management, SAP Solution Manager, Governance, Risk, and Compliance (GRC), and project management. He is a frequent speaker at SAPinsider conferences and contributes to several publications. He holds a BS in computer science and an MBA in finance. He is a PMI-certified PMP, a Certified Scrum Master (CSM), and is ITIL V3F certified.
You may contact the author at Anurag.barua@gmail.com.
If you have comments about this article or publication, or would like to submit an article idea, please contact the editor.


