Manager
Build on settings in SAP Solution Manager to roll out a central support system to administer both SAP and non-SAP trouble tickets. Learn effective practices for preparing and designing a comprehensive support system for issue reporting.
Key Concept
Many SAP users operate multiple issue-tracking tools, allowing SAP Solution Manager’s role in incident management to be simply a repository of SAP Notes. Maintaining numerous tracking and storage tools for system issues requires additional software and licensing fees, as well as increased setup and deployment resource requirements. This can lead to a decentralized approach to system issue visibility and reporting. However, key SAP Customer Relationship Management Service Management configuration settings within SAP Solution Manager can improve the tracking, reporting, and resolving of support messages. You can customize these settings and extend SAP Solution Manager’s capabilities to position the Service Desk as a single central component for operational support.
You are probably aware of SAP Solution Manager’s integration with SAP Active Global Support (SAP AGS) to facilitate SAP issue resolution. It is also likely that you have connected your SAP Solution Manager system to SAP and enabled the appropriate configuration settings. However, few users know that by expanding the SAP Customer Relationship Management (SAP CRM) Service Management configuration, you can use the Service Desk component in SAP Solution Manager as your single end-to-end IT service management solution.
In this article, I identify specific configuration settings that enable your organization to deploy the Service Desk as an all-inclusive tool for managing support messages between your end users, support team, and SAP. Before I walk you through this configuration, I’ll highlight what you should take into account before setting out on an implementation.
Implementation and Resource Considerations
You need to decide to integrate or eliminate current issue tracking and issue management tools. During the preparation phase, conduct an analysis on your current tools before proceeding. Weigh the advantages, disadvantages, and effects of how your support process will react if you integrate or replace your existing tools.
Process design is key. I recommend going through the phases of a Service Desk implementation the way you would an SAP ERP implementation — start with the prepare phase and end with operate and support. Make sure you are familiar with the documentation in the SAP Solution Manager IMG before beginning this kind of project.
Be prepared to have support from your Basis team, someone with SAP CRM configuration experience, and a developer (to help implement SAP Note 1041455: Partner Dependant Actions are not Executed[2]) to perform the configuration described in this article. SAPGUI users can be trained with a one-page flyer developed by your SAP Solution Manager consultant or the organizational change management team that introduces the new way of logging tickets and instructions for creating a support message level 1 and 2. Support desk resources may require formal classroom training on how to process support messages using the Service Desk’s Transaction Monitor screen.
You can ensure that your SAP Solution Manager landscape can handle a live support process by having a two-tier landscape in place (at minimum). This means that you test the required SAP Notes, Support Packages, and configuration or development changes in a development environment that is separate from the production environment that supports your live processes. If SAP Solution Manager is deployed to support live Service Desk processes, you should safeguard your production system in the same manner as you would your other SAP systems.
Confirm that your SAP Solution Manager system is prepared to handle hundreds or even thousands of tickets. Keep in mind that these tickets can include screenprints and other attachments. Confirm that your SAP Solution Manager production system is sized accordingly. Certain license restrictions may apply for using SAP Solution Manager to manage non-SAP issues. For specific restrictions, check with your SAP account executive.
Design a Tiered Support Structure
Having your IT department serve as the first line of support for messages that can be resolved locally (e.g., network- or communications-related) takes the department’s time away from processing system-related support messages that are higher priority. Handling business-process-related requests is most likely out of scope for your central IT department as well.
To improve support, it is critical to define a tiered support structure establishing an organizational hierarchy for your support process. Essentially, each tier is responsible for a particular scope of support message. For example, if someone within level 1 receives a support message that he or she cannot resolve, the message is forwarded to the next level by selecting an action directly within the support message. This support structure serves as the foundation for how you configure your support team (i.e., which support teams receive which kinds of messages). Furthermore, you assign resources to these levels to determine who needs access to what, and who needs to be trained on a particular SAP Solution Manager function. Finally, this structure serves as a starting point for designing your end-to-end process for message resolution. Figure 1 provides a conceptual representation of a tri-level model for operational support.

Figure 1
Operational support model
In Figure 1, the level 1 support team represents local site support. For example, say a SAPGUI user encounters an error and creates a support message. The message is routed to its region’s support personnel. At this level, the routing may occur in two ways:
1. The SAPGUI user encountering the error selects Help > Create Support Message within the SAP application where the error occurs
2. The SAPGUI user places a phone call to the level 1 support team and the support team member fills out the Create Support Message form available in transaction NOTIF_CREATE. Typically, the scope of level 1 support messages is related to business processes or local IT issues.
If the scope of the message created by the user is outside the scope of level 1 support, the level 1 support team member would reassign the message to level 2 support directly within Service Desk. Once reassigned, the action Email to Message Creator is set to notify the correct message processor by email. Level 2 issues are higher priority and require support from your organization’s IT department (e.g., authorization issues and system performance issues).
If the message cannot be resolved internally by level 2 support, it can be forwarded to SAP AGS directly from within the message. A separate action, Send to SAP, is available for communication with SAP AGS from SAP Solution Manager.
Planning an End-to-End Process
Clear process definition is fundamental when approaching the implementation of a support desk application. It is especially important if you manage a broad scope of messages concerning global business partners using multiple avenues of communication. Common pitfalls and implementation failures often result from not taking time to plan and design a process for support. More often than not, project timeline and budget planners factor in resources to configure SAP Solution Manager settings, but then fail to include fundamental prepare and design activities to support a seamless and successful transition from the current process to the next. What does all this mean? As I stated before, you need to rigidly follow an implementation methodology, executing each phase of your Service Desk project — prepare, design, configure, deploy, and operate — the way you would an SAP ERP implementation.
Note
It is beyond the scope of this article, which places an emphasis on the prepare and design phases, to get into detail about the deploy and operate phases.
Get started by using the message creator (i.e., the user who creates the support message), level 1, level 2, and level 3 roles as the functional roles for your process flows. Identify the steps that must occur for a message to be confirmed, from message creation to message confirmation, and populate them in the appropriate functional roles.
Prepare
SAP pre-delivers a standard process for end-to-end message resolution, comprised of several support units with complementary roles and responsibilities as well as actions to facilitate partner determination. Understanding what standard SAP processes offer is important before setting out to implement a more full-featured Service Desk. I recommend configuring the Service Desk in its standard manner. You must be prepared to present this solution as an initial prototype.
Design
Demonstrate the standard functionality to the stakeholders throughout design discussions. You should thoroughly understand the current process for message handling and identify the current tools that are being used. You can challenge stakeholders to distinguish the change in value between your prototype and the current support systems or processes. Keep track of any questions that arise and note any “nice-to-have” features that are discussed so that you can then determine whether or not these features can feasibly integrate with the actual solution. Then, determine how SAP’s standard process for message handling can be enhanced or modified to best fit your organization’s requirements. This process ultimately ties in directly with your tiered support structure.
Key Configuration Areas
The Create Support Message form, executable with transaction NOTIF_CREATE, is available only in SAP Solution Manager. If one or more of your support teams logs tickets when an end user makes a phone call, this is the form that the message processor fills out.
Customizing field group entries in the Create Support Message form allows support teams to log, track, and report on both standard and custom entries specific to your organization’s support processes. Similar to the repository of systems represented within the system landscape administration (transaction SMSY), the installed base (IBase) is a tiered component tree that represents the technical products used within your landscape. The IBase is the foundational structure for logging service requests against a specific technical component. The steps below explain how to configure the System/IBase, Subject, and Category entries to facilitate solution-specific message processing and reporting.
IBase Customization for Tracking Non-SAP Tickets
Use the System/IBase field value in the Create Support Message form to identify the specific system and client that the support message is being logged against (i.e., where the issue arose). Follow the directions below to extend your IBase entries to enable message creation against non-SAP systems or non-system elements.
A prerequisite to implementing the configuration in this article is completing the basic configuration activities in the IMG. One of those activities is generating your IBase. After the IBase is generated the values become available in the System/IBase field group in the Create Support Message form.
Execute transaction IB52. Enter 01 in the field for Installed Base and click the green check mark icon. On the left side of your screen, you see your IBase structure. Click SOL_MAN_DATA_REP and then enter Non SAP Systems in the Description field on the Text tab (Figure 2). Save your work.
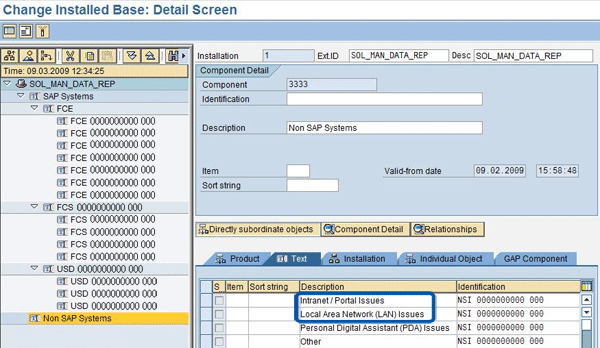
Figure 2
Operational support model
The newly created entry, Non SAP Systems, is now displayed at the bottom of the tree menu on the left side of the screen (Figure 3). Select Non SAP Systems. You can maintain the Non-SAP applications in the Text tab, as shown in Figure 3. In the Identification column, enter a system Identification, a system number, and a client number to represent your Non System Issues (NSIs). Because these are non-SAP components, I chose to use NSI for the system identification and zeros for the system and client numbers in my example. Be sure to save your work.

Figure 3
Enter description and identification of the non-SAP systems
Your custom IBase entries are now selectable in the Create Support Message form. If you enter transaction NOTIF_CREATE, you can select the icon next to the System/IBase field to display the field values. After you select this icon, the screen in Figure 4 appears.
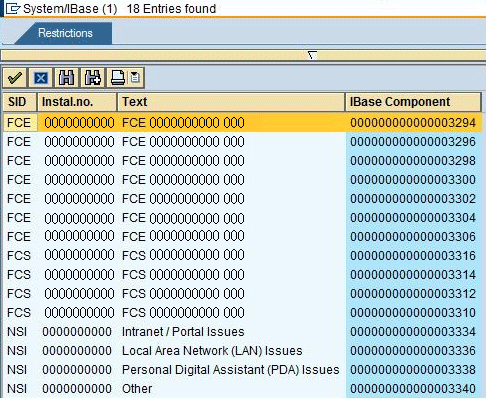
Figure 4
View results in field group System/IBase
Other Field Group Modifications for Improved Reporting
In addition to the System/IBase field, SAP delivers the Subject and Category field groups in the Create Support Message form. You can modify the Subject entries for improved issue classification (i.e., to identify the type of issue being logged), and modify the Category entries to identify the issue source (i.e., who is initiating or logging the issue).
First, I’ll describe how to maintain the Subject field. Follow menu path Transaction SPRO > SAP Solution Manager > Configuration > Scenario-Specific Settings > Service Desk > Node Text Not Found > Define Catalogs, Codes and Profiles. Create a new entry within the list. Enter a Catalog ID (in my example, Z1) and a Catalog short text (in my example, S.A.L.T. Catalog) as shown in Figure 5. Enter Codings as the category in the CatalogCty column. Save your work.
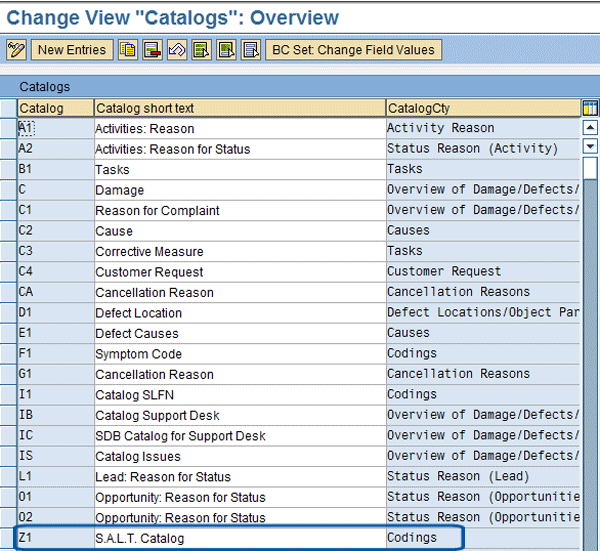
Figure 5
Create a new catalog entry
Select the Define Code Groups and Codes for Catalogs in the IMG, which results in the screen shown in Figure 6. Enter the Catalog ID you just created in the Catalog Field, and then click the green checkmark icon.

Figure 6
Define a catalog code
Next, create a code group for your catalog (Figure 7). Click the New Entries button. Enter a Code Group ID in the Code Group column (I used Z1A in this example) and a description in the Descript. column. Select Released from the list of drop-down entries in the Status column, and then save your work.
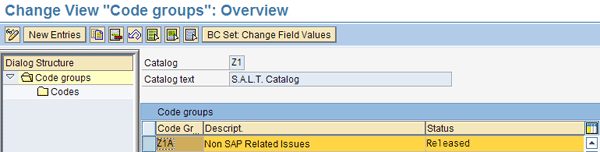
Figure 7
Create a code group
Now you can create codes for your code group. Select the line where you entered information in Figure 7. Next, double-click the Codes folder on the left side of the screen. The screen shown in Figure 8 appears. For each of your subjects, enter a Code ID in the Code column and a description in the Descript. column, and save your work.

Figure 8
Create codes for the code group
Next, select Define Code Group Profiles in the IMG. This produces the screen shown in Figure 9. Highlight your catalog and double-click the Definition of Code Group Profile folder.
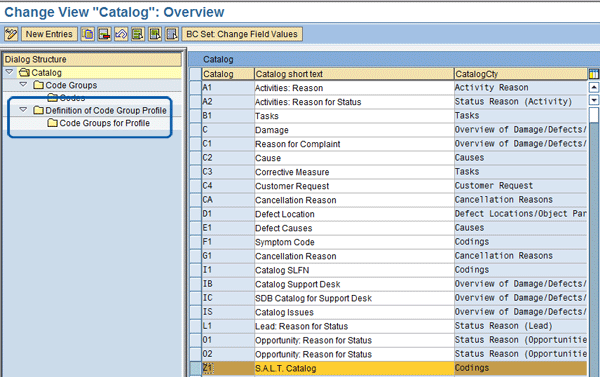
Figure 9
Select your catalog
For profile details, select the New Entries button. Enter a code group profile (Z101 in my example) in the CdGrpPrfle column and the code profile text in the CdPrfleTxt column, as shown in Figure 10.
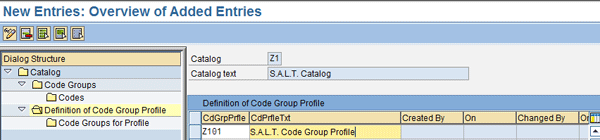
Figure 10
Enter your code group profile and profile text
Select the subfolder Code Groups for Profile. Enter your code group (Z1A in this example) in your code group profile (Figure 11). Double-click the Code Groups for Profile folder, select your Code Group, and click the Save button.
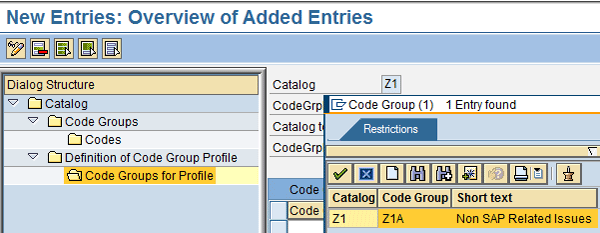
Figure 11
Add code group to code group profile
Now you assign the catalog to Subject Profile SLFN0001. Follow menu path Transaction SPRO > SAP Solution Manager > Configuration > Scenario-Specific Settings > Service Desk > Node Text Not Found > Define Catalogs, Codes and Profiles. Then select the Subject Profile SLFN0001 and double-click the Code Group Profile for Subject Profile folder (Figure 12).

Figure 12
Select Subject Profile SLFN0001
Select the line for your catalog by clicking the button to the left of it (Figure 13).

Figure 13
Select your catalog
Next, double-click the Code Groups folder on the left side of the screen. In the Code Gr… column shown in Figure 14, choose the code group you created earlier (Z1A in my example) by selecting it from the drop-down field. Again, make sure to save your work.
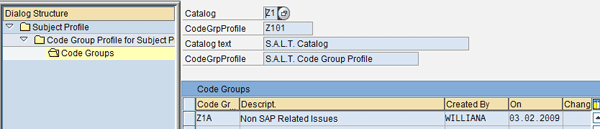
Figure 14
Add the code group to your catalog
The next step is to maintain the Category field. Follow menu path Transaction SPRO > SAP Solution Manager > Configuration > Scenario-Specific Settings > Service Desk > Node Text Not Found > Maintain Categories and Priorities. The screen that appears is shown in Figure 15. Enter the category in the C column, a description in the Descript. column, and save your work.
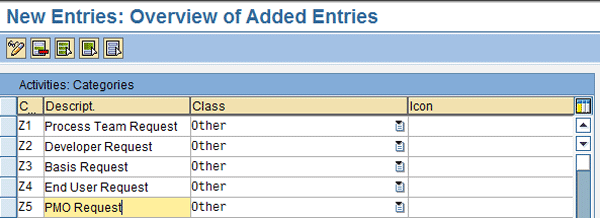
Figure 15
Select your catalog
Now you can view the results of your work so far in the Create Support Message form. The results of your work on System/IBase can be seen in Figure 4. Figures 16 and 17 show the Subject and Category entries.
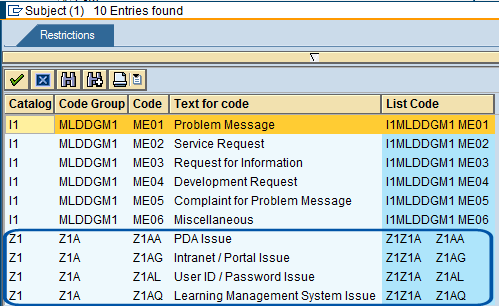
Figure 16
New subject entries

Figure 17
New category entries
If you need certain key fields to be required before a message can be saved in the Service Desk, or there are values in the Create Support Message form that are not relevant to your application, you can customize the behavior of the form by executing the RDSWP_NOTIF_CREATE_CUSTOMIZE_S program in transaction SE38.
In the screen that appears, select the field groups you want hidden by clicking the drop-down menu that is shown next to Field Group (Figure 18). The Entry and Output values were already assigned to this example (this is standard SAP behavior). To make an item a required field or to hide the field from selection, check the appropriate box and click the execute icon.
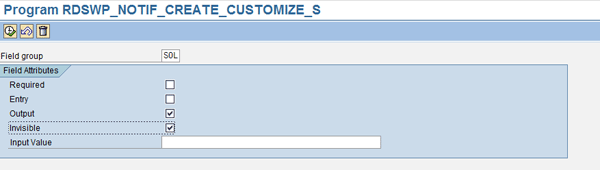
Figure 18
Field attribute behavior
Figures 19 and 20 show and before and after views for a user who hides the Solution field group.

Figure 19
Before: Visible Solution field group
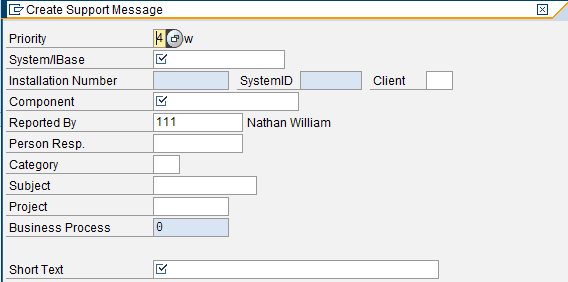
Figure 20
After: Solution field group is hidden
Enable Automatic Message Delivery
SAP provides multiple actions you can select within the Transaction Monitor screen (transaction CRM_DNO_MONITOR) throughout the message resolution process. I’ll show you how you can copy and modify an out-of-the-box action definition to enable automatic email delivery to the support team the moment a support message is saved.
Execute transaction CRMC_ACTION_DEF. Select the Action Profile SLFN001_ADVANCED and double-click the Action Definition folder (Figure 21).
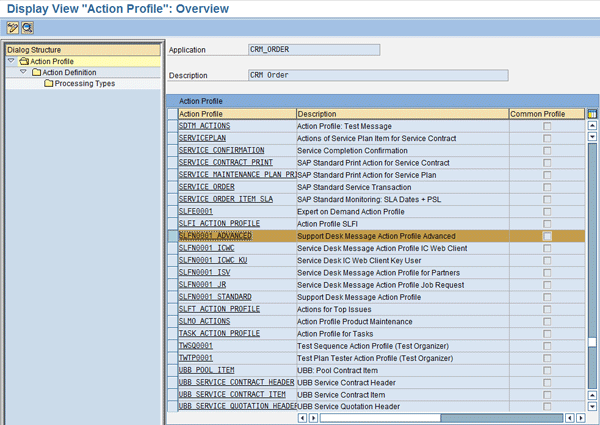
Figure 21
Select the Action Profile
In the screen that appears, copy the standard action definition E-mail to Message Creator (Figure 22). Make sure that you are in change mode by clicking the display/change icon (highlighted in the upper left). Select the line containing SLFN001_ADVANCED_MAIL and click the copy as icon (to the right of the New Entries button).

Figure 22
Copy SLFN0001_ADVANCED_MAIL
The screen in Figure 23 now appears. Enter a name in the Action Definition field and a description in the Description field.

Figure 23
Enter a description and name for your Action Definition
The only settings that you need to customize or change are highlighted in Figure 24 (which shows the bottom half of the screen shown in Figure 23). The rest of the default values can remain as is. Make your adjustments and save. The processing types for your new action definition can remain the same as the action definition that you copied.

Figure 24
Action settings definition
To use your newly created action in message processing, you need to include it in conditions. To do this, enter transaction CRMC_ACTION_CONF (Figure 25). Click the Technical Names button, highlight SLFN0001_ADVANCED, select your new Action Definition (in this example, Email Support Team Automatically at Mess), and save your work.

Figure 25
Include your action in Conditions
To complete this activity, the coding of the classic Business Add-In (BAdI) implementation CRM_DNO_PARTNER_1 needs to be copied, modified, and assigned to your action processing. You can refer to SAP Note 1041455 for the specific steps on how to accomplish this.
Nathan Williams
Nathan Williams is the Global SAP Solution Manager Practice Lead at Monocle Systems. For over a decade, Nathan has supported organizations in their efforts to leverage SAP Solution Manager as an integral component to manage their SAP solutions across the entire application lifecycle. Coordinating with IT, business, and program management teams, he has effectively defined strategies to help SAP customers seamlessly transition to SAP Solution Manager processes and capabilities. He is the author of ITSM and ChaRM in SAP Solution Manager and a co-author for SAP Solution Manager – Practical Guide.
You may contact the author at nwilliams@monoclesys.com.
If you have comments about this article or publication, or would like to submit an article idea, please contact the editor.