Together, SAP CRM and SAP NetWeaver Business Warehouse can monitor the quality of service you are giving your customers and alert you about critical problems through Alert Management. Discover how to prevent delays in critical situation processing by reducing the time between discovering and responding to problems.
Key Concept
Alert Management (ALM) enables you to predefine conditions for critical situations. ALM triggers an alert when those conditions are met, and the system identifies and informs the
responsible or interested parties immediately. The system distributes these alerts to SAP CRM and SAP ERP Central Component (SAP ECC) and publishes them to SAP NetWeaver Portal. From the SAP NetWeaver Portal, the system links to an SAP NetWeaver BW report or to an SAP CRM or SAP ECC transaction. You can then either execute the transaction to edit the document or execute the report to look at the exception and review the details.
Sometimes, just a few seconds can mean the difference between a lost customer and a returning customer. When a customer comes to your company with a problem, you need to be able to fix it quickly and efficiently, especially within the time frame promised in the customer’s service-level agreement (SLA).
You can configure your system to search SAP NetWeaver Business Warehouse (SAP NetWeaver BW) queries for exceptions and then distribute them to end users. For example, the system can trigger an alert — via exception broadcasting in the Central Alert Framework (CAF) — for any issue that is not resolved within an SLA time frame.
I recently completed a project for a retail company that manufactures greeting cards. The company implemented SAP CRM 6.0 and SAP NetWeaver BW 7.0 as part of a redesign to improve business efficiencies. I use my experiences from this project in the following step-by-step guide for configuring the system and preparing your data.
In this step-by-step guide, I show you how to configure and implement Alert Management (ALM) in SAP NetWeaver BW 7.0 and SAP CRM 6.0, deliver actionable alerts to users, and improve quality of service. Specifically, I describe how to prepare your SAP NetWeaver BW data, map it from SAP NetWeaver BW to SAP CRM, and then use broadcasting by exception distribution settings to process it. While this article is based on SAP NetWeaver BW 7.0 and SAP CRM 6.0, you can use it for earlier versions as well. You may need to consult with your company’s SAP NetWeaver BW team while performing the steps in this article.
By the end of this article, you will be able to perform the following tasks:
- Broadcast alerts as an exception from SAP NetWeaver BW to SAP CRM
- Drill through an alert to the corresponding SAP CRM transaction details on the SAP NetWeaver Portal to take further action
- Jump to an SAP NetWeaver BW report corresponding to an alert using ALM and Business Explorer (BEx) Broadcaster settings
Before you start, the query that you use must have at least one predefined exception. First you must define and execute the Distribute according to exceptions setting (directly or scheduled in the back end). Then, BEx Broadcaster checks to see if the thresholds defined in the query exception have been exceeded or not reached. BEx Broadcaster generates a document in accordance with the criteria you defined and distributes it to the designated recipients by email, to the portal, or as an alert. Once an exception is generated in a report, you can notify users via alerts, email, or the SAP NetWeaver Portal. If you use email, the exception goes directly to the user’s email ID setup in the email list while configuring exception. If you use the portal, the exception can be viewed on SAP NetWeaver Portal.
Note
Non-SAP CRM users with the appropriate authorizations can access alerts via the universal worklist in the portal.
Implementation Process
Setting up the alerts involves the following steps:
Step 1. Define or check for existing exceptions
Step 2. Open the query
Step 3. Create an exception for the query
Step 4. Select a key figure for which you want to generate an exception
Step 5. Apply the CAF
Step 6. Create container elements for SAP NetWeaver BW parameters that you want to transfer via information broadcasting
Step 7. Define a description and the reference data type for each container element that you want to map to an SAP NetWeaver BW parameter
Step 8. Provide text for the alert message
Step 9. Assign the alert to end users
Step 10. Define rule-based recipients
Step 11. Create information broadcasting settings
Step 12. Assign the corresponding alert category you created in SAP CRM to your information broadcasting setting
Step 13. Map the container parameters from SAP CRM to SAP NetWeaver BW query InfoObjects
Step 14. Save the information broadcasting setting
Define an Exception for the Alert
Step 1. Define or check for existing exceptions. Follow menu path Start > Business Explorer > Query Designer and log in to the SAP NetWeaver BW front-end GUI (Figure 1).
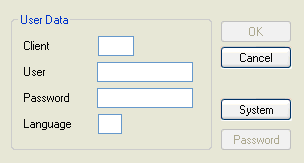
Figure 1
Enter your credentials to log in
Step 2. Open the query. You can do this by clicking the Find button on the left side of the screen. Search for a query based on the technical name or description (Figure 2).
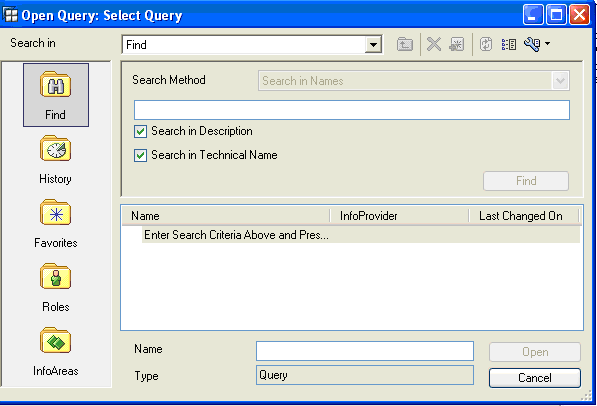
Figure 2
Find the query and open it
As you can see in Figure 3, the query you open is now available in BEx Query Designer to define exceptions.
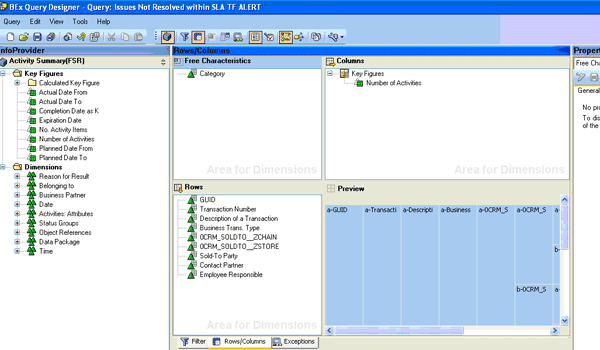
Figure 3
Query displayed in BEx Query Designer
Step 3. Create an exception for the query (Figure 4). Click the exception icon and then define the alert level for the exception under the General tab. You can add a description (e.g., Issue not resolved, in my example) and define exception values by assigning an alert level and values for it. In my example, I created one alert level (Bad 3) based on the key figure Number of Activities. In this scenario, Bad 3 ensures that any exceptions generated for this report are very critical.
You can vary the alert levels based on your business requirements. The number of activities, which is shown in the Values column, is 1 in this example. Your company requirements dictate which key figures you can create exceptions for, and you can include any appropriate value in Value column.
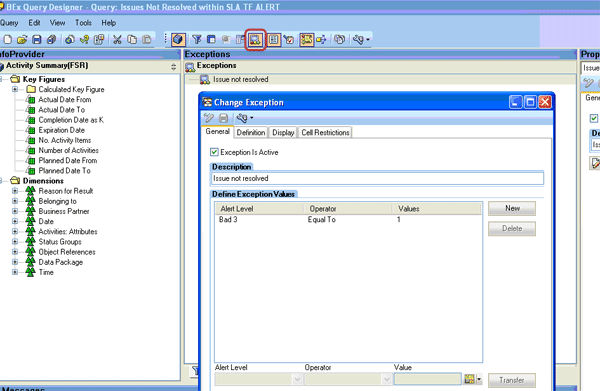
Figure 4
Define exception values based on the key figure value
Step 4. Select a key figure for which you want to generate an exception. Click the Definition tab (Figure 5). Here, you define exceptions based on certain key performance indicators. In my example, I used Number of Activities. Select this from the Exception Is Defined On Key Figures drop-down list.
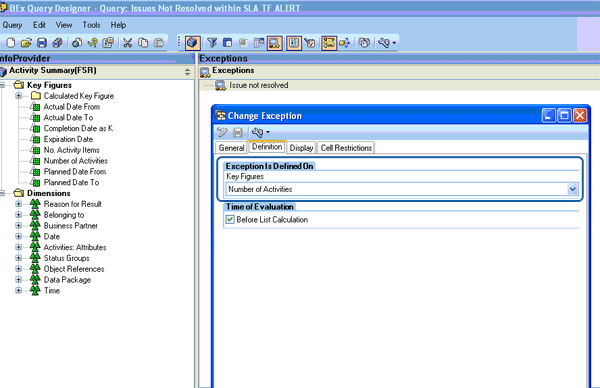
Figure 5
Select a key figure from the available list in the query
Now that I have defined exceptions in SAP NetWeaver BW 7.0 using BEx Query Designer, I will configure an alert category for transferring data from SAP NetWeaver BW 7.0 to the SAP CRM system.
Set up the Alert Category
Step 5. Apply the CAF. Go to your back-end system (i.e., SAP CRM 6.0) and enter transaction ALRTCATDEF. Figure 6 shows the alert category screen where you can create a new alert category. Enter a description and set the basic properties for the alert category.
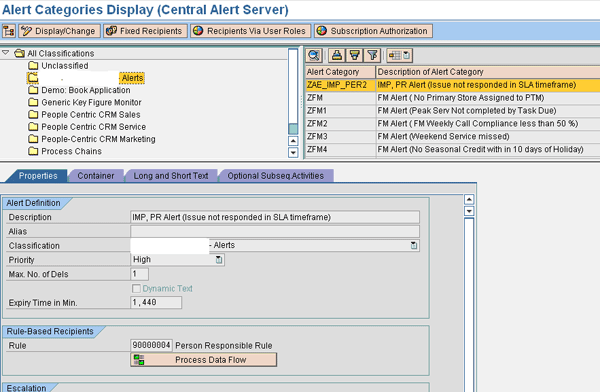
Figure 6
Define the alert category and assign a description
Step 6. Create container elements for SAP NetWeaver BW parameters that you want to transfer via information broadcasting. Go to the Container tab and click the create icon, which takes you to the pop-up window shown in Figure 7. Enter the information for the SAP NetWeaver BW parameters you are transferring.
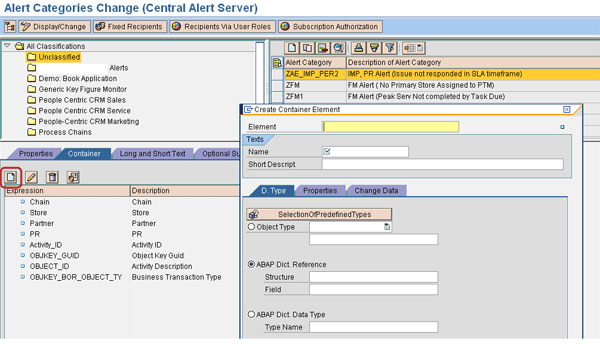
Figure 7
Define the container parameters
Step 7. Define a description and the reference data type for each container element that you want to map to an SAP NetWeaver BW parameter (Figure 8). This is required to map the correct length and data type for the values passed from SAP NetWeaver BW to SAP CRM.
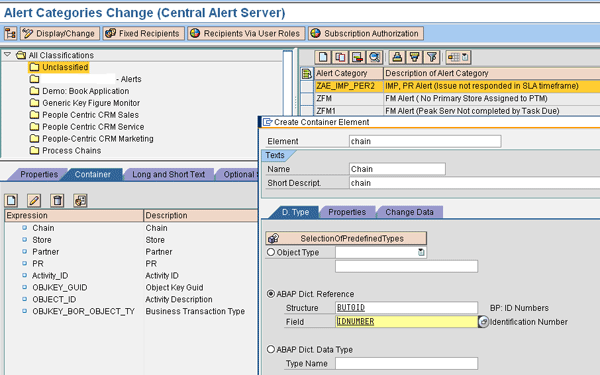
Figure 8
Assign details to the container
Set up the Alert Message and Recipients
Step 8. Provide text for the alert message. You do this on the Long and Short Text tab. This message is displayed in an email (or in the Universal Worklist if you publish it on the Web). You can reuse the variables in the message text that you created as container elements in Figure 7. You can include them as variables:
- Store: &STORE&
- Account: &PARTNER&
- Issue: &ACTIVITY_ID&.
Add descriptive text and, if required, add the values of the parameters as shown in Figure 9. In my example, the store description and &STORE& pass along the name of the store for which the alert is generated.
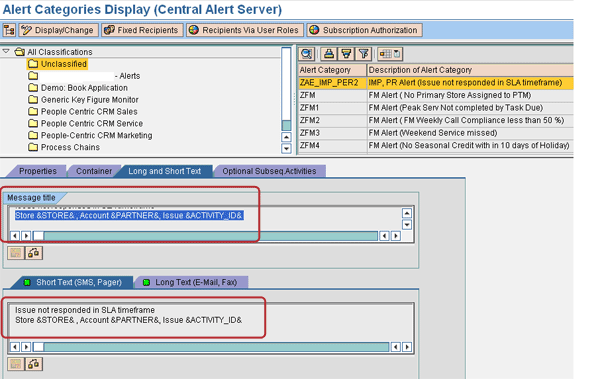
Figure 9
Enter the text and values of the parameters to be displayed for an alert
Step 9. Assign the alert to end users. You can enter fixed recipients or roles. If you enter a role, all users who are assigned to that role get the alert. You can also enter roles by clicking the Subscription Authorization button. In that case, the assigned users can opt to subscribe to the alert later. Also, when your user list changes from one territory to another on a daily/weekly/monthly basis, you can dynamically assign alerts to users based on the rules defined in the system. In my example, I used Rule-Based Recipients to distribute alerts to the person responsible (Figure 10).

Figure 10
Define rule-based recipients for the user
Step 10. Define rule-based recipients by pressing the F4 key. A pop-up screen appears that allows you to use an assigned rule to set responsibilities for the alert depending on the alert data. It determines the responsibilities you use to indicate who is to be informed about an alert. The distribution of notifications is performed using values of the alert that are written to the rule.
Enter transaction PFAC and define the desired responsibilities for rule 90000004. The window now shows the available rules. Then click the create icon to create a new person responsible rule (Figure 11).
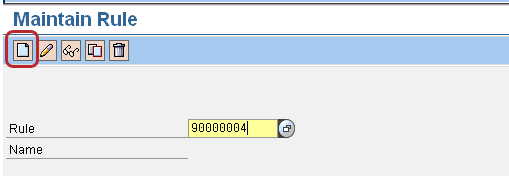
Figure 11
Click the create icon to create a new person responsible rule
In Figure 12, I entered the technical name ZPR in the Abbr. field. You can enter any technical name that starts with a Z. Enter an appropriate name for the responsibility in the Name field. Define the Category field by selecting the rule container content shown in Table 1.
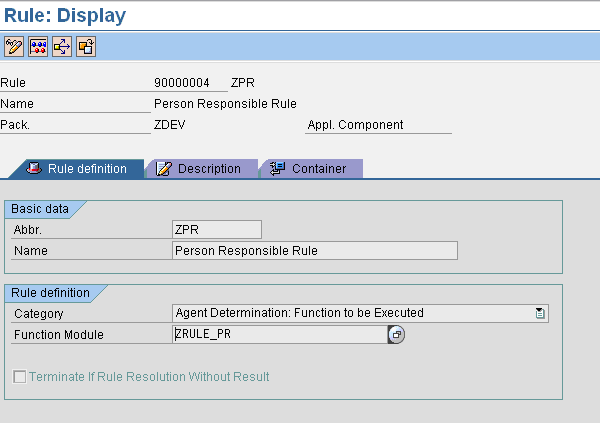
Figure 12
Define general properties and assign the rule category
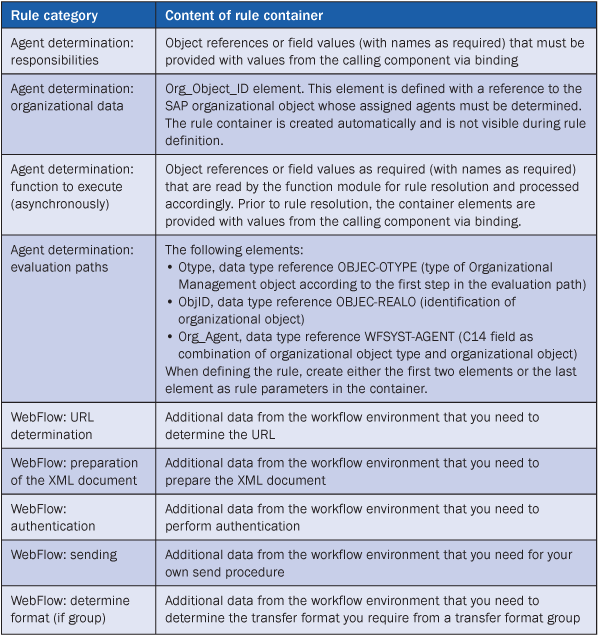
Table 1
Available rule categories
As you see in Figure 13 in the Container tab, you define parameters to determine the rule. Once the value from SAP NetWeaver BW is passed to SAP CRM, these parameters determine the rules and then the users. The alert container is a container for the exchange of application-specific variables, such as the person responsible between local systems and the central alert server. It is the interface between the SAP application and the different SAP systems that triggers the alert and the CAF.
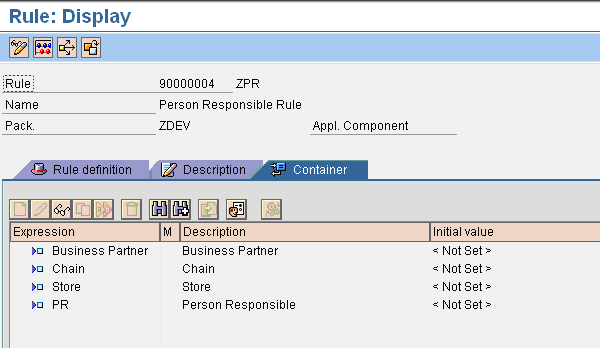
Figure 13
Define alert container parameters
In Figure 14, I used the rules category Agent Determination: Function to be Executed. The agents/person is determined based on the function module. You first enter the function module and then you define it. You can configure it according to your company’s requirements. When requirements call for more than a simple direct mapping, you can use the functions defined in transaction SE37. The company in this example used function modules for identifying agents (person responsible values) who would receive the alerts based on the territory in which they work.
Note
You use function modules for defining agent determination rules when very complex selection criteria (that cannot be depicted by other rule categories) are required for agent determination. You also should be absolutely sure about which container elements are required by the function module beforehand by checking the parameter values that are required.
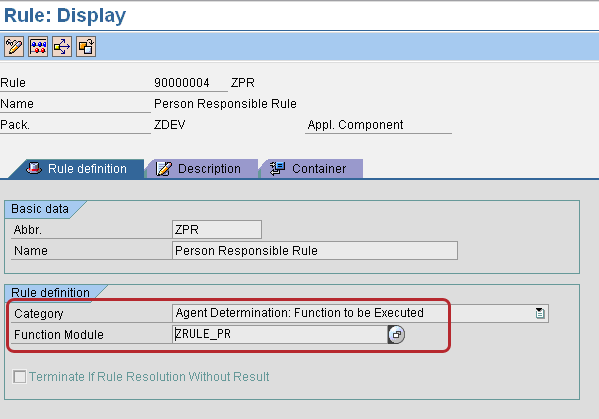
Figure 14
Rule category using a function module
When you use application-specific variables in your container definition, you supply the values for these variables by writing them into the container as name-value pairs. These are then interpreted by CAF on the central system. The runtime container is implemented as an internal table of the structure SWCONT with only the columns Element Name and Value being relevant.
The CAF uses the alert container not only for the exchange of application-specific variables but also for the exchange of internal information. The variables in Table 2 are used for this purpose.
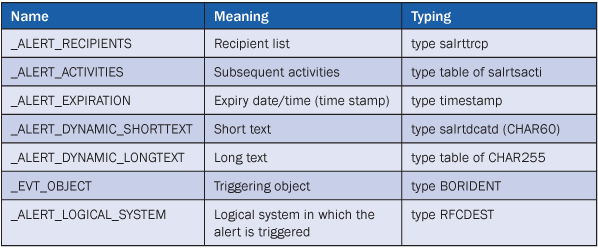
Table 2
Variable uses of a container
Set up the Alert Broadcast Settings
Step 11. Create information broadcasting settings. With these settings, you map the InfoObjects from the query you defined in steps 2, 3, and 4 to the alert category in step 6. Enter transaction RSRD_ADMIN and click the Settings button (Figure 15).
Figure 15
Select broadcast settings
You are taken to the screen shown in Figure 16. Here, select the query that you created in step 3 by clicking the Open button and then clicking the Create New Setting button. For the distribution type, choose Broadcast According to Exceptions and then click the Parameter Change link.

Figure 16
Select the query and create broadcasting settings
Step 12. Assign the corresponding alert category you created in SAP CRM to your information broadcasting setting. Once you click the Parameter Change link, your system displays the screen shown in Figure 17. Select the alert category in your SAP CRM system (see Figure 6) from the drop-down list next to the Alert Category field.

Figure 17
Select the Alert Category defined in your SAP CRM system
Step 13. Map the container parameters from SAP CRM to SAP NetWeaver BW query InfoObjects. Refer to Figures 7 and 8 for reference. In the Alert Parameter tab, click the icons to the right of each value (Figure 18). These parameters are then passed over to the alert.

Figure 18
Map the SAP CRM container parameters to SAP NetWeaver BW query InfoObjects
Step 14. Save the information broadcasting setting (Figure 19). You can execute the setting directly by clicking the Execute button or schedule the execution by clicking the Schedule button. The Schedule button opens a pop-up window in which you can schedule information broadcasting settings — such as periodically each week (Figure 20). In Figure 21, the log is displayed and you can see that four alerts were successfully generated.

Figure 19
Save and execute the information broadcasting settings

Figure 20
Schedule the information broadcasting settings

Figure 21
Broadcaster log of alerts
How the User Views the Alert
Once you execute the settings and the exceptions are generated by the SAP NetWeaver BW report for that user, the user receives an alert in the portal. Use the link https://XXXXX/irj/portal (with your values replacing X) to access the portal (Figure 22). Because alert generation is an ongoing process, once users are logged onto the portal page they can look at the alerts and take action.

Figure 22
Enter credentials on the portal page to check for alerts
After you enter your login ID, you are taken to your home page on the portal (Figure 23). You can see the alerts that are generated and click individual alerts to see details.

Figure 23
A user can see relevant alerts on the portal home page
Figure 24 shows details about an alert and its subsequent actions. You can either drill through the SAP CRM transaction to take action on this alert or you can drill down to the SAP NetWeaver BW report that triggered this alert.

Figure 24
Alert details in the portal
CRM Bus. Activity ERWER in the Subsequent Actions section defines the link to the SAP CRM activity transaction in the portal. Default View of Query (with This Exception) defines the link to SAP NetWeaver BW reports in the portal. If you click the link CRM Bus. Activity ERWER, the SAP CRM transaction screen appears (Figure 25). You now can trigger exception alerts.

Figure 25
SAP CRM transaction for this alert
Ankur Shah
Ankur Shah is a certified SAP NetWeaver BI 7.0 consultant with Capgemini US LLC and is based out of Cupertino (CA). He has been part of end-to-end implementations for SAP NetWeaver BI 7.0 and SAP BW 3.x at various clients. Before working on SAP NetWeaver BI implementations, Ankur started his career with TCS in India.
You may contact the author at ankur.shah@capgemini.com.
If you have comments about this article or publication, or would like to submit an article idea, please contact the editor.