Developers are all used to finding bugs in common programming languages, but how does this work for graphical models? This article explains in detail how to solve your process issues by using the tools shipped with SAP NetWeaver Composition Environment.
Key Concept
SAP NetWeaver Business Process Management (SAP NetWeaver BPM), as part of SAP NetWeaver Composition Environment 7.2, offers new ways of modeling business processes using the Business Process Modeling Notation (BPMN) standard. At the same time, SAP NetWeaver BPM brings the modeled processes to execution. In this sense BPMN is used as a kind of graphical programming language. Although graphical programming brings many benefits to the developer community (such as productivity gains), it is still unavoidable that errors will make their way into the models.
The SAP NetWeaver Business Process Management (SAP NetWeaver BPM) design and runtime environment, which uses the Business Process Modeling Notation (BPMN) for process modeling, improves developer productivity significantly because it takes over much of the cumbersome and error-prone development tasks. Although many error conditions are checked during development time, bugs often still make their way into the final executable model. During runtime, your process might either hang or throw exceptions.
Then the key question is: How can I figure out what went wrong? I’ll give you some tips and tricks that help you to find out why your process model is not working. This article is for developers who are in charge of implementing innovative processes for their companies. See how the tooling shipped with SAP NetWeaver BPM helps you to identify the root causes of your errors. I assume that you are familiar with the modeling environment of SAP NetWeaver BPM and you know how to model, deploy, and run BPMN-based processes.
Support During Development
The Process Composer perspective as part of the SAP NetWeaver Developer Studio is equipped with many check routines which monitor your process model during development time. (The checker is always invoked when you either click the save icon or press CTRL-S to save your model.) If those routines encounter problems that will cause trouble during execution, a red error marker attached to the erroneous BPMN shape makes the error situation visible to the modeler (Figure 1).
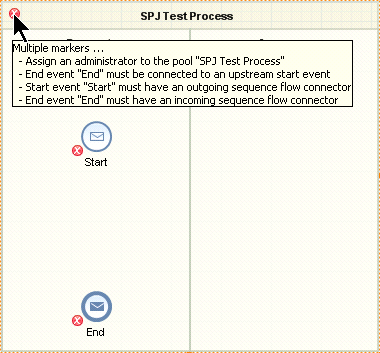
Figure 1
Error markers signal problems in your process model
By moving the mouse pointer over the red marker, you get a more detailed description of the issue. In Figure 1, the mouse pointer is over the marker of the pool leading to a list of problems encountered within the pool. This includes errors of individual BPMN elements, such as the ones assigned to the start and end event.
If you move the mouse pointer over one of the red icons attached to either the start or end event, you only receive the message for that particular BPMN element. You can turn these checks on or off in the SAP NetWeaver Developer Studio main menu. Follow menu path Project > Build Automatically to toggle between the two modes (Figure 2).
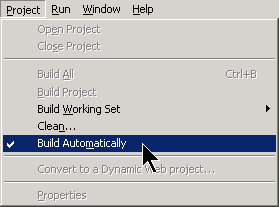
Figure 2
Toggle the automatic check facility in SAP NetWeaver Developer Studio
More than 100 checks have been implemented to help you reduce the number of errors during design time. Figure 3 shows an example of how the check routine identifies a missing default gate for an exclusive choice gateway.

Figure 3
Identify a missing default gate
In addition to errors, the check routines also identify ambiguous situations that might lead to problems during runtime. In this situation, the process itself is executable, but could lead to erroneous situations. Figure 4 shows how several sequence flows leaving the gateway point to the same activity, Create Order. This process might work during runtime. However, this is not a good modeling practice. That’s why you see the warning icon close to the gateway.
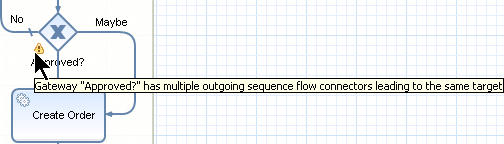
Figure 4
Warning: Multiple flows point to the same target
These are just a few examples on how the check routines take care of your process models. They help you in developing well behaving, executable BPMN models.
Debug Your Deployed Processes
After your model passes all checks, you build, deploy, and run your process. Typically, you will encounter problems during runtime. You want to debug your process models in the same way you are used to debugging your programs written in conventional programming languages, such as Java or C#. You most probably want to:
• Trace through your process model
• Inspect the contents of your process context
• Set or remove breakpoints
• Step into sub-flows
• Exit a sub-flow
• Resume process execution
I will show you how you can do this. First, make sure that you have all the rights for the debugging process models. The user you are using to connect to your Java engine requires a special role, the SAP_BPM_Debug role. Verify the correct role assignment by opening SAP NetWeaver Administrator in your browser. Use the URL https://<server>:<port>/nwa to open the SAP NetWeaver Administrator. Next, navigate to the user administration tool by following menu path Operation Management > Users and Access > Identity Management (Figure 5).
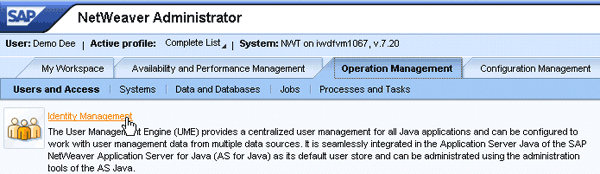
Figure 5
Open the user administration in the Java engine
Search for your user by entering the user’s name in the Search Criteria field, select the User from the associated drop-down list, and click the Go button. In the hit list of found users, select the one you are using to connect to the Java engine. Once selected, the user details appear beneath the hit list (Figure 6).
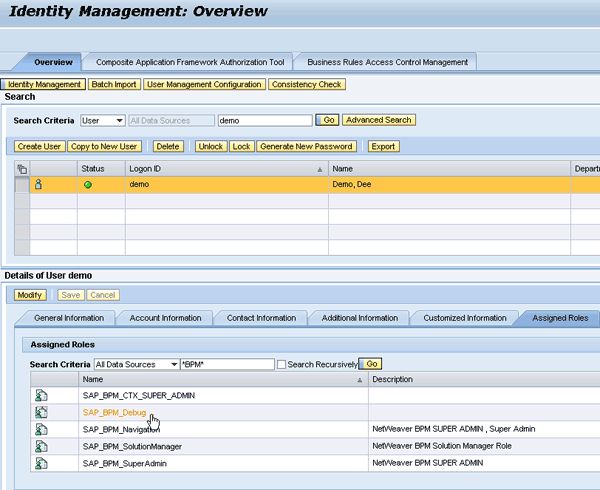
Figure 6
Verify the assignment of role SAP_BPM_Debug for your user
Next, switch to the Assigned Roles tab within the Details section. All roles assigned to your user are listed in the Assigned Roles table. Make sure that the SAP_BPM_Debug role is listed. You can reduce the number of items in the list by searching for all BPM relevant roles. You only have to add a suitable search criteria such as *BPM* and click the Go button. The result should then look like the one depicted in Figure 6.
If SAP_BPM_Debug doesn’t show up in your list, click the Modify button to add the role. Within the Available Roles section, enter *BPM* as the search criteria and click the Go button (Figure 7). One entry in your found roles list is named SAP_BPM_Debug. Select it and click the Add button to add the role to the user. Don’t forget to save your changes by clicking the Save button. With that you are done with the role assignment for your user.
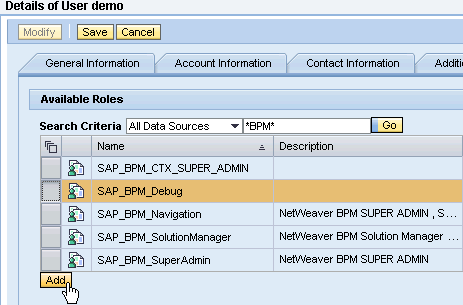
Figure 7
Assign the SAP_BPM_Debug role to your user
You now have to consider whether you have to set the server in debug mode or not. If you are only interested in debugging process instances and not Java code, then it is not necessary. However, in most cases, you also want to debug the executed Java code because it implements an automated activity. In this case, you have to set the server in debug mode.
You can either activate the debug mode from within SAP NetWeaver Developer Studio or with the SAP Management Console. Let’s begin with the SAP Management Console view inside the SAP NetWeaver Developer Studio. Follow menu path Window > Show View > Other… from the main menu. In the Show View dialog that opens, expand the SAP AS Java node, select the Management Console entry, and click the OK button (Figure 8). The Management Console view opens.

Figure 8
Open the SAP Management Console view in SAP NetWeaver Developer Studio
Navigate to the process table of your server. In the left half of the SAP Management Console window, expand the node for your server. You can identify your server by its system ID (e.g., NWT in Figure 9).
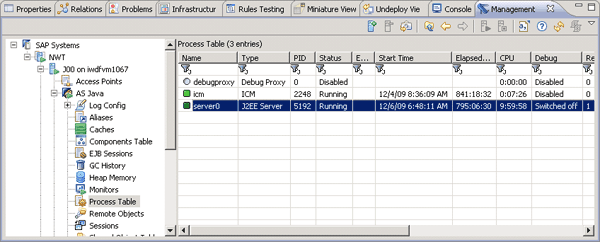
Figure 9
SAP Management Console within SAP NetWeaver Development Studio
Beneath the server are two instances: One is the Java instance (identifiable by the letter J at the beginning of the instance’s name [J00, in my case]) and the central services instance (identifiable by the letters SCS at the beginning of the instance’s name [SCS01 in my case — not shown in Figure 9]). You want to debug your Java server, so expand the Java instance node. You find an SAP NetWeaver Application Server (SAP NetWeaver AS) Java entry representing the Java application server. Beneath this node is the Process Table node that contains the actual server process that you can debug. After you select the Process Table entry in the tree, you receive a list of processes in the table to the right of the tree. Look for a process named server0. That’s the one you want to set in debug mode. By default, the debug mode is switched off as the entry in the Debug column indicates (Figure 9). Set the server in debug mode by right-clicking the entry and choosing Start Debug Session… from the context menu (Figure 10).
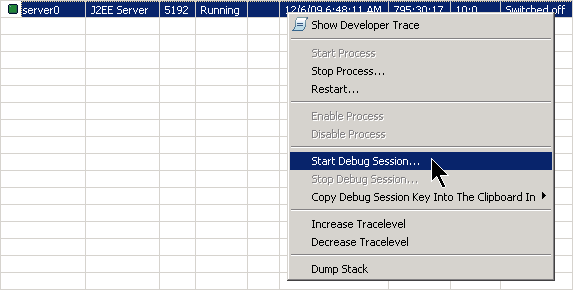
Figure 10
Set the Java server to debug mode
The Start Debug dialog opens and gives you a summary of your debug options (Figure 11). It describes in detail which debug modes are possible.
Note
If you need even more information, I recommend looking at the SAP NetWeaver CE 7.2 documentation at
https://help.sap.com. Follow menu path SAP NetWeaver > SAP NetWeaver CE > SAP NetWeaver Composition Environment 7.2 > SAP NetWeaver Composition Environment 7.2 Library. A new window opens that contains the documentation for SAP NetWeaver CE 7.2. Within that window, navigate in the tree that appears on the left side of the window. Follow menu path SAP NetWeaver Composition Environment Library > Developer’s Guide > SAP NetWeaver Developer Studio Basics > Administering AS Java from the Developer Studio > Enabling and Disabling the Debug Mode.

Figure 11
The Start Debug dialog
As shown in Figure 11, I chose the Code Isolation option. Click the Next button to open the next wizard step, which basically gives you a summary and the effects of the chosen option. Finally, click the Finish button to open a port for debugging purposes. As you can see, no restart is necessary. The server is immediately reserved for debugging and after clicking the refresh icon in SAP Management Console’s button bar, the Debug column for your server should be filled with an entry similar to the one shown in Figure 12.
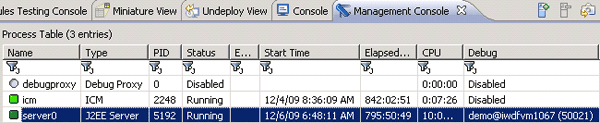
Figure 12
SAP Management Console showing the server in debug mode
As mentioned before, you can apply a similar procedure to the external program SAP Management Console as well (Figure 13). The navigation to the process table of the SAP application server is slightly different but essentially you can apply exactly the same actions as I did within the SAP NetWeaver Developer Studio-based SAP Management Console.
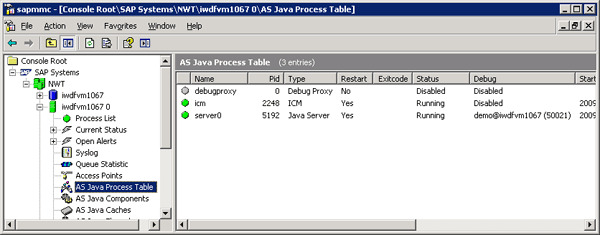
Figure 13
SAP Management Console showing the same situation as Figure 12
When you toggle between the server’s debugging and running mode, the context menu of the server node varies a little bit compared to the SAP NetWeaver Developer Studio-based version (Figure 14). The Enable/Disable Debugging entries are part of the sub-nodes of the All Tasks node.
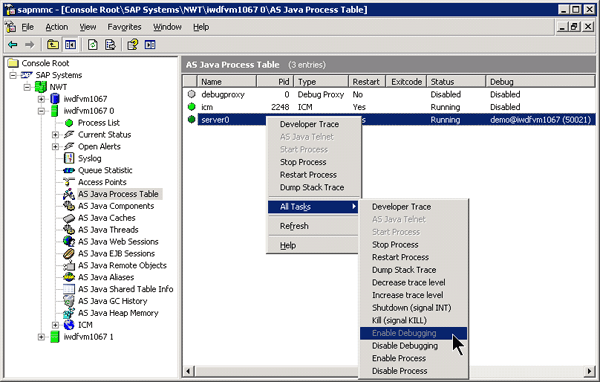
Figure 14
Enable debugging in the SAP Management Console
Now that the server is in debug mode, you can start your debugging session. You have to create a Debug Configuration that comprises the main debugging settings. You have to maintain such a configuration only once and then you can reuse it for all forthcoming debug sessions. You have two options to open the Debug Configuration wizard, which guides you through the configuration steps:
Option 1. In the Process Development perspective, click the debug icon  and select Debug Configurations from the context menu (Figure 15).
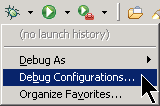
Figure 15
Open the Debug Configuration wizard from the Process Development perspective
Option 2. Switch to the debug perspective by following menu path Window > Open Perspective > Debug from the SAP NetWeaver Developer Studio’s main menu. Then select Run > Run Configurations… (Figure 16).
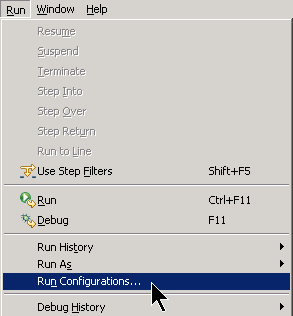
Figure 16
Open the Debug Configuration wizard from the debug perspective
The wizard opens and expects the type of debug session as your first input. Is it a Web application you want to debug, an applet, a process, or any other type that is supported by the debug perspective? You find the list of available types on the far left of the configuration wizard dialog. In this example, I want to debug processes, so select the Process entry and click the new icon in the upper-left corner to enter a new configuration for this particular type (Figure 17).

Figure 17
Create a new configuration for debugging processes
The next wizard screen is the most important one. You have to specify:
- The name of this particular configuration. You most likely want to provide several configurations for the same process for different use cases you want to cover with your tests (e.g., different input parameters). Therefore, you should provide meaningful names for your configurations to make them identifiable.
- The system on which your process is running.
- The project that contains the process model
- The concrete process (a project can contain several processes)
- Optionally, you can define input parameters for your process instance once it is started.
Figure 18 shows the most important fields of the configuration’s Main tab.
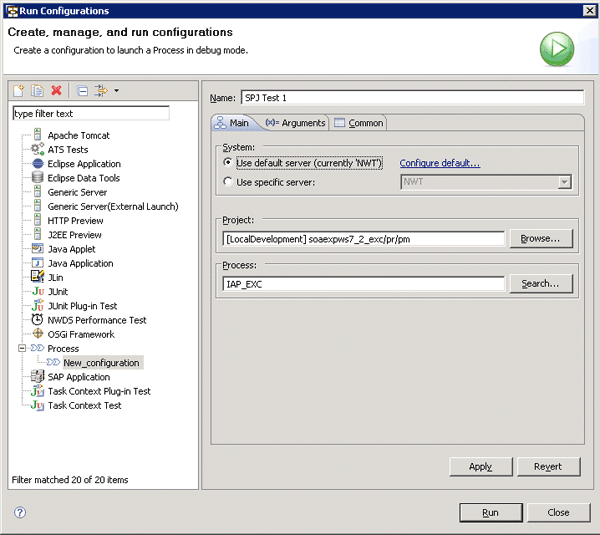
Figure 18
The Main tab comprising the most important configuration parameters for the debugging session
In my example, the name of the configuration is SPJ Test 1. The system the process is running on is the Default server, which is the one configured in the SAP NetWeaver Developer Studio preferences (Window > Preferences > SAP AS Java). You could even navigate to the server configuration by following the Configure default… link. However, I assume this has already been done in your environment. You could also point to a completely different server by selecting the Use specific server option and picking a server from the associated drop-down list. This allows you to use SAP NetWeaver Developer Studio as your central cockpit and connect to any server that you’ve maintained in the SAP NetWeaver Developer Studio preferences.
In addition to the server, you have to specify the concrete process you want to debug. As processes are developed within projects, you have to select the project first. Select the project containing your process by clicking the Browse… button and searching for the project within your workspace. Once selected, the Search… button of the Process input field only offers processes available in the chosen project, simplifying the search for processes significantly. Choose your process (Figure 18).
With these configurations you could immediately start your debugging session. However, it’s worth taking a look at the Arguments tab (Figure 19). This tab allows you to either start a new process instance from within SAP NetWeaver Developer Studio (Attach to a new process instance) or to debug the running process instances (Attach to all process instances) on the chosen server. If you decide to debug a completely new instance, you have even more options. You can specify values for the input parameters of your process by adding the appropriate entries between the opening and closing XML tags representing the parameters.
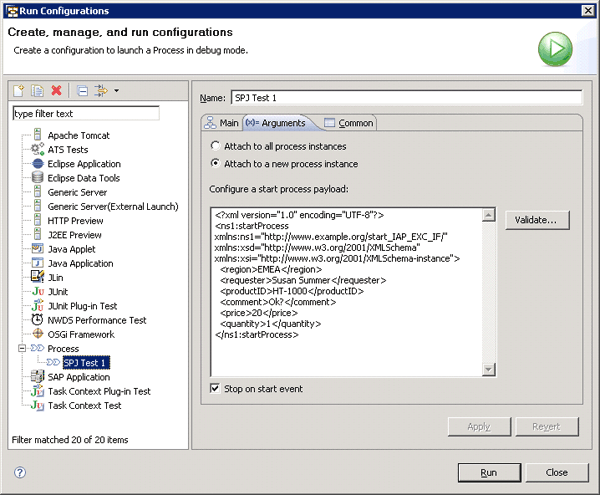
Figure 19
The Arguments tab of the configuration wizard
In Figure 19, the values for region, requester, productID, comment, price, and quantity have been set. The wizard retrieves the input parameters of the process by analyzing the process Start event, which allows the definition of triggers. A trigger is associated with an WSDL interface that reflects the process’s input interface. Based on this interface, the wizard automatically generates an associated XML representation that you can fill with appropriate content. Finally, you can specify whether the newly initiated process instance should automatically stop on the start event of your process. This feature allows you to stop the process execution right at the beginning of the process flow without defining any breakpoints. If this option is deselected the process stops only if breakpoints have been set before.
Note
Keep in mind that the setting of input parameters as well as the interruption of the process execution on the start event can only be applied if you kick off a new process instance out of SAP NetWeaver Developer Studio.
Save your settings by clicking the Apply button. You can either start your debugging session immediately by clicking the Run button or close the dialog and kick off the debugging session in a separate step.
To start the debugging session separately, open the Debug perspective and follow menu path Run > Debug Configurations from the main menu. The Debug Configurations wizard opens (Figure 20), which looks almost identical to the Run Configurations wizard.
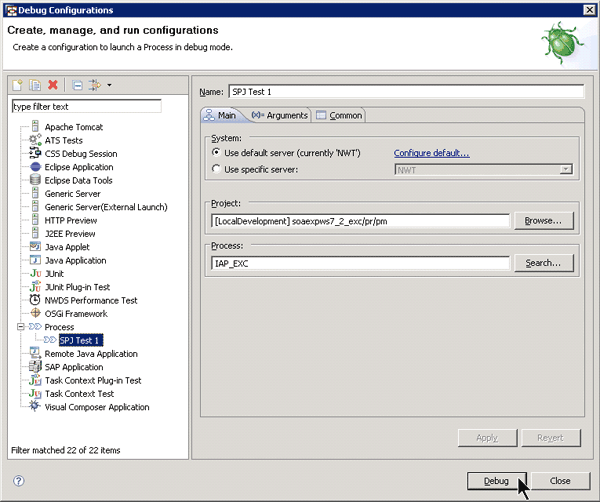
Figure 20
Start the debugging session
This time, you can identify your just-created configuration as a sub-entry of the Process node on the far left. Select your configuration and click the Debug button. The process instance is kicked off on your chosen server, the Debug perspective opens (if it is not opened yet), and the process immediately stops on the Start event because you selected the associated check box during configuration. Now it’s time to make yourselves familiar with the debugging perspective (Figure 21).
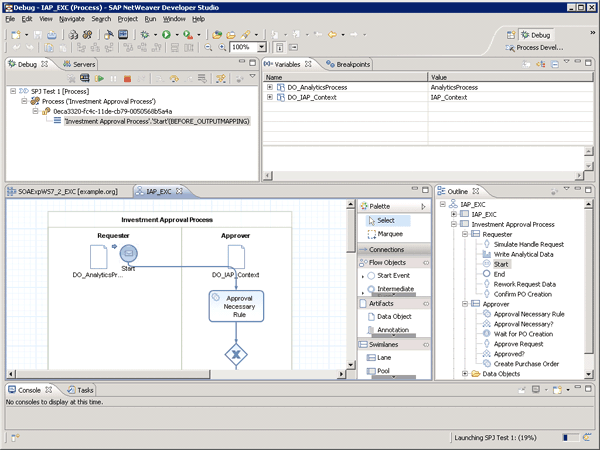
Figure 21
Debugging processes in the Debug perspective
In Figure 21, the Debug tab in the upper-left corner shows the call hierarchy. In this example, I am debugging an instance of the Investment Approval Process. The instance number is displayed right below the process’s name. Beneath the instance number, you can see the current position in the process itself. I stopped at the Start event before output mapping. This means that the process context has not been set yet with the initial values for the input parameters I’ve entered during configuration.
The current situation is also reflected in the process model beneath the Debug tab. The little blue arrow points to the step/activity/gateway that should be executed next. In the upper-right corner, you find two tabs named Variables and Breakpoints. As these names indicate, Variables allows you to analyze the contents of your process context, whereas Breakpoints lists all breakpoints defined for your process. Breakpoints can easily be set either in your Process Developer perspective or in the Debug perspective. The procedure is identical for both perspectives. Right-click your event, activity, gateway, or sub-process and select Toggle Breakpoint from the context menu as is shown in Figure 22.
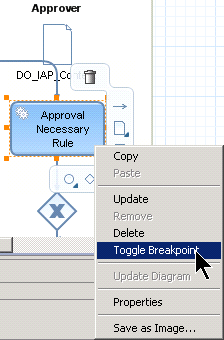
Figure 22
Toggle the breakpoints on the process model
As result a little filled blue circle close to the chosen BPMN shape is added (Figure 23) and an associated entry appears in the Breakpoints tab strip (Figure 24).
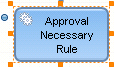
Figure 23
Activity with breakpoint
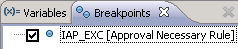
Figure 24
Active breakpoint in Breakpoints tab strip
Each breakpoint can either be activated or deactivated. You can deactivate a breakpoint by removing the marker in the associated check box on the Breakpoints tab. The process does not stop there during runtime in case it is deactivated. Visually, a deactivated breakpoint appears in the process model as an empty blue circle .
Now that you have a basic understanding about the Debug perspective, it’s time to step through the process. The most important icons you need for navigating, resuming, and terminating your process instance are:
 Step over: For stepping over an activity, gateway, event, or sub-process (equivalent to pressing F6)
 Step into: For stepping into a sub-process (equivalent to pressing F5)
 Resume: For resuming the stopped process (equivalent to pressing F8)
 Terminate: For terminating the current process instance (equivalent to pressing CTRL-F2)
As an example of what the process context looks like after applying the step over icon for the start event, look at Figure 25.
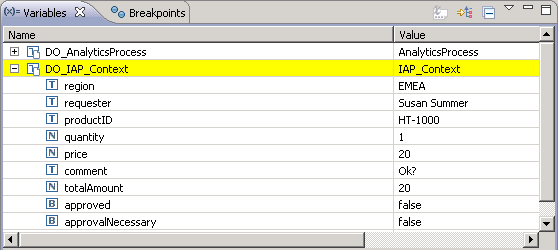
Figure 25
Process context after stepping over the start event
You can easily identify the parameters set during the maintenance of the Debug Configuration. The totalAmount field has been set by multiplying the price with the quantity, so the mapping for this field worked as well.
Stepping over automated activities means in essence to call the associated Web service and stop on the next activity, gateway, event, or sub-process before the input mapping of this next activity is executed. Stepping over human activities means that the runtime environment will add a notification to the Universal Worklist (UWL). You have to check that item and open the associated user interface (e.g., Web Dynpro application). After completing the UI, the process continues and stops again before the input mapping of the next step.
The step into icon can only be applied if the process stopped on a sub-process node. It doesn’t play a role if this is an embedded or a referenced sub-process. However, in the current release, you have to display all embedded sub-processes that you want to debug in expanded mode. That means that all steps within the sub-process must be visible in the main process model (Figure 26).

Figure 26
An expanded embedded sub-process within the main process
Once you dive into a sub-process, you can navigate through the inner flow by using the same means as for the main flow. To return from a sub-process, you have to set a breakpoint on the shape following the sub-process (Figure 26) and make use of the resume icon. The process then automatically stops at the breakpoint.
If you dive into a referenced sub-process, a separate debug thread for this referenced sub-process starts, resulting in a second node in the Debug tab strip as two completely separated process instances are executed now (compare to the Debug tab in Figure 21). What happens if your process is waiting on a break point and you go for lunch? No problem — after 30 minutes of inactivity, the debugging session is automatically freed from the breakpoint and the process continues normally.
This is all you have to know to debug processes. You can start process instances from SAP NetWeaver Developer Studio or attach the debugging environment to any running process. You can set breakpoints, step into sub-processes, return from them, step through the process flow, and analyze the contents of the process context. Equipped with this knowledge, you can take a closer look at your processes during execution and understand how they behave in different situations.
Note
With the current release of SAP NetWeaver BPM, it is not possible to change values in the context. This will certainly come with one of the next releases.
Support in SAP NetWeaver Administrator
So far I have shown you how you can analyze your processes during development time in your test landscape. However, there are always situations that require special treatment while the processes are running productively — for example, in cases in which processes are hanging and you want to figure out what went wrong.
I will show you the most important tool in SAP NetWeaver Administrator you can use for investigating the current situation directly on the server. For this start the SAP NetWeaver Administrator via the URL https://<server>:<port>/nwa. Follow menu path Operation Management > Processes and Tasks > Manage Processes (Figure 27). As result, a table with all the running process instances is displayed (Figure 28).
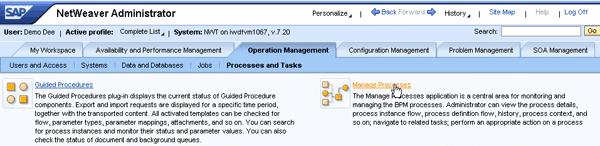
Figure 27
Navigation in SAP NetWeaver Administrator for analyzing processes
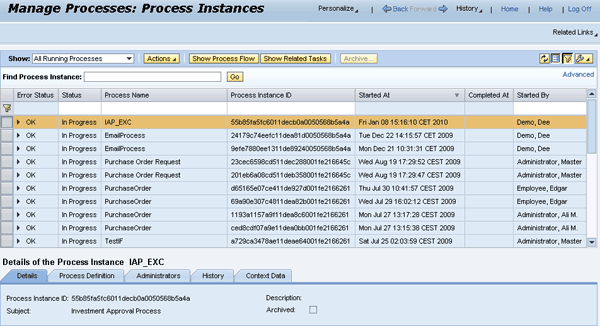
Figure 28
Table of all running process instances in SAP NetWeaver Administrator
You probably want to know what has happened to your process instance so far. Select the process instance you want to analyze further in the process table. Click the Show Process Flow button at the top to display the BPMN model of your process. A new window opens containing the visualization of the process flow. Besides the model, it contains additional valuable information (Figure 29).
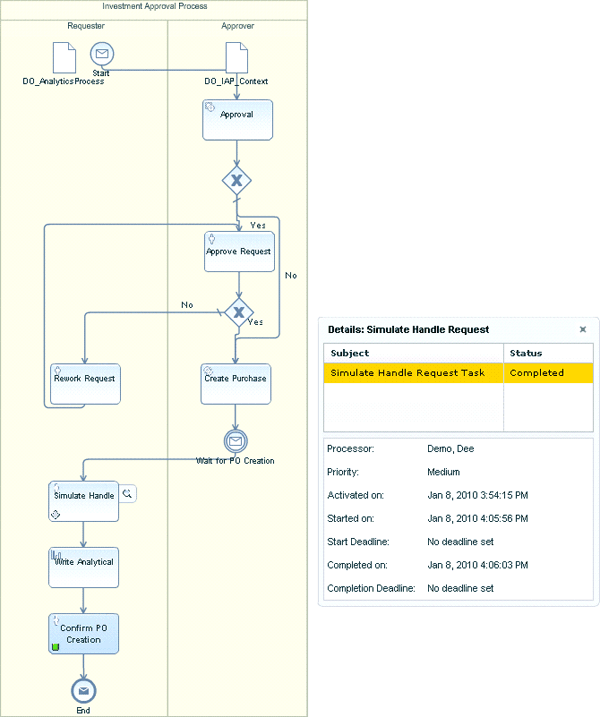
Figure 29
BPMN-model of a running process
You should recognize the green marker in the Confirm PO Creation activity. This marker indicates the current step that has to be executed next. For finished human steps, the associated activity contains a gray square as is shown in the Simulate Handle Request activity in Figure 29. You can even get more detailed information about the finished step by moving the mouse pointer over it so that a magnifying glass appears to the right of the BPMN shape. Click the magnifying glass icon and a separate window lists all details about the finished activity (on the right side of Figure 29). You can identify information about the processor, the start and completion date and time, as well as priority information. This gives you a good starting point for your process analysis.
Next, drill down into the process itself. Return to the SAP NetWeaver Administrator window containing all running processes. Beneath the table of process instances is a section named Details of Process Instance <processname> (Figure 30).
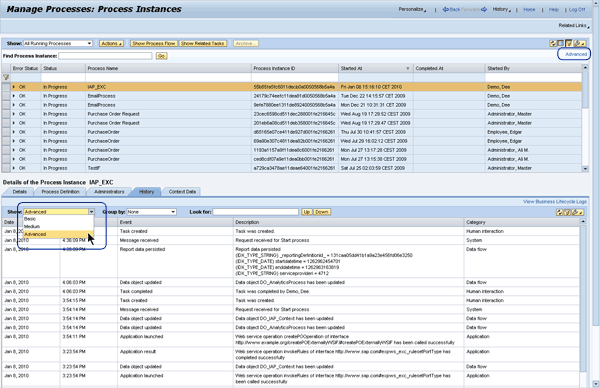
Figure 30
History overview for a selected process instance
It contains all you need to know about your process, particularly the history and the context data. Click the History tab and select the Advanced entry in the associated Show drop-down list to get more details (Figure 30). The entries appear in descending order (date and time), with the most current entry listed at the top. It’s a complete trace of the process execution and answers the question what happened when. It lists in detail:
- Date and time of each event
- Event type (e.g., task created or completed, message received, process context updates, and Web service invocations)
- Event Category (e.g., human interaction, system, data flow, and application)
With this overview, you get a detailed understanding about the process execution sequence. However, what happened to the data in the process context during runtime? You can find the answer on the Context Data tab (Figure 31).

Figure 31
Context Data tab for the selected process instance
For every change on the process context, the system writes a separate data record to the database that you can analyze on this tab. As you can see in Figure 31, you get an overview of all the fields stored in the process context. You can use it to track down errors on the data level whereas the History tab allows you to find errors in the process’s sequence flow. Both tabs together allow a detailed error analysis on your running process instances.
You are not limited to running processes. You can even look at processes that have already been finished. For this, you have to activate the advanced search capabilities for your process instance. In Figure 30, click the Advanced link in the upper-right corner of the screen to view search options (Figure 32).

Figure 32
Additional search options for process instances
Select Completed in the Status drop-down list to view a list of all the finished process instances. You can narrow down the search to whatever you need: Figure 32 gives you a very good overview of all the options. Play around with them to see what they can do for you.
Finally, I want to briefly mention the Actions button at the top of the Manage Processes screen. It lists the options you can apply to a selected process instance in the process instance table: suspend, resume, or cancel (Figure 33).

Figure 33
Actions on process instances: suspend, resume, or cancel
Suspend is particularly useful in cases in which a Web service call was not successful (e.g., due to a downtime of the server because of a software update). The process is hanging because the called server is not available. Once the service is back, you can first suspend the affected process and afterward resume it. By applying the Resume action, the process repeats the activity that caused the problem (the Web service invocation) because the system is up and running again. The process should then proceed as planned. When it is not possible to recover from an error, you should remove the process from the process table by applying Cancel to it.
The Manage Process tool displays all collected process data to help you to identify and track down issues. Although this tool delivers a significant amount of detailed information (which will certainly be good enough to solve most of your problems), you should always look at the most basic information source the SAP NetWeaver Application Server offers you: the standard Java trace. From the SAP NetWeaver Administrator homepage, follow menu path Problem Management > Logs and Traces > Log Viewer (Figure 34). From the Log Viewer homepage, follow menu path Show View > General > Default Trace (Java) (Figure 35)
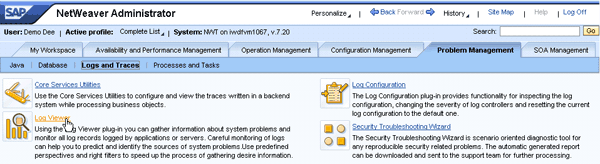
Figure 34
Navigation to the Java log viewer
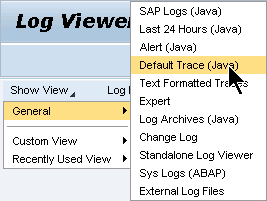
Figure 35
Calling the Java default trace
As result, you see a table of low-level errors that might help you find process-related issues. Figure 36 depicts a typical screen of the Log Viewer.
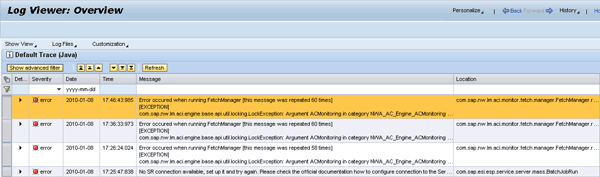
Figure 36
Log Viewer lists errors on Java level
This article gave you a detailed description on how to track down process-related issues. You started in SAP NetWeaver Developer Studio and learned how it helps you during development time to model syntactically correct BPMN models. Also, I covered some checks on process semantics.
Next, I discussed some prerequisites that have to be fulfilled to debug processes once they are deployed. You learned how to set debugging rights for users and how to switch the Java server into debugging mode (although this is not necessary if you want to debug process instances only).
After that was the creation of debugging configurations that summarize the debugging settings for a certain debug session. Then you maintained the debugging configuration, you applied them to a process model and learned how to trace processes on a BPMN level. Finally, you discovered how to track down issues using the functionality available in the SAP NetWeaver Administrator. The Manage Processes tool allows you to inspect running and completed process instances on a very detailed level. Equipped with this knowledge, you are now well prepared to resolve your own process-related issues quickly.

Dr. Volker Stiehl
Prof. Dr. Volker Stiehl studied computer science at the Friedrich-Alexander-University of Erlangen-Nuremberg. After 12 years as a developer and senior system architect at Siemens, he joined SAP in 2004. As chief product expert, Volker was responsible for the success of the products SAP Process Orchestration, SAP Process Integration, and SAP HANA Cloud Integration (now SAP HANA Cloud Platform, integration service). He left SAP in 2016 and accepted a position as professor at the Ingolstadt Technical University of Applied Sciences where he is currently teaching business information systems. In September 2011, Volker received his Ph.D. degree from the University of Technology Darmstadt. His thesis was on the systematic design and implementation of applications using BPMN. Volker is also the author of Process-Driven Applications with BPMN as well as the co-author of SAP HANA Cloud Integration and a regular speaker at various national and international conferences.
You may contact the author at editor@SAPpro.com.
If you have comments about this article or publication, or would like to submit an article idea, please contact the editor.