Learn how to modify the object manager in the standard Organization and Staffing interface so that you can easily integrate custom object types.
Key Concept
Sometimes you need to create custom object types when the standard organizational management object types cannot satisfy your business requirements. Some examples might be creating new custom object types for different kinds of functional areas of an organization or company-specific job groupings. To search objects (instances) of a new object type using transaction PPOME, you need to incorporate the custom object type in the search area of the object manager.
The Organization and Staffing interface is becoming the preferred mode of maintenance because it allows you to maintain different Organizational Management (OM) objects, relationships, and structures in a single place. It also offers an intuitive graphical user interface (UI), which is easier to use than the traditional expert maintenance mode.
Say that you need to map organizational (org) units to the divisions of North America, such as the US divisions. Users want to manage those divisions in OM. In this example, the PPOME maintenance interface is the standard working interface for the company, which means you need to use it to maintain custom object types. Although the normal search provides a list of values based on the selection criteria, this process enables the system to return an object structure based on customizations you have in your system.
The Organization and Staffing interface (PPOME) can help you with this project. By following a six- step process, you can create a custom object type (e.g., Divisions in USA), a custom evaluation path for the Structure search tool, and a search node (e.g., Division) to search for your custom object.
The Six-Step Process
Users can access the maintenance interface of the organizational structure by simply following menu path Human Resources>Organizational Management>Organizational Plan>Organization and Staffing. Then, for any ongoing maintenance of the org structure you can follow menu path Human Resources>Organizational Management>Organizational Plan>Organization and Staffing>Change. Alternately, you can use transaction PPOME.
The area on the left of the interface layout of the Organization and Staffing interface is called the object manager, which consists of the search area and selection area (Figure 1).
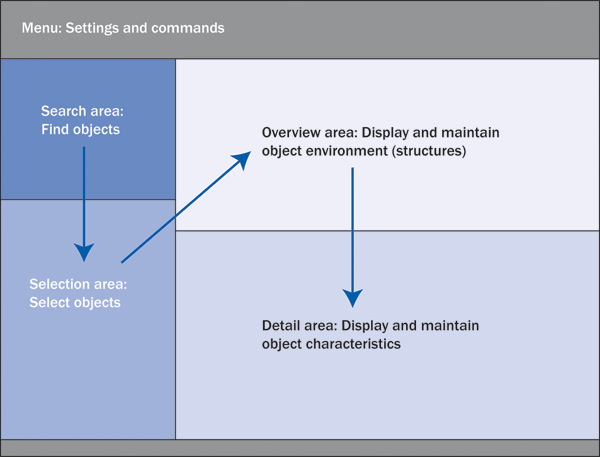
Figure 1
Different areas of the Organization and Staffing interface
Follow these six steps to successfully customize the object manager:
Step 1. Create a new custom object type
Step 2. Define a new search node
Step 3. Add the search node to the object manager search area
Step 4. Assign search tools to the search node
Step 5. Create a custom evaluation path
Step 6. Define Structure search for the object type
Step 1. Create a new custom object type. The first step is to create your own custom object type to include in the object manager. Before you customize the object manager, you must create a custom object type by following the IMG menu path Personnel Management>Organizational Management>Basic Settings>Data Model Enhancement>Maintain Object Types.
In the screen that appears, click on the New Entries button. Then enter 9D for the object type (O), Divisions in USA for the Object type text, and select the Icon name (Figure 2). After saving your entry, the system adds the new custom object 9D to table T778O, which contains all of the OM object types.

Figure 2
New custom object type definition
Step 2. Define a new search node. The search node determines where the objects appear in the search window. This is the first step to incorporate the new custom object type in the search area of the object manager. Add a search node to the custom object type by following IMG menu path Personnel Management>Organizational Management>Hierarchy Framework>Object Manager>Define Your Own Search Node.
In the screen that appears, select Definition of Search Node under the Dialog Structure and then click on the New Entries button to create a search node for your custom object type (Figure 3). After entering the Search Node Key, Name, Obj. type, and Icon name, save the data. This adds the new search node in table T77FSEAN, which controls how the system displays the search node. The Name and Icon name are displayed in the object manager search area. Here you can enter another name or icon name for your search node. If you do not specify these values in this step, the object manager uses the name and icon name from table T778O when it displays the search node.
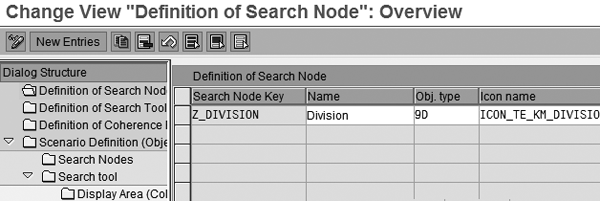
Figure 3
Create a new search node
Step 3. Add the search node to the object manager search area. This particular step configures the object manager to include the newly created search node. You specify the object manager scenario to include your new search node by following menu path Personnel Management>Organizational Management>Hierarchy Framework>Object Manager>Adjust Search Area>Add Additional Node to Search Area>New Entries.
In the screen that appears, enter the Obj. Manager Scenario, Search Node Key, Name, Position, Column group, and Column header type (Figure 4). The object manager provides different configuration options and specific configuration is represented by a scenario. OMEOO0 is the default scenario, which I’ll use for this example.
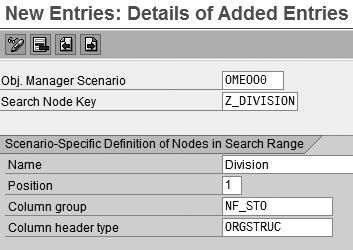
Figure 4
Link the new search node to the object manager scenario
Note
INSERT NOTE To display the active object manager scenario’s technical name in the search area, you need to activate the user parameter OM_OBJM_SCEN_DISPLAY by following menu path System>User Profile>Own Data. In the screen that appears, click on the Parameters tab and assign value X in the Parameter value field to activate user parameter OM_OBJM_SCEN_DISPLAY.
The Column group field in Figure 4 specifies the type of object information that should appear in the search results. I used column group NF_STO (organizational unit in locator) because the columns defined in this group are relevant for my custom object type Divisions in USA. The Column header type determines which titles appear at the top of the columns.
Note
The fields Column group and Column Header type in Figure 6 are optional. Any entires made here override the values you entered in step 3 of the main article.
Step 4. Assign search tools to the search node. The search node is a collection of search tools, so you need to assign these tools to the search node you just created. Examples of search tools include search term, structure search, and free search. Follow menu path Personnel Management>Organizational Management>Hierarchy Framework>Object Manager>Adjust Search Area>Adjust Search Node>New Entries.
First, assign the search tool Search term to the search node you created in step 2 (Figure 5). Search term allows you to search for a particular object and show the result in a list display format. The field Interaction tool defines the possible user actions on the search results in the selection area — such as double-click and drag-and-drop — and the results of these actions. These user actions move the object from the selection area to the object manager overview area.
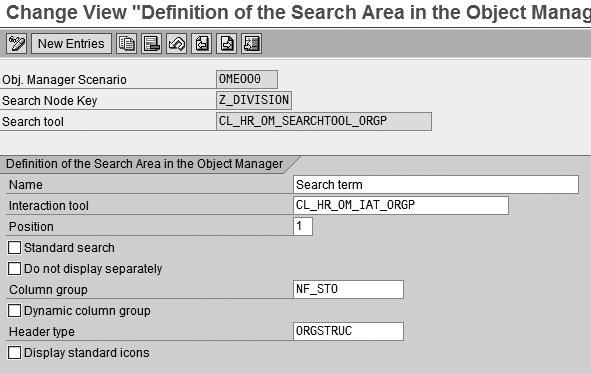
Figure 5
Assign the search tool Search term to the search node
The standard search tool CL_HR_OM_SEARCHTOOL_ORGP is implemented as an ABAP object class for Search term. The interaction tool CL_HR_OM_IAT_ORGP used here is also implemented in the class of ABAP objects. You can also choose another interaction tool, such as CL_HROM_STANDARD_ACTIONTOOL.
Another search tool you can add is Structure search, which shows the search result in a hierarchical display format. Assign Structure search to the search node Z_DIVISION (Figure 6). The standard search tool CL_HR_OM_SEAT_ STRUCTUAL_SEARCH is available for Structure search. However, to use Structure search for the custom object, you need to create and store an evaluation path with your object type, as described in the subsequent steps.
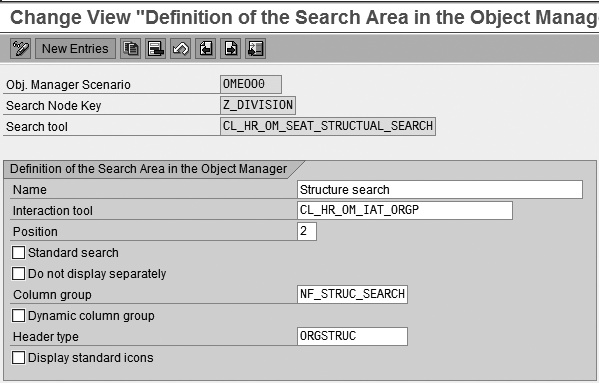
Figure 6
Assign the search tool Structure search to the search node
Step 5. Create a custom evaluation path. An evaluation path is a series of relationships between different object types. Structure search displays different object types based on the relationships specified in the evaluation path while searching for your custom object type. The system finds the evaluation path from table T77OS (Structure search) for the object type.
This step is required so that you can use the Structure search tool. For this step, follow the IMG path Personnel Management>Organizational Management>Basic Settings>Maintain Evaluation Paths>New Entries.
To create the evaluation path, enter an Evaluation Path name and description before saving the entry (Figure 7). In my example, I created Z_DIV, which I named List Of Org units in a Division. Then click on Evaluation path (individual maintenance) on the left side of the screen and click on the New Entries button. Next, specify the sequence of objects and the relationships between them.

Figure 7
Define the evaluation path Z_DIV
Note
I mentioned how to create a custom object type and the evaluation path. However, this article assumes that user has already created the custom relationship allowed between Org unit and Divisions in USA. This custom relationship is used in the evaluation path.
Step 6. Define the Structure search for Object type. This step is allows you to attach the evaluation path Z_DIV for Structure search with your custom object type — 9D (divisions in US) in my example. Follow IMG menu path Personnel Management>Organizational Management>Basic Settings>Data Model Enhancement>Maintain Object Types.
In the screen that appears, select your Object type and then double-click on the Structure Search folder under Dialog Structure (Figure 8). Click on the New Entries button to create a new entry containing the evaluation path Z_DIV that you created in the previous step. Here, I created the custom object type 9D. List Of Org units in a Division is the text for the evaluation path Z_DIV.

Figure 8
Specify the evaluation path for Structure search
Now both the Search term and Structure search tools are available for our custom object type 9D in the Organization and Staffing interface via transaction PPOME (Figure 9). These search tools automatically start when the search node is selected in the search area of the object manager. As a result, you can search for your custom object type and display the search result in a list display or tree format.
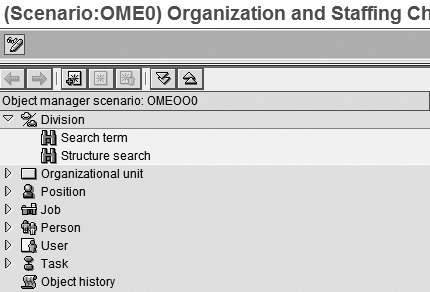
Figure 9
The object manager search area after customization
Note
How to configure the Free search tool is beyond the scope of this article, so I’m not going into further details. Follow the standard IMG to perform this task
Note
InfoSet is a prerequisite for creating queries, which contain data that might include tables (infotypes) or logical databases. You can create your own InfoSet using SAP transaction code SQ02. This should be done before performing the Free search tool IMG activity. Always remember to generate your InfoSet before use.
The Search tool specifies the way the system searches a particular object. Various search tools are implemented as an ABAP Object class. I have shown two common search tools: Search term CL_HROM_SEARCHTOOL_ORGP and Structure search CL_HR_OM_SEAT_STRUCTUAL_SEARCH. You can also use the Free search tool CL_HR_ST_ADHOC_SELECTION for your custom object type. Free search, also known as Query search, is based on the InfoSet that contains the data fields and object types you needed. In order to store your own InfoSet for Free search, follow IMG menu path Personnel Management>Organizational Management>Hierarchy Framework>Assign InfoSets to Object Types.
Debanjan Chattopadhyay
Debanjan Chattopadhyay specializes in SAP HCM (Personnel Administration, Organizational Management, Compensation, Payroll, ESS, and MSS). He has worked on multiple SAP HR/Payroll projects comprising full-cycle implementations, upgrades, post-implementation support, and outsourcing engagements since 1997. He currently works as a senior SAP HR manager and solution architect for Citrix Systems.
If you have comments about this article or publication, or would like to submit an article idea, please contact the editor.


