You can use a custom data slice and standard exit functionality to create a data slice that you can lock and unlock. This allows the person responsible for BI Integrated Planning (BI-IP) configuration to set up a BI-IP layout in which users cannot update data cells manually. Sample code is included
Frequently during BI Integrated Planning (BI-IP) implementations, I have come across scenarios with different security requirements for the same data set based on who is working with the data. In other cases, companies want to enforce consistency in how data is modified. For example, you might not want to allow users to edit certain data cells, but you might want them to be able to access and edit other functions.
This requirement could occur in various situations:
- In the direct expense entry screen in cost center planning, you want to show all cost elements. However, you cannot directly enter some expenses and want to calculate them using a function. For example, salary should be driven off of headcount planning. Users should only be able to edit headcount numbers, whereas salary numbers should be calculated using a formula.
- You have a demarcation in a layout in which users enter some data manually while the system enters other numbers using an automated process — for example, known expenses attributable to a specific characteristic versus unknown expenses arrived at using an allocation rule. Users should not be able to edit the function-calculated numbers.
- You have a planning layout with a mixture of plan and actuals. The actuals data should be locked for user input. However, you have multiple plan scenarios. You want the user to be able to copy all the data (plan and actuals) to a new scenario, and then work with the new data set with the same restriction in place. The copy function needs to skip the data slice.
I’ll show you a method to implement a switchable data slice that allows the person configuring the layouts and functions to control when the system uses or ignores the data slice. The method uses custom ABAP exit functionality with logic built in for a data slice. This logic defines the data cells that should be locked for user entry when the data slice is switched on. The data slice class includes buffering to improve performance. The addition of a small piece of code allows you to control when the system calls the logic for locking cells. I will build a couple of functions to turn the data slice on and off. You then can include these functions in BI-IP planning sequences. In this manner you can control in the background when the data slice locks cells for input or when the cells are unlocked.
This allows users to build a data slice that is easily extensible without modifying standard data slice tables. Because the slices are controlled by a function, you can easily control what data is protected for what specific use case. You can extend this concept to have multiple layers of data slices for which you can set the locking layer by layer.
Say your layout is composed of different types of data cells (types A, B, C, and D) as shown in Figure 1.

Figure 1
Data in the InfoCube
You can create four different data slices: DS_A, DS_B, DS_C, and DS_D. These are layered data slices. The process I describe allows you to control which data slices should be switched off in which layout. For example, you can have a layout in which data cells A and B are locked (data slices DS_A and DS_B are active) and another layout in which data cells C and D are locked (data slice DS_C and DS_D are active).
You can use this method if you want a certain cell to be protected in one layout and to be open in another (such as on a different aggregation level). The method enables session-level switching, which means that the data slice is turned off only for a particular session. This allows you to use the data slice for user-executed functions without affecting the entire user community.
Note
The functionality used is the exit functionality provided by SAP to build your own data slice. This is not a modification of the standard SAP solution.
The Four-Step Process
The four steps at a high level are:
Step 1. Create a custom data slice that incorporates your data protection logic
Step 2. Create a custom exit class to implement a function that switches the data slice on and off
Step 3. Create the planning function type based on the class in step 2
Step 4. Create and use planning functions that switch your data slice in a planning sequence
Step 1. Create a Custom Data Slice That Incorporates Your Data Protection Logic
Use transaction SE24 to define a custom exit class. Name the data slice and click the Create button (Figure 2). If you are going to create multiple data slices, you might want to consider using serial naming to identify them (e.g., ZCL_MY_SLICE_DS_A and ZCL_MYSLICE_DS_B).

Figure 2
Create a new class for the custom data slice
In the Create Class window that opens, enter a Description for your new class, set the Instantiation to Public, and select Usual ABAP Class (Figure 3). Click the Save button to save your changes.
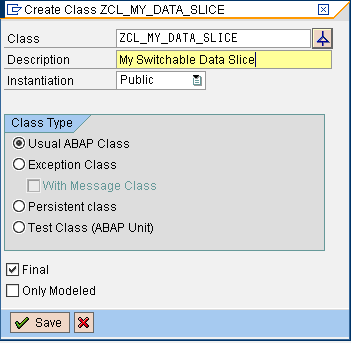
Figure 3
Enter the class description and select the class type
Return to the Class Builder screen, select the Properties tab, and click the Superclass button (Figure 4). Enter the Superclass name as CL_RSPLS_DS_EXIT_BASE (Figure 5).The ZCL_MY_SLICE exit class inherits from the CL_RSPLS_DS_EXIT_BASE class, making it a superclass. This superclass is required to give you access to the standard methods to maintain a data slice, which are the protect cells method and the method to access the data slice buffer. Click the save icon.

Figure 4
Click the Superclass button to indicate from which class ZCL_MY_DATA_SLICE should inherit
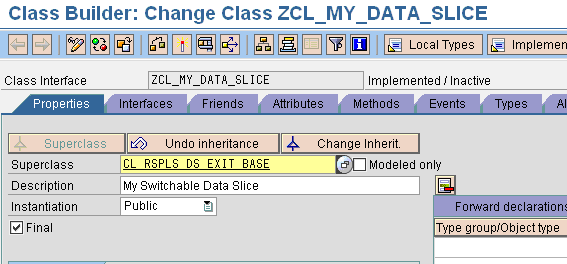
Figure 5
Enter the superclass CL_RSPLS_DS_EXIT_BASE
Next, click the Methods tab, which displays the standard methods with pre-populated information (Figure 6). I add my own method, MY_DATASLICE, in which I implement logic for locking data based on my requirements. I then add the Level, Visibility, and Description.

Figure 6
Add a new method (e.g., MY_DATASLICE)
Keep the cursor on this method and click the Parameters button. Add parameters to the new MY_DATASLICE method (Figure 7). I added the following three:
- I_S_DATA : The input data record that the system checks to determine whether the data cells defined by that record should be protected
- E_T_MESG: The output message structure. For example, you can pass a message that states that this cell is locked by your data slice. I recommend using this message because you always want to know what has locked cells in case of any unexpected results.
- E_NOINPUT: A Boolean flag that you can set to indicate whether the cell should be protected or not. If you want to protect the cell, the method sets this parameter to X, otherwise it leaves the parameter blank.
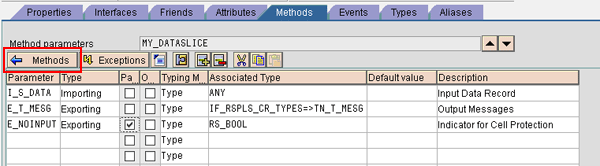
Figure 7
Add parameters to the MY_DATASLICE method
Now add logic to MY_DATASLICE that defines what cells should be locked. For example, this is where you could set that all cells of type A should be locked. Click the Methods button in Figure 7 to return to the screen in Figure 6 and then double-click MY_DATASLICE. This takes you to the screen in Figure 8. Here you redefine the standard method IF_RSPLS_DS_METHODS~IS_PROTECTED to include buffering and the data slice switch. Select this method and click the redefine icon.

Figure 8
Redefine the IS_PROTECTED method
Replace the code in this method with the IF_RSPLS_DS_METHODS~IS_PROTECTED code available at this link. This code uses the buffer to improve performance. The basic algorithm is as follows:
Input: New Record
Check if the record exists in the buffer. If so, use the results from the buffer. Otherwise call the method to check whether the cell should be locked. Return the result and store the result in the buffer.
Save the ZCL_MY_DATA_SLICE class and activate it. Your custom data slice is now ready.
Step 2. Create a Custom Exit Class to Implement a Function That Switches the Data Slice On and Off
Use transaction SE24 to define class ZCL_MAINTAIN_DATASLICE for the switching function. Create class ZCL_MAINTAIN_DATASLICE similar to the way you created the ZCL_MY_DATA_SLICE class. In the Class Builder screen click the Interfaces tab and add the interface IF_RSPLFA_SRVTYPE_IMP_EXEC_REF (Figure 9).

Figure 9
Add the interface for planning functions
Click the Methods tab. Double-click the IF_RSPLFA_SRVTYPE_IMP_EXEC_REF~ INIT_EXECUTION method and save it. Then double-click the IF_RSPLFA_SRVTYPE_IMP_EXEC_REF~EXECUTE method and save it. I do not need to enter in any code because I am using this function for the sole purpose of switching the data slice on or off.
Next, redefine the IF_RSPLFA_SRVTYPE_IMP_EXEC_REF~GET_REF_DATA_SEL method following the same method-redefining process in the previous step. Replace the code in this method with the IF_RSPLFA_SRVTYPE_IMP_EXEC_REF~GET_REF_DATA_SEL code available at this link. This is where the logic is implemented to set the data slice to either LOCK or UNLOCK based on what has been passed to the method.
Save the ZCL_MAINTAIN_DATASLICE class and activate it.
Step 3. Create the Planning Function Type Based on the Class in Step 2
Use transaction RSD1. Create an InfoObject to store the parameter that identifies whether the data slice needs to be locked or unlocked. Name the InfoObject ZIP_DSLK (Figure 10). This InfoObject stores values for locking or unlocking the data slice.
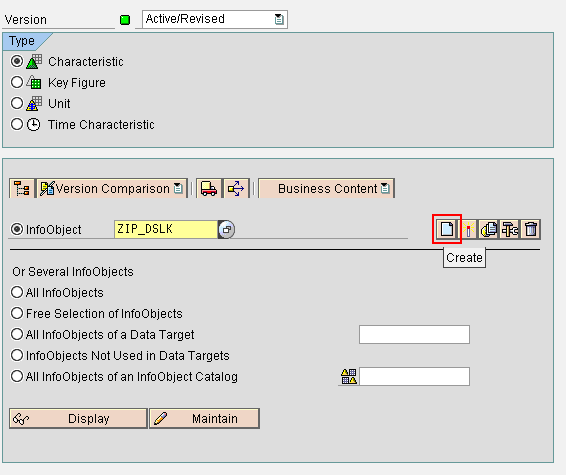
Figure 10
Create the ZIP_DSLK InfoObject used for the planning function
Next, click the create icon. Enter the InfoObject description and continue by clicking the green check mark icon (Figure 11).

Figure 11
Enter a description for ZIP_DSLK
Return to Figure 10 and click the Maintain button. In the General tab select CHAR- Character String for the Data Type (Figure 12). For the Length, enter 10. The length should be high enough to maintain the maximum text length (UNLOCK in our case). Save and then click the activate icon to activate the ZIP_DSLK InfoObject.
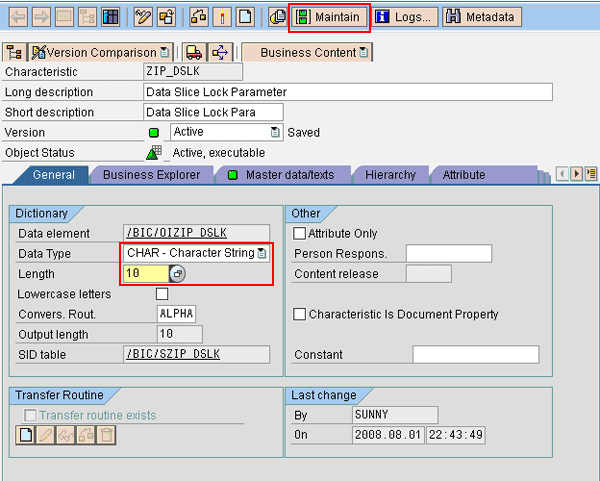
Figure 12
Maintain InfoObject properties and values
Now you create the master data entries required for the function. Click the Maintain button in Figure 12. In the screen that appears, click the execute icon. In the next screen, click the create icon to create two entries: LOCK and UNLOCK (Figure 13). Save and exit.
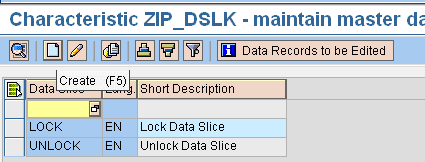
Figure 13
Add the master data values LOCK and UNLOCK
Next, use transaction RSPLF1 to set up the function type that switches the data slice. I created this function type using the class ZCL_MAINTAIN_DATASLICE that I created earlier. Enter a name for the function type, such as ZMNTN_DATA_SLICE, and click the Create button (Figure 14).

Figure 14
Create a new function type
In the Properties tab of the screen that appears, choose the class that you created in step 2 (Figure 15). Select the check boxes for Reference Data and Process Empty Records to signify that the ZMNTN_DATA_SLICE function is a just a dummy function used for switching data slices. This function does not modify any data, so it needs to process empty records.

Figure 15
Select the properties for the ZMNTN_DATA_SLICE function
Now switch to the Parameter tab. Right-click the Parameter field to add an elementary parameter called COMMAND (Figure 16). This parameter has the values LOCK or UNLOCK that pass the InfoObject ZIP_DSLK values from the master data to the function itself.

Figure 16
Add the COMMAND parameter to the ZMNTN_DATA_SLICE function
Save and activate the function type. Your planning function type for maintaining data slices is ready. In the next step, you apply this planning function in a sequence to turn the data slice on and off.
Step 4. Create and Use Planning Functions That Switch Your Data Slice in a Planning Sequence
First, create a dummy aggregation level. The system uses this dummy aggregation level only for exit functions, so it does not need to be relevant for planning. I am using this function primarily to execute ABAP code. You need at least one characteristic in this aggregation level.
Next, create a filter in the planning modeler on this aggregation level that does not select any data. You can do this by selecting filter values that do not satisfy any data conditions (e.g., year = 1700) to ensure that you do not lock any data when the system executes the exit functions.
Then create two planning functions in the planning modeler on this aggregation level. One activates the data slice and another deactivates it. These are functions such as the one you create in step 3, with the only difference being the value of the parameter command. The Activate Data Slice function has the parameter value LOCK whereas the Deactivate Data Slice function has the parameter value UNLOCK (Figure 17).

Figure 17
Create the planning functions to switch the data slice
Next, use these functions in a planning sequence in which you need to deactivate the data slice (Figure 18). Execute the function to deactivate the data slice and then activate it again. The sequence looks like this:
- Deactivate the data slice
- Execute your function
- Activate the data slice

Figure 18
Planning sequence that modifies data locked by a switchable data slice
Shailesh Unny
Shailesh Unny is a technology architect with more than eight years of BI experience, primarily focusing on translating business requirements into effective functional and technical specifications. He has extensive experience in data modeling, design, configuration, and performance tuning of BI systems. He has also helped adapt SAP’s standard offerings to implement several specific customer requirements. Shailesh is currently involved with working on BI-Integrated Planning and SAP BusinessObjects Planning and Consolidation solutions in the SAP NetWeaver BW 7.0 environment.
You may contact the author at shailesh.unny@bearingpoint.com.
If you have comments about this article or publication, or would like to submit an article idea, please contact the editor.