In this question-and-answer article, find out how to start working with the new user interface (UI) in SAP CRM 2006s. The author provides a three-day plan for accessing the new UI, learning the concepts the new UI introduces, and customizing the layout.
Key Concept
The WebClient UI in SAP CRM 2006s uses Business Server Pages (BSPs) and the Business Object Layer (BOL). This user interface is similar to the one for SAP CRM on-demand, except that your company hosts the files, rather than SAP.
Over the past 12 months I have participated in a large SAP CRM 2006s implementation. I discovered that the SAP CRM 2006s user interface (UI) introduces many new terms and concepts, which was a little daunting at first. However, now that we are into our sixth month of realization, I’ve found that the new UI is not as daunting as it first appeared.
The SAP CRM 2006s UI will be very familiar to those of you who have worked with the SAP CRM on-demand solution because they are based on the same design concepts. For others who have been working with People-Centric User Interface (PCUI), many of the screen constructs parallel objects in the PCUI.
Let me share some tips to guide you through the first three days of an SAP CRM 2006s implementation. I’ll show you how to:
- Access the new UI
- Set up and use the new business role concept
- Change screen layouts
In future articles, I’ll take you deeper into SAP CRM 2006s. I’ll explain how you manage business partner views and add new customer views to your business partners.
Day 1: Let Go of WinGUI
For many of you, WinGUI is your friend. If you’ve used this interface, you probably have not had to learn WebClient. Here are answers to some common questions about the new UI.
Where have all my transactions gone? The very first thing you notice when you log into the SAP CRM 2006s system is that your user menu isn’t what it used to be. The start-up menu no longer contains Maintain Business Partner, Maintain Marketing Attributes, and Maintain Products options. Master data maintenance and business transaction processing are now presented in the SAP CRM 2006s WebClient (Figure 1).

Figure 1
The new SAP CRM 2006s UI
Although transaction codes such as /nBP are still available, the only officially supported ones are those that are related to pure administrative tasks (e.g., PPOMA_CRM for business role assignment). You can use the SAP CRM 2006s UI to perform your day-to-day maintenance and transaction-processing tasks. Figure 1 represents the SAP CRM 2006s UI for a sales professional user. You can maintain the business partners by clicking on Account Management on the left side of the screen. The new UI also lets you customize the UI’s overall appearance by clicking on the icon circled in Figure 1. In addition, many of the screens now have a Personalize link that you can click on to customize the displayed fields.
How can I get into the SAP CRM 2006s UI? You have to set up a couple of things in SAP CRM to ready yourself for login. For example, the SAP CRM 2006s UI introduces the new concept of business roles, which define access to the various SAP CRM components. A business role for a marketing manager provides the user with access to all the related marketing activities, such as Segment Builder and Marketing Calendar, whereas a sales business role provides access to quotations, sales orders, and opportunities. The framework assigned to the business roles dictates the availability and navigation of business processes.
You assign a business role to a position in the organizational structure. As a part of any SAP CRM 2006s implementation, you’ll need a person responsible for defining the various CRM business roles. This role has many similarities to that of a security expert. On my current project, the CRM security/Basis team is configuring the new business roles with assistance from functional consultants and the business.
Any employee who is assigned to a given position inherits the business role assigned to that position. For example, you may have the marketing manager set up as a business partner in the role of employee. Using transaction PPOMA_CRM, you assign the employee to the Marketing Manager position in the organizational structure. In SAP CRM 2006s, this Marketing Manager position becomes the MARKETINGPRO business role, which defines the menu paths and navigational links available to the marketing manager when she logs in to the new UI. If you are assigned to more than one position and these positions have different business roles assigned, the system prompts you to select which business role you want to use.
How do I set up my ID? When you first start SAP CRM 2006s, you need to set up your ID. If you do not follow the four steps that follow, the system raises an error stating that you do not have an assigned business role and prevents you from proceeding. To get yourself set up to use the new UI, follow these steps:
Step 1. Create yourself as a business partner. Using transaction /nBP, set yourself up in the employee role and enter your SAP CRM user ID in the User field in the Identification tab.
Step 2. Set up a basic organizational structure. If you do not have a defined organizational structure, you must set one up. If you already have a company organizational structure set up, all you need to do is identify a position to use or create your own position. For configuration and testing purposes, it is probably a good idea to create your own position. This prevents you from affecting other users if you decide to modify a business role.
Go to transaction /nPPOMA_CRM. Create a root organization by clicking on the create icon and choosing Organizational unit (Figure 2). In the bottom half of the screen, enter the ID and name of the new organizational unit, and click on the save icon. At this point, all you need is a single organizational unit.
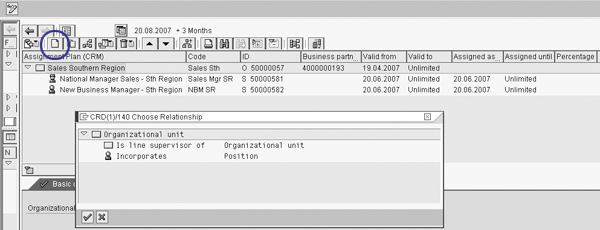
Figure 2
Basic organizational structure with two positions
Create a new position under this new organizational unit by selecting Organizational unit and clicking on the create icon. Select Position and enter the ID and name of the new position. Click on the save icon.
Note
For testing purposes, you also can assign a business role directly to your user ID in transaction SU01. In the Parameters tab, add the parameter CRM_UI_PROFILE. Then, in the Parameter field, add the business role ID.
Step 3. Create a new position. Double-click on your new organizational unit, then right- click and select Create from the context menu. Select Position from the list, enter the name of your new position, and then save.
Step 4. Assign a business role to this new position. Double-click on your new position in the organizational structure and follow menu path Goto>Detailed Objects>Enhanced Object Description.
Figure 3 shows a list of infotypes. Scroll down until you find the Business Role infotype. Select this infotype and click on the create icon. The drop-down menu for the business role contains a list of standard business roles, as shown in Figure 4. For my example, I selected MARKETINGPRO for Marketing Professional and saved the infotype.
Tip!
If the business role that you need doesn’t appear in the menu, you can configure your own business roles. Follow IMG menu path Customer Relationship Management>User Roles>Define Business Role.
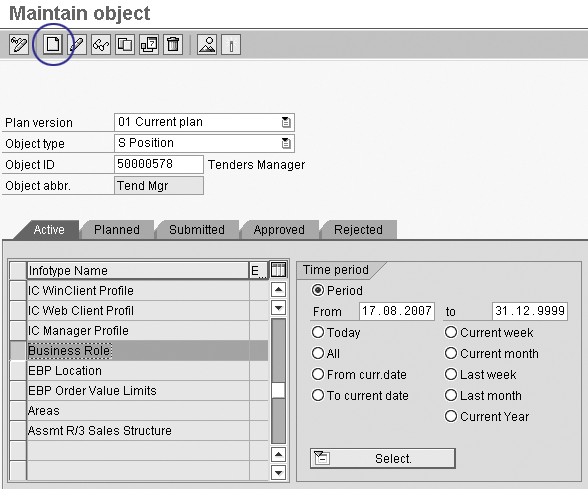
Figure 3
Create the Business Role infotype

Figure 4
Standard business roles
For testing purposes, you can assign a newly configured business role directly to your user ID using transaction SU01. This enables you to test the role without affecting other users who may be attached to your position in the organizational structure. To do this, go to transaction SU01, enter your user ID, and navigate to the User Parameters tab. Enter the parameter ID CRM_UI_PROFILE. For the parameter value, enter the business role ID you want to use and save your work. You are now ready to use the new UI.
How do I launch the new UI? You can launch the UI via a URL that your Basis team sets up. However, when you first start using the SAP CRM 2006s UI, this URL may not be set up yet. In this case, you can launch the SAP CRM 2006s UI from WinGUI using these steps:
Step 1. Go to your Favorites in your WinGUI start-up page
Step 2. Right-click on Favorites and select Add Other Objects
Step 3. From the Objects list, select BSP Application
Step 4. In the next screen enter the following:
- BSP Application: CRM_UI_FRAME
- Description: 2006s UI (Overwrite the German description.)
- Start Page: default.htm
Press Enter when you’re done. This adds a URL link to your Favorites. When you double-click on this new Favorite, it launches the SAP CRM 2006s UI. The available functionality is based on the business role you assigned to your position.
Day 2: The New Lingo
SAP CRM 2006s comes with a new set of objects and concepts. You should familiarize yourself with a few key objects that I’ll explain in this section. Once you understand these, it makes screen configuration a simpler task. For those more technically inclined, it also sets a good foundation to commence development of new applications within the SAP CRM 2006s UI.
What is a “skin”? A skin defines the overall look and feel of the UI. Using Cascading Style Sheet (CSS) files stored on the Web Application Server, you can set the screen colors, fonts, and company logos to customize the UI. A set of skins with amusing names such as New Hope and Serenity are available as well. You can set your own UI skin by clicking on the Personalization option shown in Figure 1. This allows you to select your skin and change the font size and keyboard shortcuts. Be warned, the High Contrast skin can be rather disturbing if you are feeling somewhat fragile from a late night of data loading.
What is a “view”? A view represents a set of logically grouped data. A view may contain a set of individual fields (a form view) or it may hold a table of data (a table view). The view contains all the logic for launching the data fields to the screen. The logic is actually built in HTMLB, which is an extension of HTML. Fortunately, the new BSP Component Workbench provided with SAP CRM 2006s means you shouldn’t need to view this code unless you want to be really clever. (I explain how to use this tool in the “Day 3: Getting Started with the UI Configuration” section.)
Views in the business partner maintenance include areas such as:
- Bank details
- Standard address
- Relationships
- Sales area data
- Roles
Figure 5 shows an example of a Bank Account Details view. This particular view is an example of a form view. The mandatory fields are flagged with a red asterisk. You can rename the field names and add or modify captions, such as Bank Data, according to requirements. Most of the form views have a Back button that returns the user to the previous screen, which is usually the display overview screen.

Figure 5
Corporate Account Bank Account Details: Form view Click here to to view a larger version of this image
Figure 6 shows the business partner roles view. This is an example of a table view in which you can add and delete line items in a table format. This view also has a Back button to navigate back to a previous screen. In this instance, the Back button returns the user to the Business Partner Overview screen.

Figure 6
Corporate Account Roles: Table view Click here to to view a larger version of this image
What is a view set? A view set is a collection of two or more views. When you choose to edit a view set, such as when you create a new individual account, you can open several views in one screen for editing. The view for editing the individual account address, the notes view, and the roles view are all opened for editing as a part of the view set (Figure 7).

Figure 7
Individual Account: View set Click here to to view a larger version of this image
What is a component? In non-technical terms, a component consists of a collection of views for development and configuration purposes. In more technical terms, it is an ABAP Object-Oriented (OO) class. When you need to configure a particular view, you must specify the view name and the component in which it was built. There are many aspects to a component — however, when you are getting started, the only area of the component you need to be concerned with is the view.
Day 3: Get Started with the UI Configuration
Now that you have managed to log in to the new UI and have familiarized yourself with the terminology, the next step is to configure the screens. Let me show you how to add new fields, remove fields, make fields mandatory, and change the name of fields on the screen.
First you need to identify the name of the component and the view you wish to change. You may be familiar with the F1 (technical information) option in WinGUI. This is a habit you must break because F1 in the new UI gives you Microsoft Internet Explorer user help. To find out the name of the component and view to edit, navigate to the screen you would like to modify and press F2 (Figure 8).
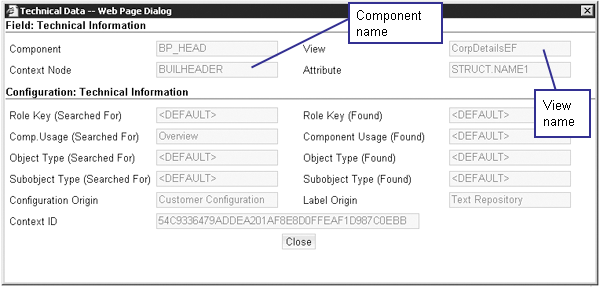
Figure 8
F2 help screen
When you have the component and view, you can start your configuration in the new BSP Component Workbench. SAP developed this tool to allow users with limited knowledge of the underlying technology stack to configure the UI.
Go to transaction BSP_WD_CMPWB or follow IMG menu path Customer Relationship Management>UI Framework>UI Framework Definition>Configure User Interface. Enter the name of your found component and click on the Display button. At the left of the screen is a list of objects that are maintained in the component (Figure 9). At this point you only need to navigate through the Views list.

Figure 9
BSP Component Workbench for BP_HEAD, which is the main component for business partner maintenance
Ensure you are in the browser component structure by clicking on the Browser Component Structure button circled in Figure 9. Then click on the Views option in the hierarchy list, locate the view you determined earlier, and double-click on it. The full view definition appears on the Structure tab. Again, you can bypass all of this detail and go straight to configuration by clicking on the Configuration tab (Figure 10). Initially you are in display mode, so click on the Display/Change button to commence configuration. If you want to have the configuration enlarged, you can use the Mode button in the toolbar of the Component Workbench.
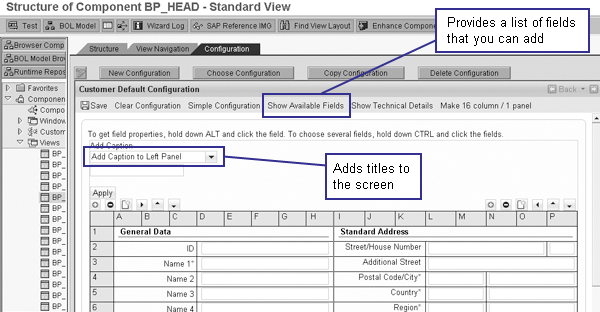
Figure 10
Configuration tab of a view in component BP_HEAD
How do I change the field properties? You can modify the standard field properties by holding down the Alt key and clicking on the field you want to change. The system displays the field properties on the right side of the screen, as shown in Figure 11.
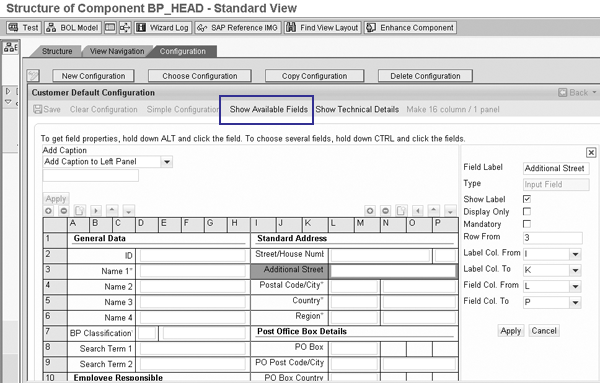
Figure 11
Configuration tab of a view in component BP_HEAD
In the field properties you can set the field to Mandatory or Display only; change or remove the field label; or move the field to another location on the screen grid.
After you have made your changes be sure to click on the Apply button. You then must close the field properties window to allow further changes on the other fields.
How do I remove fields? To delete a field from the screen, click on the field to highlight it, and then click on the subtract icon above the column of the selected field.
How do I add fields? Within the Configuration view, the context nodes define the fields that are available (Figure 12). You can add fields as long as they are specified within one of the view’s context nodes. To see which fields are available, click on the Show Available Fields link in Figure 11. The left side of the screen displays a list of the context nodes. You can drill down on each of them to see the available fields to add to your screen. Click on the field you want to add to highlight it, and then click on the plus icon above the column to which you want to add the field. When you are happy with your changes make sure to save them — the system doesn’t warn you to save before exiting.
Tip!
If you would like to add a field between two existing fields, highlight the field above the location where you would like to add the new field prior to clicking on the add icon.

Figure 12
Configuration tab of a view in component BP_HEAD
Where can you go from here? Now that you have managed to log in and experience the SAP CRM 2006s UI, it is a good idea to go back to the documentation. For me, the documentation made much more sense once I had a chance to play on the system and familiarize myself with the navigation and terminology. In my next article, I’ll show you how you can use a Business Add-In (BAdI) and configuration tables to influence what views appear for each business role.
Katrina Burke
Is a senior CRM consultant at SAP Australia. Working as an SAP consultant for 13 years, initially Katrina was entrenched in ABAP and SAPScript. In later projects in both Asia and Europe, Katrina worked as a development manager and HR Payroll consultant. Most recently Katrina has been working at SAP as a CRM consultant specializing in business partner, marketing, and opportunity management. In her current CRM consulting role, she has been working with SAP CRM 2006s.
You may contact the author at katrina.burke@sap.com.
If you have comments about this article or publication, or would like to submit an article idea, please contact the editor.


 Premium