Design flexible, attractive HR-related forms through HR Forms Workplace. HR Forms Workplace is the central tool for creating HR-related forms through SAP Smart Forms or PDF Forms. Find out how to easily select HR-related data to create forms specific to your company without writing any extraction routines.
Key Concept
HR Forms Workplace (transaction HRFORMS) is standard in SAP ERP HCM. In it, you can design forms using SAP Smart Forms or PDF forms. An extensive directory of HR Forms Workplace ensures all data required to create a form is present to capture using drag-and-drop functionality. HR Forms are cross-client components and can be viewed in other clients.
You no longer have to rely on lots of code to customize forms to your organization’s specifications. Using the standard HR Forms Workplace in SAP ERP Human Capital Management (SAP ERP HCM), you can create an attractive layout for forms using SAP GUI. HR Forms Workplace provides a comprehensive directory that represents multiple data sources to companies that want to develop their own flexible SAP Smart Forms or PDF forms using SAP ERP HCM master data, as well as payroll and time management data.
In-depth knowledge of tables, fields, and structures is not required anymore. With drag-and-drop functionality in the HR Forms Workplace, you can include data to be captured. This tool enables you to select data from various sources without writing ABAP code. You can then design an SAP Smart Form or PDF form at a later stage. These forms can be displayed in SAP ERP Central Component (SAP ECC) systems as well as in the employee portal (formerly known as employee self-services [ESS]) in SAP ERP HCM.
I’ll show you how to create a payslip in HR Forms Workplace from scratch. I’ll also teach you how to create and design SAP Smart Forms. All examples are taken from an SAP ECC 6.0 system with enhancement package 4 and are applicable from SAP ECC 6.0 on. The article is intended for both functional and technical audiences.
Note
I am using SAP Smart Forms in this example rather than SAP Interactive Forms by Adobe as they require Java stack and Adobe Document Service (ADS) configuration. Later, by configuring some features, you can have this payslip in the employee portal in SAP ERP HCM as well.
HR Forms Components Overview
Before proceeding, let’s discuss some of the components in HR Forms Workplace. These components help you define your extraction in HR Forms. Don’t worry if you don’t completely understand these components now. You will use them in creating the form and you will get a clearer understanding later when creating the extraction.
- MetaNet. This directory contains all the data sources present in SAP ERP HCM. MetaNet contains all the data that you can use in an HR Form. After selecting data sources (i.e., nodes) an InfoNet is available to use this data in your HR Form. MetaNet contains MetaStars. In this example, I’ll be using SAP default MetaNet. If you have customized infotypes in SAP ERP HCM then you have to create your own MetaNet to process them in HR Forms. I will also illustrate how to fetch other infotype data without creating a custom MetaNet, but that requires additional coding.
- MetaStar. MetaStar is a view of data that can be read from a specific data source. It’s a grouping of information from the same business area (e.g., IT_FAMILY contains information related to family for an employee).
- MetaDimension. MetaDimension is a complete description of a business object or concept. MetaStar contains both the MetaDimension and MetaFigure. MetaDimension contains relevant business object data through MetaFields, which are either key fields or attributes. The best example is that PAY_RESULT contains the Wage Type MetaDimension, which contains country and wage type as MetaFields.
- MetaField. MetaField is the field value or information that exists in a MetaDimension. Each MetaField is part of the key that specifies the complete MetaDimension in full, or its attribute.
Figure 1 can help you understand all these components. It shows the difference between all these components and their significance in HR Forms Workplace. The SAP_DEFAULT MetaNet is the standard MetaNet. Once you start making your form you see this list of MetaStars, MetaDimensions, and MetaFields in HR Forms Workplace.

Figure 1
MetaNet, MetaStar, MetaDimension, and MetaField components
Similarly, when you use these components for your form, they are named InfoNet, InfoStar, InfoDimension, and InfoFields, respectively. Think of the MetaNet as the universe of possible information that can be made available to the form. The user can then select a subset of the information available in the MetaNet and group that information in the InfoNet. The form designer UI does not interact with the MetaNet directly. The HR Form interacts with the InfoNet and its related data. If the information is not present in the InfoNet, the HR Form cannot process it in the Forms designer. Let’s look at these components in more detail:
- InfoNet. This directory contains all the data sources you can use to create your form. Drag and drop data sources from MetaNet to InfoNet to start using data sources based on your requirements. InfoNet is the higher level and contains InfoStars, InfoDimensions, and InfoFields.
- InfoStar. InfoStar is a view of data that can be read from a specific data source. It’s a grouping of information from the same business area (e.g., IT_FAMILY contains information related to family for an employee).
- InfoDimension. InfoDimension is a complete description of a business object or concept. InfoStar contains both the InfoDimension and the InfoFigure. InfoDimension contains relevant business object data through InfoFields, which are either key fields or attributes. The best example is that PAY_RESULT contains the wage type InfoDimension, which contains country and wage type as InfoFields.
- InfoField. InfoFields are the field value or information exists in an InfoDimension. Each InfoField is part of a key (or subset) that specifies a complete InfoDimension in full (e.g., wage type) or its attribute (e.g., country grouping or amount).
Note
Before proceeding, you should read
SAP Note 878168. It explains an error you might receive when creating an HR Form. I got an error even when the correct Support Packages were installed, so you should perform the steps in the SAP Note before moving forward.
Create a Payslip in HR Forms
Let’s start by creating a new payslip in HR Forms Workplace from scratch. Use transaction HRFORMS to get to the HR Forms Workplace (Figure 2).

Figure 2
Use transaction HRFORMS to get to the HR Forms Workplace
As you can see, SAP provides plenty of pre-built forms according to country grouping. After reading this article, you can copy one of these forms and change it according to your requirements, but for now let’s go through creating an example payslip. HR Forms Workplace gives you a brief description of the category (in the Form Class column) of the form and shows in which type it is created in the Layout Editor column. Press F5 or click the create (page) icon to start creating your first HR Form (Figure 3).

Figure 3
Create a form
Enter a Form Name, Country Grouping, and Form Class. Form Name is your HR Form name that is shown in the HR Forms Workplace. Country Grouping in this case is 99, which indicates that it is international. Form Class lets you choose the form category, such as PAYJNAL (payroll journal), PAYSLIP (remuneration statement), or TIME (time statement). Selecting the Form Class gives you a set of sources from where to fetch data and is meaningful to identify the purpose of the form at a later stage. Click the execute (green check mark) icon to see the output shown in Figure 4.

Figure 4
Create the HR Form YHR_PAYSLIP, with MetaNet on the left, InfoNet on the top right, and the description on the bottom right
Now let’s discuss this screen and its components. On the left side, you have the SAP standard MetaNet as mentioned earlier in the article. The InfoNet and its description are on the right side and represent what data sources need to be extracted. Currently it is empty; I’ll show you how to populate it later in this article. The lower right section (the HR Form tab) gives you header information of your current form. Figure 5 shows you a closer view of the lower right section so you can see the detail.

Figure 5
Enter a description
Enter an appropriate description for your HR Form. The Form Class is PAYSLIP Remunerat and the MetaNet is SAP_DEFAULT SAP standard MetaNet. Select SAP Smart Forms (in place of X Form Builder) as the Layout Editor from the drop-down menu.
Note
Form Builder represents SAP Interactive Forms by Adobe. To design in SAP Interactive Forms, you need to have properly installed Adobe Document Services in your server system environment as well as having the Adobe LiveCycle Designer client software installed on your computer. Adobe LiveCycle Designer replaces the SAP GUI-based layout designer UI in the HR Forms Workplace.
The SAP_DEFAULT MetaNet is preconfigured and shows the standard HR-related master data to be captured. To fetch custom infotype data, you have to create a custom MetaNet, which is a lengthy process by itself and is outside the scope of this article. However, there is a way to get other details into the payslip, which I will show you later in this article.
Now select sources and start creating the payslip in HR Forms Workplace. Keep in mind that this is the extraction level; later on you design your form in SAP Smart Forms. The beauty of the system is that it segregates the extraction and design of the form, which reduces design complications. Select the data sources from SAP_DEFAULT MetaNet by clicking ITY_BANK_DETAILS and following menu path Edit > MetaNet > Select Nodes (Figure 6). Drag and drop these nodes into your InfoNet (e.g., YHR_PAYSLIP) with MetaDimensions and MetaFields. What is displayed on your payslip depends on your requirement. In this case, you want payroll data, bank details, and other master data information. Similarly, you could include other information, such as absence or family, on the InfoNet. The screen then looks like what is shown in Figure 7.

Figure 6
Drag and drop the data source to the InfoNet

Figure 7
Selected data source bank details in the InfoNet
Repeat the same procedure with ITY_PERS_STRUCT, PAY_PERS_STRUCT, and PAY_RESULT MetaStars. Your screen should look like Figure 8.

Figure 8
ITY_BANK_DETAILS, ITY_PERS_STRUCT, PAY_PERS_STRUCT, and PAY_RESULT MetaStars added to the InfoNet
Note
You can add other MetaStars to your InfoNet depending on your requirement. Here you have InfoNet, under which there are four data sources that further contain InfoDimensions. If you select one of the InfoDimensions, such as BANKS, you can see a set of key fields under the InfoFields tab. You can capture these InfoFields in SAP Smart Forms.
Design an HR Form in SAP Smart Forms
Now create the layout in SAP Smart Forms using the InfoNet that you created. Before proceeding, save and activate this HR Form. When you activate, you get an error because you didn’t create the layout of the form yet. The system generates a structure from the InfoNet that you created to capture in SAP Smart Forms. Click YHR_PAYSLIP to see the structure (Figure 9).

Figure 9
Structure generated from InfoNet
The ABAP Dictionary Structure /1PYXXFO/YHR_PAYSLIP is the basis and integration point between the HR Form and the layout of the payslip. This structure contains all the fields that you can capture in your SAP Smart Form. Copy this dictionary name, go to transaction SE11, and paste it in Date Type. Then press F7 or click Display. You are able to see fields generated from the HR Form as DIM_* and STAR_*. These are the fields that will be further used in the SAP Smart Form to generate the payslip.
Note
If you add more InfoStars to the InfoNet then you have to activate it again so that the Data Dictionary is generated accordingly. All this activation is handled within the HR Forms development environment.
Now you are ready to design your SAP Smart Form based on the InfoNet that was created. The advantage of an HR Form is that you don’t need to write code and make extra checks to perform validity checks, and you have direct access to text and various other tables (e.g., RT) when creating the SAP Smart Form.
Click the Layout button present on the top left of Figure 8 to open the SAP Smart Form (Figure 10). The selection screen is from the PNPCE Logical Database (LDB).

Figure 10
Create an SAP Smart Form
The SAP Smart Form name is automatically proposed by the system. Right-click the %PAGE1 New Page folder and choose Create > Window from the context menu. I have designed and adjusted the layout of the payslip as shown in Figure 11.

Figure 11
Layout of an SAP Smart Form
As you can see, the SAP Smart Form is divided in various windows. Employee details are shown in the HEADER window, while the MAIN window contains all the employee’s pays and allowances. The DEDUCTIONS window contains employee deductions as well as net pay. BANKDETAILS shows the account number, bank, and other bank-related information of the employee.
Let’s fetch the payroll data, and thereby fetch the employee details as well. Double-click Global Definitions on the left of the screen in Figure 11 and declare the variables shown in Figure 12.

Figure 12
Global data of an SAP Smart Form
The HR RT table contains all the information regarding payroll of any employee, so WA_RESULT contains the payroll resulting from the RT table. WA_EMPLOYEE contains employee information (e.g., name or address). WA_BANKDETAILS shows the bank details of the employee, and WA_INPERIOD has the period of payroll. NETPAY, DEDUCTIONS, and GROSSPAY will contain their respective values at a later stage in the SAP Smart Form creation.
Are you puzzled by where I got the information in the Associated Type column? Double-click the Form Interface node on the left of the SAP Smart Form (Figure 11) and you see the data type with the name HRDATA. HRDATA is automatically defaulted by the SAP system. It acts as an interface between the HR Forms Workplace and SAP Smart Forms. To print data on the SAP Smart Form, you need to pass data to it. In this case, the system automatically generates structure /1PYXXFO/YHR_PAYSLIP.
Declare the loop and table in the main window by right-clicking MAIN Main window (Figure 13). Then choose Create > Table and then Create > Flow Logic > Loop.

Figure 13
Loop and Table in MAIN window
Double-click the icon next to %LOOP1 New Loop 1 and enter HRDATA-DIM_INPERIOD, INTO, and WA_INPERIOD in the three fields next to Internal Table as shown in Figure 14, and mark the Internal Table check box.

Figure 14
Loop declaration
HRDATA-DIM_INPERIOD contains the payroll period that the user later selects on the selection screen. It is mandatory to capture the period as the HRDATA table has retroactive evaluation results, meaning that a pay period can have multiple entries that reference the original processing of the data for the period, along with possible reevaluations of the same and other periods. WA_INPERIOD contains the exact period the user enters on the selection screen after executing this payslip.
You are finished with the loop. Now in the table’s Data tab write the variables shown in Figure 15.

Figure 15
MAIN window for Pays Table Declaration
The Data tab is used in table control to loop across the internal table into the work area that you want to print according to particular conditions. Here you loop across HRDATA-STAR_PAY_RESULT into WA_RESULT. HRDATA-STAR_PAY_RESULT contains the payroll result for the employee for the period selected from the selection screen. In Figure 14 you fetched the period that will be entered by the user on the selection screen and by this period key. Then for this period, you could fetch information such as payroll, employee, and bank data for employees. In this example, I put some checks on the fields (i.e., to loop across wage types starting from 1 and for the current period that WA_INPERIOD contains). In my case, wage types starting from 1 are pays and wage types starting from 2 are deductions. You can manipulate values here according to your need.
Note
You could have evaluation classes to segregate pays, deduction, and loans, as well. The structure generated by HR Forms does not contain evaluation classes, so I put the wage type starting from 1 as pays. In my case, wage types starting from 1 are pays, but your situation may differ. For those situations, the solution is to loop all your wages present in HRDATA-STAR_PAY_RESULT and select pays, loans, deductions in separate internal tables and show them accordingly.
In the Calculations tab, calculate the gross pay by adding all the pay values coming across WA_RESULT-PAY_AMOUNT into GROSSPAY (Figure 16).

Figure 16
Calculating gross pay using WA_RESULT-PAY_AMOUNT
Now divide Table 1 present in the MAIN window in two parts to show the wage type text in the first column and the amount in the second column (Figure 17).

Figure 17
Table division
Go into node TABLE1 in the MAIN window and open it. Right-click the Main Area and choose Create > Table Line (Figure 18). Select %LTYPE2 in the Line Type drop-down box. This creates a table row in the table.

Figure 18
Select %LTYPE2
Create text in both cells by right-clicking them and choosing Text. In the first cell’s text, enter &WA_RESULT-WAGETYPE_LONGTEXT& by clicking the + icon on the top left in the General Attributes tab. Repeat the same procedure with the second cell and enter &WA_RESULT-PAYAMOUNT& in the text area (Figure 19).

Figure 19
Create text in the cells
This table prints all pays with their respective wage type name and amount. Tables are dynamic and loop until the end is reached. It expands in the Main window according to pays of any employee.
Repeat the same procedure for the Deductions window as shown in Figure 20, leaving the loop that was used to get the period as shown earlier in the article. In this case, wage types starting from range 2 are considered as deductions. Add two tables in the Deductions window, and one text control (the TEXT29) to print deductions of the employees and to display the net pay using gross and deductions.

Figure 20
Layout of Deductions window
I will use Table 2 to display deductions of the employee, Table 5 to show pays, deductions, and net pay, and Text 29 to leave extra spaces in between these tables. To show pays, repeat the same procedure of including wage type long text and wage type amount as previously shown in the MAIN window. In my example, I use wage types starting from 2 as my system is configured in such a manner (Figure 21).

Figure 21
Table 2 for showing the Deductions table
Here you are using the same WA_RESULT to show deductions in this table. Click the Calculations tab and enter the information shown in Figure 22 to get the total of deductions into the Deduction field previously declared in the Global Definition window.

Figure 22
Deduction calculation
Switch to Table 5 by double-clicking it on the menu path on the left (shown in Figure 20) and enter the values shown in Figure 23.

Figure 23
Net table
Wage type ‘/560’ contains the net pay of an employee, so you show gross pay, deductions, and net pay (gross pay minus deductions equals net pay) in this table. Divide your line into two columns (Figure 24). Declare three rows in Table 5 and add text control to each cell of the row.

Figure 24
Net table layout
On the first row (%ROW10 New Line 10 first cell, %CELL24 New Column 24) write Gross Pay in the text control (i.e., %TEXT23). Repeat the same procedure with ROW12, CELL26, and write Total Deductions. Then do the same for TEXT27 in ROW13 and write Net Pay in the text control. This creates headings in the left column of the table. Now you need to display the amount on the right side of the table. Add &grosspay& to TEXT24 in CELL25 as shown in Figure 25 by clicking the + sign on the upper-left corner of the text control.
Note
When you create text control in SAP Smart Forms, the system generates the name by itself.
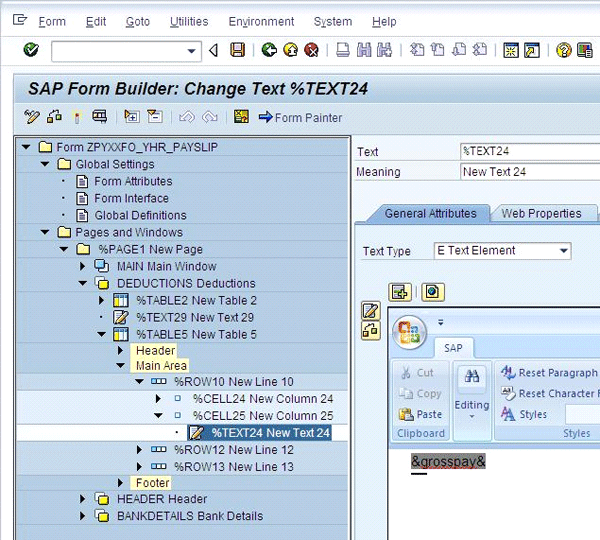
Figure 25
Add the gross pay field
This displays the gross pay amount as calculated in the MAIN window. Repeat the same procedure with TEXT26 in CELL27 and add &deductions& to the text control (Figure 26).

Figure 26
Add the deduction field
Now add &WA_RESULT-PAY_AMOUNT& to TEXT28 in CELL29. WA_RESULT-PAY_AMOUNT has the net pay with the wage type ‘/560’. Save your work and double-click the text control TEXT29 and press Enter twice to have some space between the two tables (DEDUCTION and NETPAY). Now you need to type the personnel number, name, and other employee-related information in the Header window.
As with the Header window you add one text control and one table control (Figure 27). Write your company name to the text control (e.g., for TEXT15, write XYZ Company). Then enter the values shown in Figure 28 to the table in the Data tab for Table 3.
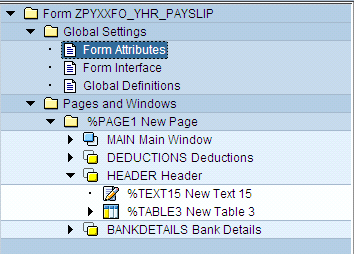
Figure 27
Layout of header window

Figure 28
Enter the values for Table 3
Now you have internal table HRDATA-DIM_EMPLOYEE into WA_EMPLOYEE with KEY equaling WA_RESULT-EMPLOYEE_KEY. HRDATA is a deep structure with all the information coming from HR Forms Workplace to the SAP Smart Form. DIM_EMPLOYEE contains all the information related to the employee according to the key. The key is a combination of dates and the employee number. You loop across HRDATA-DIM_EMPLOYEE into WA_EMPLOYEE where the employee information is present according to the key. This key from WA_RESULT-EMPLOYEE_KEY contains the exact employee period (e.g., 012009 for payroll period) selected by the user on the selection screen.
Now you can make adjustments to show the personnel number, name, and hiring date of the employee. Divide Table 3 into four parts and add two rows to the table (Figure 29). In TEXT9 of CELL9 enter Personnel Number and in TEXT11 of CELL11 type Name. Type Hire Date in TEXT13 of CELL13.
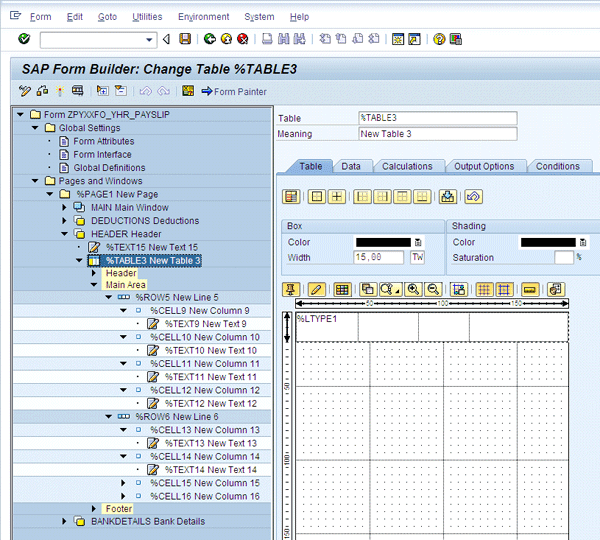
Figure 29
Add employee
Note
If you want to print positions and other employee-related information then drill down into HRDATA and loop across with the KEY on table DIM_POSITION and other fields whose information you need to show on the payslip.
Write &wa_employee-key-PERSONNEL_NUMBER& in TEXT10 of CELL10 to include the personnel number of the employee and click the + icon on the top-left corner of the text control (Figure 30).
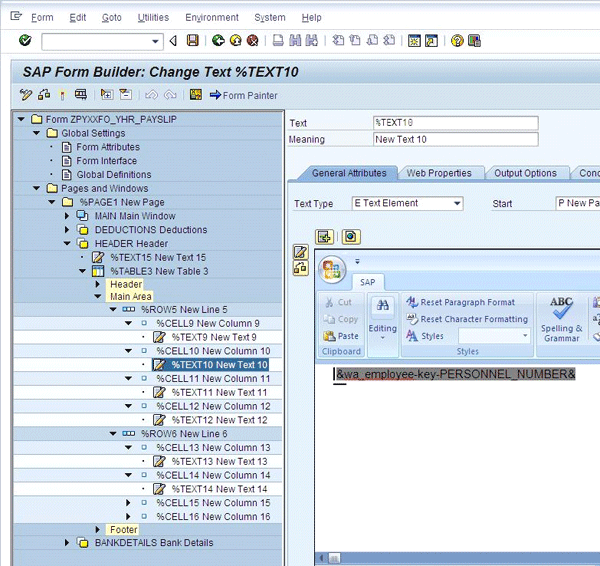
Figure 30
Include the employee’s personnel number
Repeat the same procedure with the remaining cells and write &WA_EMPLOYEE-PRINT_NAME& and &WA_EMPLOYEE-HIRE_DATE& in TEXT12 and TEXT14, respectively.
The Header part is designed and now all you need is the bank details of the employee. I have two records in my system for bank details: from 01.01.2010 to 31.03.2010 and 01.04.2010 to 31.12.9999. When the HR form is executed, it processes all period data for an employee with their specific key value. The key is to uniquely identify a record with its dates and personnel number. To do this, you have to do some coding to fetch the exact data from the infotype for the current period entered by the user. I’ll show you how to get additional data from other tables or infotypes without creating a custom MetaNet. This ensures that you are not limited to getting data only from the HR Forms Workplace; you can get data anywhere from your SAP server.
Create program lines by right-clicking the BANKDETAILS window and selecting Create > Flow Logic > Program Lines. Add a table in the BANKDETAILS window and write the code shown in Figure 31.
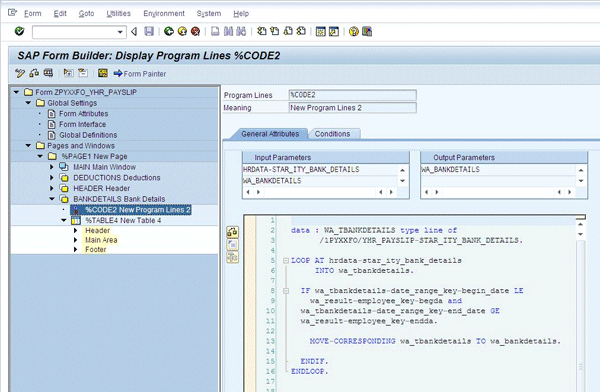
Figure 31
Bank details code
Note
I chose to use a minimal amount of ABAP code in this example to make sure you get the data you need, in case you are unable to get it using the MetaNet in the HR Forms Workplace.
In Input Parameters, write all the incoming data for the Program Lines control and write a variable whose values are to be changed after processing Program Lines in Output Parameters. Write HRDATA-STAR_ITY_BANK_DETAILS, WA_BANKDETAILS, and WA_RESULT in Input Parameters and WA_BANKDETAILS in Output Parameters. In this code, you are fetching the exact record of the bank details (from infotype 0009) in the given period. Now divide Table 4 in the BANKDETAILS window as shown in Figure 32 and then click the Data tab.

Figure 32
Layout of TABLE4
Uncheck the Internal Table check box because you don’t need to loop HRDATA- STAR_ITY_BANK_DETAILS into WA_BANKDETAILS. You already processed it in the last step (program lines).
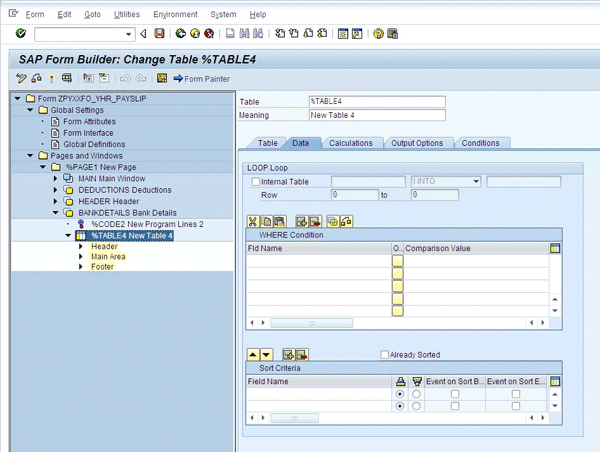
Figure 33
Header table showing employee details
Create three rows in the main area of the table and declare the text field in all those cells (Figure 34).

Figure 34
Add rows and text control to the table
In the first cell (%TEXT17) write Account Number, in %TEXT18 write Bank Name, and in %TEXT20 write Bank Branch. This is shown on the left column of the table. Now put &WA_BANKDETAILS-BANK_ACCOUNT_KEY-ACCOUNT_NUMBER& in %TEXT22 to show the bank account number on the payslip. Write &WA_BANKDETAILS-BANK_BANK_NAME& and &WA_BANKDETAILS- BANK_BANK_BRANCH& in %TEXT19 and %TEXT21 to print the bank name and bank branch, respectively.
The payslip is now complete and ready to test.
Testing
Apply Smart Styles to the SAP Smart Form to create an attractive layout for the payslip. I have made my own style and supplied it to the SAP Smart Form in the Output Option tab in the Form Interface node of the smart form (i.e., YHR_STYLES).
Go back to HR Forms Workplace and select your newly created form YHR_PAYSLIP and activate it. Press F8 or click the execute icon. Notice that the selection screen is of PNPCE because the back-end system is processing through PNPCE LDB logic. The payslip output after formatting is shown in Figure 35.
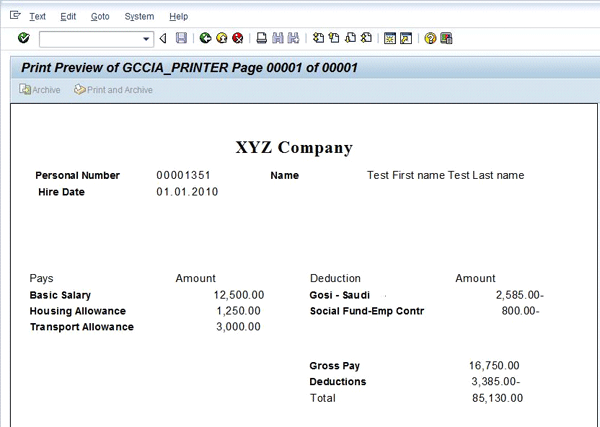
Figure 35
Payslip generated from HR forms
You can put colors, lines, and your company logo in this payslip to make it more attractive for the user. You can also add more MetaStars to the HR Form and adjust the layout to display values such as Position or Employee Group. This payslip can work in any company provided the HR Form is in place with the same InfoNet, InfoStars, and InfoDimensions. This reduces the time and effort to develop the same payslip, payroll register, and other reports on other projects. Keep in mind that you need to use the same InfoStars to make a previously developed HR Form work. You can upload my payslip and Smart Styles at the bottom of this article. Make sure you provide the same name to Smart Styles as it is already declared in the SAP Smart Form, or you will get an error message.
How to Show This Payslip in the Employee Portal
To show this payslip in the employee portal in SAP ERP HCM, you need to configure three features: HRFOR, EDTIN, and EDPDF. After putting your payslip name in these features, the payslip is displayed for every employee. Employees can log in to their employee portal and view their current and past payslips with ease. Off-cycle payments or payslips are also shown to employees in their Employee Portal screens. This allows them to print or locally save the payslips in PDF form at any time.
Muhammad Usman Malik
Muhammad Usman Malik is a senior SAP consultant at Saudi Business Machines (SBM), Saudi Arabia. Usman has been involved in ABAP development and functional configuration of HR for many years. He has several years of experience implementing and supporting SAP systems including logistics, WebDynpro ABAP, workflow, and FI/CO at multinational and local companies.
You may contact the author at usman.malik.sap@gmail.com.
If you have comments about this article or publication, or would like to submit an article idea, please contact the editor.