See how to use Cash Management’s hedging report to track your foreign currency liquidity position without setting up the whole Cash Management module.
Key Concept
Cash Management is part of the Treasury module and has always been part of SAP R/3. Although it doesn’t have to be difficult to implement Cash Management, not many companies have activated it, either because they think it contains much more functionality than they really require or because they think it is too complicated.
To cover their foreign currency risks, most companies require a monthly or quarterly report showing their current and future foreign currency liquidity position. In an SAP environment such a report would contain information from the accounts payable (AP), accounts receivable (AR), Sales & Distribution (SD), and Materials Management (MM) modules, and possibly other modules as well. Because this requires cross-module reporting, no such report is standard except within the Cash Management module. However, many companies have not implemented Cash Management. The consequence is that instead, they create their own hedging report using ABAP or Microsoft Excel.
I’ll show you how you can use the standard Cash Management report to create an out-of-the-box hedging report without customizing the Cash Management module itself. What you need to do is activate Cash Management, transfer the existing sales and purchasing data using standard available tools, and run the report.
This method is effective with releases beginning with SAP R/3 4.7 and through all mySAP ERP Central Component (ECC) releases. I’m using screenprints from ECC 5.0 and data from the IDES database. In other SAP releases the screens may differ a little, but in principle it works the same.
Customizing
Before you activate the Cash Management functionality, ensure that the field Cash management group is an optional or required field in the customer/vendor master data. In most implementations the field is optional, but in some implementations the field has been suppressed so the user only sees fields that they really should use.
You can check or update the settings for the vendor master data via customizing menu path Financial Accounting>Account Receivable and Account Payable>Vendor Accounts>Master Data>Preparation for Creating Vendor Master Data>Define Account Groups with Screen Layout (Vendors) or transaction OBD3. You can check or update the settings for the customer master data via customizing menu path Financial Accounting>Account Receivable and Account Payable>Customer Accounts>Master Data>Preparation for Creating Customer Master Data>Define Account Groups with Screen Layout (Customers) or transaction OBD2.
Within these transactions, select the account groups you use for your customers and vendors. After you activate Cash Management, you must be able to enter a value in the field Cash management group of the master data to assure the system transfers data from the FI, MM, and SD modules to Cash Management. Therefore, you must make sure that the field Cash management group is either optional or required. Figure 1 shows the field Cash management group set to optional for customer account group 0001. The field is part of the Account management view of the master data.

Figure 1
Make sure the field Cash management group is either optional or required
Activate Cash Management
Once you have checked that the field Cash management group is at least optional, you can activate Cash Management. Start transaction FDFD or use customizing menu path Financial Supply Chain Management>Cash and Liquidity Management>Cash Management>Tools>Prepare Production Startup and Data Setup.
When you start transaction FDFD you get a pop-up screen where you enter the company code for which you want to make the Cash Management settings. Press Enter to continue to the screen shown in Figure 2. As you can see, you must indicate that you want to activate Cash Management and that you want to transfer data from both sales and purchasing. Click on the Save Settings button to save your settings and to activate the transfer.

Figure 2
Activate Cash Management
Update and Transfer Existing Data
Although in the previous step you activated Cash Management, running the hedging report wouldn’t report anything. First you have to allocate a cash management group to your customers and vendors, and then you transfer the existing finance, sales, and purchasing data to the Cash Management module. You can do all this using the same customizing transaction FDFD that you used for activating Cash Management.
Customer/Vendor Master Data
By allocating a cash management group to a customer/vendor, you indicate that the system should transfer financial data for this customer/vendor into Cash Management. To put a value in the Cash management field, use transaction FDFD and click on the Customer/Vendor Data button. Figure 3 shows the next screen. You have to do this step twice, once for customers and once for vendors. When you execute the step indicate whether the update of the data is for customers or vendors.

Figure 3
Allocate a cash management group to customers/vendors
As it is not the intention to use Cash Management to its full extent, you can keep it simple: All customers have the same cash management group, E1. Enter a 1 in the left column labeled Priority and E1 in the column Group. You can also indicate that you want to set the indicator for customer payment history. When transferring the sales data, the system then takes the customer’s payment behavior into consideration. You do not need to set this indicator for vendors as it is not relevant. For vendors you can use group A1.
Note
Cash management groups are used to classify customers and vendors according to your own criteria. Often the groups are used to classify customers and vendors according to risk exposure (likelihood of payment).
The value you enter for the cash management group is not relevant as long as you enter a value. Allocating cash management groups can be more sophisticated than the method I used, but this is beyond the scope of this article. You can always change the values later. Table 1 shows the standard available values for cash management groups. You cannot see the available group values within transaction FDFD.
|
Plan. grp
|
Description
|
|
A1
|
Domestic payments (A/P)
|
|
A2
|
Foreign payments (A/P)
|
|
A3
|
Vendor-affiliated companies
|
|
A4
|
Major vendors
|
|
A5
|
Personnel costs
|
|
A6
|
Taxes
|
|
AC
|
One-time vendors
|
|
E1
|
Customer receipts (A/R)
|
|
E2
|
Domestic customers
|
|
E3
|
Foreign customers
|
|
E4
|
Customer-affiliated companies
|
|
E5
|
High risk customer
|
|
E6
|
Major customers
|
|
E7
|
Customer rent received
|
|
E8
|
Loan redemption (A/R)
|
Table 1Click on the Fill Master Rec. button to start the allocation of the cash management groups. After the update of the master data, the system generates a message indicating how many customers or vendors the system updated.
Transfer Existing Data
After you update the customer/vendor data, you can transfer the existing sales/purchasing data. The system transfers sales orders values and purchase order values for all customers/vendors that have a cash management group. That is the reason that you need to allocate a cash management group first.
To transfer the data, use transaction FDFD and click on the Data Setup button. Figure 4 shows the screen that appears. Indicate that you want to Copy Sales Data and Copy Procurement Data. The other modules are not relevant for the hedging report.

Figure 4
Transfer sales and purchasing data
Click on the Schedule Data Setup button to schedule the jobs that transfer the data. A popup appears with background jobs that are automatically scheduled (Figure 5). You can schedule and check these jobs as you do with normal background jobs. Once the jobs finish, the data has been transferred and you can use the cash management report.

Figure 5
Data transfer jobs
Warning 1: Make sure that you run the data transfer jobs when no other users are active, as data that is being used is not transferred. In principle, you could run these jobs whenever you want, but the longer you wait the more data you will have to transfer.
Warning 2: The jobs could run for a long time, depending on the quantity of data.
Run the Hedging Report
Use transaction FF7B to create the hedging report. The menu path is Accounting>Financial Supply Chain Management>Cash and Liquidity Management>Cash Management>Information System>Reports for Cash Management>Liquidity Analyses>Liquidity Forecast.
Start this transaction and fill in the fields, as shown in Figure 6. You must enter the Company Code for which you want to run the report. Indicate that you want the Cash Position (AR and AP open items) and the Liquidity Forecast (sales and purchasing values). Use grouping PERSONEN (required to get all information). See the sidebar, “Reporting Structure in Cash Management,” for an explanation of this value. You can choose the display and currency freely.

Figure 6
Selection screen reached via transaction FF7B
The field in Unit indicates whether you want to see value per day (unit T), week (unit W), or month (unit M). The field called Increment indicates whether you want to see value per 1, 2, or more time units. You can use Scaling to display amounts in thousands, millions, or units.
Once you enter all selection data, you can start the report. Figure 7 shows what a report could look like.

Figure 7
Output screen of transaction FF7B
As you can see, you get a report per month because of the increment unit. The standard report shows cumulative amounts. It is possible to select delta amounts as well. You can do that on the selection screen by clicking on the all selections icon  or in the report itself by clicking on the New Display button. On the pop-up screen that results (Figure 8), you can change cumulative values into delta values. You could run either report, or both, depending on your business needs.

Figure 8
Change the appearance of the hedging report
Once you have set the cash management group to optional/required for the master data, this field is visible on the account management view, as you can see in Figure 9 for company code 1000.

Figure 9
Cash management group E1 now is visible
Reporting Structure in Cash Management
To report in Cash Management, you have to set up the tree structure that you want to use for reporting. You are free to define your own structure. An example of such a structure is shown in Figure 1. In this example there is a distinction between liquid assets and customer/vendor transactions. You could make a further split (e.g., high-risk and low-risk customers).
You must give a name to each group in the tree (i.e., each box). You use this group name when using transaction FF7B. You can use any of the group names to start the report. Within FF7B you can drill down to any of the underlying groups.
Standard SAP provides a reporting tree that you can use. In this standard reporting tree, SAP has assigned the name PERSONEN to the group for customers/vendors. That is why in transaction FF7B you have to enter PERSONEN in the field group. It gives you all the AR and AP open items, purchase orders, and sales orders.
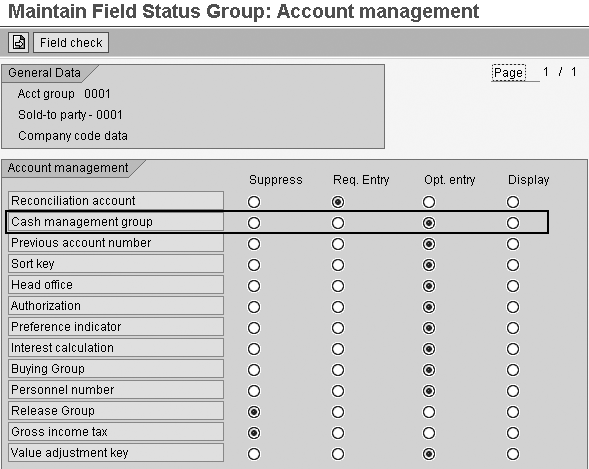
Figure 1
Make sure the field Cash management group is either optional or required
Kees van Westerop
Kees van Westerop has been working as an SAP consultant for more than 25 years. He has an MBA degree in mathematics and a degree in finance. Kees has been concentrating on the financial modules, especially in general ledger accounting, cost center accounting, and consolidation. He also has a great deal of experience with rollouts of kernel systems and integrating finance and logistics.
You may contact the author at keesvanwesterop@hotmail.com.
If you have comments about this article or publication, or would like to submit an article idea, please contact the editor.