Review how to work with Java Scheduler functionality provided by SAP NetWeaver Application Server Java 7.00 or higher. This shows you how to schedule already-existing background processes (i.e., jobs defined in deployed Java-based business applications). Additionally, walk through the creation steps of the new job that is provided by a custom-provided business application. The description of particular steps contains an example Java message-driven bean class and required job configuration.
Key Concept
SAP NetWeaver Scheduler Java (Java Scheduler), integrated in SAP NetWeaver Application Server Java, allows the scheduling of jobs (background processes) using time-based and event-based conditions. Job definition consists of Java message-driven beans and job configuration (job metadata). The Java message-driven bean contains the Java program implementing business logic and the job configuration contains default configuration defined by the job provider.
The user-related planning and execution of processes running in the background are key functionalities in modern business applications. SAP NetWeaver Application Server Java (SAP NetWeaver AS Java) offers all business applications SAP NetWeaver Scheduler Java (Java Scheduler) — an integrated infrastructure service that supports the configuration and execution of background business processes.
The main idea and functionality of Java Scheduler is similar to ABAP Scheduler, the ABAP-based job scheduler (see transactions SM36 and SM37 in SAP NetWeaver AS ABAP). Java Scheduler allows the scheduling of jobs using time- and event-based conditions. The time-based conditions are used for jobs starting and running after the scheduled date and time are fulfilled. Using event-based conditions allows the definition of an event that triggers the start or run of the particular job in the system.
Note
In SAP NetWeaver AS Java 7.00 and later, you can define the event-based job scheduling by external schedulers that are integrated with Java Scheduler. The integration is done using the Java eXternal Batch Processing (JXBP) API. The detailed description of the functionality is outside the scope of this article.
Because SAP NetWeaver AS Java implements an object-oriented architectural approach, Java Scheduler uses the same approach in developing jobs. This means the business application provider defines one or many jobs based on Java message-driven beans (classes written in Java that allow you to encapsulate many objects into a single object) that implement the business process or logic in the background process. I’ll present example configuration and implementation of a Java message-driven bean that defines a background business process and is integrated with Java Scheduler.
Let’s start with the short overview of the Java Scheduler architecture. In the next section, I will present the Java Scheduler functionality and its configuration options provided with SAP NetWeaver AS Java via SAP NetWeaver Administrator. Finally, I will present the required configuration and implementation in SAP-provided and customer-built business applications that integrate the defined processes with Java Scheduler. You should have knowledge of the Java language as well as basic knowledge of SAP NetWeaver AS Java, SAP NetWeaver Developer Infrastructure, and SAP NetWeaver Developer Studio.
Architecture of SAP NetWeaver Scheduler Java
The basis functionality of Java Scheduler builds the following two services:
- Scheduler Service: Provides the maintenance of job scheduling. This means creation, modification, and deletion of job definitions that are persisted in the SAP NetWeaver AS Java database.
- Scheduler Runtime Service: Encapsulates runtime-relevant facets of the job, such as providing access to job definition or configuration (e.g., job parameters), job execution, and error handling of background processes on a particular SAP NetWeaver Java server instance node
The Java-based business application may provide process or functionality that can be stored as a background process using the message-driven beans. This means that for each job definition visible or configurable in Java Scheduler the business application provides one message-driven bean. In SAP NetWeaver AS Java, the execution of the implemented message-driven bean method is handled by the Enterprise Java Beans (EJB) container. Figure 1 presents the architecture of the SAP NetWeaver Scheduler Java.

Figure 1
Architecture of SAP NetWeaver Scheduler Java (image via this SAP Help page)
As shown in Figure 1, Java Scheduler starts the execution of the message-driven bean by sending a Java Messaging Service (JMS) message from the scheduler runtime service to the EJB container. The sending of this message can be triggered in a time-based manner — for example, if the particular point in time defined in job start conditions is reached.
The starting of the job using JMS plays an important role in a cluster environment — the JMS is responsible for load balancing of the scheduled jobs. This means the JMS that is implemented in SAP NetWeaver AS Java uses the current load of particular server nodes to decide which instance of the message-driven bean receives the request to start the particular process.
Note
In a cluster environment, SAP NetWeaver AS Java can be installed and run on many physical servers and each server can be running one or more server nodes. Java Scheduler must ensure failover functionality. Therefore, the scheduler runtime service and scheduler service are deployed on every server node. The scheduler runtime service is also running on every server node, but to avoid parallel starting of one or more scheduled jobs, the scheduler service is running only on a single server node. This means the scheduler service is designated to a server node called the singleton server node. If the designated singleton server node is down, SAP NetWeaver AS Java automatically starts or activates the scheduler service on the next running server node.
The main goal of Java Scheduler is the smooth integration, configuration, and execution of the background processes that are defined in Java-based business applications. Therefore, Java Scheduler offers a scheduler API (see below for an example that presents its use to build customer-defined background processes in SAP-provided and customer-specific business applications). The scheduler API allows the business application to schedule jobs programmatically and obtains information about already-scheduled jobs.
As shown in the architecture image shown in Figure 1, Java Scheduler supports integration with an external job scheduling system. This means that it provides a public API called Java eXternal Batch Processing (JXBP), which can be used by any third-party scheduling system to monitor and control all background processes defined in SAP NetWeaver AS Java. The intention of the JXBP API in Java Scheduler is very similar to the concept and functionality of ABAP Scheduler in SAP NetWeaver AS, which is provided by the external interface called eXternal Background Processing (BC-XBP).
Define a Job in Java Scheduler
You can start Java Scheduler in SAP NetWeaver AS Java using SAP NetWeaver Administrator. To call this tool, use the URL https://<hostName>:<portNumber>/nwa (for example, https://JavaApplServer:50000/nwa, where the host is named JavaApplServer and the HTTP port number is 50000) and start SAP NetWeaver AS directly. Log in as an administrator and select Operation Management > Jobs > Java Scheduler (Figure 2).

Figure 2
Java Scheduler in visual administrator
Figure 3 presents the Java Scheduler administration view integrated in SAP NetWeaver Administrator that provides for views of:
- Jobs: A list of the already-running or completed jobs, called scheduler jobs
- Tasks: A list of scheduled jobs, called created tasks
- Job Definitions: A list of job definitions that are defined or provided by deployed and running business applications, called scheduler job definitions
- External Schedulers: A list of externally scheduled jobs. This list is available if you integrated an external scheduling system via JXBP API. Detailed discussion of this functionality is outside the scope of this article.

Figure 3
List of completed jobs in Java Scheduler
The job definition is defined in the Java-based business application that is deployed on the SAP Java server. The job definition consists of job configuration (job metadata) and job implementation (the Java message-driven bean that was defined and implemented in the Java programming code). The job provider (e.g., SAP for SAP-provided business applications) defines in the job configuration the initial job parameters (default job parameters) that should be replaced or adapted to a local environment. Because the administrator can create one or many job instances from a single job definition (theoretically an infinite number of job instances), the job definition does not contain any start conditions.
The start conditions and the parameter values for the particular job instance are defined by the task scheduler during the creation of job instances. The administrator may create various scheduler tasks based on the same job definition. Therefore, the administrator may define jobs that are based on the same job definition but run with different parameters and different start conditions.
After the administrator defines the start conditions and parameter values in the task scheduler, Java Scheduler builds the job instance and executes it at a particular point in time.
Note
Java Scheduler implements an object-oriented approach for developing and scheduling jobs. Therefore, it supports child jobs and job chains.
Figure 4 presents the Job Definitions view with an example job definition named SbaUserGroupSynchronization provided by the sap.com/is~findgrid-core-ear business application.

Figure 4
General job information of the selected job definition
After the job definition is selected, Figure 4 shows the Job Definition Details section that provides you with the name of the job, its short description, its retention period, and the name of the business application that provides the job definition. The Parameters tab in the Job Definition Details section (at the bottom of the screen in Figure 5) presents you with the list of job parameters — its name, type, direction (the IN value is used for input parameter and the OUT value is used for output parameter), default value, description, and display indicator (which defines if the parameter is visible or configurable in the task scheduler while defining the job instance).
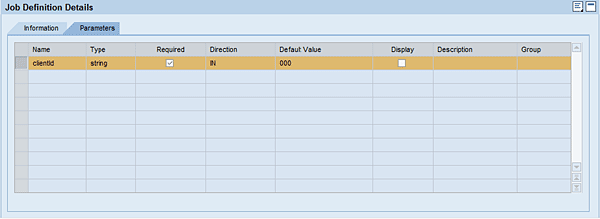
Figure 5
Default job parameters of selected job definition
Now let’s start presenting the creation of a particular job instance from the job definition.
Scheduling Task
To create a new task (background job), open the Tasks view, which provides you with the list of currently scheduled tasks. Click the New button and the task creation wizard starts (Figure 6).

Figure 6
Create a new task — select a job
In the first creation step, select a job definition from the list of existing job definitions and click the Next button (Figure 7).
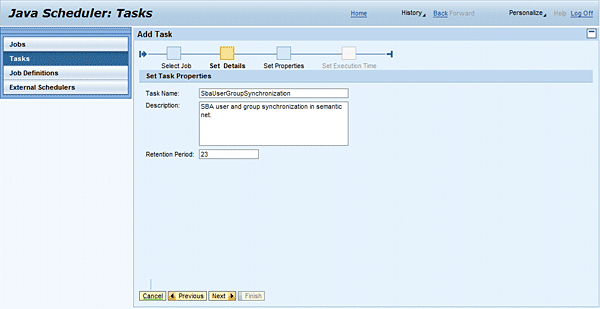
Figure 7
Create a new task — set the task name and retention period
In the next step, you define the task name, its description, and its retention period. The Retention Period parameter defines in days how long the particular job instance (executed task) remains in the list of jobs after the job is completed. (I’ll talk about this more in the Job Execution Results section.) As you can see, the wizard proposes the initial or default values that are defined by the job provider in the job definition and you can freely modify them.
Figure 8 presents the next step, in which you define the value of the job parameters that are used for the execution of the particular job instance. In this example, the job SbaUserGroupSynchronization defines only one input parameter clientId (see also the job definition parameter in Figure 5) which is defined and understood by the particular business application. In this example business application, the clientId parameter is used as a data container. This means the Java business application uses a similar data separation mechanism that the ABAP system uses (client separation).
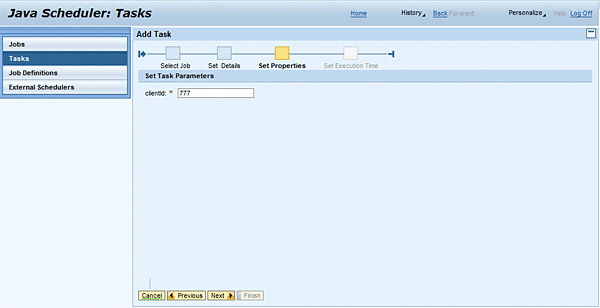
Figure 8
Create task — Set task parameters
If the business application defines more parameters, the set properties creation step contains a list of all input parameters that are visible for the configuration (i.e., that are not defined as pure display parameters via the Display check box in Figure 5).
In the next creation step, define the job start conditions, which define the point in time at which the job starts and how often the job is repeated, among other conditions. In other words, the job starts to run every time certain start conditions are fulfilled, and the start conditions defined in the job instance are used to trigger automatic job execution.
Note
Java Scheduler allows you to schedule an unlimited number of jobs per day, but this may have a significant impact on the performance of your system. Additionally, each job may require a different amount of system resources, so you should try to reduce the number of jobs. In case of performance problems, investigate their reasons and optimize the job configuration. Additionally, Java Scheduler persists all information about past, current, and future jobs in the database of SAP NetWeaver AS Java. This information is required for the data integrity and failover reasons, but its amount may cause system overload problems, such as if a task is executed several times a second.
Java Scheduler supports the following three views to define start conditions, shown in the three tabs in Figure 9:

Figure 9
Create task — set recurring execution conditions
Recurring Conditions
Figure 9 presents the creation of once-running jobs (i.e., jobs running only once at a defined date or time) and periodic-running jobs (i.e., jobs running every day or x-times at specified hours). First, you define the time zone (see the Time Zone drop-down list), which initially contains the time zone of SAP NetWeaver AS Java. Afterward, you set the start and end dates and time conditions (see the Start Date, End Date, and Time input fields). Initially the times and dates are set to the current date and time; you may need to modify them as needed (and make sure the end date and time are after the start date and time).
The third group of conditions is the periodic conditions: period in hh (hours), mm (minutes), and ss (seconds). You can define how often the job should run in between defined dates (start and end dates or time) — for example, every 10 hours or 30 minutes (or any combination of the values in periodic input fields). In this case, you may specify a number of times at specified regular intervals.
Note
The once-running job is a special case of recurrent execution. In this case, the job has a single iteration and is created when the values of Period input fields (hours, minutes, and seconds input fields) are set to 0 (zero).
After you define the job conditions, click the Add button and the system adds the conditions to the table of conditions (Figure 10). As you may assume, you can define one or many conditions (entries in the table) and Java Scheduler starts the execution of a particular job instance as soon as one of the created conditions is fulfilled.

Figure 10
Create task — scheduled execution conditions
Cron Conditions
The task creation wizard also offers the creation of start conditions defined as a day relative to the start of the month, week, day, and hour. These are called cron conditions (Figure 11). Using the cron start conditions, you can define minute, hour, day of the week or month, and the year when the job should start or run. The Cron view allows you to create once-running jobs and periodic-running jobs. If the job should start periodically, you can set one or more times within a period of time that occurs at regular intervals. For example, you can set it up so that the job runs every Monday at 6:00 a.m. or the job runs the 12th day of every month in 2011 at 8:00 p.m.
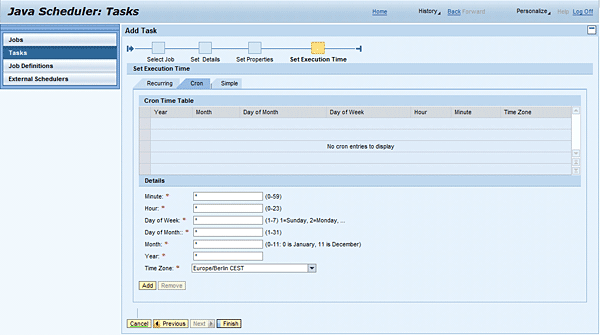
Figure 11
Create task — set cron execution conditions
Simple Conditions
Figure 12 presents the third option to create job start conditions — the Simple tab, which allows you to set one or many start conditions in the Simple Time Table.
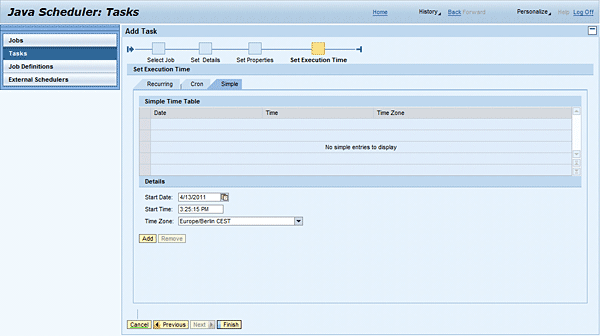
Figure 12
Create task — set simple execution conditions
To do that, you define the time zone (in the Time Zone drop-down list), and the start and end dates and time conditions for one job start or run (see the Start Date, End Date, and Time input fields in Figure 12). Initially, the dates and times are set to the current date and time; you can modify them freely. The Time Zone field is initially set to the time zone configured on SAP NetWeaver AS Java. You can achieve the semi-periodic execution if you define many start conditions that are listed in the condition table (see Simple Time Table).
After creation of the task start conditions is finished, click the Finish button and in Java Scheduler add the task to the list of already-scheduled tasks (Figure 13).
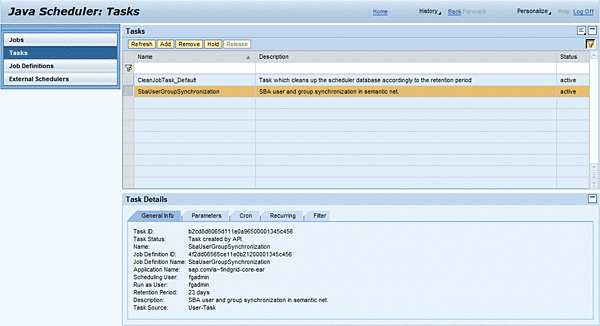
Figure 13
List of created tasks — task general information
The task list contains the list of all created tasks, the configuration (the General Info tab in Figure 13 and the Parameters tab of Figure 14), and the starting conditions (the Recurring tab in Figure 15).
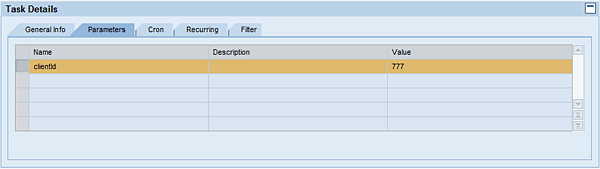
Figure 14
List of created tasks — task parameters

Figure 15
List of created tasks — task start conditions
After the job is configured and scheduled, Java Scheduler can create the job instances and start or run them in a particular server node of SAP NetWeaver AS Java. As the Java server administrator, you can check the job execution and eventually analyze execution problems (if any occurred).
Check the Job Execution Results
The Java Scheduler’s Jobs view gives you a list of currently running and completed background jobs (Figure 16). The list contains the name of the job (as was defined in the task creation wizard — see Figure 7), the job status (see the Status column — RUNNING for currently running jobs or COMPLETED for currently completed jobs), the return code (in the Return Code column), the start and end dates and times (in the Start and End columns), the scheduler type (in the Scheduler column), and the user ID (in the User column).

Figure 16
List of completed tasks — job detail information
The return code 0 defines that the particular job instance was executed without problems. The other values (not zero) reflect some problems. The concrete value and meaning of the return code is defined in the particular job definition and therefore may vary between business applications. This means that the same return code may represent different kinds of errors.
The scheduler type informs you if a particular job was scheduled in the Java Scheduler administration UI (the value of the scheduler type is set to SAP J2EE Scheduler) or external scheduler that was integrated via JXBP API.
Each scheduled job is defined by the user with administrative rights and each job instance must be executed with business-related permissions. Therefore, Java Scheduler uses the user account that created the task to run or execute particular job instances. If the job requires specific business application permissions, the user who scheduled the job must be permitted to execute a particular business-specific operation. Otherwise, the job can be started by Java Scheduler (the user has permission to create and execute the job) but the background job fails and reports execution problems (the user does not have permission to execute business functionality).
Therefore to check the current execution step and determine and solve eventual execution problems, Java Scheduler reports all execution-relevant information in the execution log in the Log tab of the Job Details section in the screen in Figure 17.
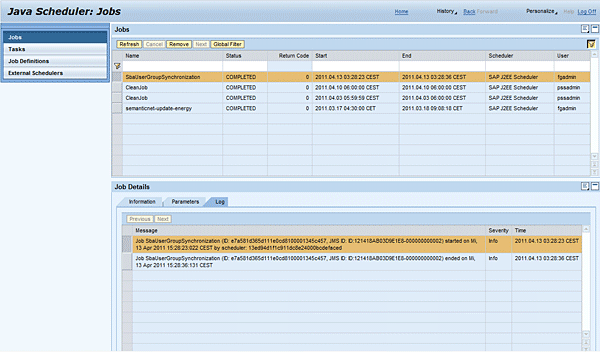
Figure 17
List of completed tasks — job execution log
Java Scheduler integrates the logging and tracing of job activity with SAP Logging Framework and reports the log messages on two levels:
- Job-related logs: Logs reported or written into job database by every executed job
- Java Scheduler logs: Logs reported or written under the /System/Server category, at SYS_SERVER
The job-related logs are always associated with the job instance that logged it and its lifetime matches the lifetime of the job. Therefore, the logs are deleted when the corresponding job is deleted — for example when the job’s retention period has expired.
Note
The SAP NetWeaver AS Java supports the rolling log-write strategy that guarantees a constant size of the logs. The job-related logs are an exception — this means these logs are not overwritten by a rolling log-write strategy. Therefore, the logs are kept for an indefinite period of time and cannot be deleted.
Because SAP NetWeaver AS Java also supports cluster configuration, Java Scheduler allows you to retrieve logs written by a particular job on different cluster nodes (where the job ran).
Java Scheduler as a job execution framework writes to the log the technical information about the starting and ending of the executed job. The start and end messages contain information about the current job instance (e.g., job ID, JMS message ID, Java Scheduler instance ID, and start and end dates and times). All other messages (e.g., execution steps and eventual problems and errors) must be reported by a particular job implementation.
Create a Job Definition in a Java-Based Business Application
The SAP-provided and custom-defined business applications may provide the integration of their functionality with Java Scheduler providing and developing job definitions. This means the business application provider defines in the business application one or many Java message-driven beans that implement the business logic that is performed in the background process, and defines a respective metadata or configuration using the appropriate descriptors.
Creating job definition can be done in the following steps:
- Create Java message-driven beans
- Implement business logic in Java message-driven beans
- Create job metadata and configuration
Step 1. Create Java Message-Driven Beans
You can create the Java message-driven bean using SAP NetWeaver Developer Studio, which is a software development platform based on the Eclipse Integrated Development Environment (IDE). SAP NetWeaver Developer Studio supports development of Java-based business applications and allows you to analyze problems using local or remote debug functionality for all SAP NetWeaver AS Java servers running in debug mode.
Note
The Java message-driven bean is a type of enterprise bean that can handle JMS messages. The EJB container handles these Java message-driven beans on SAP NetWeaver AS Java.
In SAP NetWeaver Developer Studio, create a new Java project using File > New > Java Project and the project creation wizard starts (Figure 18).
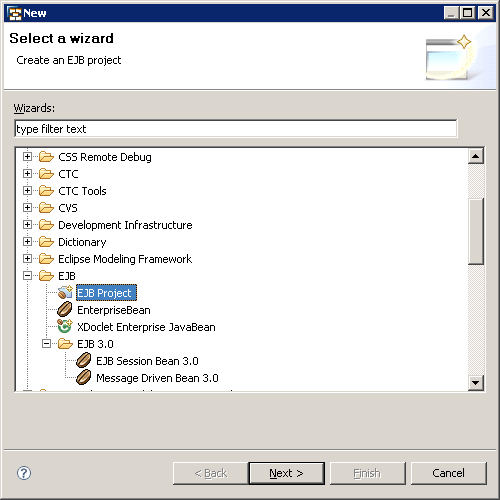
Figure 18
Create a new EJB project
In the list of possible project types select the EJB > EJB Project option and click the Next button (Figure 19).

Figure 19
Create a new EJB project — define the project name
Enter the Project name and click the Next button. In this creation step, you may also define the project location. In this case deselect the Use default check box in Project contents group and then enter the appropriate project location in the Directory: field in Figure 19.
You may also add the EJB project to an existing SAP J2EE application (EAR file) that can be directly deployed on SAP NetWeaver AS Java. SAP NetWeaver Developer Studio does not support the creation of EJB projects that can be directly deployed on the SAP Java server, so the deployment is mostly done using an existing SAP J2EE application project that encapsulates the EJB project. (The creation of the SAP J2EE application project is outside the scope of this article.) To do that, select the Add project to an EAR check box and then select the already existing SAP J2EE application.
Finally, you should set the EJB Module and SAP Specific Ejb Module options to project facets, which are required to build a particular EJB project (Figure 20). Also select the Java check box. Click the Finish button and SAP NetWeaver Developer Studio creates the EJB project with the required compilation dependencies.
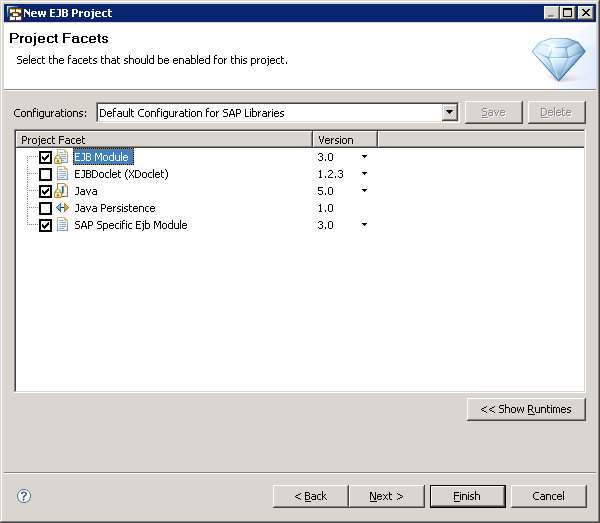
Figure 20
Create a new EJB project — define project facets
After the EJB project is created, you can start to create the Java message-driven bean. Select the previously created project and select from the context menu New > Others option. Then follow EJB > EJB 3.0 > Message Driven Bean 3.0 (Figure 21).

Figure 21
Create a message-driven bean
Enter the EJB Class Name (e.g., UserSynchronizationJobBean), the EJB Project name (e.g., findgrid-core), and the Default EJBPackage (e.g., com.sap.synch.job). Because the Java message-driven beans are running in the EJB container (Figure 1) you should not modify the transactional settings that are proposed by the wizard in the Transaction Type drop-down (Figure 22).
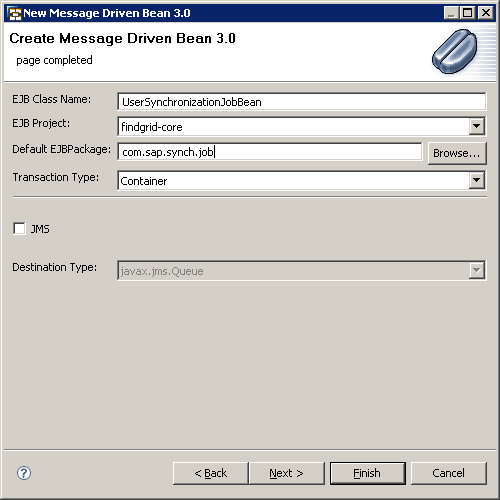
Figure 22
Define the EJB class name
If your SAP NetWeaver Developer Studio is integrated with SAP NetWeaver Development Infrastructure (specifically with the Design-Time Repository [DTR] and Central Build Server [CBS] pieces), you should set the project references in the SAP NetWeaver Developer Studio - Development Infrastructure view. To do that, select the EJB project and navigate to Component Properties > Dependencies and add the new dependency (e.g., tc/je/scheduler/api) to Java Scheduler (Figure 23).
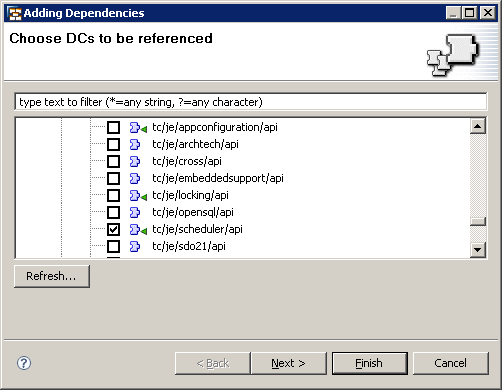
Figure 23
Add a dependency to Java Scheduler component
After you click the Next button, you need to define if the dependency is used at Design Time, Deploy Time, or Run Time (Figure 24). To avoid problems, you should select all types of dependencies and click the Finish button to activate the modifications.
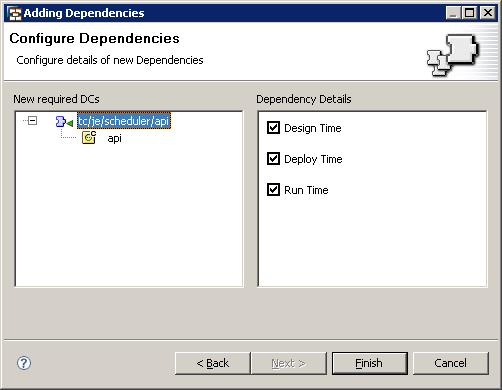
Figure 24
Define dependency types
After the dependencies are set, you can start to implement job functionality in the message driven-bean.
Step 2. Implement Business Logic in Java Message-Driven Beans
The generated EJB class UserSynchronizationJobBean.java automatically contains the reference to the Java message-driven bean (Figure 25).

Figure 25
Default reference in message-driven bean
Now you can start implementing the business logic that is provided in the public method onJob(JobContext ctx). Figure 26 shows you an example implementation of the business logic that is calling the existing java bean to update the users and groups. (The detailed description of user and group update is outside the scope of this article.)
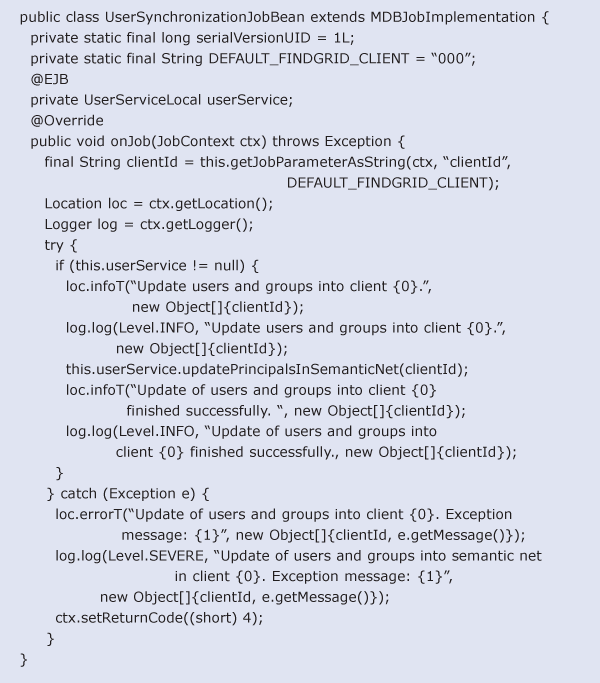
Figure 26
Example message-driven bean implementation
To report job steps, you need use the location class (part of the SAP logging framework) or the logger class (part of the Java logging framework), which are available from the job context object JobContext. (In this example, you use both frameworks.)
Additionally, you should use the Job context object (see JobContext class) to report the status code of the job execution (see call ctx.setReturnCode((short) 4) on Figure 26). Finally, you can start to configure the required job metadata and configuration, in particular EJB deployment descriptors.
Step 3. Create Job Metadata and Configuration
Java Scheduler requires you to define job metadata and configuration as a part of the job definition. This definition is done in the following three XML-based deployment descriptors:
- ejb-j2ee-engine.xml: deployment descriptor for message-driven beans
- application-j2ee-engine.xml: deployment descriptor for message-driven beans application
-
job-definition.xml: message-driven bean-specific deployment descriptor that contains the job configuration (job metadata)
Define Metadata in ejb-j2ee-engine.xml
The configuration of the message-driven bean (Figure 27) specifies the destination name and connection factory name that of the class that implements the message-driven bean (see the values of the ejb-name and jndi-name elements). The destination name is JobQueue and the connection factory name is JobQueueFactory (see the default values of the destination-name and connection-factory-name elements).

Figure 27
Example configuration of ejb-j2ee-engine.xml
Define Metadata in application-j2ee-engine.xml
As shown in Figure 28, the SAP application descriptor contains the reference to the Java Scheduler APIs (see the service reference to scheduler~runtime J2EE service). At runtime, this provides functionality required by the job definition — for example the access to Java Scheduler context (see JobContext) and the job basis class (see the MDBJobImplementation class, which has to be extended by the job implementation class [UserSynchronizationJobBean class declaration in Figure 26]).

Figure 28
Example configuration of application-j2ee-engine.xml
Define Metadata in job-definition.xml
Figure 29 presents the job-definition.xml file. This is the Java Scheduler-specific descriptor that contains the definition of the following elements:
- Job name and its description (see the job-definition element and name and description attributes)
- Names and properties of the job parameter (see the job-definition-parameter element)
- Job default retention period (see the retention attribute). This is the number of days for which the job logs are persisted in the database.
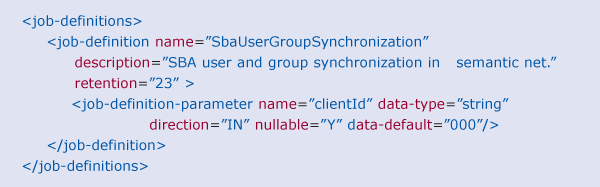
Figure 29
Example configuration of job-definition.xml
In the SAP Help Portal, you can find the job-definition.dtd documents that describe the full definition of elements and attributes defined and used in job-definition.xml. For more information, see https://help.sap.com/saphelp_nw73/helpdata/en/4a/65d4db8b693a0fe10000000a421937/content.htm. After you create the job definition, you can deploy the application in the SAP NetWeaver AS Java and the job definition is automatically available in the Java Scheduler Job definition view (Figure 4).

Robert Heidasch
Robert is the chief innovation and technology lead in the global Accenture Technology Platform, which is responsible for SAP Leonardo and the new digital technology defining business value and driving the digital transformation of complex enterprise solution for Accenture diamond and strategic clients. Before that he was responsible as innovation and solution lead for the design and architecture of new business applications developed jointly by Accenture and SAP based on the newest SAP and non-SAP technology. Robert is the Accenture certified Senior Digital Architect and Senior Technology Architect. He is coauthor and trainer of a couple of SAP technology-related trainings for the in-memory platform and architecture of new business applications (e.g., SAP HANA, SAP Cloud Platform, and SAP Leonardo applications for solution architects and technical architects, all of which were provided by Accenture in Europe, the US, and Asia). Robert has more than 23 years’ experience designing and developing IT systems. He published several technical and business articles about SOA, SAP NetWeaver and its integration with non-SAP systems (e.g. Microsoft, Oracle, etc.), and SAP HANA technology. He is also an inventor of 38 patents in the US in the area of in-memory technology, artificial intelligence and machine learning, security, semantics, and SOA. He is a frequent speaker in international business conferences and SAP Forum. He is a subject matter expert in customer projects worldwide and has extended experience in team leadership in Europe, the US, and India.
You may contact the author at robert_heidasch@outlook.com.
If you have comments about this article or publication, or would like to submit an article idea, please contact the editor.


