You can use the SAP Query functionality to integrate information from an SAP R/3 system into a Microsoft Word document. That gives you the ability to create form letters without resorting to a custom report.
Key Concept
R/3 uses Desktop Office Integration controls that call an SAP document container and SAP DataProvider. This functionality is part of the R/3 core software. These standard controls, which are the communication channel between the R/3 system and the desktop office application such as Microsoft Word, use an OLE2 interface.
Companies do not want to pay for custom reports that aren’t needed, yet many are doing just that. Many are not aware that they can use SAP Query functionality with Microsoft Word instead to create simple payroll or HR form letters.
I will show how simple the integration is between R/3 and Microsoft Word with an example. Every January 1, employees who are in Union X receive a $.50 per hour increase. The company must send the employees a letter to their home addresses stating their adjusted annual income after the increase. The business needs to send this information annually, yet since fewer than 50 employees are affected, the company does not want to spend a lot of money and time creating the letters.
Certainly one option would be to create a quick ABAP custom report to pull this information. However, some might not consider this cost effective. Let’s take a look at how easy it would be to pull an SAP Query and merge this data into a Microsoft Word document. The screenprints are from R/3 Enterprise Release 4.7.
How to Create the Simple SAP Query
Go to transaction SQ01. Pull up the user group you belong to and type in the name of the new query that you want to create. In my example, I’ll call it HR_Mailing. Click on the Create button. The system prompts you for an InfoSet.
On the Create Query HR_MAILING: Title, Format (Figure 1) screen, enter the text name for the query as well as a short description. Since you are going to merge this with a Word document, select the Word processing button.
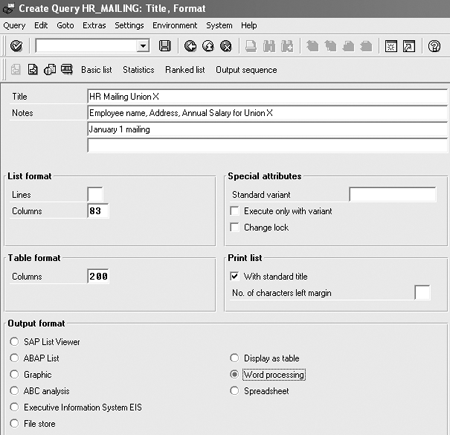
Figure 1
Create a query
On the Create Query HR_MAILING: Select Field Group (Figure 2) screen, select the following infotypes: Personal Data, Addresses, and Basic Pay.

Figure 2
Select field group
Go to the Create Query HR_MAILING: Select Field (Figure 3) screen. Scroll down and highlight the following fields: First Name, Last Name, Address Record Type, House Number and Street, City, Region (State, Province, County), Postal Code, and Annual salary. You use these fields as selection fields or displays on your report.
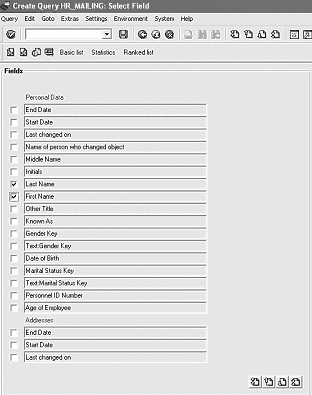
Figure 3
Select fields
On the Create Query HR_Mailing: Selections (Figure 4) screen, select Address Record Type. The general query selection screen allows you to select the personnel area. Use the personnel area to ensure that you get only Union X employees. The user needs to pull only subtype 1 records from the multiple types. The Address Record Type is not automatically defaulted as a selection screen on the general query selection screen.
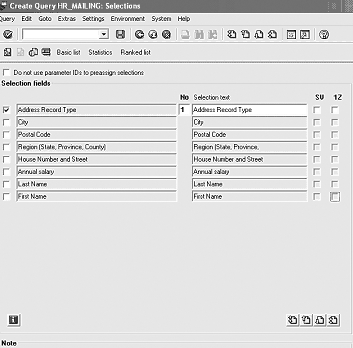
Figure 4
Select record type
Users have the option to indicate what fields they would like to display on their report by selecting the Basic list, Statistics, or Ranked list button. Since the data required for this example will be used in a Microsoft Word template, select the Basic list button. On the Query HR Mailing layout design screen, the user not only indicates what fields should display on the report, but also the order in which they are displayed (Figure 5).

Figure 5
Indicate the fields to display and their order
In the example of the query selection screen, put in the personnel area for the Union X employees as well as the Address Record Type 1 for permanent address. The period should be set to 01/01/2005 to 12/31/9999 (Figure 6).
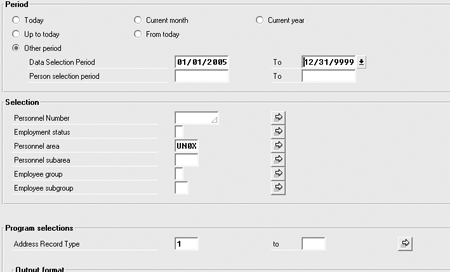
Figure 6
Export the document to Word
When the user clicks on the execute icon, the system automatically prompts the user to export the query to Word (Figure 7).
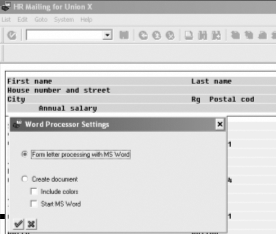
Figure 7
Word processor settings
Now the system prompts you to create a new Word document. Merge the data into a current Word document, or use an existing Word document (Figure 8). Select the button you see in Figure 7 for Form letter processing with MS Word, as you will write the form letter with the merged data. No password is required to merge this into a Word document.
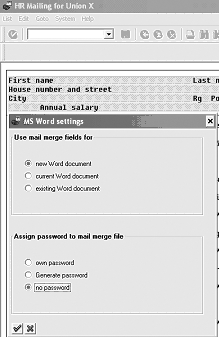
Figure 8
HR mailing for Union X
Merge SAP Query Data with the Word Document
For one brief moment the user sees the SAP Query data merge into Microsoft Word. Do not worry. The data is available to the Word document, but you must complete the data merge steps.
The data must be merged into the Word document in three places. Use the following Word icons to complete the mapping:
- Merge the data into the address block.

- Merge the data into the greeting line.

- Merge the annual salary into an inserted merged field value.

Begin with the address block. You can state how you want the user’s name to appear (Figure 9). To map the rest of the address information, select the Match Fields button.
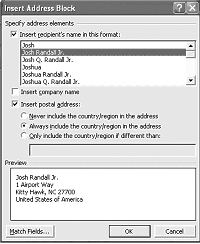
Figure 9
Insert the address block
Now match the rest of the fields from the flat file into the Word document (Figure 10).
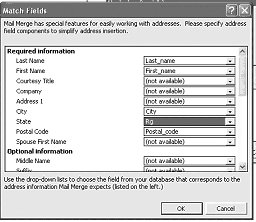
Figure 10
Match the fields
The Desktop Office Integration functionality exists within the core SAP R/3 system. When a user downloads information from the SAP R/3 system to a non-SAP R/3 software application, such as Word or Excel, the SAP R/3 system uses controls called the SAP document container and SAP DataProvider. Members of your production/implementation team do not have to do anything special to take advantage of this functionality. These standard controls are the communication channel between the R/3 system and the desktop office application product such as Microsoft Word.
The SAP document container control uses methods and attributes to communicate with a desktop application using the OLE2 interface automatically. All you have to do is to map the data so that the system knows what field you are linking from the SAP system to the Word document.
The SAP DataProvider is a container and converter for data in different formats. Data that you import into an application is converted into a readable format based on the Internet standard MIME. You do not need to know the MIME functionality to use this. The SAP DataProvider buffers document data that is administered in the R/3 system, which means that the system holds the data in a temporary storage until you click on the merge icon in Word. When you select the merge icon, the system automatically places the data from the buffer into the Word document’s mapped field per your specifications.
The Greeting Line (Figure 11) allows the user to determine to address the reader’s name.
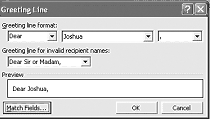
Figure 11
Greeting Line settings
Now you write the contents of the letter. You can use the inserted merged field  icon to place the annual salary information into the letter.
The final step is to merge the data from the SAP ABAP Query into the Word document now that you have mapped the field values. Select the check for errors icon  . You are asked about how you wish to see the errors (Figure 12).
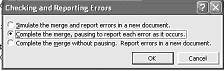
Figure 12
Checking and Reporting Errors screen
Now you verify that you have the results that you were looking for (Figure 13).
Figure 13
Merge complete
You can reuse the SAP Query as it is stored within the SAP R/3 system in the SQ01 transaction. You can store the Microsoft Word document on your PC so that you can reuse it next year.
Dawn Burns
Dawn Burns is an SAP-certified human resources senior consultant and Quality Assurance Manager and HR Consultant with Howrey LLP. She is a former SAP Human Resources instructor for SAP America and has more than 12 years of experience in human resources and information technology.
If you have comments about this article or publication, or would like to submit an article idea, please contact the editor.


