Find out how to configure custom calendars for use in Demand Planning through fiscal year variants. You can use a single planning area for multiple planning books. For example, you can create one planning book for custom weeks and another for custom months using fiscal year variants.
Key Concept
Data in Demand Planning is divided into time buckets, which can be daily, weekly, monthly, or quarterly depending on business requirements. You can use standard or configurable time buckets. Examples of configurable time buckets are weekly buckets that do not follow the SAP standard of a Monday through Sunday week (factory weeks), or a monthly bucket that does not correspond to a calendar month, but has a variable number of weeks (factory months).
With the custom calendar, I was able to avoid disaggregation issues. For instance, if I enter the product
allocation in a standard calendar month it disaggregates to the custom weeks. If the custom week belongs partially to two
months, the data for that particular custom week comes from both months. With the custom month, there is no confusion as
to which month the custom week belongs.
I’ll illustrate this with an example of a factory week that runs Saturday through Friday. The process
involves the following seven steps:
Step 1. Define the fiscal year variant E1
Step 2. Define the factory month fiscal year variant EM
Step 3. Define the storage bucket profile Z_FACTORY_WEEK
Step 4. Use Z_FACTORY_WEEK in the planning area
Step 5. Define the factory week ID (time bucket)
Step 6. Define the factory month ID (time bucket)
Step 7. Define the planning book with a planning area
I’ll also describe the limitations you face if you use Global Available-to-Promise (GATP) to perform product
allocation checks. Although I use SAP SCM 5.0 in my example, the ability to define fiscal years has been available at
least since APO 3.0.
Step 1. Define the Fiscal Year Variant E1
Companies create custom time buckets by using fiscal year variants and multiple planning books. For example, in
product allocation planning, you can plan product allocations for some materials in weekly buckets and others in monthly
buckets. This allows you to view and change data in either time bucket.
Use transaction code SPRO and follow menu path mySAP SCM>Implementation
Guide>Advanced Planning and Optimization>Supply Chain Planning> Demand Planning>Maintain Fiscal Year
Variants. In the FV (fiscal variant) column in Figure 1, the fiscal year
E1 appears with a Description of FYV 1999-2010. The
end of any posting period in a year is not constant, so I selected Year-dependent.

Figure 1
Definition of a fiscal year variant for a factory week
A year could have a maximum of 53 periods, corresponding to the Number of posting periods.
If you have a fiscal year with only 52 weeks, see the sidebar “Shortened Fiscal Year” to see how to define
such years as shortened fiscal years to avoid errors. The field No. of special periods is blank because
the fiscal year variant does not have special periods.
You have to define the posting periods for each of the fiscal years. Select the line corresponding to the
fiscal year variant shown in Figure 1 and then click on Periods under Fiscal year
variants. A pop-up screen appears with the year 2007 selected to define the periods
(Figure 2). For each of the posting periods, specify the end date by entering the values for the
Month and Day when the posting period ends (field Period in Figure 2).
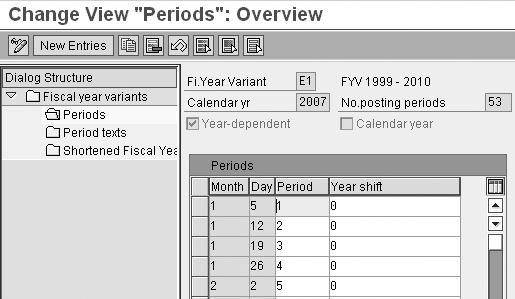
Figure 2
Define the fiscal year variant E1 for 2007
The period belongs to the same year, so the Year shift has a value of 0
— for example, the first period in 2007 ends on January 5. A particular fiscal year could include days from the
previous calendar year or days from the next calendar year. This depends on how the company defines its fiscal year.
Note
You have to include an entry containing December 31 in the year- dependent fiscal year variant. If you don’t do this, an information message states that the financial year is incomplete and you cannot save the data.
Table 1 shows the start and end dates for fiscal years 2007 and 2008, based on my week
that runs Saturday through Friday. Figure 3 shows the last few periods for fiscal year 2007. The period
of December 29 through 31, 2007, is period 1, but the year is +1, which refers to
calendar year 2008. December 29 through 31, 2007, are in fiscal year 2008 because the 29th is a Saturday and the beginning
of the factory week. In my definition, all days mentioned are the end days; the starting days are implied.
| 2007 |
December 30, 2006 |
December 28, 2007 |
| 2008 |
December 29, 2007 |
December 25, 2008 |
|
| Table 1 |
Start and end dates for fiscal years 2007 and 2008 |

Figure 3
Definition of the fiscal year variant for fiscal year 2007 (last few periods)
If a calendar year posting period belongs to a previous fiscal year, you specify it by entering a value
of -1 in the year column and the calendar day and month when the posting period ends. I’ll clarify this with another
example, this one with the fiscal year having four posting periods of three months each and the fiscal year starting on
April 1. In this case, the period ending March 31, 2007, actually belongs to fiscal year 2006 (fourth period of 2006) and
is defined as:
Month: 3
Day: 31
Period: 4
Year Shift: -1
Note also that you should define the fiscal year variant for a longer period of time than the horizon
used in the planning book. If the planning horizon in the planning book is one year in the past and one year in the
future, then you should define the fiscal year variant for at least two years in the past and two years in the future.
This is to ensure that the periods are defined consistently in the transition from one year to the next.
Step 2. Define the Factory Month Fiscal Year Variant EM
To view the data in both factory weeks and factory months, you define the factory month using another
fiscal year variant. In my example, this is the fiscal year variant EM with 12 posting
periods (Figure 1). The starting day for this factory month corresponds to the starting day of the factory week. The
ending day of the factory month corresponds to the ending day of another factory week. Typically, the factory month
corresponds to four or five factory weeks. For my example, I define a fiscal year variant with 12 periods in a year. A
particular fiscal year contains days from the previous calendar year or from the next calendar year, falling in line with
how I defined the factory week.
You define the posting periods in a similar way as for the factory week. Enter the end calendar day and
the calendar month on which the posting period ends. If the days of the calendar year fall in the next fiscal year, you
specify that by entering a value of +1 in the Year shift
column. Similarly, if a posting period starts in the previous year, then you specify it by entering a value of -1 in the Year shift column.
Figure 4 shows the posting periods for EM in calendar year 2007. The
first posting period in 2007 also includes the last couple of days of calendar year 2006 (December 30 and 31, 2006). So,
the first factory month of 2007 starts on December 30, 2006, and ends on January 26, 2007. This corresponds to the periods
defined for fiscal year variant E1 in Figure 2. Now that I have defined the fiscal year variants,
let’s see how to use them in the planning area and planning books.
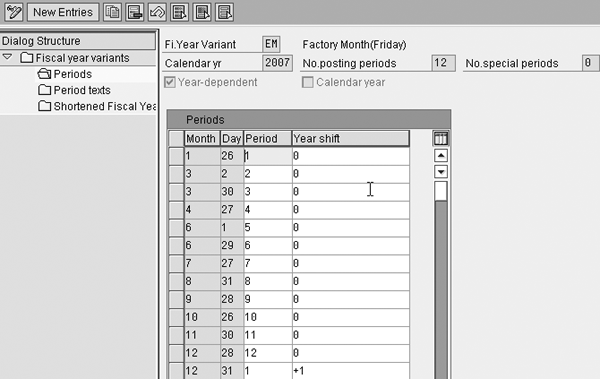
Figure 4
Definition of the fiscal year variant EM for 2007
Step 3. Define the Storage Bucket Z_FACTORY_WEEK
Use menu path Demand Planning> Environment>Current Settings> Periodicities for Planning
Area to define the storage bucket profile, which directs how the system stores data in the planning area. When
you create the storage bucket in DP, you can only use one fiscal year variant (one custom period). In the example shown in
Figure 5, I created Z_FACTORY_WEEK as the storage bucket profile with the month
(calendar month) and the posting period (using the E1 fiscal year variant defined previously).
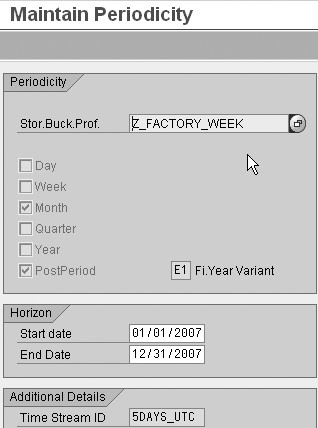
Figure 5
Define the storage bucket profile
Step 4. Use Z_FACTORY_WEEK in the Planning Area
In the planning area definition, use the storage bucket profile Z_FACTORY_WEEK (menu
path Demand Planning> Environment>Administration of Demand Planning and Supply Network Planning).
Select the relevant planning area, in my example PROD_ALLOC_PLAN. In the Info tab select
the storage bucket profile Z_FACTORY_WEEK that you defined in step 3.
Step 5. Define the Factory Week ID (Time Bucket)
In Figure 6, you define the time bucket profile ID called the FACTORY
WEEK to use in the Planning Book. This time bucket profile has a single uniform display for 52 weeks
corresponding to the posting period (specified by Display periodicity P). It uses the fiscal year variant
E1 (corresponding to factory week).
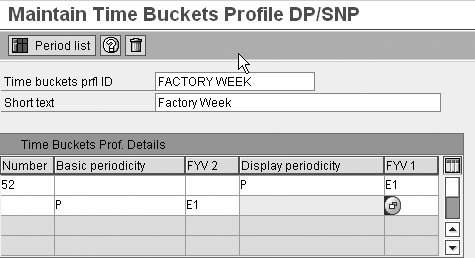
Figure 6
Define the time bucket profile for the factory week
Click on the Period list button to display all the periods that are defined for this
factory week (Figure 7). Note that the detailed display starts from the current date. For the first
period, the system only displays the number of work days left in the current period based on the current date (which in
this case corresponds to 06/12/2007). This shows the start and end time for the factory weeks, which correspond to how the
system displays the data in weekly buckets in the planning book.
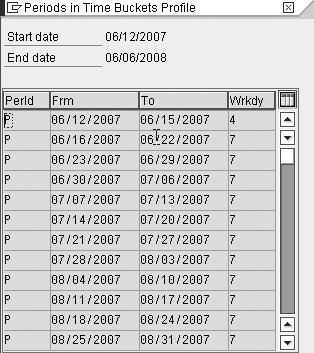
Figure 7
Detailed period display for the time bucket profile
Step 6. Define the Factory Month ID (Time Bucket)
You define the factory month in a similar way to the factory week. In Figure 8 the time
bucket profile ID called FACTORY MONTH is used in the Planning Book. This time bucket profile has a
single uniform display for 12 months corresponding to the posting period (specified by Display periodicity
P) and uses the fiscal year variant EM, which corresponds to the factory month.
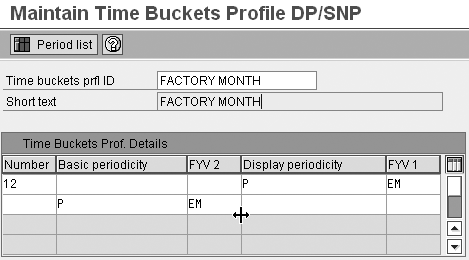
Figure 8
Define the time bucket profile for factory month
Click on the Period list button shown in Figure 8 to display all the periods that are
defined for this factory month (Figure 9). Note that the detailed display starts from the current date.
For the first period it only displays the number of workdays that are left in the current period based on the current date
which corresponds to 06/12/2007. This is how the system displays the data in monthly buckets in the planning book.

Figure 9
Detailed period display for the time bucket profile
Step 7. Define the Planning Book with a Planning Area
Now let’s see what the options are when you define a planning book using the planning area
PROD_ALLOC_PLAN. My example defines the data view called PROD ALLOC WEEK for the
planning area. The storage bucket profile has the fiscal year variant E1 and the calendar month, so you
would expect the time bucket profile for the factory week and the calendar month to be available because the time bucket
cannot have a more detailed periodicity than the storage bucket. For example, if the lowest periodicity in a storage
bucket is a week, then the planning book cannot display data in daily buckets.
When you look at the drop-down menu for the field TB Profile ID (Future) in
Figure 10, you can see that these two options are available. However, a third option for the factory
month is also available because the start and end dates of the factory month coincide with the start and end dates of the
factory week.
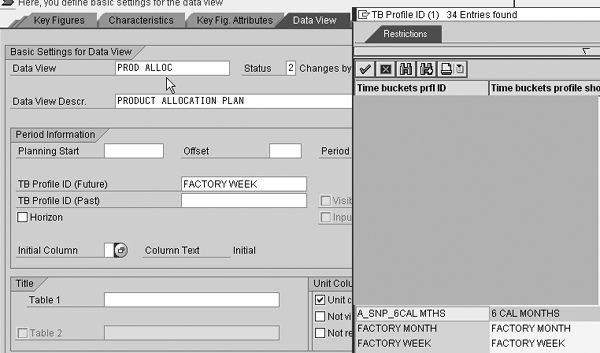
Figure 10
Select the time bucket profile in the planning book
Next, go to Interactive Demand Planning via menu path Demand Planning>Planning>Interactive
Demand Planning and access the product allocation planning book that manages product allocations. Interactive
Demand Planning is the central planning screen that allows you make manual changes to product allocation. The system
displays the data by default based on the time bucket profile chosen for the data view. You can highlight any of the time
periods. If you right-click you can see the factory week period description as shown in Figure 11.
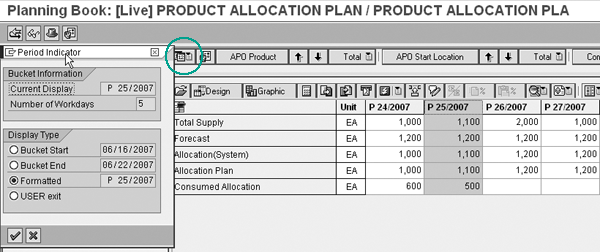
Figure 11
Interactive DP view in the factory week
You can view the monthly time bucket profile by clicking on the period structure icon circled in Figure
11. In the screen that appears, click on the Select Time Bucket Profile menu option and select the
FACTORY MONTH profile (Figure 12).

Figure 12
Interactive DP view in the factory month
The ability to select a time bucket profile in Interactive Demand Planning is new in SAP SCM 5.0. In
previous versions, you could only display data in the time buckets specified in the data view. Although the view in
Interactive Demand Planning in SAP SCM 5.0 defaults to what you selected for the data view, you can switch to another time
bucket profile. In my example I can display data in the factory month buckets even though the planning book and data view
are defined in factory weeks.
Limitations with GATP
The ability to use custom calendars is limited if you use GATP to perform product allocation checks.
Within a single planning area you can only perform product allocation checks using a factory week bucket or a calendar
month bucket. For my example, a product allocation group connected to Z_FACTORY_WEEK can use the factory
week bucket. The only way it can use the factory month bucket is if the storage bucket profile has fiscal year variant EM,
which corresponds to the factory month.
For more information about the detailed configuration, refer to my April 2006 SCM Expert article
“Better Manage Shortages by Integrating Allocation Planning with Supply Planning.”
Shortened Fiscal Year
Although the number of posting periods specified for E1 allows for a fiscal year to have 53 weeks, in most cases a fiscal year has only 52 weeks. You need to define those years as shortened fiscal years. If you do not specify this, you receive messages when you save the fiscal year (and the variant) such as “Gaps in the financial year periods E1” and “Data not saved.”
You define the shortened fiscal year by highlighting the corresponding item Shortened Fiscal Years. Enter E1 for the Fi.Year Variant and 2007 for the Fiscal Year. Click on the New entries button on the resulting screen and enter a value of 52 in the No. of posting periods field, as shown in Figure 1.
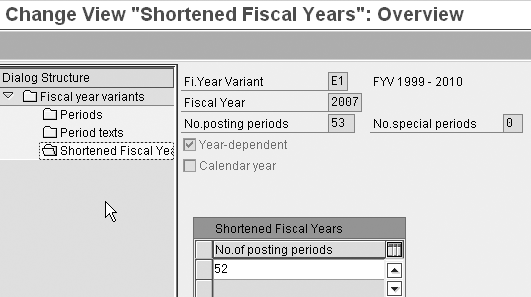
Figure 1
Shortened fiscal year
Ranjan Sinha
Ranjan Sinha is a senior managing consultant at IBM. He has vast experience implementing SAP APO functionality in various industries, including electronic and chemical.
You may contact the author at RSinha1152@yahoo.com.
If you have comments about this article or publication, or would like to submit an article idea, please contact the editor.