Post Processing Framework is a technology introduced with Web Application Server that triggers a workflow for message output. Here’s how to configure it with just a few simple steps.
Key Concept
Post Processing Framework allows you to process actions for different output types such as printing, sending emails, or faxing using Smart Forms. Since SAP applications work on the document concept (i.e., they generate documents for key business events or processes), they can also trigger a workflow or user exit to perform functions based on the conditions you configure. This technology replaces the output control in R/3 with a wider functional scope that is simple to maintain, use, and connect to another SAP system, a non-SAP system, or any other subsystem.
PPF has tools for scheduling, starting,
and monitoring actions. Determining,
generating, and processing actions can
either take place automatically or with
user interaction. A condition trigger
could be a preset condition the system
can look for, such as a price higher
than a certain amount, or it could be
based on a user action, such as an approval
in the case of workflow.
I’m going to show you how to
set up actions that trigger application
documents. The system supplies some samples,
so you can use Copy with Reference and
make your own changes to predefined configurations,
or you can take the approach of creating
your configuration from scratch using
the wizard. I’ll explain the two
methods:
- Create and modify PPF directly
in the Web AS configuration in the
application area. I’ll start
with the customizing steps, as they
explain the configuration from the
application point of view.
- Create a PPF definition using
the wizard, a quick setup tool that
focuses on the technical setup of
the PPF. Using a wizard, you get
the same results in terms of the
technical settings for the PPF configuration
as if you had used the configuration
steps directly. The wizard provides
application area detail and pre-populated
information and it is the best practice.
It can help when you create a new
action that differs widely from those
you already have.
The wizard, however,
helps you perform the definition
only — you must
do other associated configurations
directly in the application area.
Direct Configuration
Using an Action Copy
I am going to walk you through setting
up a PPF function for a Global Trade
Services (GTS) application. GTS is
an SAP application that enables companies
to expedite their imports through customs
by improving transparency throughout
the supply chain. It enables the sharing
of cross-border trade information with
business partners, such as regulatory
entities, brokers, and insurance agencies.
You could also use a different mode
of communication to pass this information
to your partners, including a printout,
Electronic Data Interchange (EDI),
email, or fax.
In my example, I’ll show some
of the applications available with
the PPF setup. As I mentioned earlier,
you can apply PPF technology to any
other SAP system, such as mySAP ERP
or mySAP CRM.
I’ll start with the Action
Profile setup, which you
access via transaction SAPSLL/PPFC.
The Action Profile
(Figure 1) defines
the interface between the application
and the PPF. The system evaluates
the conditions that lead to the scheduling
of the actions within the profile
using the profile properties. You
associate the Action Profile with
an Object Type. Object
Type defines the application
to which this PPF belongs or uses. Action
Definition describes the
content of each action.

Figure 1
Define an Action Profile to integrate the application with PPF
Step 1. Create a template
for the Action Profile. You
can define the way in which the system
performs the action — for example,
by method call or Smart Forms. The Action
Profile provides the interface
between the application (print, fax,
EDI) and the PPF-enabled application,
GTS in this example. Every Action
Profile is associated with
an Object Type,
which is the technical name for the
business object, in this case a customs
document used for declaration (BUS6880)
as shown in Figure 1. Set the Object
Type to indicate the technical
or ABAP name of the function (for
example, Sales Order or Delivery). Date
Profile defines which date
types, time durations, reference
objects, and date rules are used
in the application. These objects
are standard delivered but you need
to assign the values to tell the
system where the action applies.
Note
You can use the configuration steps or the wizard I detail here to PPF-enable any application from R/3 4.7 onwards that has PPF function in it. For example, all new dimension products from SAP are PPF-enabled, including mySAP CRM and mySAP SRM.
Step 2. Define the action. Figure
2 shows the list of action
definitions available in the system.
Select any one Action Definition and
click on the details (magnifying
glass) icon in the top corner or
double-click on it to bring up the
screen shown in Figure 3.
In this screen, set the content of
the action and the level at which
you want to implement the determination
technologies (email, EDI message,
fax, or workflow). When the conditions
you set in the application document
occur, the system triggers the action.

Figure 2
View the list of all Action Definitions within the Action
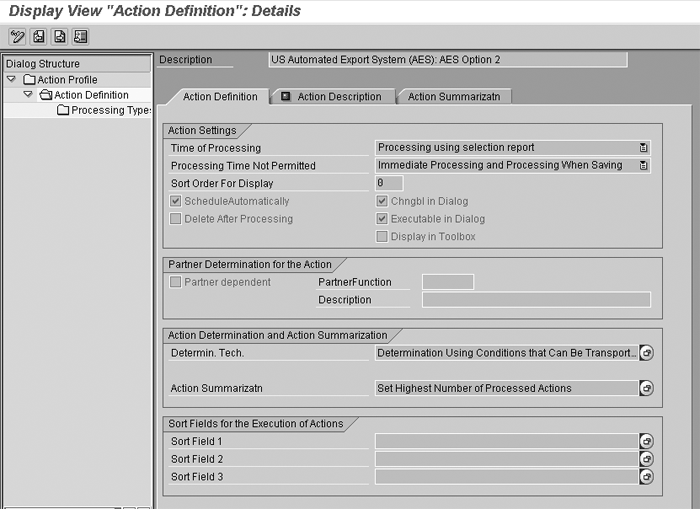
Figure 3
Set details in Action Definition
If you select the Action Definition and
click on the details icon in Figure
2, you see the Action Settings for
the time of processing. Figure 3 shows
the setup behind the action definition
to run the action based on an event,
such as when the document is saved,
printed, or faxed.
The application program starts the
determination automatically when you
save a document. The executed actions
are permanently linked with the application
document and are deleted when it is.
If you implement the PPF in your
application, you must first program
the necessary classes. You can use
transaction code SE24 and
copy an example class. PPF uses object-oriented
programming, in which classes describe
objects. From a technical point of
view, objects are runtime instances
of their classes. The object itself
is a section of source code that contains
data and provides services or methods.
You then have to determine in Customizing
how the system uses the classes for
specific actions. Use transaction code SE24 or
follow menu path Action Profile>Processing
Type.
Step 3. Determine the Action
Profile and Action Definitions. Using
the PPF user interface, call the
transaction either directly or in
the IMG of the relevant application.
The IMG is recommended because the
transaction code you need here varies
according to what application you
are using, and the IMG provides application-specific
documentation. This documentation
only describes the settings options
in general terms, but it allows you
to proceed without knowing the transaction
code. For my GTS example, the transaction
code you’ll need is /SAPSLL/PPFC.
Note
The applications provide the default settings for the action profiles and templates. Some default settings (for example, for the applications and contexts) must not be changed. For more information, see the documentation for the relevant application.
The Processing Type within
the Action Definition could
be a Method Call (a
program or function used to send data
to a sub-system) via EDI or a Smart
Forms Print for a print. For Smart
Forms, assign a Form
Name and a Processing
Class and define the Archive
Mode (Print, Archive)
as shown in Figure 4.
For EDI communication, simply select Method Call.
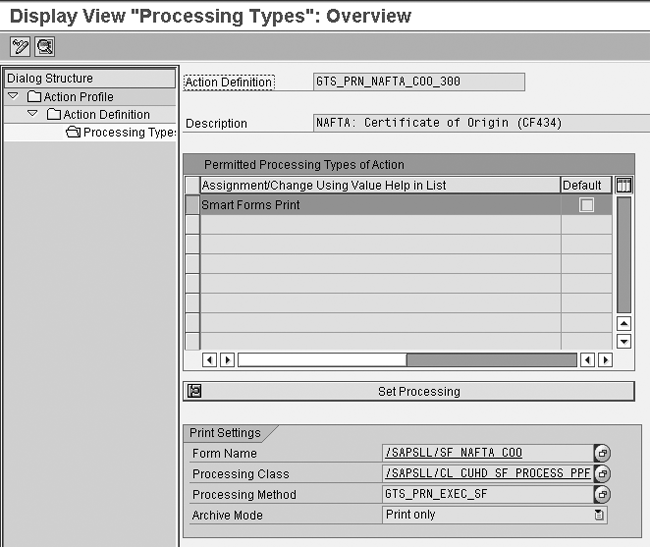
Figure 4
Define Processing Types for Smart Forms printing
Next, in my GTS example, define these
settings via menu path SAP
Global Trade Services>SAP Customs
Management>General Settings>Basic
Functions>Communication Processes
for Document Print and EDI>Define
Technical Medium for Messages or
via transaction code /SAPSLL/PPFC.
Step 4. Define conditions
and outputs parameters for messages
(PPF actions). The message
is the output and action triggers
the output. In the Condition
for Actions: Change screen,
click on GTS Standard Profile
for Printing and EDI. It
lists the Action Definition (Figure
5).
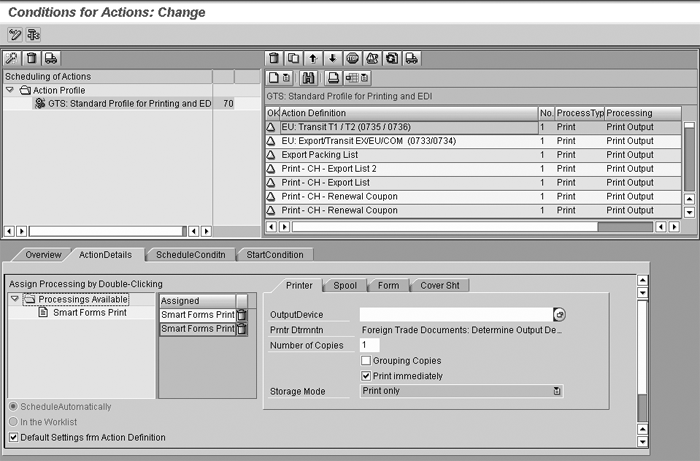
Figure 5
Set conditions for Smart Forms Print
If you have created a new action definition,
you must include it here by clicking
on the create icon in the right top
window. Once you have included it,
it appears with a yellow triangular
icon.
Step 5. Enter printer and
spool. The overview section
brings in the values maintained in
the previous transaction. Select
the ActionDetails tab
for entering the Printer, Spool,
and other details. You can also access
this via menu path SAP Global
Trade Services>SAP Customs Management>General
Settings>Basic Functions>Communication
Processes for Document Print and
EDI>Define Conditions and Output
Parameter for Messages (PPF Actions).
You can add any number of Smart Forms print commands
by double-clicking on the Smart
Forms Print button below Processing
Available (Figure
5). You can choose the printer
device and the number of copies. To
group the copies, choose Print
immediately and Cover
Sheet Attached and fill in
the Spool ID.
Step 6. Define messages for
communication processes. This
message has an action definition
assigned to it (the one you assigned
earlier). When the message is determined
in a customs document, the system
triggers the action definition.
You can also access the screen for
message definition through menu path SAP
Global Trade Services>SAP Customs
Management>General Settings>Basic
Functions>Communication Processes
for Document Print and EDI>Define
Messages for Communication Processes.
Here you also assign other attributes
to the message type, such as Responsibility, Message
Type, Message
Scheme, ID
Message, and EDI Techn.
Name. You can pick an existing
message type to view the default settings.
If you create a new message type, you
might want to copy with reference to
an existing message type that is close
to your requirements and make any necessary
changes to your copy.
Step 7. Assign the message
types to Activities (Printing or
EDI). Access the screen
in Figure 6 via
menu path SAP Global Trade
Services>SAP Customs Management>General
Settings>Basic Functions>Communication
Processes for Document Print and
EDI>Define Procedures for Communication
Processes. Messages are
under Activities. Assign
Activities to Process and
finally assign the Process to
the process template (Process
Templ.). For a business
process of, for example, trading
out of a specific country, the process
might consist of doing declarations
(EDI messages or hard copy printouts
of the shipment) during export and
import. You could define a process
entitled Export and Import under
the process template. Under the process,
you could have different activities
to communicate and track declarations
to the customs authority (e.g., if
you use an automated export system
[AES] for a US Export or Import Declaration,
or an entry summary).
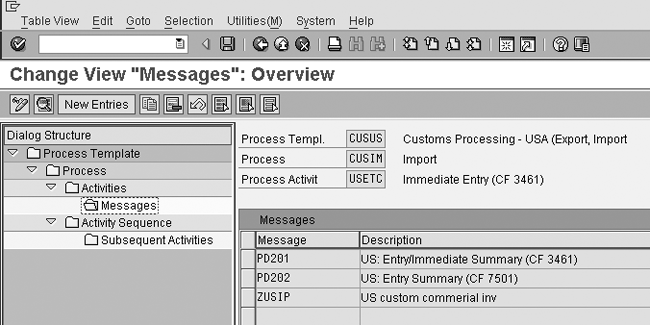
Figure 6
Define Process Template, Process, Activities, and Messages
Next, you must assign the process
template created in step 7 to Legal
Regulation (export or import)
for determination during customs shipment.
Access the screen shown in Figure
7 via menu path SAP
Global Trade Services>SAP Customs
Management>Customs Processing Service>Legal
Regulations>Customs Processing
Service Control> Customs Processing
Service Control.

Figure 7
Map the process template defined in step 7 to the Control Settings
In my example, I defined this for Legal
Regulation – ACE(US
Automated Customs Environment)
or US exports. As explained earlier,
the Action Determination happens
based on the document data. When
you create the customs declaration
document, the system looks at it
to determine if it is an export or
import. Let’s say it is an
export document (a sales order from
an ERP system) — the system
looks for the export country, which
is the country key from the shipping
plant. Based on the country key,
it determines the legal regulation,
which has a process template assigned
to it.
Step 8. Set the message parameter. Next,
you must maintain the message determination
parameter in the GTS customs
management>Customs Processing – Import
/ Export.
You can maintain the message determination
at the GTS customs management cockpit
via transaction /SAPSLL/PRNDT1(Figure
8). You can set it to be determined
based on message, legal regulation,
document type, or any other parameter.
This is an additional setup that allows
output message determination based
on conditions such as the creation
of a document or save. The selected
condition triggers the event in the
specific PPF configuration of the application.
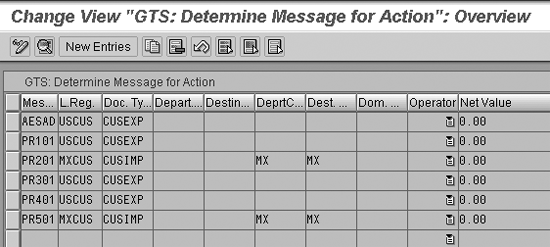
Figure 8
Maintain message determination
Using the Wizard
Now that you know the components
of PPF, let me walk you though setting
up PPF through its administrative tool.
Known as the PPF: Application
in Customizing wizard, it
walks you through the steps to configure
PPF for defining and scheduling an
action, although the wizard is a general
tool you can use or apply to any application
area.
Use transaction SPPFCADM to
access the tool (Figure 9).
In the top section you see the standard
list of applications available with
the object type indicated. The customizing
and configuration functions are on
the bottom left.

Figure 9
Access the PPF: Applications in Customizing wizard
Define Action Profile and
Actions
Select an application and click on Define
Action Profile and Actions button.
A pop-up window walks you through
the steps to schedule a new action
for an action profile. Here are hints
for using this tool:
- After the introductory screen,
the wizard asks you to select from
an existing action profile or create
a new action profile. If you prefer
to use a copy, I recommend the configuration
option detailed in the previous section.
With the wizard option, you do have
to go through all the steps and confirm
all the values, unlike in configuration,
where you view all values in one
or two steps.
- You’ll see a list of tasks,
which you go down as a checklist
as you configure each item (Figure
10). In the next step, Create action,
enter the Action Definition and
click on Continue.

Figure 10
Use the checklist to define an Action Profile
- Select the Processing
Time from the drop-down
menu and the Schedule-Automatically option.
Leave the other choices on this
screen on their default settings.
- Next, you can set up partner-dependent
output determination. Setting partner
determination is only necessary if
the action execution depends on the
business partner. The output is sent
to the corresponding business partners
in their preferred format (print,
fax, or email). If you do not want
to make any partner-dependent settings,
press Enter or click on the Continue button.
- You can then select action processing,
based on your business needs, for
example, to send Smart Forms using
print, fax, or email, or start a
workflow.
- The next screen (Figure
11) allows you to enter:
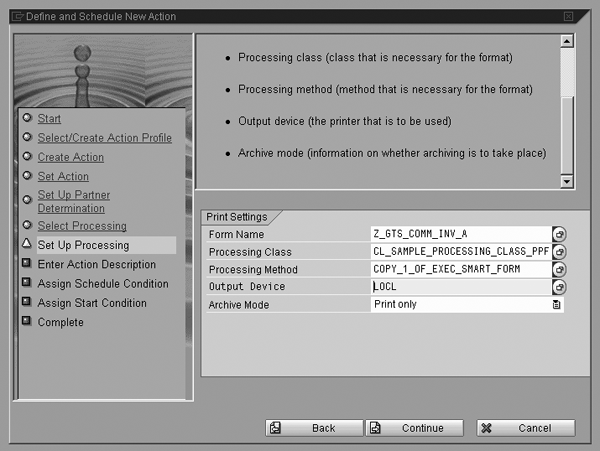
Figure 11
Set Smart Forms print processing
• Form Name (name of a Smart
Form)
• Processing Class (necessary
for the format)
• Processing Method (necessary
for the format)
• Output Device (i.e., designate
printer if necessary)
• Archive Mode (information about
whether archiving is to take place)
- Enter the action description in
the next screen. You can display
the description during document processing
and have it serve as instructions
for the user.
- Assign a schedule condition (optional),
which determines if an action is
to be scheduled for processing; the
action is generated only if the schedule
condition is met. Choose an existing
schedule condition using the input
help. You must have the scheduling
set up or it won’t trigger
an action.
- Assign a Start Condition.
This is the last step in the PPF
setup, and shows on the list just
above Complete.
Click on it or arrive at the start
condition screen by clicking the Continue button
on the previous screen. Select the
condition you would like to trigger
your action in the system. For example,
you may choose not to generate an
export declaration document if the
price of the item to be shipped is
less than a certain dollar amount.
Once you have completed these settings,
the system triggers the message based
on your configurations of the action
profile and the print setting.
Rajen Iyer
Rajen Iyer is the cofounder and CTO at Krypt, Inc. Rajen has written several in-depth, best practice articles, white papers, patents, and best-selling books on SAP Logistics and SAP Global Trade Services, including Effective SAP SD and Implementing SAP BusinessObjects Global Trade Services. He is also an invited speaker at industry conferences.
You may contact the author at Rajen@kryptinc.com.
If you have comments about this article or publication, or would like to submit an article idea, please contact the editor.


 Premium
