Find out how to connect to the Services Registry, download the service from it, and design, deploy, and test the service using the Java 2 Platform, Enterprise Edition (J2EE) engine in an SAP NetWeaver Developer Studio environment. Learn how you can publish a service using SAP NetWeaver Administrator on the Java side, browse and download an enterprise service to SAP NetWeaver Developer Studio, and finally, develop, implement, and deploy a Web service client application using SAP NetWeaver Developer Studio.
Key Concept
Publication restriction means that only authorized consumers may publish certain information, and that the restriction may be enforced by legal means.
Enterprise services form the backbone of many business processes in SAP customer landscapes. Recently, they’ve also become extremely important in the development of consumer applications (a.k.a. Web service client applications).
Using the example of the ManageCustomer enterprise service, I’ll show you how to create, connect to, and consume those enterprise services with Java (designed in the Enterprise Services [ES] Repository of the service-oriented architecture [SOA] infrastructure). In an earlier article, Susanne Rothaug, SAP’s product manager for SAP NetWeaver, and I explained the same process using ABAP: “Use SAP NetWeaver PI 7.1 tools for provisioning and consuming enterprise services in ABAP.”
I also discuss how to publish an enterprise service to the Services Registry via SAP NetWeaver Administrator. Then, I give you a step-by-step approach for how to consume a service from the Services Registry using SAP NetWeaver Developer Studio. You can implement, configure, and consume services in Java from the Services Registry using the SAP NetWeaver Developer Studio tools.
Next, the article takes a closer look at SAP NetWeaver Developer Studio, how to use it to connect to the Services Registry, how to download the service from the Services Registry, and what steps are required to design and deploy the service to the J2EE engine in an SAP NetWeaver Developer Studio environment and test the service.
Figure 1 provides an overview of the main steps and tools involved in creating a service. Using SAP NetWeaver Developer Studio, you connect to the Services Registry, browse and search for the service, download it to SAP NetWeaver Developer Studio, and develop a consumer application scenario using the Web Services Description Language (WSDL) service that I show you how to download below. (The WSDL represents the model used to describe a Web service defined as a collection of network endpoints or ports.) The steps show you how to configure SAP NetWeaver Developer Studio to connect to the Services Registry and download the WSDL service via the wizard.

Figure 1
Follow the development cycle of an enterprise service
Prerequisites
For this article, I assume that you are familiar with middleware technologies such as SAP NetWeaver Process Integration (SAP NetWeaver PI), SOA, Web services, the Services Registry, and Java Servlets (which enable Web developers to expand Web server functionality). I also assume that you have read my previous article. In addition, you need some familiarity with Extensible Markup Language (XML), XML Schema Definition (XSD), the Universal Description, Discovery, and Integration (UDDI) standard, and WSDL standards. You can find more information on these topics via the SAP Help Portal at
https://help.sap.com.
Note
SAP NetWeaver Developer Studio is the official name of this tool. For the purpose of this article, I refer to the tool simply as NWDS.
Publish Services via SOA Management
Let’s look at the SOA management features needed to publish a service to the Services Registry via SAP NetWeaver Administrator. (NWDS is used later for developing the consumer application in a Java environment.)
- Log on to the SAP NetWeaver Administrator page via https://<hostname>:<port number>/NWA with a username and password.
- Click SOA Management > Business Administration > Publication Restrictions.
- Click Create to create a publication restriction.
- In the wizard, add the name and description of the publication restriction, e.g., ManageCustomerPI, as shown in Figure 2, and click the Next button.

Figure 2
Name a publication restriction in the wizard
- Click the Add Service Definition button, and then select the service you want to publish, as shown in Figure 3. Click the Finish button.

Figure 3
Define the service you want to publish
- Verify that the service appears on the Publication Restrictions List and that its status is Active, as shown in Figure 4.

Figure 4
Verify the Publication Restrictions List and its active status
To verify that SAP NetWeaver Administrator has successfully published the service to the Services Registry:
- Log on to the Services Registry at https://<hostname>:<j2ee port number>/sr with your username and password.
- Click the Service Definitions tab.
- To search for your service, ManageCustomer, enter the service’s name and click the Go button. Figure 5 shows you that the service is published in the Services Registry.

Figure 5
Publish your service to the Services Registry
Connect to the Services Registry
To find Web services in the Services Registry using NWDS, you have to configure the connection between NWDS and the Services Registry. You start from NWDS, as shown in Figure 6, and follow menu path Window > Preferences > Web services > Services Registry.
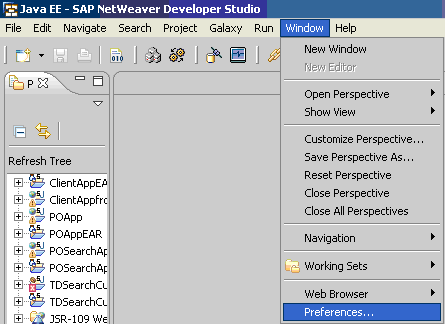
Figure 6
The NWDS view
Enter the values for the following parameters in both the UDDI Service and Classification Service sections of the screen: Server Name, Server Port, and Server HTTPS Port, as shown in Figure 7. Click the Apply button and then the OK button to save the values.

Figure 7
Configure the connection between NWDS and the Services Registry
Consume and Implement a Web Service Client Application
To consume and implement a Web service client application based on the provider Web service, you use NWDS to connect to the Services Registry, create a dynamic Web project, and import the provider WSDL service to NWDS. Then, you generate a Web service client application in Java based upon the provider service, create a Java Servlet, and implement the Web service client application. Finally, you deploy the client application project file to the Web application server and test the consumer client application.
The following six steps are used to consume and implement enterprise services.
Step 1. Create a Dynamic Web Project
Open NWDS by following menu path Start > All Programs > SAP NetWeaver Composition Environment 7.1 > SAP NetWeaver Developer Studio 7.1 > NetWeaver Developer Studio 7.1.
- From the NWDS menu bar, select File > New. As shown in Figure 8, there are two options for a project here: If you want to create a new project resource, use the first option — Project; if you want to create a dynamic Web project, use the second option — Project… . In this case, select Project… to create a dynamic Web project.

Figure 8
Create a new dynamic Web project with the NWDS tool
- In the pop-up screen, select Web > Dynamic Web Project, as shown in Figure 9. Click the Next button.

Figure 9
Set up the Dynamic Web Project
- Enter the project name (e.g., POSearchApp), and then check the Add project to an EAR check box at the bottom of the screen to add the project to the Enterprise Application Archive (EAR) build, as shown in Figure 10. Click the Finish button.

Figure 10
Add the Web project to an EAR
Step 2. Import the WSDL Service from the Services Registry
From your desktop, go to Start > All Programs > SAP NetWeaver Composition Environment 7.1 > SAP NetWeaver Developer Studio 7.1 > SAP NetWeaver Developer Studio to open NWDS. The service that is in WSDL format is ManagePO.
- From the NWDS menu bar, select File > Import, as shown in Figure 11.

Figure 11
Select the import option for the WSDL service
- In the pop-up screen (Figure 12), expand the Web services folder, select WSDL, and click the Next button.

Figure 12
Locate the WSDL service to import
- Select an output folder location to which you want to import the WSDL (in this case, the project name /POSearchApp). Select the Services Registry radio button as the WSDL source, as shown in Figure 13, and then click the Next button.

Figure 13
Set up the source and target for the WSDL import
- In the pop-up screen (Figure 14), enter your username and password to log on to the Services Registry, and click the OK button.

Figure 14
Log on to the Services Registry
- Enter the service name (in the example, ManagePO) into the Find field, as shown in Figure 15, and click the Next button. This action triggers a lookup for the service from the Services Registry.

Figure 15
Find a specific service in the Services Registry
Then, the system displays the service definition, as shown in Figure 16.

Figure 16
Authentication required to download the WSDL
- Highlight the Found Service Definitions line for ManagePO, and then select the endpoint BindingPO. Click the Finish button to trigger the download of the WSDL file.
- Enter a username and password, as shown in Figure 17. The ManagePO service was configured to have basic authentication via username and password. The consumer usage of ManagePO requires authentication to log on to the host (the system where the Service Registry is installed and running) via username and password to download the WSDL and the endpoint. Click the OK button to complete the import.

Figure 17
Authentication required to download the WSDL
The WSDL import is now complete, and the source format of the WSDL service file appears in your project workspace window, as shown in Figure 18.

Figure 18
Source format of the WSDL
Note
ManagePO is the external name of the service used in the consumer application. ZManagePO is the internal service name used in the provider application.
Step 3. Generate a Web Service Client Application
For a consumer to consume a Web service from the service provider in the Services Registry, the consumer has to generate a Web service client application by connecting to the Services Registry and downloading the provider service. In the example scenario, you use NWDS to import the service from the Services Registry and implement the client application in Java.
- Right-click the imported WSDL file in the Project Explorer window of NWDS (Figure 19), and then select Web Services > Generate Client.

Figure 19
Figure 19 Start the Web Service Client wizard
- Select SAP Server and SAP NetWeaver in the Configuration area of the wizard (to the right of the picture area) because the consumer application deploys to the selected SAP server. Slide the slider bar down on the left side of the wizard until the label “Develop client” appears in the picture area, as shown in Figure 20. Click the Next button.

Figure 20
Develop the client using SAP Server and SAP NetWeaver
- Make sure the Output folder points to the project, as shown in Figure 21. If the Output folder doesn’t point to the project, then you need to add it here manually. The radio buttons are self-explanatory and indicate the customization level of the client. Click the Finish button.

Figure 21
Configure client generation with the wizard
The wizard generates all of the classes that the client application requires (e.g., ManagePO.java, ObjectFactory.java), as shown in Figure 22. The highlighted line has an ABAP suffix because the service is designed in the ES Repository, an ABAP tool, with a specific namespace at the root-node level. So, when you download the service from the Services Registry, it follows the ES Repository’s naming convention.

Figure 22
Required classes for the Web service client application
At this point, you have finished generating the Web service client application. Based on the WSDL structure, you have generated all of the class files necessary to implement the client application. The NWDS tool generates all of the required files under the project node.
Step 4. Create and Implement a Servlet for Web Service Client Application Use
You have several choices when it comes to implementing the Web service client application (generated above with the NWDS tool): Web Dynpro for Java, Enterprise JavaBeans (EJBs), or Servlets. You have to create a Servlet to implement the Web service client application, so the example uses the Servlet option.
- Using the NWDS tool, right-click the project POSearchApp and select New > Servlet, as shown in Figure 23.

Figure 23
Implement the Web service client application using a Servlet
- Enter the Servlet’s Java package and class name parameter values (you can use any name format; typically, developers follow the format of the application’s name), as shown in Figure 24. Click the Finish button.

Figure 24
Enter the parameters to create the Servlet’s class files
You can see the Servlet’s class files in the updated Project Explorer window. Figure 25 shows the Servlet’s files under the project node POSearchApp.

Figure 25
Servlet implementation of the client application
- Add the implementation code, shown in Figure 26, to the POServ.java class file.
package po; import java.io.IOException; import java.io.PrintWriter; import java.util.Map; import javax.Servlet.ServletException; import javax.Servlet.http.HttpServletRequest; import javax.Servlet.http.HttpServletResponse; import javax.xml.ws.WebServiceRef; import com.sap.soa.abap.ManagePO; import com.sap.soa.abap.PODT; import com.sap.soa.abap.POITDT; import com.sap.soa.abap.POREQ; import com.sap.soa.abap.ZManagePO; /** * Servlet implementation class for Servlet: POServ * */ public class POServ extends javax.Servlet.http.HttpServlet implements javax.Servlet.Servlet { static final long serialVersionUID = 1L; @WebServiceRef(name="ZManagePO") ZManagePO service; public POServ() { super(); } protected void doGet(HttpServletRequest request, HttpServletResponse response) throws ServletException, IOException { // TODO Auto-generated method stub try { // Get the port from the service instance ManagePO port = service.getBindingPO(); javax.xml.ws.BindingProvider bp = (javax.xml.ws.BindingProvider) port; Map context = bp.getRequestContext(); context.put("javax.xml.ws.security.auth.username", "admin"); context.put("javax.xml.ws.security.auth.password", "abc123"); // Construct the input to be applied to the service call PODT searchPO_ResMT = null; ManagePO input = port; POREQ searchPO_ReqMT = new POREQ(); searchPO_ReqMT.setPONum("10003"); searchPO_ReqMT.setVendor("301000"); searchPO_ResMT = input.searchPO(searchPO_ReqMT); // Call the service searchPO_ResMT.getPONum(); searchPO_ResMT.getVendor(); searchPO_ResMT.getPODate(); searchPO_ResMT.getPOType(); searchPO_ResMT.getPOGrp(); POITDT searchPO_ResMT1 = searchPO_ResMT.getPOItem(); searchPO_ResMT1.getItemNo(); searchPO_ResMT1.getMatNo(); searchPO_ResMT1.getPlant(); searchPO_ResMT1.getQty(); searchPO_ResMT1.getPrice(); // Evaluate and display the response PrintWriter writer = response.getWriter(); writer.println("Purchase Order Details for PONumber: " + searchPO_ResMT.getPONum()); writer.println("
Vendor: " + searchPO_ResMT.getVendor() ); writer.println("
PODate: " + searchPO_ResMT.getPODate()); writer.println("
POType: " + searchPO_ResMT.getPOType()); writer.println("
POGroup: " + searchPO_ResMT.getPOGrp()); writer.println("
Item Number: " + searchPO_ResMT1.getItemNo()); writer.println("
Material Number: " + searchPO_ResMT1.getMatNo()); writer.println("
Plant: " + searchPO_ResMT1.getPlant()); writer.println("
Quantity: " + searchPO_ResMT1.getQty()); writer.println("
Price: " + searchPO_ResMT1.getPrice()); } catch (Exception e) { throw new ServletException(e); } } protected void doPost(HttpServletRequest request, HttpServletResponse response) throws ServletException, IOException { // TODO Auto-generated method stub } }
|
| Figure 26 |
Code to implement the POServ.java Servlet class file |
- From the main menu, select Project > Build Project to build the necessary EAR files required to successfully implement the project, as shown in Figure 27, and check for any errors. If there are errors, the Problems tab displays them.
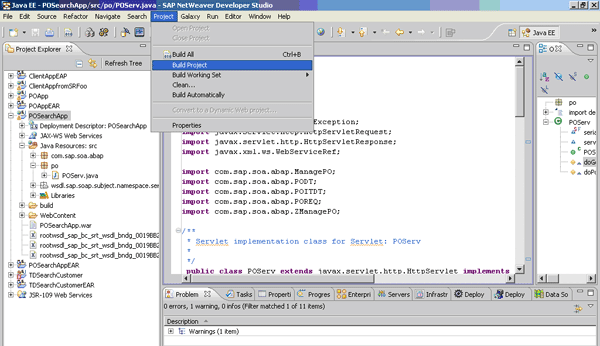
Figure 27
Build the project
Now that you have finished creating and implementing the Servlet and building the project files, it’s time to deploy the client application to the Web application server.
Step 5. Deploy Web Service Client Application to J2EE Web Application Server
Now that you have developed the Web service client application, you need a way to execute it. To run this application, you deploy it to the J2EE Web application server. First, you need to configure the J2EE Web application server for the Web service client application you want to deploy.
- From the NWDS menu bar, select Windows > Preferences. Select the node SAP AS Java on the bottom left of the Preferences window (Figure 28). In the SAP Instance identity section, enter the values for Instance host and Instance number, and click the Register SAP Instance button. Register the SAP Web application server instance at which your client application resides in NWDS as a project file that connects to the Web application server. Then, deploy the project’s EAR file for the Web service client application. Finally, click the OK button.

Figure 28
Register the SAP Web application server Java instance
- Check under the Servers tab to see whether the server starts, as shown in Figure 29. This is a cross-check to ensure that the server is successfully connected to the NWDS tool based on the connection settings in Step 1. If your connection isn’t successful, recheck the settings in Step 1. In addition, the server state, Started, and status, Republish, are shown at the bottom of the figure. You can use the green arrow button on the right side to restart the server.

Figure 29
Successful connection between the server and the NWDS tool
- Drag and drop the EAR project file POSearchAppEAR from the Project Explorer to the Deploy area under Server at the bottom of the screen, as shown in Figure 30.
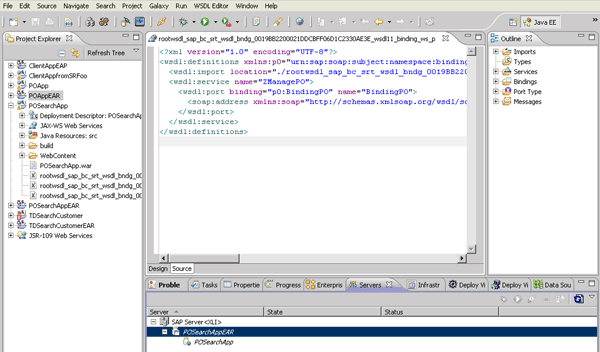
Figure 30
Deploy the EAR project file to the Web application server
- Right-click the project file and select Publish to both publish and deploy the project to the J2EE Web application server, as shown in Figure 31. If the project service has an authentication mechanism defined in the WSDL, log on with the same username and password you used during the WSDL download.

Figure 31
Publish the project
- During deployment, the system creates all the necessary build files. Click the Deploy View tab to check for any errors and troubleshooting. Once the deployment completes successfully, as shown in Figure 32, click the OK button.

Figure 32
Deploy the Web service client application to the J2EE server
Step 6. Test the Web Service Client Application
The previous five steps have shown you how to consume and implement a Web service client application using NWDS. Now, you need to test the execution of the client application from a browser page and make sure the client application works as the original design defined above.
Open a Web browser page and go to https://<hostname>:<port number>/POSearchApp/POServ. In the example scenario, the input values for Purchase Order number = 10003 and Vendor number = 301000 were set and hardcoded in the previous article. In the Web service client application’s implementation code, the output results containing the Purchase Order details, as shown in Figure 33, appear as soon as you call the service, POSearchApp/POServ, via the browser page.

Figure 33
Display the output results of executing the Web service client application
How Easy It Is
Now you know how to publish a service using SAP NetWeaver Administrator on the Java side, connect to the Services Registry from NWDS, browse and download an enterprise service to the NWDS tool, and finally, develop, implement, and deploy a Web service client application using the NWDS tools. Various tools are available to develop Web service client applications in the Java world, and there are diverse approaches for implementing Web service client applications. This simple business case shows you in detail how easy it is to develop a Web service client application using the NWDS development tool environment.
Acknowledgments
I would like to thank my colleagues Boris Magocsi and Abdul Razack (SAP Business Solutions & Technology NetWeaver Solution Management RIG, SAP Labs LLC, USA) for their valuable input and feedback on this article.
Prasad Illapani
Prasad Illapani is a solution architect/PL RIG specialist with the BST SAP NetWeaver Solution Management RIG team at SAP Labs LLC, in Redmond, Washington, where he focuses on both the development and systems areas of SOA middleware technologies. He has been with SAP Labs for nearly eight years. During this time, he has also been part of the SAP Supplier Relationship Management (SAP SRM) team, working as a Regional Implementation Group (RIG) Specialist in various Ramp-Up SAP SRM integration projects. Prasad holds a master’s degree in computer science and a bachelor’s degree in civil engineering. He is a regular speaker at SAP TechEd, SAP SDN, and Wellesley Information Services’ SAP Insider conferences.
You may contact the author at prasad.illapani@sap.com.
If you have comments about this article or publication, or would like to submit an article idea, please contact the editor.