Learn what needs to be done to configure an integration scenario that is based on the new Java-only deployment option of SAP NetWeaver Process Integration 7.3 — Advanced Adapter Engine Extended (AEX) — in combination with SAP NetWeaver Business Process Management (SAP NetWeaver BPM). Once configured, run and monitor your integration process using the process monitor of SAP NetWeaver BPM and the AEX monitoring tools.
Key Concept
Integration processes extend the functionality of enterprise integration solutions by adding state handling to the mix. Typical standard functionalities for system integrations are routing of messages to target systems, data transformations between different dialects the systems are using, and the technical connectivity depending on what the involved systems have to offer. The use of integration processes allows system integrators to build highly sophisticated integration solutions that take relationships between different messages into consideration. In the example in this article, messages that belong together are collected and forwarded as one message to the final destination.
You can combine the 7.3 versions of SAP NetWeaver Business Process Management (SAP NetWeaver BPM) and the Advanced Adapter Engine Extended (AEX — the new Java-only deployment option of SAP NetWeaver Process Integration [SAP NetWeaver PI]) to implement integration processes in a pure Java world. As part of this, you need to configure and model the overall scenario (i.e., an aggregator/collect pattern) within the Integration Directory for the SAP NetWeaver PI side as well as within the Process Composer for the SAP NetWeaver BPM side.
My previous article, “Combine SAP NetWeaver BPM and AEX to Implement Powerful Integration Scenarios,” showed you how to do this. At the end of that article, I successfully deployed the business process model and notation (BPMN) model on the Java server. What is still missing is the connection between the SAP NetWeaver PI and SAP NetWeaver BPM sides. As a refresher, the overall scenario is shown in Figure 1.

Figure 1
Aggregator pattern implemented using BPMN
You have to define under which address the start and intermediate message events (for starting and continuing the process in Figure 1) can be reached from the SAP NetWeaver PI side as well as define the address for reaching SAP NetWeaver PI from the SAP NetWeaver BPM side (for the Send Collected Messages step in Figure 1).
I’ll start with the configuration of the connection from SAP NetWeaver PI to SAP NetWeaver BPM. In my previous article, I wasn’t able to activate the configuration within the Integration Directory yet, as the SOAP receiver adapter required a concrete endpoint to which it can send the order message. Now that the SAP NetWeaver BPM process has been deployed, you can determine the URL to the start and intermediate message events. From this, you can conclude that each start and intermediate message event is implemented within SAP NetWeaver BPM as a Web service endpoint.
In addition, each event using the identical trigger results in the same URL. It is essential that you remember this point as you move through the process in this article.
This is exactly the case in this scenario: I have chosen the same trigger for both the start and the intermediate message events, resulting in one URL. This allows me to send a message to one URL and let the SAP NetWeaver BPM framework decide whether a new process instance needs to be created or whether the message can be forwarded to an already-waiting instance. If I had chosen two different triggers for the start and intermediate message events, I would have had two different URLs.
However, how do you find out the right URL to your events? For this, open the SAP NetWeaver Administrator of your SAP NetWeaver Composition Environment (SAP NetWeaver CE). The URL to the SAP NetWeaver Administrator typically looks like this: https://<server>:<port>/nwa. Navigate to SOA > Application and Scenario Communication (Figure 2). Click the Single Service Administration link to bring up the screen in Figure 3.

Figure 2
Navigate to the Single Service Administration link

Figure 3
Search the Web service representing the events
In the Service Definitions tab, click the Search subtab and enter SPJ in the Find field. Press Enter or click the Go button. As a result, you find the Web service representing both the start and the intermediate message events (e.g., SPJ_CreateOrderWithOneItem_In_Service). Select the found service and scroll down to the tabs beneath the result list (Figure 4). Click the WSDLs tab.

Figure 4
Identify the WSDL URL for the Web service
In the WSDL column, you can find the needed URL. Copy it into the clipboard. Open the Integration Builder to complete the configuration of the SAP NetWeaver PI part. Under the SPJ_SCP business component, follow Communication Channel > SOAP_R_PurchaseOrder, right-click it, and select Open from the context menu (Figure 5).

Figure 5
Open the communication channel
Switch to edit mode by clicking the edit/display toggle icon . Paste the copied URL into the Target URL field, select the Configure User Authentication check box, and provide the credentials needed for accessing the URL (Figure 6).

Figure 6
Configure the connection parameters for the SOAP adapter
Save your changes and activate them in the way I explained in my previous article. Now that the URL has been provided, the change activation is successful (Figure 7).

Figure 7
Successful activation of changes in the Integration Directory
You’ve now established the connection from the AEX to the process.
Next I’ll show you how to configure the communication from the process to the AEX. For this, you need the Web service endpoint on the AEX side. You can retrieve it within the Integration Directory from the integrated configuration object (ICO) that is responsible for receiving messages from SAP NetWeaver BPM. This is why I created an ICO called |SPJ_SCP|SPJ_CreateOrder_Out_Service| in the previous article. Right-click this ICO and select Display WSDL… from the context menu (Figure 8). This is only possible because the message reception is handled by a SOAP adapter for which such a WSDL URL can be generated.

Figure 8
Display the WSDL URL for the ICO
A dialog box opens and shows you the generated WSDL URL (Figure 9). Copy the URL into the clipboard by clicking the copy WSDL URL to buffer icon adjacent to the WSDL URL field in the upper-right corner.

Figure 9
Copy the WSDL URL for the ICO
Now it’s time to connect the outgoing service call from your integration process to the AEX by pasting the copied URL into the appropriate configuration form of the process. For this, open SAP NetWeaver Administrator of your SAP NetWeaver CE system again. This time navigate to SOA > Application and Scenario Communication and click the Application Communication link. Enter spj in the Search field and press Enter or click the Go button (Figure 10). In the result table of your search, you can see your collect pattern process (SG_SendCreatePO).
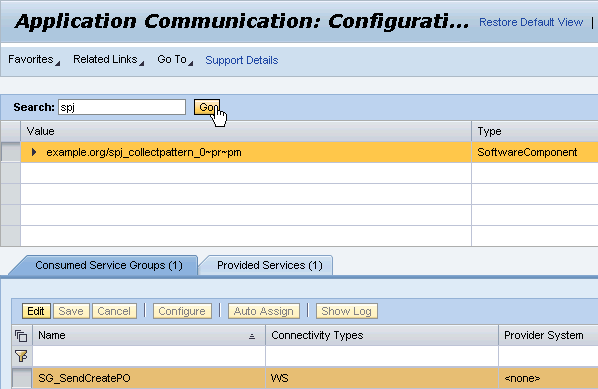
Figure 10
Search the collect pattern process
Beneath the list of found applications, the Consumed Service Groups and Provided Services tabs allow you to configure the connections to other systems. Obviously, a provider system for the outgoing service call has not been configured yet based on the <none> value in the Provider System column. In my previous article, I created the service reference (or service group — both terms have the same meaning) SG_SendCreatePO. It now shows up on the Consumed Service Groups tab, waiting for the configuration. Now I’ll show you how to assign the concrete endpoint targeting the SOAP adapter of the AEX as the endpoint for the SG_SendCreatePO service group.
Click the Edit button in Figure 10 and scroll down the page until you reach the Details section (Figure 11). Click the Configuration tab and then click the Configure Manually button to bring up the wizard shown in Figure 12.
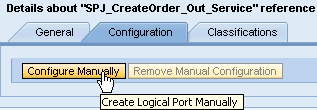
Figure 11
Manually configure the endpoint

Figure 12
Provide the buffered URL to the ICO in the configuration wizard
A wizard opens to guide you through the rest of the configuration. On the first step (Figure 12) paste the buffered WSDL URL of the ICO into the WSDL URL field and provide the credentials for accessing the WSDL URL on the AEX. Note that you likely have a different user to access the AEX than you do for the SAP NetWeaver CE system. Make sure you don’t mix them up.
Click Next to proceed. The wizard is accessing the WSDL behind the scenes to retrieve possible endpoints. They are listed in the second wizard step on which you have to decide how to connect to the endpoint (Figure 13). For this example, I choose the HTTP_Port for the communication by selecting the associated radio button.
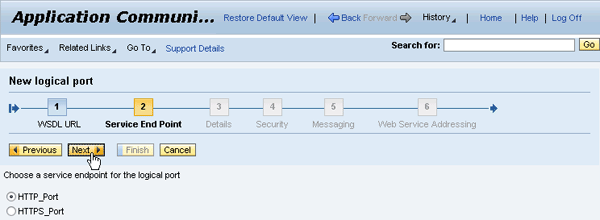
Figure 13
Choose the endpoint
Click Next and confirm the Web Service Endpoint URL without modifications by clicking Next again. The Web Service Endpoint URL was automatically derived for you out of the WSDL information the system has accessed before. You reach step 4 of the wizard, which requests credentials that are used during runtime to call the Web service (Figure 14). Choose HTTP Authentication from the Authentication drop-down list, select the User ID/Password (Basic) radio button, and add the credentials in the Details section of the screen.

Figure 14
Provide credentials for accessing the service during runtime
Click Finish to complete the wizard. Finally, save the newly created configuration by using the Save button (Figure 15). As a result, the Processing State column contains the remark Manually configured.

Figure 15
Save your service group configuration
Before you can test the scenario you have to adjust one final configuration on the Provided Services tab (Figure 16). You have to assign a profile to the services that are made available by the integration process. Remember that the start and intermediate message events are implemented in SAP NetWeaver BPM using Web services and in this regard the process indeed provides services.

Figure 16
Assign a profile to the provided services
Note
A profile determines how a Web service can be accessed. In essence, it answers the key questions about whether the transport of the Web service call should be secured, whether the authentication of the caller is necessary, and the authentication methods involved (e.g., None, user name/password, X.509 client certificate, SAML assertion). SAP ships a default profile called SAP_DEFAULT_PROFILE with some default values set (e.g., no secured transport and allowing all kinds of authentication methods). You can maintain profiles in SAP NetWeaver Administrator. From the SAP NetWeaver Administrator homepage, simply navigate to SOA > Technical Configuration > System Connections. On the screen that opens, just click the Communication Profiles tab.
Obviously, this process provides only one service with the interface SPJ_CreateOrderWithOneItem_In_Service. This fits perfectly to the configuration of the SAP NetWeaver PI part at the beginning of this article where I assigned the address to the SOAP adapter. The only thing you have to do is switch to edit mode by clicking Edit and use the Assign Profile button to open the identically named dialog box. There you have to select the SAP_DEFAULT_PROFILE. Finally, click OK to confirm your selection (Figure 17).

Figure 17
Choose SAP_DEFAULT_PROFILE
Save your changes and refresh the contents of the Provided Services tab by clicking the refresh icon to verify your successful assignment by a Processed entry in the Processing State column (Figure 18).

Figure 18
Successful assignment of the profile to the provided service
Now you are ready to run the scenario. Referring back to the BPMN diagram depicting the overall collaboration between all parts (Figure 1), the communication sequence is kicked off by a message from the sender containing a first order item. As I have configured a SOAP adapter within the AEX for this, I can simulate the sender by using the standard Web Services Navigator for this purpose. However, the Web Services Navigator requires the WSDL URL you want to call. Therefore, open the Integration Builder again and retrieve the WSDL URL for the Integrated Configuration Object (ICO) |SPJ_Sender|SPJ_CreateOrderWithOneItem_Out_Service| as you did for the ICO |SPJ_SCP|SPJ_CreateOrder_Out_Service| (compare Figures 8 and 9), and copy its URL into the clipboard. Next, start the Web Services Navigator on your SAP NetWeaver CE system. The URL to open the Web services navigator typically looks like this: https://<server>:<port>/wsnavigator.
On the first screen, just paste the copied URL into the WSDL URL input field (Figure 19). Click the Next button twice to reach the Input Parameters step of the wizard.
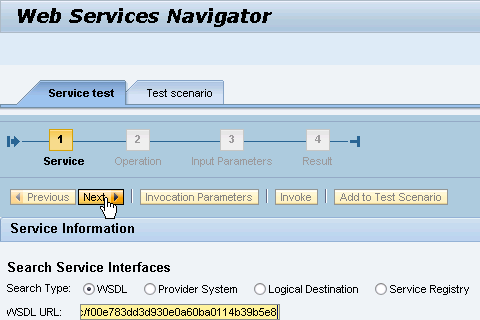
Figure 19
Provide the WSDL URL to the SOAP adapter in the Web Services Navigator
On the Input Parameters screen, enter the values for the orderNumber, productID, and quantity fields as shown in Figure 20. The orderNumber is of special importance as it will be used in the correlation for the process. It stays the same for all forthcoming order items. Otherwise, a correlation is not possible. Click the Next button to actually send the message to the SOAP adapter and to the AEX. The successful delivery of the message is confirmed by an appropriate message in the Web Services Navigator (Figure 21).

Figure 20
Provide values for the input parameters
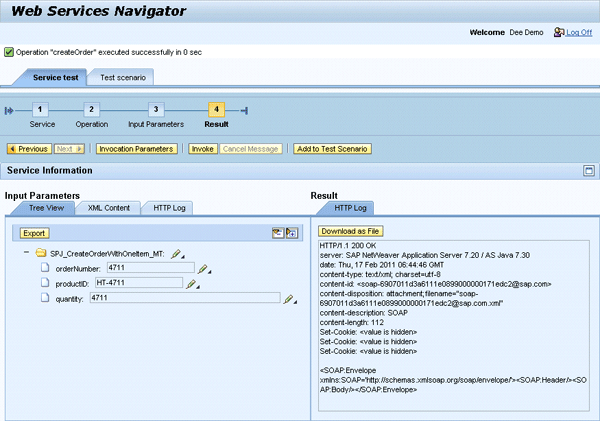
Figure 21
Successfully transmit the data via SOAP adapter to the AEX
Next, you need to monitor the message on its way through the AEX. For this, open the monitoring homepage of the AEX. Open the AEX’s tooling homepage (https://<server>:<port>/dir) and click the Configuration and Monitoring Home link (Figure 22), which causes the Monitoring Home to open (Figure 23).

Figure 22
Call the monitoring homepage of the AEX

Figure 23
Navigate to the AEX’s message monitor
On the Monitoring homepage, just click Message Monitor to navigate straight to the message monitoring table depicting the messages that passed the AEX already (Figure 24).

Figure 24
Confirmation of the successful message transmission from the Web Services Navigator to the process
Recognize the entry in the Success column of the table together with the Sender Component and Receiver Component columns. Obviously, the message has been successfully delivered from the SPJ_Sender to the receiver SPJ_SCP, which actually represents the integration process. You can even verify the contents of the message that came across the AEX by clicking the digit 1 (in the Success column), and from there going to the message content.
To verify the correct start of the integration process, you have to open the appropriate view on your SAP NetWeaver CE machine — yes, you have to jump between the two environments a little bit, so make sure that the URLs fit. Open SAP NetWeaver Administrator on your SAP NetWeaver CE instance and navigate to Operations > Processes and Tasks > Manage Processes (Figure 25).

Figure 25
Navigate to the process monitor of SAP NetWeaver BPM
On the Manage Processes page, make sure that you have selected All Running Processes from the Show drop-down list (Figure 26). If this is the case, you can identify your SPJ_CollectPattern_Process (Process Name column). Notice the In Progress status of the process.
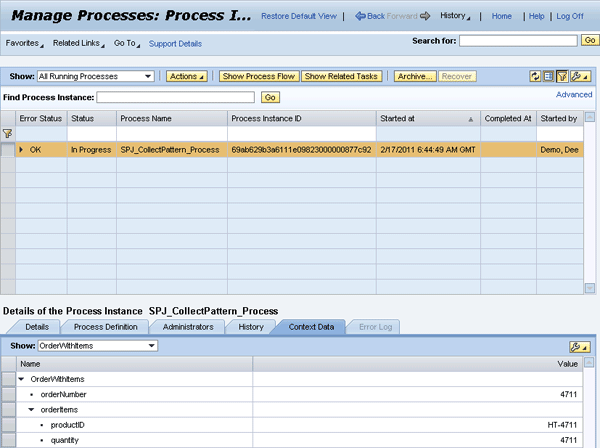
Figure 26
Monitor the running instance of the process: the first message has arrived
On the tabs beneath the process table, select the Context Data tab to inspect the process context of your running process instance. From the Show drop-down list, pick the OrderWithItems entry as this is the data object in the process model responsible for collecting all received order items. As you can see the orderNumber and the first order item have been correctly assigned (Figure 26).
Now repeat the sending of another order item via the Web Services Navigator. This is straightforward now: fill the input parameters with a new order item but leave the orderNumber as it was set for the first item (Figure 27).
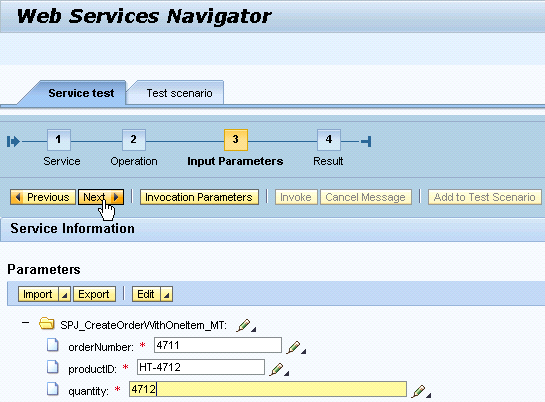
Figure 27
Submit the second message from the Web Services Navigator
After submitting the item, verify the successful delivery in the message monitor in the AEX (Figure 28) as well as on the Manage Processes view in SAP NetWeaver BPM (Figure 29). In both cases, you have to refresh the view by either clicking the Time Range’s Go button in Figure 28 or by clicking the refresh icon in Figure 29, respectively.
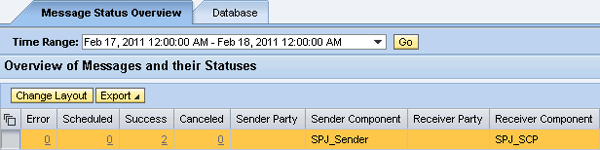
Figure 28
Confirmation of the successful delivery of the second message in the AEX
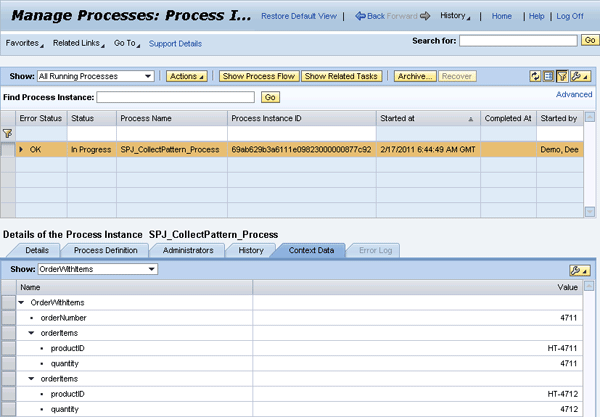
Figure 29
Confirmation of the successful delivery of the second message in the collect process
Finally, send the third message, as shown in Figure 30. Again, only the values for the productID and the quantity have changed.
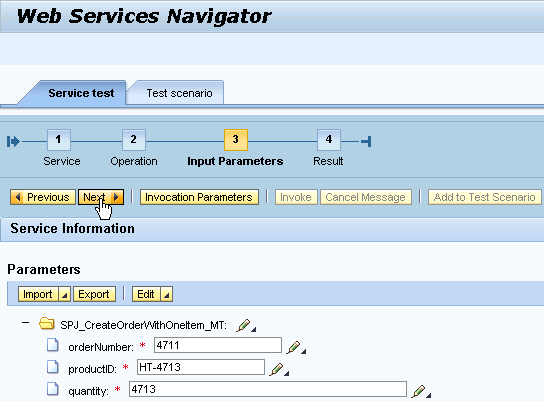
Figure 30
Submit the third message
This time if you verify the message transfer on the AEX, you recognize the successful delivery of the third message. You also find a new row in the table that shows you the transmission of the response message from the process (Sender Component SPJ_SCP) to your file adapter (Receiver Component SPJ_Receiver) (Figure 31). This indicates the successful completion of your integration process as well. Confirm the correct finalization of your process on the Manage Processes view of your SAP NetWeaver CE machine (Figure 32). Pay attention — as the process is not running anymore, you cannot simply refresh the screen. Pick the process ID of your instance by copying it from the Details tab, paste the number into the Find Process Instance input field, and click the Go button. You then get the result shown in Figure 32.
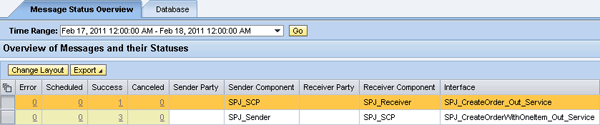
Figure 31
Confirm the delivery of the third message and the return message in the AEX

Figure 32
Confirm the successful completion of the collect process
Finally, look at the file that was written by the file adapter into your target directory. Its name starts with the PurchaseOrder string followed by the current date and time (Figure 33). Open the file and verify its content. It should look similar to what’s shown in Figure 34.

Figure 33
File in target directory has been created

Figure 34
Contents of the received file
Congratulations! That was indeed a long journey to finally get the integration scenario running. You’ve learned how to configure the connections between the AEX and your process running on the SAP NetWeaver Composition Environment and how to run and monitor such an integration scenario on both sides. With that, you are now well-equipped to start your own investigations. Play around with this scenario, start several processes, and watch them disappear in the Manage Processes view as according messages arrive. Finally, build your own integration processes.
This should give you an idea of what to expect about integration processes in the Java world. It is a major shift for the SAP NetWeaver PI community and it is time to prepare for this change, which includes BPMN playing a fundamental role. I remind you of the note in my previous article, which stated that with the current versions (7.3) of SAP NetWeaver PI and SAP NetWeaver BPM the communication between the two only supports the quality of service Best Effort. If you want to implement reliable communication it is recommended to wait for the next release, which is expected to support the quality of service Exactly Once and Exactly Once in Order. It is also not recommended to start with high-volume scenarios. SAP will publish recommendations for message sizes and volumes once the next release is available.
These articles should help you address your individual integration challenges; I encourage you to send me your scenarios that you have had with running ccBPM or that you are about to implement.

Dr. Volker Stiehl
Prof. Dr. Volker Stiehl studied computer science at the Friedrich-Alexander-University of Erlangen-Nuremberg. After 12 years as a developer and senior system architect at Siemens, he joined SAP in 2004. As chief product expert, Volker was responsible for the success of the products SAP Process Orchestration, SAP Process Integration, and SAP HANA Cloud Integration (now SAP HANA Cloud Platform, integration service). He left SAP in 2016 and accepted a position as professor at the Ingolstadt Technical University of Applied Sciences where he is currently teaching business information systems. In September 2011, Volker received his Ph.D. degree from the University of Technology Darmstadt. His thesis was on the systematic design and implementation of applications using BPMN. Volker is also the author of Process-Driven Applications with BPMN as well as the co-author of SAP HANA Cloud Integration and a regular speaker at various national and international conferences.
You may contact the author at editor@SAPpro.com.
If you have comments about this article or publication, or would like to submit an article idea, please contact the editor.