Management
Learn how to configure SAP Access Control 5.3 to use an enterprise role concept across all SAP ABAP components, Java components, and LDAP user group provisioning.
Key Concept
An enterprise business role is a super composite role that encompasses roles or profiles across all your SAP ABAP and Java environments.
As more organizations make the transition from a user-based role provisioning process to position-based provisioning, there is an increased need to develop enterprise-wide business roles that encompass access across various parts of the organization.
Existing solutions such as SAP Netweaver Identity Management (IDM) and SAP Access Control 10.0 can technically accommodate enterprise or business role concepts. However, a vast number of organizations have not made the leap to a full-blown IDM solution and are focused on getting more mileage out of their SAP Access Control 5.3 investment.
How to Design an Enterprise Role Concept
The first step toward an enterprise role concept in SAP Access Control 5.3 is to extract all your roles with user assignments from all your SAP systems. There are traditionally a large number of single roles and a lesser number of composites. The initial goal is to consolidate as many single roles as possible in a particular environment into composite roles (Figure 1).

Figure 1
A sample of a role-mapping diagram
For example, if an accounts payable clerk has three single roles directly assigned in SAP ERP Central Component (SAP ECC) 6.0, these three roles need to be consolidated into one composite that designates that this is a role reserved for an accounts payable clerk.
From an ownership perspective it’s simpler to structure your business roles according to job function. Cross-functional enterprise roles should be kept to a minimum.
Once you have consolidated your roles in each system, come up with a logical grouping of roles across your SAP systems that each type of employee requires. For example, an SAP security manager needs:
- Manager Self-Service (MSS) and security admin roles in ECC 6.0
- MSS and user admin portal roles in SAP Netweaver Portal
- Requisitioner and security admin role in Supplier Relationship Management (SRM)
These logical groupings become your business roles. Create a naming convention for your business roles. For my example, I chose Y_SECURITY_ADMIN. Make sure that the naming convention used is in easy-to-understand language for end users if they are requesting this role without any assistance.
Where Does the Business Role Reside?
The business role is best thought of as a super composite role that encompasses all SAP environments. Where the role technically resides is based on the main point of entry for your SAP environment.
For the purposes of this discussion, I assume that the SAP ERP HCM or ECC system is the main entry point. Typically, in an HCM system all users have a personnel record and a user ID to use basic Employee Self-Service (ESS) or MSS functionality.
In the main point of entry environment, the security administrator uses transaction PFCG and creates single roles that use the agreed upon naming convention for the business roles. This role does not need to contain transactions, authorizations, or a profile. It is a blank, single role (Figure 2).

Figure 2
The Profile Generator (PFCG) screen
Assign the Business Role to a Position in the HCM Organizational Structure
If you choose the option of creating your business role in the SAP ERP HCM system and you have Organizational Management (OM) and Personnel Administration (PA) in place, you can use position-based security.
Position-based security allows you to use the organizational structure to indirectly assign roles to users. Roles are assigned to positions in the org structure, and as users are assigned to positions, they automatically inherit the roles that come with their particular positions.
Assigning roles or other objects to positions requires some SAP ERP HCM functional knowledge. Assigning a role entails creating a relationship (infotype 1001) between the Position object (S) and the Role object (AG). The relationship type or subtype is named B007 (Is described by) as shown in Figure 3.

Figure 3
Create a position to role relationship via transaction code PO13
Once you have created relationships between each position and a business role, run the report RHPROFL0 to actually assign the users their roles and profiles (Figure 4). You can use transactions SA38 or SE38 to directly execute the RHPROFL0 report.
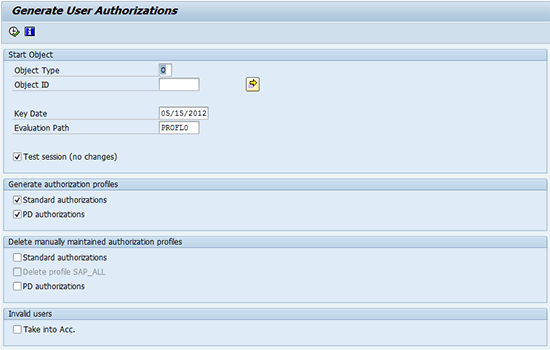
Figure 4
The RHPRFL0 report
Refer to the documentation in the SAP system for more information on report RHPROFL0. You can also refer to this SAP Help document.
How to Use Role Mapping
A feature called role mapping is available in SAP Access Control 5.3, within compliant user provisioning (CUP). Role mapping can be used to assign main roles to specific systems and assign dependent roles to main roles. In this case, your main roles are the business roles from your HCM system and the dependent roles are the various roles and groups from the other systems that make up that business role.
Note
In SAP Access Control 10.0, CUP is now called user access management.
The role mapping can be done two ways: via file upload or by manual configuration within CUP. If you choose to upload a file, you can get the role mapping upload template from within CUP. Navigate to Roles > Role Mapping on the Configuration tab. Once you have downloaded and saved the Role Mapping template, open it and enter the values for Main System, Main Role, Dependent System, and Dependent Role. Save the file to your local system and import the file.
If you wish to map your roles via manual configuration, follow these steps. On the Configuration tab, go to Roles > Role Mapping. Select the desired system name from the drop-down list. Select the desired role name from the Role Selected by User list. In my example, the role name is SAP_MM_PUR_ARCHIVE (Figure 5). After you click the Add Main Role button, the Select Main Role screen appears. Select the desired system name and click the Search button. Select the enterprise business role name and click the Add button. After adding the main business role to the system, you associate the main role with the dependent associated roles that you mapped to your main business role.

Figure 5
The Role Mapping configuration screen in CUP
The final step within the CUP configuration is to make sure that indirect provisioning is active within the Global Settings for Auto Provisioning. On the Configuration tab, go to Workflow > Auto Provisioning. Display the Global tab. Under Auto Provisioning – Provisioning Type from the Default Role Provisioning Type, select the type Indirect from the drop-down list.
After you select Indirect, you must choose the HR object that CUP transmits to the HR module. In this case, select Position from the drop-down list.
Now, you can only do indirect provisioning to an HR system. Next you need to provision the dependent roles in non-HR systems. Within the CUP configuration on the menu Workflow > Auto Provisioning, select the By System tab. Click the Create button. Select the system in which you want to enable specific system settings. For non-HR systems, select Direct provisioning from the drop-down list.
Note
The By System settings supersede the Global settings. Refer to the SAP Access Control 5.3 Configuration Guide for more information on role mapping configuration.
Using the CUP HR Trigger Concept for Full Provisioning Automation
You have designed your business roles, assigned them to positions in your org structure, and mapped them to dependent roles within CUP. Now how does all this work in a real-life provisioning situation?
If you are using an SAP ERP HCM system, you can take advantage of a concept called HR triggers. This functionality allows for the creation of automatic requests in CUP corresponding to changes in the master data in the SAP ERP HCM system. When an event is triggered in SAP ERP HCM — a new hire, for example — rules are applied and related actions are initiated to create a workflow request in CUP.
Note
SAP has documentation that outlines how to configure HR triggers in great detail. Once it is configured, all provisioning across your SAP system via business roles can be automated.
As an example, you have a security administrator, James Doe, who is starting at a company on July 1, 2012. A hire action is performed in SAP ERP HCM for James on his start date. This hire action activates the HR trigger rule for a NEW_HIRE action within CUP.
The NEW_HIRE action tells CUP to create a request for an SU01 user record and to assign roles for James with the SAP ERP HCM system, the SRM system, and a portal system. When James was hired, he was assigned to a position within the HR org structure. The business role Y_SECURITY_ADMIN was assigned to his position.
Because you are using indirect provisioning in CUP for HR triggers, CUP fetches the business role from James’s position for his request. When the business role Y_SECURITY_ADMIN is brought into the CUP request, the dependent roles configured via the Role Mapping feature are fetched as well.
Now, CUP creates a request for James to receive an SU01 record and roles for a security administrator across three systems. Based on how you configure your workflows, the request travels to various stages and at the end, CUP auto-provisions the roles and creates the SU01 record in SRM, SAP ERP HCM, and SAP Netweaver Portal for James.
If you don’t have a single environment in which your business roles can reside, such as an SAP ERP HCM system, there is a workaround.
First, within CUP, you need to create a “fake” connector. See the SAP Access Control 5.3 Configuration Guide for instructions on how to create a connector.
When you create a connector on the Configuration tab, configure it for a system that does not exist. It exists in name only in your GRC system.
Go to Compliant User Provisioning > Configuration tab > Connectors > Create Connectors. The Connectors screen appears. In the Connector Type drop-down menu, select SAP. In the Name field, enter a name for your connector. In the other required fields, enter dummy information
Manually import your business roles for this fake system, and you now have your business roles in the GRC system. Configure your role mapping within CUP to add the business role in your fake connector as a main role. Then associate the dependent roles from the other systems to the main roles you’ve added.
This option prevents you from using position-based security or HR triggers. However, it remains a simpler option to configure. As an example, a requestor fills out a CUP request form for a new hire. When selecting the roles, the requestor selects the system of the fake connector and chooses a business role. When the business role is added to the request, the dependent roles from the other systems are added as well. You receive all the benefits of using business roles, without the complexity of implementing HR triggers or position-based security.
Malcolm Dillon
Malcolm Dillon is an independent SAP GRC and security consultant. He has over eight years of SAP security and audit experience. He has worked on multiple SAP Access Control 5.3 implementation and upgrade projects. HCM security role design and integration with SAP Access Control via HR triggers is his specialization. When he’s not spending time with his family, he can be found out on a local golf course.
You may contact the author at MDillon@Nine21SAP.com.
If you have comments about this article or publication, or would like to submit an article idea, please contact the editor.