See how to configure SAP HANA Cloud Platform to switch from the standard identity provider (IDP) or SAP ID Service to instead authenticate users using your own custom identity provider. Learn how to configure a local IDP that you can create on the fly within Eclipse. You can create temporary users within Eclipse so that you can test the custom IDP-based authentication without any additional configuration. You can then use these users to run applications deployed on SAP HANA Cloud Platform.
Key Concept
SAP HANA Cloud Platform is an in-memory, platform-as-a-service offering from SAP. It not only powers applications with the SAP HANA engine, but it also allows SAP users to build and deploy applications or even extend on-premise applications over the cloud. In addition, SAP HANA Cloud Platform provides integration possibilities with cloud extensions, mobile collaboration, and even analytics capabilities to track and monitor applications and servers in real time.
When you sign up for a trial SAP HANA Cloud Platform account, by default SAP ID Service is enabled to authenticate users and manage access to content published or deployed on SAP HANA Cloud Platform. However, while working in a productive scenario, you are often required to use a custom or local identity provider (IDP) that acts as a user store. When you want to provide roles and authorizations to internal users or customers who exist in a custom user store of a particular organization, you have to set up a custom trust provider on the SAP HANA Cloud Platform Portal that authenticates organization users and not SCN users.
Note
SCN uses the SAP ID Service as its identity provider. All SAP trial
services including SAP HANA Cloud Platform and Portal by default use the
SAP ID Service. Users who are registered on SCN can log in without
creating an additional or a new account. The SCN user store or SAP ID
Service is the default IDP for SAP HANA Cloud Platform. This article
explains how to replace the default IDP with a custom one so that
customers can use SAP HANA Cloud Platform with their own set of users
instead of the SAP ID Service users.
I am going to discuss IDPs and show how to configure SAP HANA Cloud Platform to switch from the standard IDP or SAP ID Service to instead authenticate users using your own custom IDP, which could be a local IDP, Lightweight Directory Access Protocol (LDAP), or Active Directory. However, for this article, I am using the local IDP. If you want to use LDAP or Active Directory, the process remains the same.
Prerequisites
This process requires the following:
- Eclipse version Juno or Kepler
- SAP HANA Cloud Toolkit installed in Eclipse
- Access to SAP HANA Cloud Platform or at least a trial SAP HANA Cloud Platform account
- At least one working SAPUI5 application
Note
If you have not created a trial account, you can do so by following this URL:
https://account.hana.ondemand.com/ and registering for an SAP HANA Cloud Platform developer account.
Step 1. Set Up a Local IDP in Eclipse
The configuration of a custom IDP with SAP HANA Cloud Platform starts with the creation of a local IDP in Eclipse. Launch Eclipse and navigate to New > Other > Server > Server to create a new server to act as an IDP. Figure 1 shows the option you need to select once you navigate to the Server option mentioned in the navigation path above.
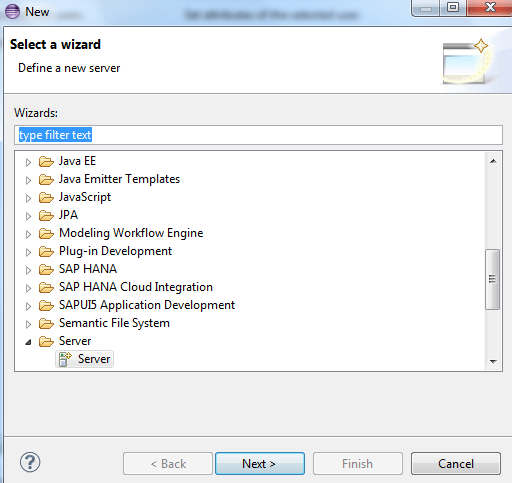
Figure 1
Create a new server to act as a local IDP
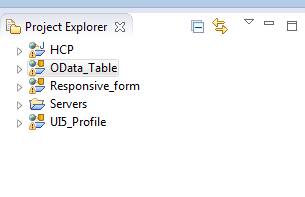
Figure 2
The new entry for servers is created and is available in Project Explorer
A new server is available in the Servers section in the Project Explorer pane. Do not do anything with the other entries. Those are just dummy projects I have been working on. Now double-click the Servers entry and you see a list of available and configured servers within your Eclipse environment. Figure 3 shows the four local run-time servers that I just created. A local IDP server is also available (the last entry). You can ignore the other server entries.
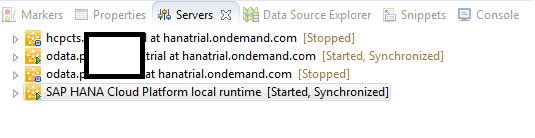
Figure 3
List of servers available in Eclipse
Now, double-click the SAP HANA Cloud Platform local run time option to see an overview and associated server properties (Figure 4).
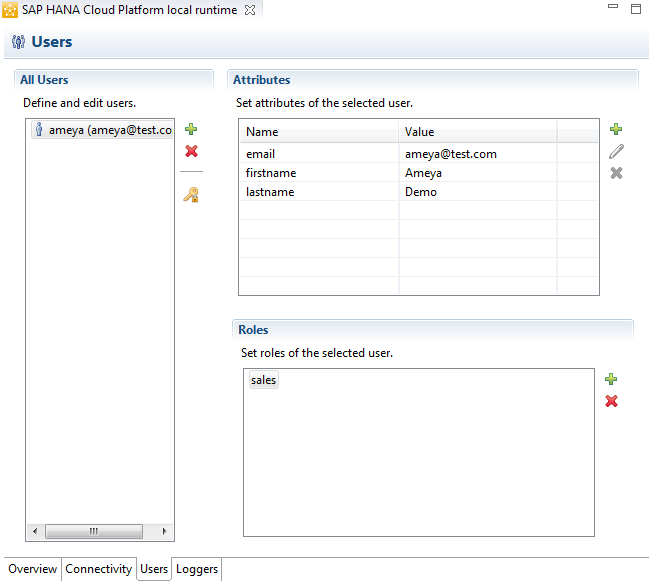
Figure 4
Local IDP server properties (attributes and roles)
In Figure 4, the All Users section displays existing users and also provides the option to create new users or to delete or modify existing users. Initially, no user is defined in this section. The Attributes section is a table with a name-value pair. If you intend to refer to any of the user attributes programmatically, you must first define that attribute in this section. For example, if you want to fetch the name of the user, you must first define the attribute firstname and assign its default value. You can choose any attribute to represent the name of the user such as firstname, fname, or just name.
Note
SAP HANA Cloud Platform IDP configuration allows a change of reference
to attributes without touching code or requiring subsequent IDP
configurations. SAP HANA Cloud Platform IDP configuration allows you to
refer to the same attribute, but with a different reference name. For
example, if you want to change the reference from firstname to fname,
you do not need to change the attribute from IDP configuration. You can
simply use assertion attributes and still refer to firstname with fname.
I cover assertion-based attributes later in this article.
Step 2. Create a User in the Local IDP Server
To create a new user and define its attributes and role, click the green + icon, as shown in Figure 5.
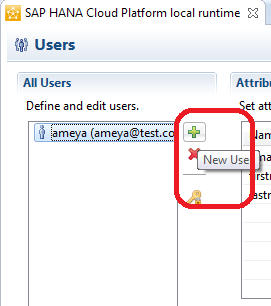
Figure 5
Create a new user in the local IDP server
Once you click the + icon, you are taken to the next screen where you are required to enter details about the users. Figure 6 shows the user properties that you need to enter to create a user. After you enter the data, the OK button is enabled so that you can save it.

Figure 6
Specify user properties to create a new user
Step 3. Define a Role for the User
You can define a role for a user in Figure 7. This is the same as Figure 4, but I am referring to the Roles section here, whereas Figure 4 was used to display an overview of the server properties.
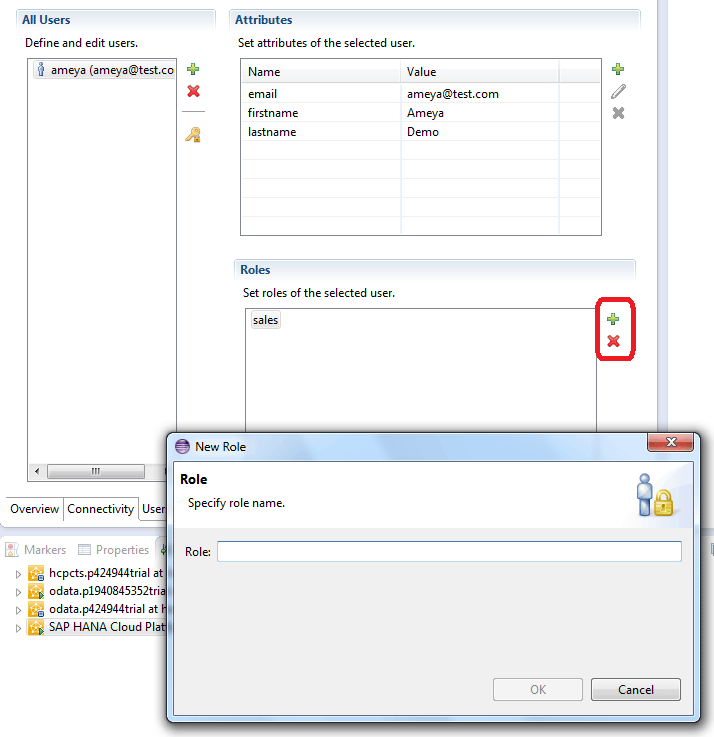
Figure 7
Specify a role for a user in the local IDP server
Once you are on the screen shown in Figure 7, click the green + icon in the Roles section to add a role. Roles defined in a local IDP are always predefined roles. Now the question arises as to what a predefined role is and how it differs from other roles, such as a custom role or SAP HANA Cloud Platform roles.
SAP HANA Cloud Platform has a number of roles that you can use for different purposes. One of the roles is the predefined role, also known as an application role. An application role is specific to the application encompassing the role. That means there is one-to-one mapping between an application role and an application. You cannot use a cross-application role reference.
In sum, predefined roles are maintained at the application level and are only referenced in a local IDP for the sake of application authentication. That said, I assume you have at least one SAPUI5 application working and deployed on SAP HANA Cloud Platform. If you don’t know how to deploy an SAPUI5 application on SAP HANA Cloud Platform, refer to this link before you proceed: Deploying Application on SAP HANA Cloud from Eclipse.
Note
Make sure that you specify the role correctly. Do not make spelling or
case mistakes or the authentication will not work correctly.
Step 4. Define a Predefined Role in Application Web.xml
You now need to define a role in application web.xml. Trust between a local IDP and SAP HANA Cloud works on the basis of application roles. To specify an application role in your application, open a web.xml file in your application and copy and paste the code in Figure 8 just before the </web-app> tag.
<login-config>
<auth-method>FORM</auth-method>
</login-config>
<security-constraint>
<web-resource-collection>
<web-resource-name>Protected Area</web-resource-name>
<url-pattern>/*</url-pattern>
</web-resource-collection>
<auth-constraint>
<!-- Role Everyone will not be assignable -->
<role-name>sales</role-name>
</auth-constraint>
</security-constraint>
<security-role>
<description>All SAP SAP HANA Cloud Platform users</description>
<role-name>sales</role-name>
</security-role>
Figure 8
Code to create a sales role
This code creates a role named sales that is specific only to your application.
Note
If you are not sure where to find web.xml, follow menu path Project
Explorer > your project > WebContent > WEB-INF > web.xml. Figure 9 shows this in Eclipse.
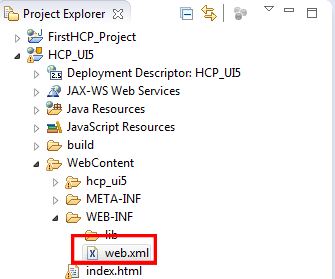
Figure 9
Web.xml location in the application structure
Step 5. Establish Trust with XML Metadata Files
There are two metadata XML files that you work with. An XML file from the local IDP server is uploaded to SAP HANA Cloud Platform and an XML from SAP HANA Cloud Platform is uploaded to your local IDP server. This establishes trust between your local IDP and SAP HANA Cloud Platform.
To download the IDP metadata XML file, enter this URL in the browser window:
https://localhost:8080/saml2/localidp/metadata.
This operation should download an XML file named localidp-metadata. You do not have to rename the file.
Note
The URL to download a metadata file is always the same. It does not change from user to user.
Step 6. Upload the Local IDP Server Metadata to SAP HANA Cloud Platform
As I mentioned earlier, you need to upload a metadata XML file from the local IDP server to SAP HANA Cloud Platform. To do so, and to create a new trust provider for SAP HANA Cloud Platform, log in to your SAP HANA Cloud platform cockpit and navigate to Trust > Trusted Identity Provider (Figure 10).
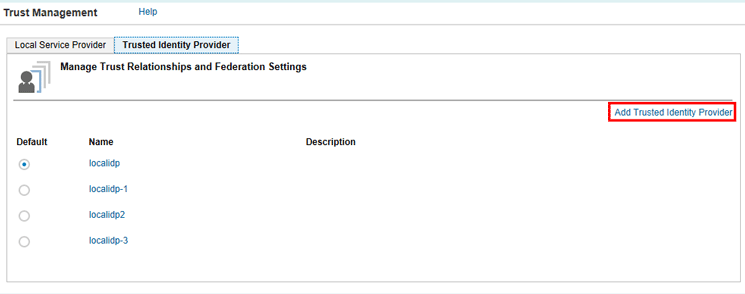
Figure 10
Trusted IDP on SAP HANA Cloud Platform
Once you arrive at the screen in Figure 10, click the Add Trusted Identity Provider link to create a new IDP. Note that localidp and the other variants are not there by default if you are working on a new SAP HANA Cloud Platform account.
Clicking the Add Trusted Identity Provider link takes you to Figure 11. This figure shows the general properties of a typical custom IDP along with its required properties.
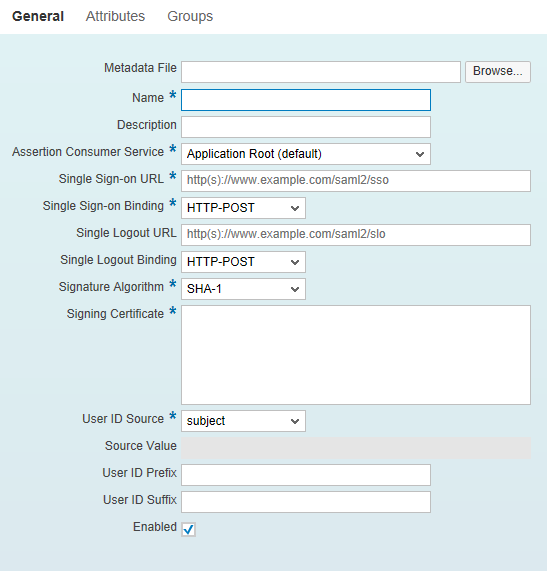
Figure 11
Trusted IDP properties
You do not have to manually enter a value for any property except the Metadata File. Click the Browse… button and in the screen that opens (not shown) select the localidp-metadata file you just downloaded in step 5. Doing this should populate all the required fields automatically. Click the save icon to close the window.
Step 7. Upload SAP HANA Cloud Platform Metadata to the Local IDP Server
To complete the trust process, download a metadata XML file from SAP HANA Cloud Platform and upload it to your local IDP. Navigate to Local Server Provider to download the SAP HANA Cloud Platform metadata XML. Use the same navigation path. Log in to your SAP HANA Cloud Platform cockpit and navigate to Trust > Local Service Provider. Upload the metadata XML file by clicking the Browse… button in Figure 11 to go to Figure 12. This figure shows the auto-populated properties that were blank in Figure 11.
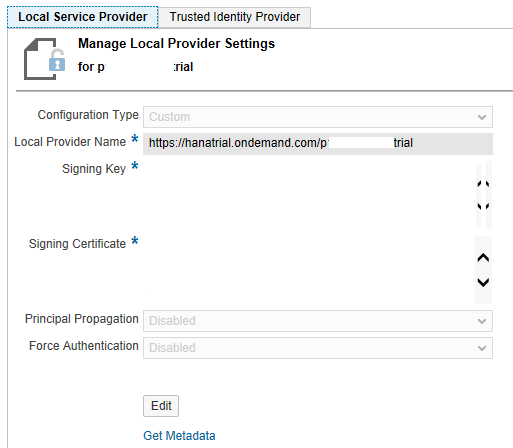
Figure 12
Configuration settings and SAP HANA Cloud Platform metadata XML download from the local service provider
Click the Get Metadata link and save the metadata XML file to the local system. Once it is downloaded, copy the file and paste it in the Servers entry in Eclipse as shown in Figure 13.
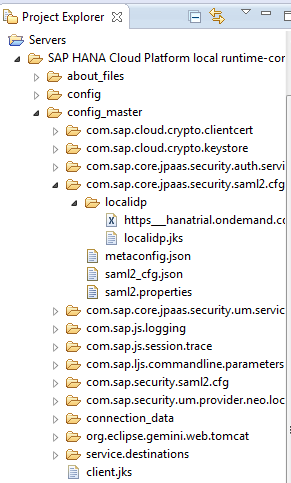
Figure 13
Upload the SAP HANA Cloud Platform metadata XML file to the local IDP server
Only note the location where the file is copied. It is SAP HANA Cloud Platform Local Runtime-config > config_master > com.sap.core.jpaas.security.saml2.cfg > localidp > and upload or copy the SAP HANA Cloud Platform metadata file in the directory shown in Figure 13.
Step 8. Restart the Local IDP Server for the Changes to Take Effect
Figure 14 shows how to restart a local IDP server from Eclipse.
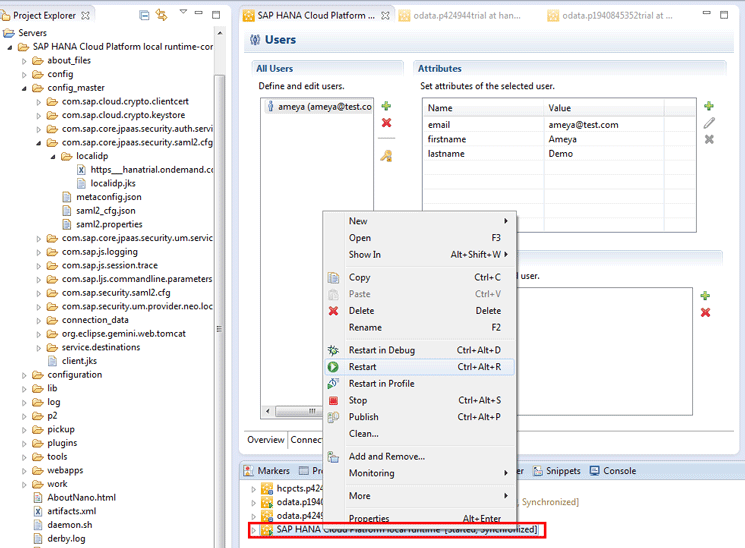
Figure 14
Restart the local IDP server
Right-click the SAP HANA Cloud Platform Local Runtime entry at the bottom of the screen (boxed in red) and in the pop-up window that opens click the Restart option to restart the server or IDP.
Step 9. Assign a Pre-Defined Application Role to the User in SAP HANA Cloud Platform
In addition to defining an application role in web.xml, you also have to specify a role assignment for a user in SAP HANA Cloud Platform so that when a user tries to access the application, SAP HANA Cloud Platform re-directs the user to the local IDP for authentication.
Navigate to SAP HANA Cloud Platform Cockpit > Roles. Figure 15 shows how to navigate to the Roles section in SAP HANA Cloud Platform and assign the predefined role to the user.
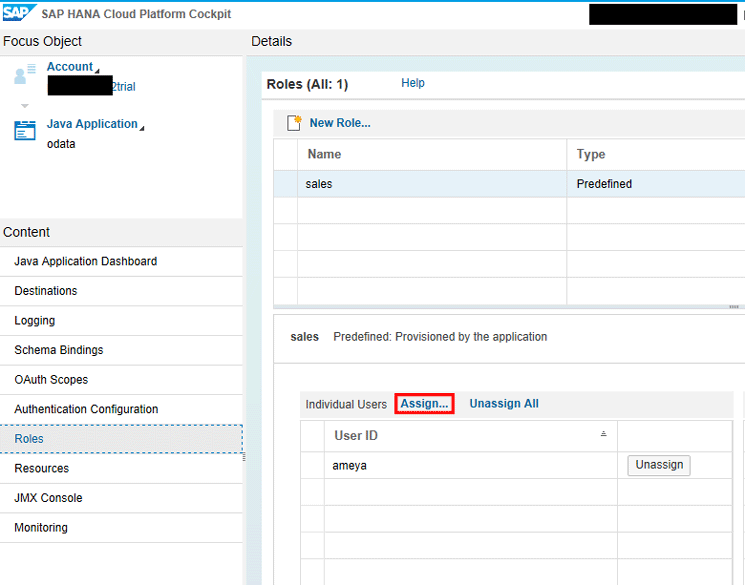
Figure 15
Assign a predefined role to the user from SAP HANA Cloud Platform
Once you deploy your application to SAP HANA Cloud Platform, a role named sales should already be present. You have a User ID ameya in the local IDP. You need to assign the sales role to this user. To do this, click the Assign… link and enter the user ID (in this case, ameya). You are then taken to Figure 16 where you click the Assign button.
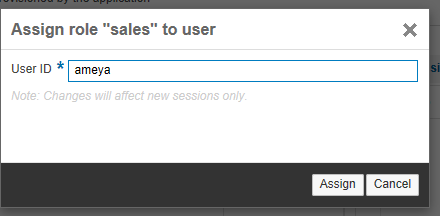
Figure 16
Role assignment operation
Step 10. Test the Local IDP Server-Based Authentication for the Application
To test your application, go to SAP HANA Cloud Platform Cockpit > JAVA Application Dashboard > Application URLs. Even if you have deployed an SAPUI5 application, it is still available under the Java Application Dashboard. Figure 17 shows the application details of a deployed SAPUI5 application, its state, availability details, and its application URLs. Click the URL in the Application URLs section to test the local IDP-based authentication.
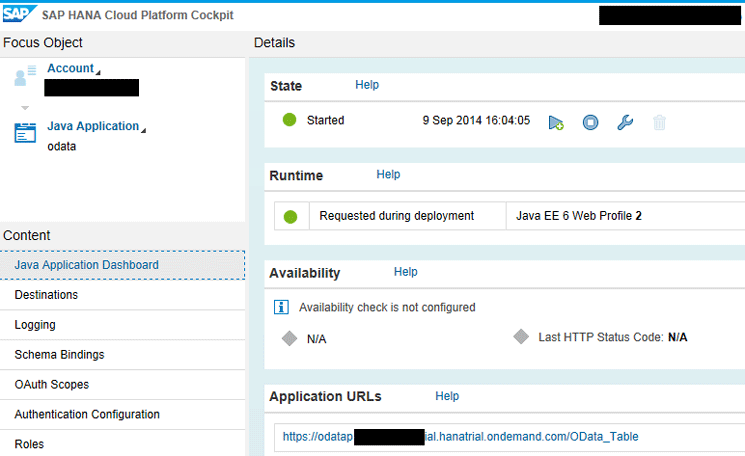
Figure 17
Application dashboard on SAP HANA Cloud Platform
Upon clicking the URL, you are taken to Figure 18. This figure shows that a user is presented with a custom log-in screen generated by a local IDP. This log-in screen is different from the log-in screen that is displayed while using an SAP ID service or SCN user ID-based authentication. If you get this screen, you have correctly configured a local IDP with SAP HANA Cloud Platform.
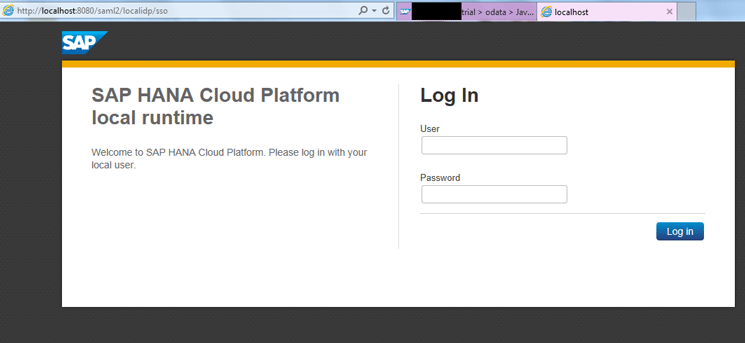
Figure 18
Custom log-in screen generated by a local IDP
Enter the User ID and Password you specified in the local IDP and click the Log in button. If authentication is successful, the application is executed and displayed in a browser. Figure 19 shows the result of this process and represents a successful authentication based on a local IDP.
Figure 19
Successful application authentication based on a local IDP user
SAP HANA Cloud Platform uses your local IDP to authenticate users instead of an SAP ID Service, which authenticates SCN users only. This way, you can enable authentication for your internal users, vendors, and customers who don’t have an SAP HANA Cloud Platform account.
This completes the configuration of a local IDP with SAP HANA Cloud Platform. Irrespective of what user store you want to use, the process remains the same.
Ameya Pimpalgaonkar
Ameya Pimpalgaonkar is a senior SAP architect. He specializes in SAP Netweaver Portal, SAP BPM, BRM, MDM, and SAP Mobile. His interests include UI and front-end technologies, SAPUI5, Responsive Design, and integration of modern technologies with SAP UI. He has also worked on HTML5, CSS3, and jQuery. Ameya is also a certified usability analyst from HFI, USA.
You may contact the author at ameya85@gmail.com.
If you have comments about this article or publication, or would like to submit an article idea, please contact the editor.