With the introduction of the Composite Designer as part of SAP enhancement package 1 for SAP NetWeaver Composition Environment 7.1, a composite is treated as one entity for the first time. Learn how to work with the Composite Designer as your central cockpit for developing composite applications. See how to start with a skeleton of a business process that you are going to sketch with SAP NetWeaver Business Process Management.
Key Concept
Business Process Modeling Notation (BPMN) is a graphical notation for describing business processes. It bridges the gap between business process experts and IT experts. The BPMN-based process models should be understandable for all involved parties — from the business analyst creating the first process drafts to the technical expert who has to implement the process and to the business people maintaining and monitoring the processes.
Developing composite applications is a real challenge. There are many artifacts involved: business processes, user interfaces (UIs), services for persisting business objects, services encapsulating new composite-specific business logic, services accessing back-end systems, or services that themselves make use of several other services to accomplish a certain business task. To complicate things even more, they are themselves heavily interconnected, hindering the analysis of dependencies significantly. What really would help is a visualization of all composite application artifacts including their relationships. In addition, it would be beneficial for developers if one integrated development environment supports them in navigating through all parts of the composite.
I will give you an overview of how to get hold of all these challenges using the new Composite Designer, your central cockpit for composite application development. I begin with the development of a new composite application from scratch, starting with the model of a business process. As a modeling environment, I use the new SAP NetWeaver Business Process Management (SAP NetWeaver BPM).
With SAP NetWeaver Composition Environment (SAP NetWeaver CE) 7.1, the composite’s layers were represented by different tools, which were not tightly integrated. The process layer, for example, was implemented using the Guided Procedures (GP) framework, which is a Web-based application implemented using Web Dynpro technology. The UIs that were needed to implement a new business process were implemented using either SAP NetWeaver Visual Composer (another Web-based application requiring a Scalable Vector Graphics [SVG] plug-in in your browser to run it) or Web Dynpro.
Note
The more developer-targeted Web Dynpro tool is integrated into SAP NetWeaver Developer Studio and allows the development of highly complex UIs, whereas SAP NetWeaver Visual Composer follows a purely modeling-based approach for the highest productivity.
Finally, services are also built within SAP NetWeaver Developer Studio using the Composite Application Framework (CAF) perspective. If projects reach a certain complexity, chances to get totally lost in all the artifacts of a composite application are high.
With the SAP enhancement package 1 for SAP NetWeaver CE 7.1, things changed radically. With this release, a new perspective in SAP NetWeaver Developer Studio was introduced — the Composite Designer. This tool helps control all pieces of a composite application, shows the relationships among them, and guides the developer through the complete development process. All layers are now integrated into SAP NetWeaver Developer Studio, so navigation is dramatically simplified. Furthermore, the build-and-deploy process for an entire composite is reduced to two simple clicks.
In addition, the new SAP NetWeaver BPM framework is integrated into SAP enhancement package 1 for SAP NetWeaver CE 7.1, which allows you to model collaborative processes graphically, assign tasks to human activities, connect service calls to automated activities, and bring everything to execution. These significant improvements relieve the developer from cumbersome and error-prone tasks.
I’ll show you how to:
- Develop an entire composite application guided by the Composite Designer
- Model collaborative business processes with SAP NetWeaver BPM
- Integrate Web Dynpro UIs into your business process and learn how the UI and the process environment work together
- Model a business object for persisting data collected during the execution of your business process, expose the functionality as a Web service, and consume it in your business process
- Bring your new composite application to execution
This article goes well beyond previous articles on this topic as the new version of the SAP NetWeaver CE pushes the idea of a composite application being one consistent entity even further. For the first time, you’ll get an overview of all pieces of a composite as if it were one unit.
Whether you’re a Java developer or a business process expert (BPX) looking for detailed information about the new possibilities offered by the latest SAP NetWeaver CE release, this article gives you all the details you need to get started.
Improvements in the Latest Release of SAP NetWeaver CE
SAP NetWeaver CE provides a development and runtime environment for developing composite applications. It is optimized for supporting developers in their composite development efforts and increases developer productivity with tailored modeling tools. The goal is to model as much as possible, to solely concentrate on the new business logic, and to reduce coding to a minimum. However, developers always can break out in Java code to get full control over the logic they want to implement.
Compared with its previous version, SAP enhancement package 1 for SAP NetWeaver CE 7.1 brings valuable new tools to improve the development experience. Another new component is SAP NetWeaver Business Rules Management (SAP NetWeaver BRM). Business rules represent corporate policies and business guidelines driving business decisions. Without a rules environment, developers would have to implement business and application logic directly in code using either Java or ABAP. This requirement comes with drawbacks in regards to maintainability, especially if the rules have to be adapted often because of changing market conditions.
Take pricing as an example: A business provides different discount rates based on the relationship between its customers and the business. Depending on the industry, this rate might change often, and usually business people decide on the current value. It is then the responsibility of the developer to adapt the rates in the code. To enable businesses to modify the values and activate them without involving IT, SAP NetWeaver BRM provides everything business people need to change the values without involving developers.
SAP NetWeaver BRM consists of the rules composer and the rules engine. The rules composer is integrated into SAP NetWeaver Developer Studio as a separate perspective and provides rich and user-friendly formats of rules representation, enabling users to model complex business rules. It contains extensive business rules modeling capabilities for business analysts and rules implementation functionality for business rules developers. The rules engine represents the runtime for rules execution. It is a system that helps you to manage business rules more effectively. It provides a means to classify and manage rules in a centralized location instead of being hard-coded within an application.
Besides these three major enhancements — Composite Designer, SAP NetWeaver BPM, and SAP NetWeaver BRM — there are other improvements such as:
- SAP NetWeaver Developer Studio based on Eclipse 3.3
- Integration of SAP NetWeaver Visual Composer into SAP NetWeaver Developer Studio
- Embedding of Web Dynpro components into SAP NetWeaver Visual Composer models
- Enterprise Services Repository and SAP NetWeaver Development Infrastructure are now part of the SAP NetWeaver CE shipment
- Support for reliable messaging ensuring exactly one execution of services
- Configuration optimization for services (i.e., service groups): All services hosted on one back-end system can now be configured once for all services instead of maintaining an entry for every service as was necessary in the previous release
- Performance and monitoring improvements
Now that you have an understanding of composite applications and the new capabilities of SAP enhancement package 1 for SAP NetWeaver CE 7.1, you can start with a simple implementation project. First, I will briefly introduce the business scenario and then help you start the implementation by sketching the process flow with SAP NetWeaver BPM.
To run through the exercises of this article, you have to install SAP enhancement package 1 for SAP NetWeaver CE 7.1. The download is available on SDN at https://sdn.sap.com. Follow menu path SDN Community > Downloads > Software Downloads > SAP NetWeaver Composition Environment > EHP1 for SAP NetWeaver Composition Environment 7.1 - Preview Version. It is recommended that you install SAP NetWeaver CE by following the detailed description in the PDF document named “Install & Configure SAP NetWeaver Composition Environment 7.1 EHP1 (Preview Version).” You will find this document if you follow the identically named link on the software download page. Make sure that you create users with the correct access rights as described in the guide starting with bullet point 30 in the section named “Installing the Enterprise Services Repository.” Equally important is the creation of a logical destination named LocalWSIL for accessing Web services on your J2EE instance. This is explained right at the beginning of the “Additional Settings in the SAP NetWeaver Administrator” section.
Investment Approval Scenario
The methodology for starting a new composite application did not change with the latest release of SAP NetWeaver CE. The business process is still the driver for all development decisions. To get a better understanding about the process I am going to implement, have a look at the process flow in Figure 1.
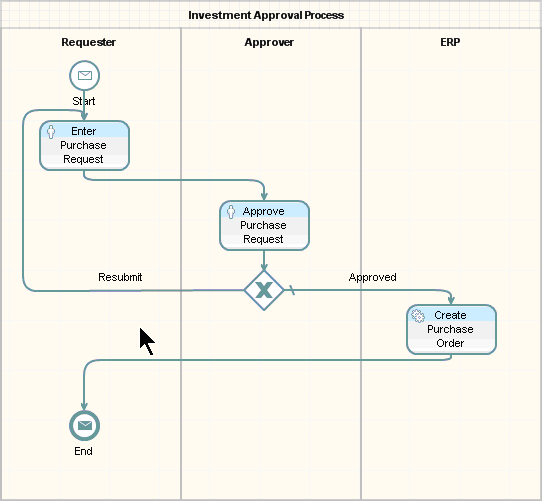
Figure 1
Process flow of the investment approval scenario
The investment approval process covers a simple ordering scenario: A requester orders new material for his department (e.g., new servers or laptops). An approver needs to review the order and then either accepts or rejects it. If the approver accepts the order request, an order is created. If the approver rejects the order request, the requester can modify the request and submit it again for confirmation.
Based on this scenario, you can now begin to plan your composite application development project. You need two UIs: one for the requester and one for the approver. To save the order data, you have to create a business object representing the order so you can store the data in a database. In addition, you make this functionality available as a Web service. The icons that appear in the upper-left corner of the steps in Figure 1 indicate automated or interactive steps.
The next question to answer is, “On which data is this process working?” As explained in the “Composite Applications and SAP NetWeaver CE Reloaded” sidebar, you should only concentrate on the fields on which the process is actually working. Apply this rule now and get the following field list with their associated data types (the names of the structures appear in parentheses throughout this article):
- Data for identifying the requester (Requester) — requesterName: String
- Data representing the ordered product (Product) — productID: String; productQuantity: Decimal; productPrice: Decimal
- Data accompanying the approval process (ApprovalInfo) — approverName: String; orderApproved: Boolean; comment: String
- Additional information in regard to the purchase order (PurchaseOrder) — orderTotalAmount: Decimal
Now that you have an understanding about the process flow, the UIs, and the services you need as well as the data, you can start with the implementation.
Implement the Investment Approval Scenario
The foundation for the implementation project has been laid. You know the artifacts that you need to build. You will use the Composite Designer to work through the development process.
Use Composite Designer to Build an Application
The Composite Designer is a new perspective in SAP NetWeaver Developer Studio. It treats the whole composite application as one entity, called a product, which makes the development process significantly easier because you are dealing only with the product as the entity that you deploy (in contrast to all the individual pieces that make up the product as was done in previous releases). As you build the example application, you learn how to use the Composite Designer and experience how this tool helps you in composite application development. Start SAP NetWeaver Developer Studio and follow the steps to create a new product — that is, investment application.
Step 1. To create a new product, follow menu path File > New > Other. In the pop-up window, expand the Composite Designer node and select Product (Figure 2). Click the Next button.
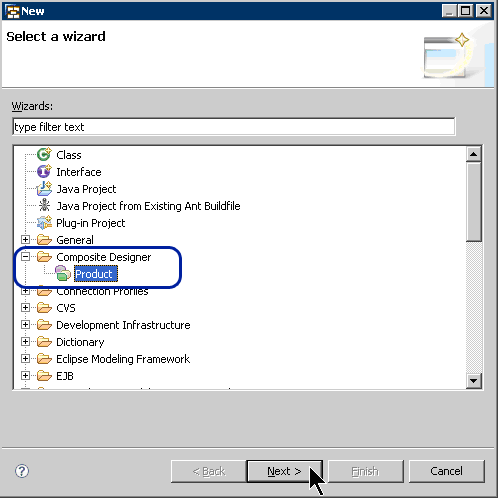
Figure 2
Start the new product wizard in Composite Designer
Step 2. Enter the information as shown in Figure 3 by providing a name for your product. Accept the default values for all other fields (the vendor responsible for the product, the version number, and the location where your files will be stored) and click the Next button.
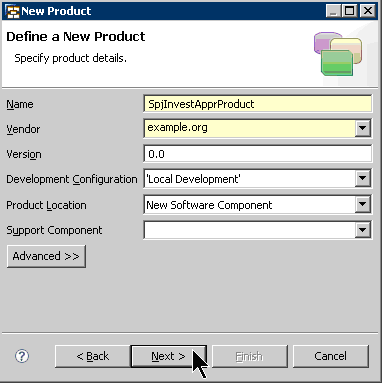
Figure 3
Enter the details for the new product
Step 3. In the next wizard step, deselect the MyComponents check box because you want to save the product’s source code in its own software component. Click the New Software Component button to create a new component (Figure 4).

Figure 4
Specify that the source code should be saved in its own software component
Step 4. The New Software Component window opens. Enter the data as shown in Figure 5 (e.g., Spj_SC as the name of the software component, example.org as the vendor, and Spj_SC as the relative root). Select the Source SC option and click the Next button.

Figure 5
Specify the attributes for the new software component
Step 5. On the next screen, a list of software components that your product requires to run properly appears (Figure 6). The list consists of supporting software components representing the various tools and associated runtime environments. For example, Business Process and Event Management (BPEM) includes all libraries for running business processes in this software component. Business Rules Management System (BRMS) supports the development of rules-based applications. This pattern of abbreviations holds true for all entries in this list. Accept all by clicking the Next button.
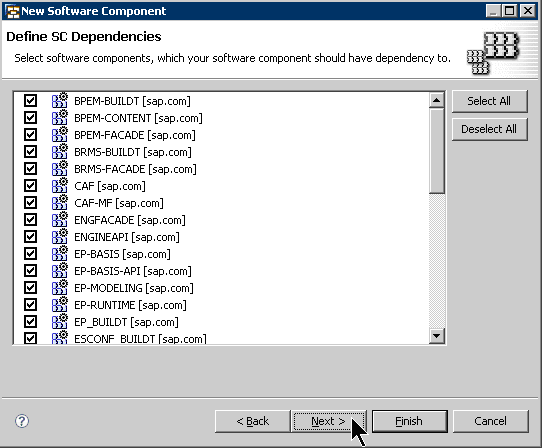
Figure 6
Supporting software components that your new software component requires
Step 6. In the next wizard step, you specify the versions of your software components. Because this is your first version, simply accept all entries by clicking the Finish button (Figure 7). However, if you want to create a new version of your software component, you would use this screen to specify the key attributes.

Figure 7
Specify the key attributes for the software component
You now return to the New Product wizard (Figure 8). As you can see, the new software component has been created and is automatically selected. Click the Next button to proceed.
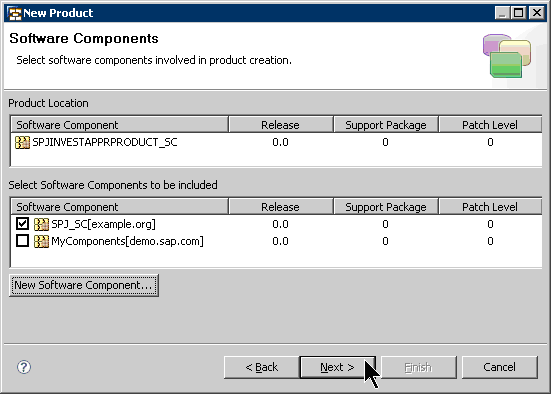
Figure 8
The New Product wizard displays the new software components attributes
This next wizard step allows you to pick the technologies that your composite application will most likely use. This does not mean that if you deselect an option that you cannot add it later. It just means that all required development components will be prepared for you. For the example, you need the process environment, Web Dynpro as the UI technology, and CAF with its Java Persistence API (JPA)-based persistency, so select all the check boxes shown in Figure 9.
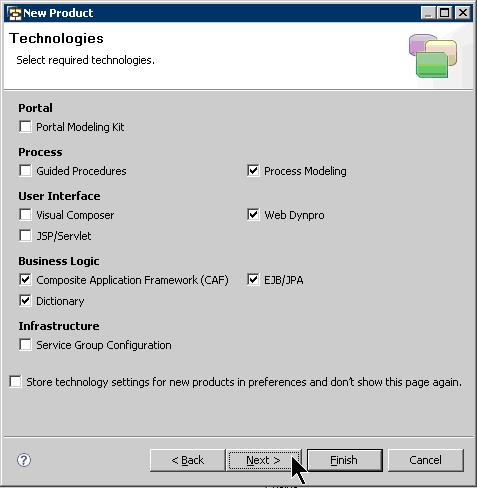
Figure 9
Specify the technologies needed for the product
Uncheck the Service Group Configuration check box because you don’t want to work with service groups in this little example. You can use your current settings as a template in case you want to create further products by checking the appropriate check box. For this example, leave it blank and continue by clicking the Next button. You receive a summary page containing all the new development components for the technologies selected before (Figure 10). Click the Finish button to create the product.
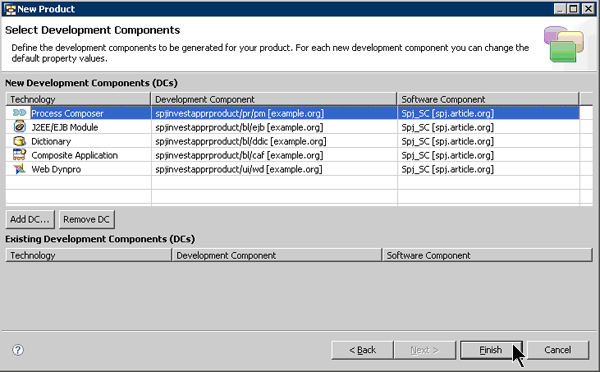
Figure 10
The development components of the new product for the investment application
After creating all necessary development components, the wizard recognizes that your newly created product has to be displayed in the Composite Designer perspective. If it is not already opened (which is normally the case after a fresh installation), the system asks whether you want to open it now. Confirm the dialog by clicking the Yes button.
The Resulting Layout
SAP NetWeaver Developer Studio is now separated into several areas represented by different windows. The two most important windows are the Composite Explorer (Figure 11) and the window displaying the architecture overview of your composite application (Figure 12).
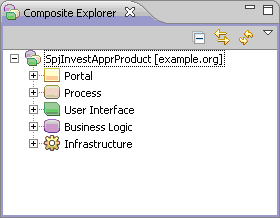
Figure 11
The Composite Explorer

Figure 12
Composite architecture overview
As you can see, the architectural overview reflects the exact structure of a composite application as I explain in the “Composite Applications and SAP NetWeaver CE Reloaded” sidebar. You can easily identify the different layers such as process layer, user interface layer, or business logic layer.
All the technologies that can make up a composite application are listed in the palette on the right side. You just need to drag and drop a technology into the associated layer to create a component of that type. I’ll show you how to do this with an example.
Because you want to start with the process flow, click the Process button on the palette. Next, move the mouse pointer into the process area of the architecture overview window and click once somewhere inside it. The New Process wizard starts. The process you are going to build reflects the investment approval scenario. Enter Investment Approval Process as the name of the process (Figure 13). Click the Next button.
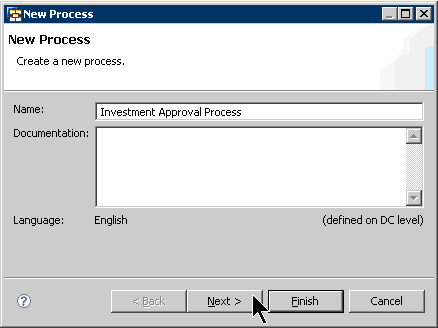
Figure 13
Enter the name for the new process
To create a new process, the wizard needs to know whether it should create process artifacts automatically (e.g., start event, end event, or pools) and how you want to model your process: from top to bottom or from left to right. Select the entries shown in Figure 14 and click the Finish button to create your first process skeleton. (I explain the new terms later in this article). As a result, an icon for your newly created process appears in the Process space (Figure 15).

Figure 14
Select the settings for your new process
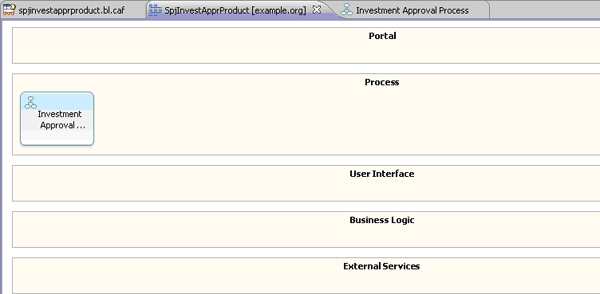
Figure 15
An icon for your new process appears under Process
With that, you can see how the Composite Designer helps you in creating composite artifacts. In addition, you also use Composite Designer to set relationships between the different components, to navigate to the participating components, and to find errors when you have changes with implications on the dependent components.
However, behind the scenes a complete process modeling project was created for you. SAP NetWeaver BPM consists of a design time and a runtime environment that helps you model, build, deploy, configure, run, and monitor your collaborative processes. For more information about SAP NetWeaver BPM, see the sidebar “Introducing SAP NetWeaver BPM.”
To explain BPMN, I will follow a practical approach: While I am developing the business process, I will explain in detail all the artifacts that make up a BPMN-based process, such as human activities, automated activities, sub-processes, tasks, pools, lanes, and gateways.
Before going into the development itself, I’ll briefly take a look at the other SAP NetWeaver BPM components: the process server that represents the runtime services of SAP NetWeaver BPM. The integration into the SAP NetWeaver Administrator enables you to start and stop processes, to monitor and manage processes and tasks, and also to troubleshoot processes. The process desk represents the human interaction management part of SAP NetWeaver BPM. It provides a centralized process and task management. The business users can centrally access and execute their tasks and can additionally display their tasks in the process flow.
Sketch the Investment Approval Scenario
In the last development step, you were able to create the process project that appears in the Process area of the Composite Designer (Figure 15). Double-click the process icon that appeared and you are automatically guided to the process composer (Figure 16).

Figure 16
Process composer after opening the process component in the Composite Designer
For an example of the main building blocks of a BPMN-based process, look at Figure 1. A process flow is modeled within a pool that contains one BPMN process, which is further divided into lanes. In Figure 1, the pool is named Investment Approval Process and consists of three lanes named Requester, Approver, and ERP. Each lane typically represents a role, an organizational unit, or a system and represents participants of a process. However, the meaning of the lanes is up to the modeler.
The pool is a square-cornered rectangle drawn with a solid line and the lane is a sub-partition within a pool and extends the entire length of the pool, either vertically or horizontally. Lanes are used to organize and categorize activities within a pool. Here the term “activity” is used as a generic term for work that a company or organization performs via a business process. Examples for activities are human activities (representing the involvement of a human interaction via a GUI), automated activities (such as service calls), and sub-processes. In this example, I use two human activities (Enter Purchase Request and Approve Purchase Request) and one automated activity (Create Purchase Order).
One process diagram can consist of several pools. However, only one pool can be the active pool, which means that only the process flow in the active pool is executable during runtime. All other pools (i.e., inactive pools or descriptive pools) are for documentation purposes only and reflect the interaction of the active pool with its environment (Figure 17).

Figure 17
One active and one inactive pool with their interactions
The pool named External is inactive. You can easily identify inactive pools by their dashed line whereas the active pool has a solid line. You can also identify two kinds of connections indicated either by a solid or a dashed arrow. The solid arrow represents the sequence flow of activities in a process (the sequence in which the activities are executed during runtime). The dashed arrow indicates a message flow that you use to model interactions between pools and is — in contrast to the sequence flow — not used to model the flow of control.
The circles in the process flow represent events, another important term used in the BPMN specification. An event represents some kind of signal that something has happened. This can be the start, pause, resume, interrupt, or the end of a process or an activity.
Equipped with this basic knowledge about the terminology used in the BPMN domain, you can now start your process model. I’ll continue the description where I left off: You’ve opened the process composer as shown in Figure 16. The system automatically creates the start and end events. Be aware of the different appearances of start and end events. The start event has a relatively thin border, whereas the end event is relatively thick. By this the BPMN notation differentiates between catching and throwing events. For the start event, this means that catching this event starts a new process whereas the end event occurs when the end of the process is reached. By these events the process can interact with its outside world (i.e., you can integrate it as a sub-process within another business process model).
Here are the steps to add the process flow to the model:
Step 1. Click the pool’s name once and rename it Investment Approval Process. In Figure 18 you can see icons in the upper-right corner called context buttons. Context buttons are a new concept to display actions you can perform on the objects to which your mouse pointer is currently pointing. These context buttons appear without clicking the mouse. In my example, my mouse pointer is over the pool and I can either create lanes or collapse or delete the pool. These three actions are represented by the three icons you see in Figure 18.

Figure 18
Context buttons for improving developer productivity
Step 2. Delete the default connection between the start and end event. Right-click the line and choose Delete from the context menu.
Step 3. Because you want to organize the activities within your pool in lanes, you have to add them to your pool. Here you use the context buttons that appear when you move the mouse pointer over the pool name Investment Approval Process. Click once on the create lane context button  .
.
The new lane appears to the right of the existing one and you are prompted to give it an appropriate name (e.g., Approver). Create a third lane by clicking the create lane context button and then name it ERP. This lane represents any ERP system that you want to call. Finally, rename the first lane containing the start event to Requester (Figure 19).
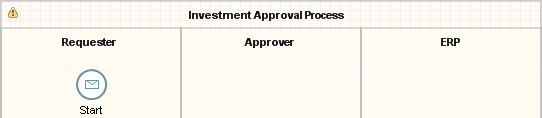
Figure 19
Pool after creating the lanes, which represent roles and systems
Define the Activities and Process Flow
For this process, you once again make use of context buttons. This time you move the mouse pointer over the start event and several context buttons show up.
Step 1. Click the Activity button in the lower-left corner and drag and drop it somewhere within the Requester lane beneath the Start event (Figure 20).
Figure 20
Using the context button: dragging and dropping an activity within the Requester lane
As result, a context menu opens, listing all possible activities you can add. For this scenario, I need a human activity as the first step in the process flow. Therefore, select Human from the context menu.
Step 2. The human activity appears in the process flow and it is automatically connected with the start event because you’ve initiated the connection from the Start event. You are automatically prompted to give the activity an appropriate name. In my example, I used Enter Purchase Request.
Step 3. Repeat step 1, but this time use the context button for the first activity and not the one for the Start event and drop the human activity within the Approver lane. Rename the activity as Approve Purchase Request.
Step 4. Based on the decision made in the Approve Purchase Request activity, you either want to jump back to the requester in case the request was not approved or you want to continue with the creation of the order in a back-end system. This split of the process flow is modeled within BPMN using gateways. Drag and drop the Gateway context button of the Approve Purchase Request activity somewhere beneath in the approver lane and select Exclusive Choice from the context menu (Figure 21).

Figure 21
Gateway context button for splitting the process flow
You distinguish two different splitting gateways (Exclusive Choice or Parallel Split) and two merging gateways (Uncontrolled Merge or Parallel Join). An Exclusive Choice is used when you want to route the sequence flow to one of the outgoing branches based on conditions. The Parallel Split activates all outgoing branches simultaneously. If it comes to merging branches, the Uncontrolled Merge awaits one incoming branch to complete before it triggers the outgoing flow. The Parallel Join waits for all incoming branches to complete. For this scenario, you need the Exclusive Choice so you can continue with one branch after the decision has been made.
Step 5. Now that the exclusive choice appears in the process flow, you can connect it with the Enter Purchase Request activity as one out of two possible outcomes of the approval step, which can be either “approved” or “not approved.” As the Enter Purchase Request activity exists already, you are not creating a new activity this time. Therefore, you do not use the Activity context button to model the connection. Instead, you drag and drop the Connection context button to link the gateway to the Enter Purchase Request activity (Figure 22).

Figure 22
Connect the gateway with the first step that is followed if the request is not approved
As a result, the gateway is connected with the first activity. The label that is attached to the newly created line is named Alternative 1 by default. Click it once to rename it something more meaningful, such as Resubmit. The label indicates the condition under which circumstances this branch is followed during execution. In this example, this branch is followed if the approver rejects the request.
Step 6. Continue with the second connection that begins from the gateway. To create this new activity, drag and drop the Activity context button to the ERP lane (Figure 23).
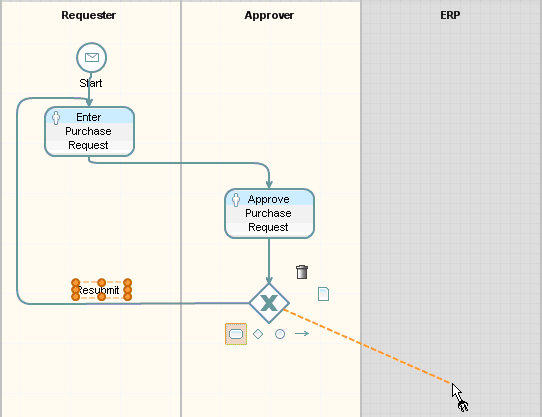
Figure 23
Model the second connection for the gateway in case the request is approved
From the context menu that appears when you release the mouse button, select Automated for an automated activity. Automated activities represent service calls and this is exactly what you want to achieve: calling a service for creating a purchase order. Once selected, you are again prompted to rename the activity. Enter Create Purchase Order as the appropriate name for this activity. Notice that the label close to the connection was automatically generated for you. Rename it to Approved as you did for the Resubmit branch (step 5).
Step 7. Connect the automated connectivity with the End event by using the Connection context button (Figure 24). Save your model by clicking the save icon.
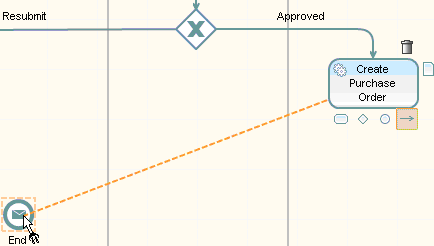
Figure 24
Connect the automated activity Create Purchase Order with the End event
After saving, you see some error labels because the process composer automatically checks whether your process is executable. Because this is not the case, these errors show up. Once you have all the parts in place, you resolve the issues one after another.
If you like, you can move the mouse pointer over the error icons to see a list of messages that explain why each error occurs. This is another valuable feature of the process composer: It guides you through the development process and helps you to think of all the details that are necessary to transform the pure process model into an executable process.
Tip!
You can switch off the automatic check by selecting Project > Build Automatically from the main menu. Make sure that the check mark in front of the menu item Build Automatically is removed. This is useful if a business process expert starts with process modeling. As this person is likely not interested in delivering an executable process, the error messages might be irritating.
If you have a closer look at the process composer, you see a palette on the far right side of your modeling environment. It contains all the BPMN artifacts you can use for process modeling. I didn’t use the palette because the context buttons improve the development efficiency significantly. However, you could have used the palette for your modeling efforts as well. For this, you simply drag and drop the BPMN artifact of choice from the palette into the appropriate lane. To create a sequence consisting of activities and connections, you have to drag the activities and the connections individually into the lanes, which requires significantly more clicks than using the context buttons. That’s why I personally prefer the context buttons.
With that, you’ve defined your business process purely from a business perspective. You can close the process composer now so you can continue with the development of the user interfaces for your process.
To sum up, you’ve covered the basic ideas behind the BPMN and how to work with the process composer to model BPMN-based processes. After closing the process composer, you are back in the Composite Designer to continue with UI development.
Composite Applications and SAP NetWeaver CE Reloaded
Before diving directly into the development process, I want to remind you of the basic ideas behind a composite application (
Figure A). The main characteristics of composite applications are as follows:
- Composite applications follow a layered approach consisting of a business process layer, a UI layer, and a business object and service layer
- The business process layer concentrates on highly innovative collaborative business processes that bring companies a competitive advantage. Composite applications are not intended to re-implement existing standard functionality already available in packaged applications such as SAP ERP. Look for processes that distinguish your company from the competition.
- The UI layer cares for task-oriented UIs. The UIs are tailored to the needs of the current role. From where the data is actually retrieved is irrelevant for the UI design.
- The business object and services layer provides all the necessary services that the UI and process layers require. This can be new business logic, data persistency, or simply connecting to external services.
- Composite applications are loosely coupled with their back-end systems. That means that composite applications only define their business needs via a clearly defined interface description with a short explanation about the business functionality they require to work correctly. How this interface is implemented is not important for the composite. Composite applications benefit from this approach as you can replace service implementations as needed. This feature brings additional flexibility, especially in volatile environments.
- Composite applications have their own life cycles. There are no dependencies between composite and called back-end systems, so they can have their own release cycles independent from releases of the integrated applications.
- Composite applications work only on data that its business processes require. The composite architect should always be guided by the business processes that the composite contains. Concentrate only on the business objects the composite requires and within a business object take only the necessary fields. Reduce the number of attributes for a business object to the bare minimum.
- Composite applications are not invasive, so no adaptations in the back-end systems are needed to benefit from a composite

Figure A
Architecture of a composite application
Introducing SAP NetWeaver BPM
Collaborative, innovative business processes are the driving factor for composite applications. SAP addresses standard processes reflecting best practices in its SAP Business Suite offering. However, for keeping competitive advantage, companies are always looking for processes that offer them the chance to differentiate from their competition.
That’s where SAP NetWeaver BPM comes into play: Modeling a business process and bringing this model to execution is a major step forward in the SAP NetWeaver? BPM domain. This is the goal of the new offering: a better alignment between the business and the IT side so that nothing gets lost during the transition from the business to the IT world. The model reflects the implementation and vice versa.
With its new graphical modeling environment based on the BPMN, an official standard of the Object Management Group (OMG), SAP NetWeaver BPM is the strategic foundation stone for all BPM-related activities at SAP. SAP NetWeaver BPM consists of the process composer, the process server, and the process desk. The process composer is integrated into SAP NetWeaver Developer Studio as a separate perspective and provides BPMN-based process modeling capabilities.
The basic idea of BPMN is to provide a notation that is understandable to all involved parties — be it the business analyst who typically starts with the process idea, the developer who actually brings the process to life, or the business people who are going to monitor the process. In the meantime, it turns out that BPMN is indeed widely accepted by all the different groups, which was not the case before. It is a huge step forward.
The process composer follows this idea and supports all stages of process modeling from high-level definitions of the process down to the enrichment for the actual development into deployment and execution.

Dr. Volker Stiehl
Prof. Dr. Volker Stiehl studied computer science at the Friedrich-Alexander-University of Erlangen-Nuremberg. After 12 years as a developer and senior system architect at Siemens, he joined SAP in 2004. As chief product expert, Volker was responsible for the success of the products SAP Process Orchestration, SAP Process Integration, and SAP HANA Cloud Integration (now SAP HANA Cloud Platform, integration service). He left SAP in 2016 and accepted a position as professor at the Ingolstadt Technical University of Applied Sciences where he is currently teaching business information systems. In September 2011, Volker received his Ph.D. degree from the University of Technology Darmstadt. His thesis was on the systematic design and implementation of applications using BPMN. Volker is also the author of Process-Driven Applications with BPMN as well as the co-author of SAP HANA Cloud Integration and a regular speaker at various national and international conferences.
You may contact the author at editor@SAPpro.com.
If you have comments about this article or publication, or would like to submit an article idea, please contact the editor.